Leaderboard


Popular Content
Showing content with the highest reputation on 09/23/24 in all areas
-
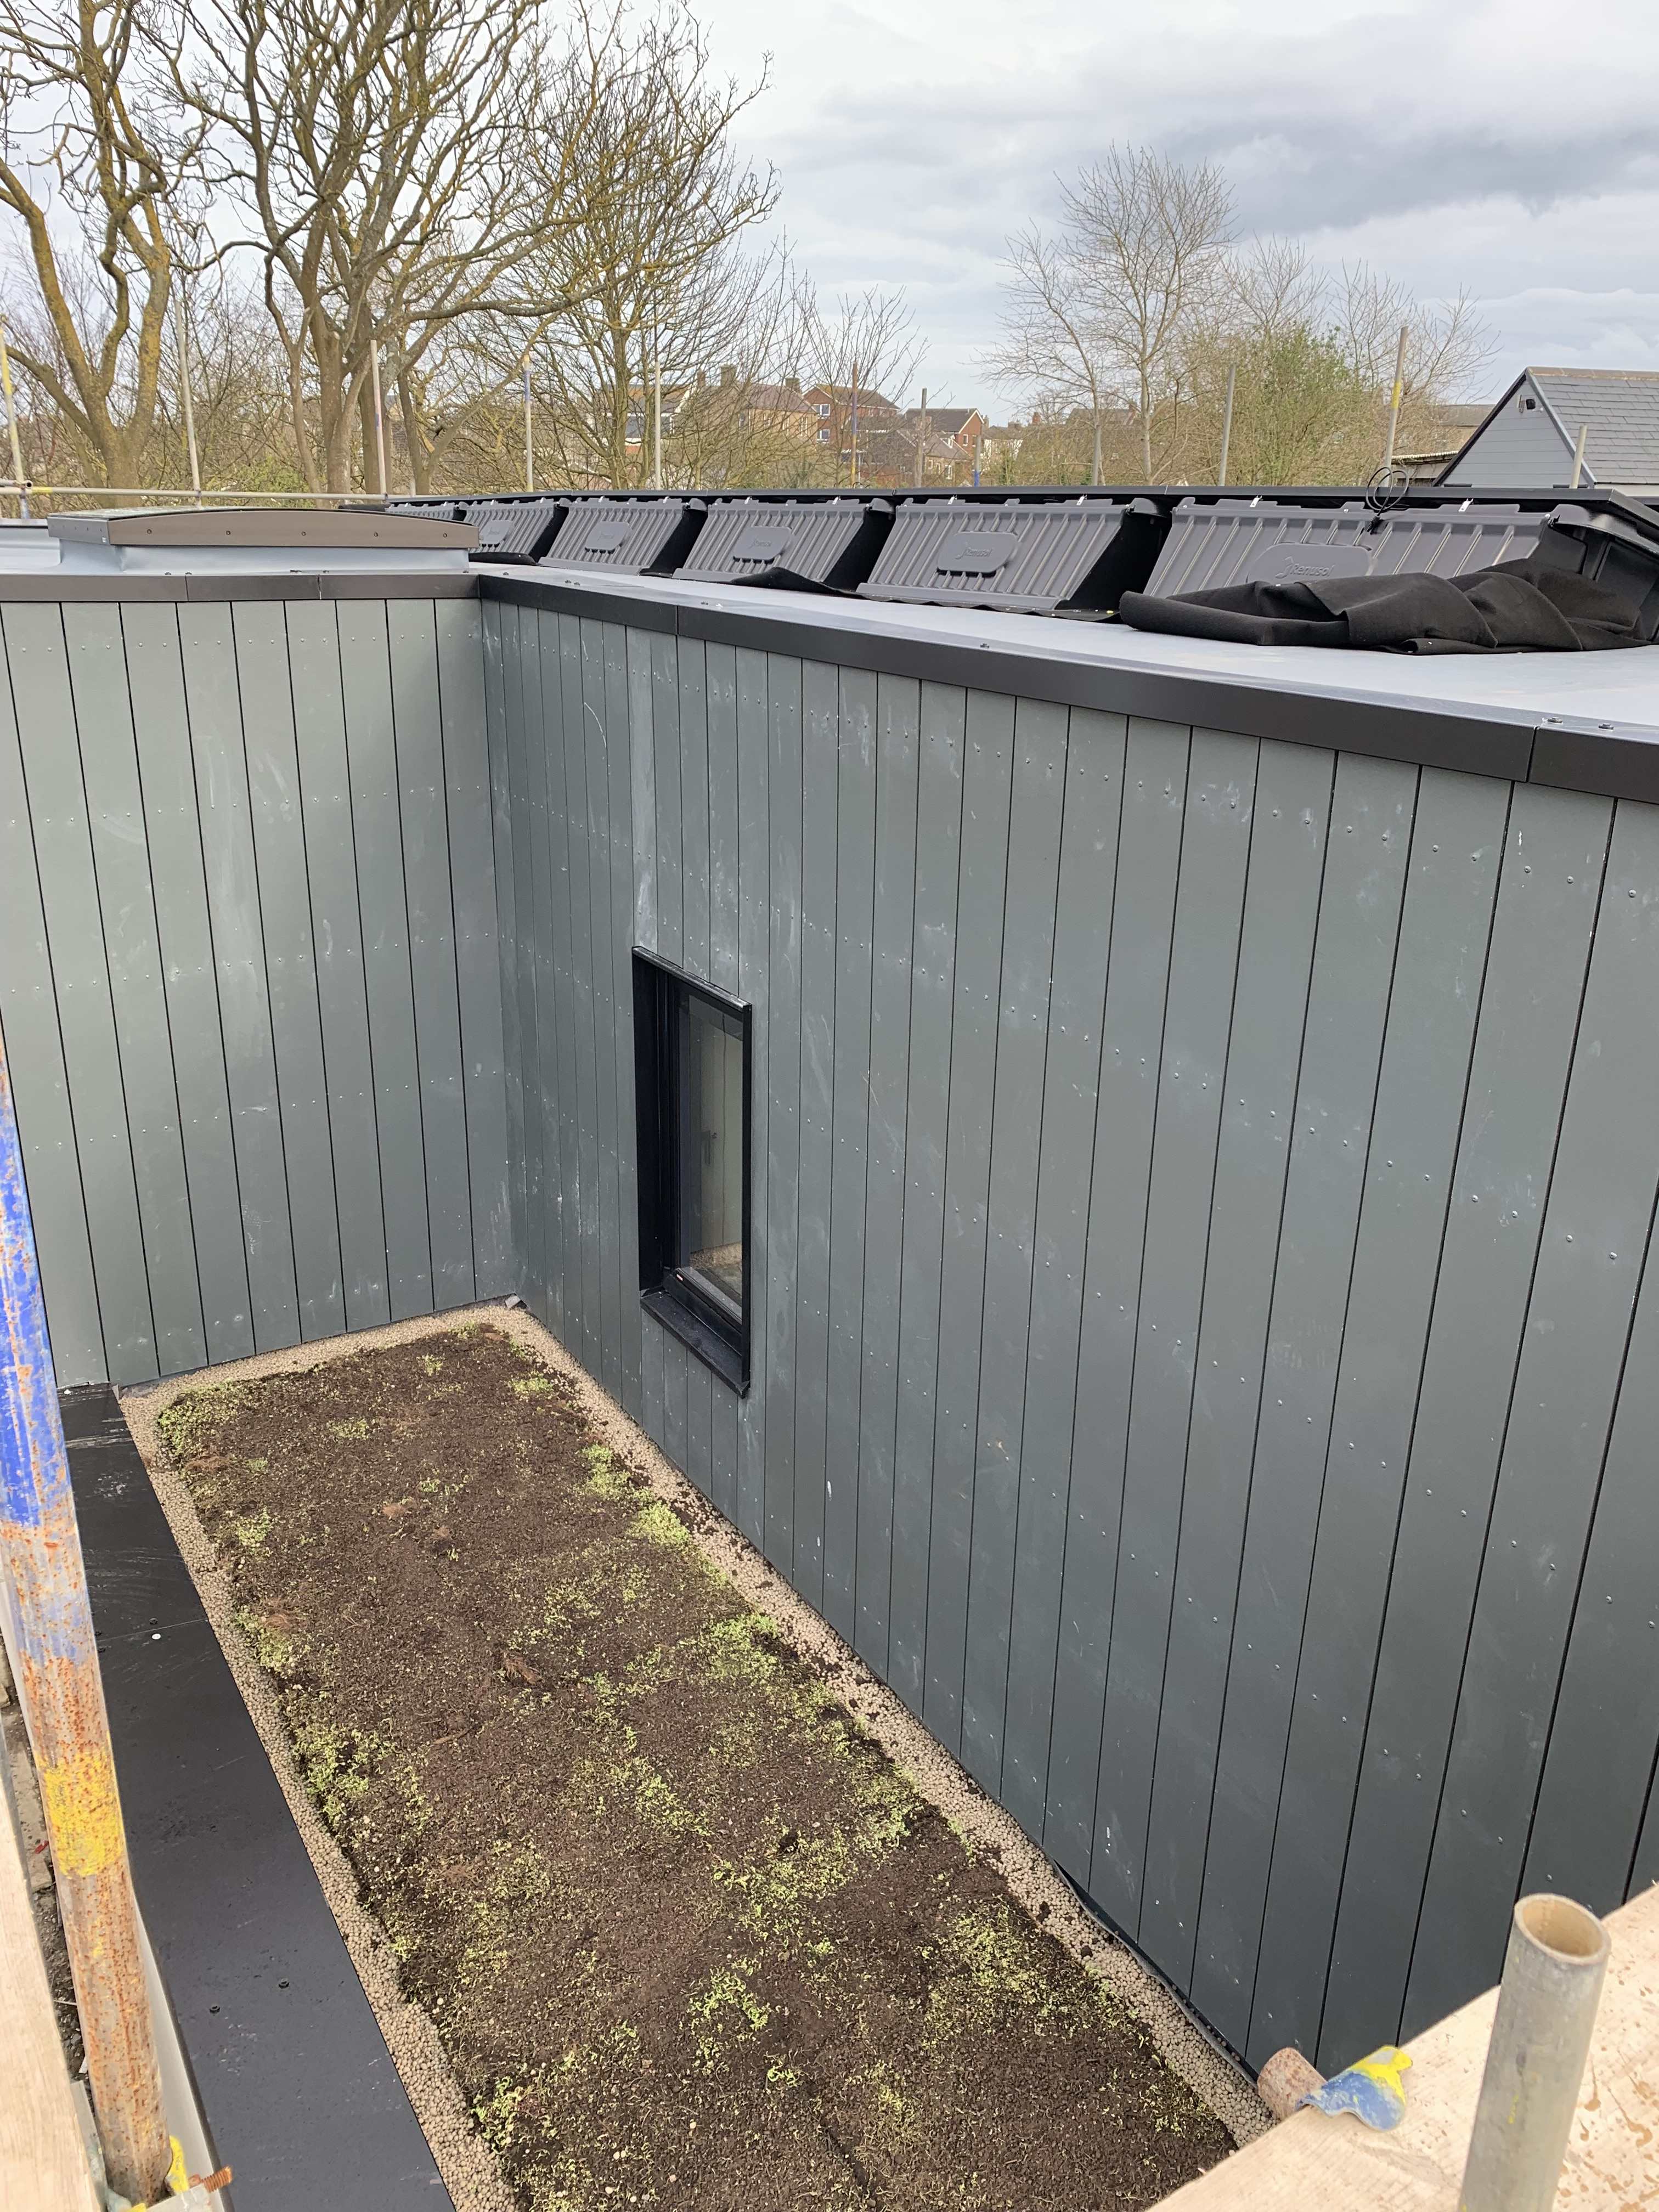
Our builder installed this system, https://www.greenroofsdirect.com/products. but we added additional soil under it and put down additional wild flower seeds. it’s sitting on a single ply (memtec) warm roof. only a small area. The photos are April 24 when it was laid and June 24, by July it had lots of cornflowers and other plants. It’s still going strong and will need to climb on to cut it down in the next couple of weeks, in preparation for winter. The builders laid it, we could have done it, but as they were up on the roof we thought it easier for them to do the lifting.

 2 points
 -
Hello all New to self build and have a plot with permission for a replacement house. We (my wife and I) are currently looking at an oak frame build. Hopefully we can get some useful information from others and can also provide some to newbies too. Thanks Richard1 point
-
That seems new. It is however for load bearing walls only. You can’t build a load bearing wall on top of PIR.1 point
-
If it’s for the builders they won’t expect hot water It tends to be only the large commercial sites that have hot water and clean loos1 point
-
I guess you've already done it now but for anyone else...I'll add a link. Underside of sole plate should be at or above ffl apparently? https://nhbc-standards.co.uk/6-superstructure-excluding-roofs/6-3-internal-walls/6-3-5-load-bearing-timber-walls/1 point
-
We also used Glenn, with both of us self employed with different company structures he really helped us get what we needed.1 point
-
It was found that the MPV would go to and stay in mid position when CH only was selected, a replacement new Honeywell ST9400C programmer appears to have solved the problems.1 point
-
This is the first time I’ve ever joined a forum on anything so it’s take a while to click on the right buttons to introduce myself. I’m a retired civil engineer but more of an avid DIYer. I have immense respect for the trade but tend to try most things at a snails pace. I’m currently working on my own extension after my builder completed the shell. I suspect I’ll be asking more questions than I can answer but am keen to join in if I can. That’s it in a nutshell!1 point
-
Yes, between the door block and screed.1 point
-
Hedge all in now, not the best of weather for it today!
 1 point
 -
I've used the sedum blanket systems before. Pretty straight forward to install but if I did it again I'd put irrigation in as it can dry out in the summer. Check out 'skygarden' they do supply only and supply & fit.1 point
-
The cavity has blown insulation already yeah. I understand the logic behind having the AT layer right on the inside, especially due to the risk of interstitial condensation. But once the additional EWI is added, even the outside face of the brick is "inside" from a thermal gradient POV. My calcs say it'll be 15° at that surface on a 0° day, so relative humidity would need to get up to ~70% indoors and stay there long enough for moisture to get all the way through the wall. MVHR will keep that in check. All that being said, it feels more like I shouldn't expend so much effort if there's going to be such large gaps impossible to seal. Maybe I'll rig up a DIY blower and see how bad a single room is. The rooftop extension (full footprint) that's also part of this project: that I will make airtight. I'll be putting in MVHR regardless, just for the air filtering. My wife's allergies demand it!1 point
-
Have you got the land already ? We had already purchased the land when we applied for our self build mortgage. land so all the "hard work" was done, and all the searches etc were still valid. So we used one of the cheap online quote finders, essentially a go compare type, We ended up with Home | Holdens Law Holden's Lancaster, who were very efficient, but as I said all the work was done in the purchase stage.1 point
-
No, just meant a space for a countertop airfryer. I think we'll remove our second oven and set the airfryer there instead of on the island. Really no need for two ovens! We have our microwave in the pantry / utility and works out well.1 point
-
Really you should go 25mm to 22mm stop cock, 22mm double check, then get distributed via 22mm as far as possible.1 point
-
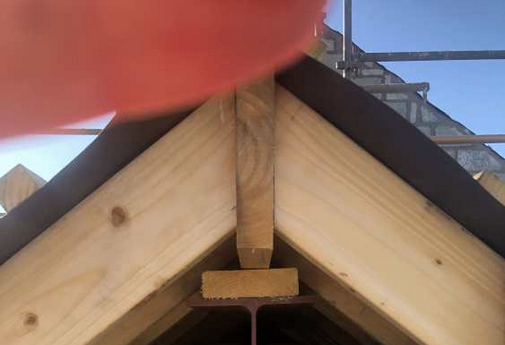
Catching up with this after some time away, if this is the end of the ridge then it doesn't look good. In the absence of an alternative solution, the top of the rafter should be notched over the beam (or a timber sitting on the beam), so that notch transmits the load from the roof vertically onto the beam. The timber ties beneath the beam are normally there to stop horizontal movement - that is, to keep the notches in their intended place on the beam - not to stop the rafters sliding down towards the wall plates which, they will otherwise tend to do. I would strongly suggest that you get a Structural Engineer involved before proceeding.
 1 point
 -
here’s our kitchen. Contrary to the suggestions above we put the sink on the island and the induction against the wall. Works well for us! we also love the ceiling led strip which replaces the need for down lights.
 1 point
 -
I’ve fitted matrix on the last two But any that don’t have moving parts are fine1 point
-
Sometimes you have to leave it to the experts. If you get the wrong door it is an expensive mistake. You're trying to save money, fair enough. But expertise has a value. What would you think if the advice on here turned out not to work for you because of some misunderstanding? Maybe a fitter will let you pay direct for the door, but do pay for the advice.1 point
-
200mm of insulation for the First Floor feels massively excessive to me.The concrete that insulation is sat on is in the heated envelope (unless over a garage) so is already warm. A well insulated house is going to have a low UFH flow temperature (e.g.35C) so thick insulation is a waste of money. Ground Floor sure, but not first floor. Insulation on first floor is only for responsiveness and zoning as far as I can guess.50mm would be plenty for that. Just seen your not the OP so presume you're talking about Ground Floor1 point
-
Lots of discussion on this here from time to time and no definitive answer. Technically the answer is very probably that you don't _need_ a heat pump cylinder, provided you end up with a heat pump capable of a reasonably high temp (eg 65) and modulation ratio (eg3:1). Many modern heat pumps achieve this. Historically the 'problem', as @JohnMosays, is that at a lowish flow temp the coil doesn't transfer enough energy to the water to keep the heat pump happy, particularly if it doesn't modulate down well. But with higher flow temps and decent modulation depth, this is not necessarily any longer the case. Furthermore an add on plate heat exchanger and pump can convert more or less any 'standard' cylinder to one with plenty of coil area. Mixergy sell this but only for their cylinders. There is at least one installer who is developing such an add on, but the idea does not yet have mainstream traction. At least 2 heat pump manufacturers sell cylinders with a PHE instead of a coil. Alternatively @JohnMos suggestion simply to top up with the immersion is sensible, but again not mainstream so many installers won't accept it. In practice however the industry is completely obsessed with swapping out dhw cylinders. Heat pump manufacturers often specify coil sizes which are larger than makes sense and installers are bound to follow their recommendations. So you may not find an installer that will reuse your cylinder, even through it may well work. So for now it's an unsafe assumption that you will be able to reuse a cylinder without a hp (ie large) coil, despite the fact that it's technically feasible in many cases. Sadly the recently announcement of an increased grant and delay in the boiler ban will reduce the pressure on the industry to get it's act together and become more innovative in how it approaches this problem.1 point
-
Hi @haythorn_1, I got 2 timber windows (3G) and one insulated timber front door supply only from Russell Timber Tech. I measured them myself and they were all a perfect size. I was pleased with RTT. The recommended installer was pretty shoddy. They were supposed to use the Illbruck i3 system supplied by me (Compriband - FM330 foam - ME508 airtight tape). It looked such a mess that I removed the ME508 in one corner to re-do and discovered that they hadn't used any FM330 foam in the gap. I ended up cleaning the glue off the frames, doing the foam and applying new ME508 tape myself. On top of this, when they applied the Compriband they stretched it around the corners in one continuous run rather than cutting it at each corner. Even I know that's not the way to do it! Consequently I have gaps in the corners - some worse than others. The worst ones you could see daylight through the corners (if they'd bothered to do the foam I wouldn't have spotted this). Also, they didn't check with me about the height of the threshold before cutting the Compacfoam. So the door is too low, not enough space for a door mat and there's a bigger gap at the top of the door. And I'm still waiting for the FENSA certificate. Grrrr. I paid £1000 inc for two people to come one day (not more than 6 hours) and fit 2 windows (not huge) and one front door. They were very good at removing the old windows but I would NOT recommend them. The other quote I got was £1750 to install. In hindsight I wish I'd not listened to the people who told me to leave it to the experts. If I could do it again I'd still measure myself and get timber frame windows from RTT (they seem just as good as my expensive 16 year old Rationel windows). I would then either pay for someone to come and remove the old windows/door and lift the new ones into place and level and fix to walls (with them/me applying Compriband before lifting into place, me deciding where in the cavity to locate them - ie. all building regs my responsibility). Or I would get a couple of friends to come and help me remove the old windows/door (I understand not easy if you've not done it before) and secure/lift into place the new joinery, hacking off plaster on the reveals etc. Lift new window to check fit and remove again. I would apply the Compriband correctly (and quickly) before finally lifting into place. I would also stick the ME508 to the side of the frame before lifting into place. I would then foam (FM330) and do the ME508 myself. I would obviously have to sort out Building Regs myself too which would cost me £304 in Surrey (for up to 20 windows). For me it's not necessarily about saving money. It's about having the job done properly with minimal hassle. No point in having 3G windows if they're not installed airtight.0 points
-
@nod has forgotten more about rendering than all of us put together will ever know. But that hasn't stopped me trying to find out about rendering because it's a really interesting thing to do (or in my case mess up). I still know close to SodAll, but I can research Tinternet This guy is really good at explaining the process0 points
-
since this has been posted, my partner has moved the air fryer from the island and in to one of the larder units (has worktop in it) and relegated the coffee maker to the utility. See how it goes.0 points