
Leaderboard


Popular Content
Showing content with the highest reputation on 06/08/24 in all areas
-
I would make a pattern from a piece of thin ply, say 6mm. Mark out the distances, drill a tiny hole and put a screw through the ply do it sticks out the other side a little. Then measure for the other screw, drill & fit another screw. Check the bookcase fits on the plywood then drill a very small hole in the wall. Lodge one of the sticking out screws in that hole and scribe a small arc, 5mm each way on the horizontal. with the other screw. Use a spirt level to get the horizontal from the small hole over to the arc, then drill the second small hole.2 points
-
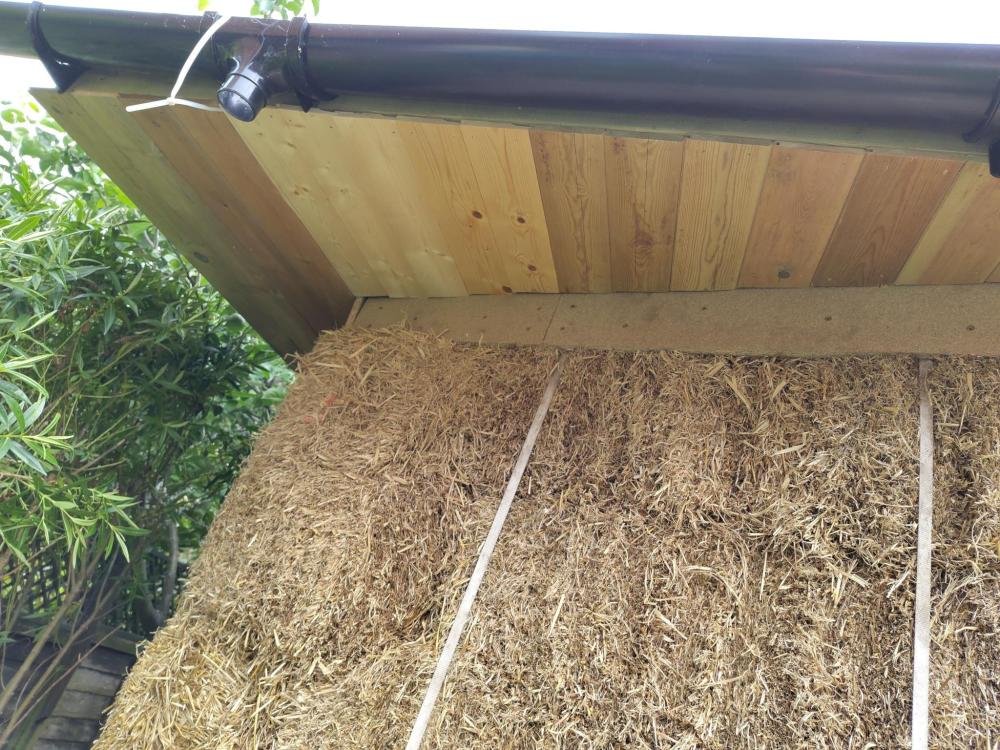
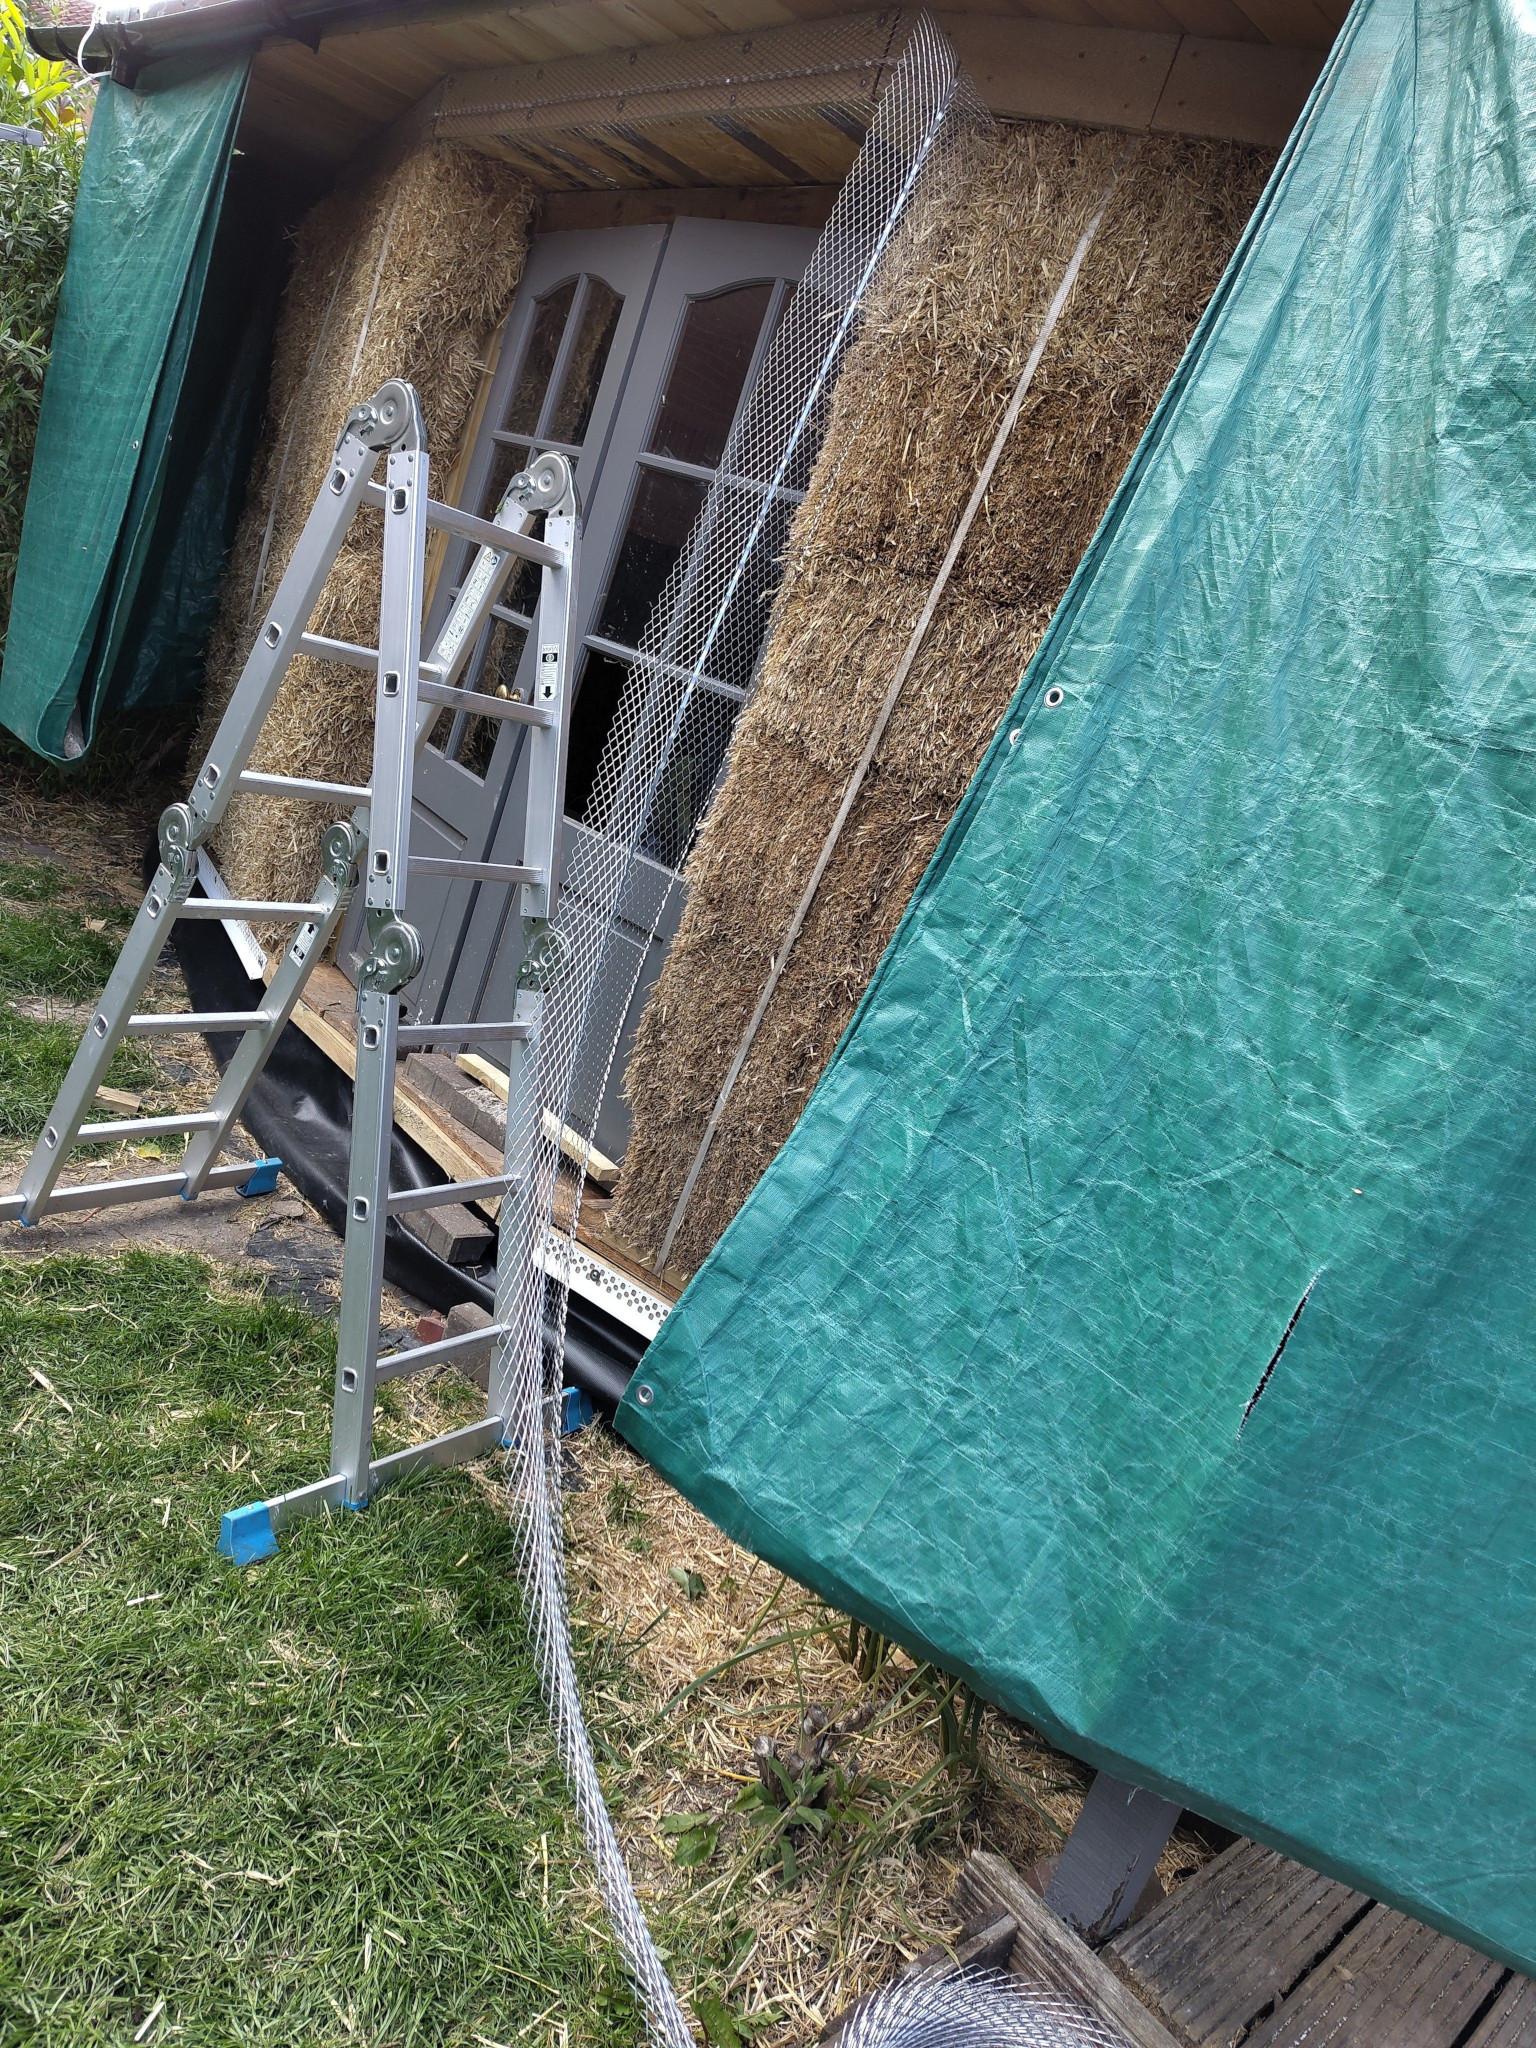
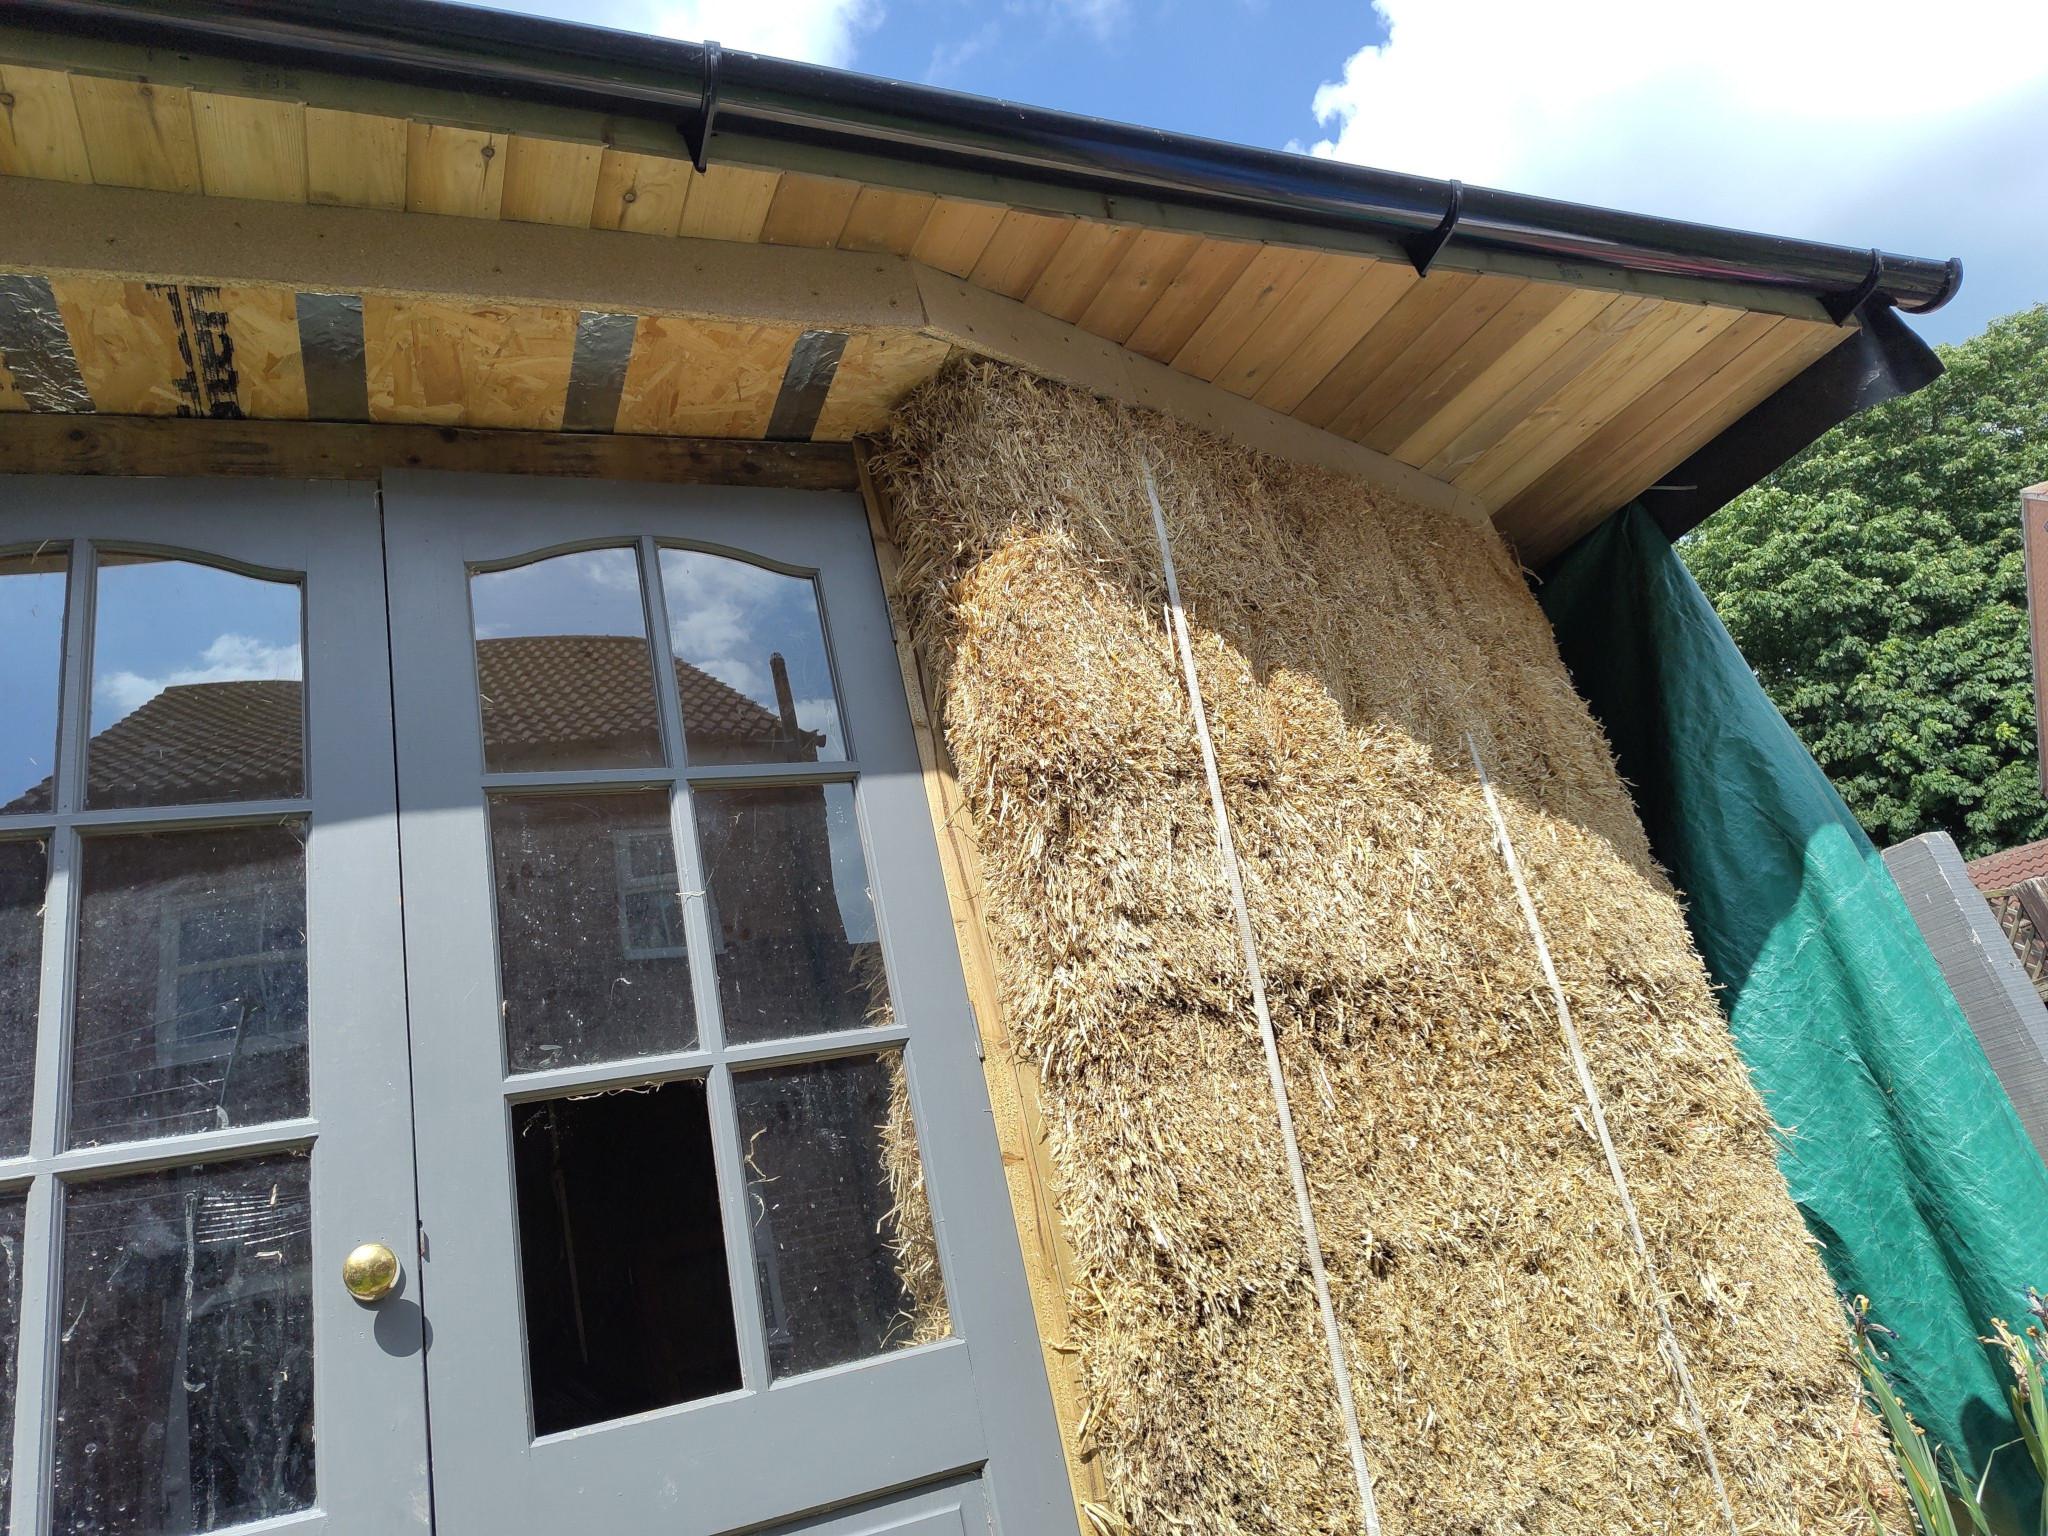
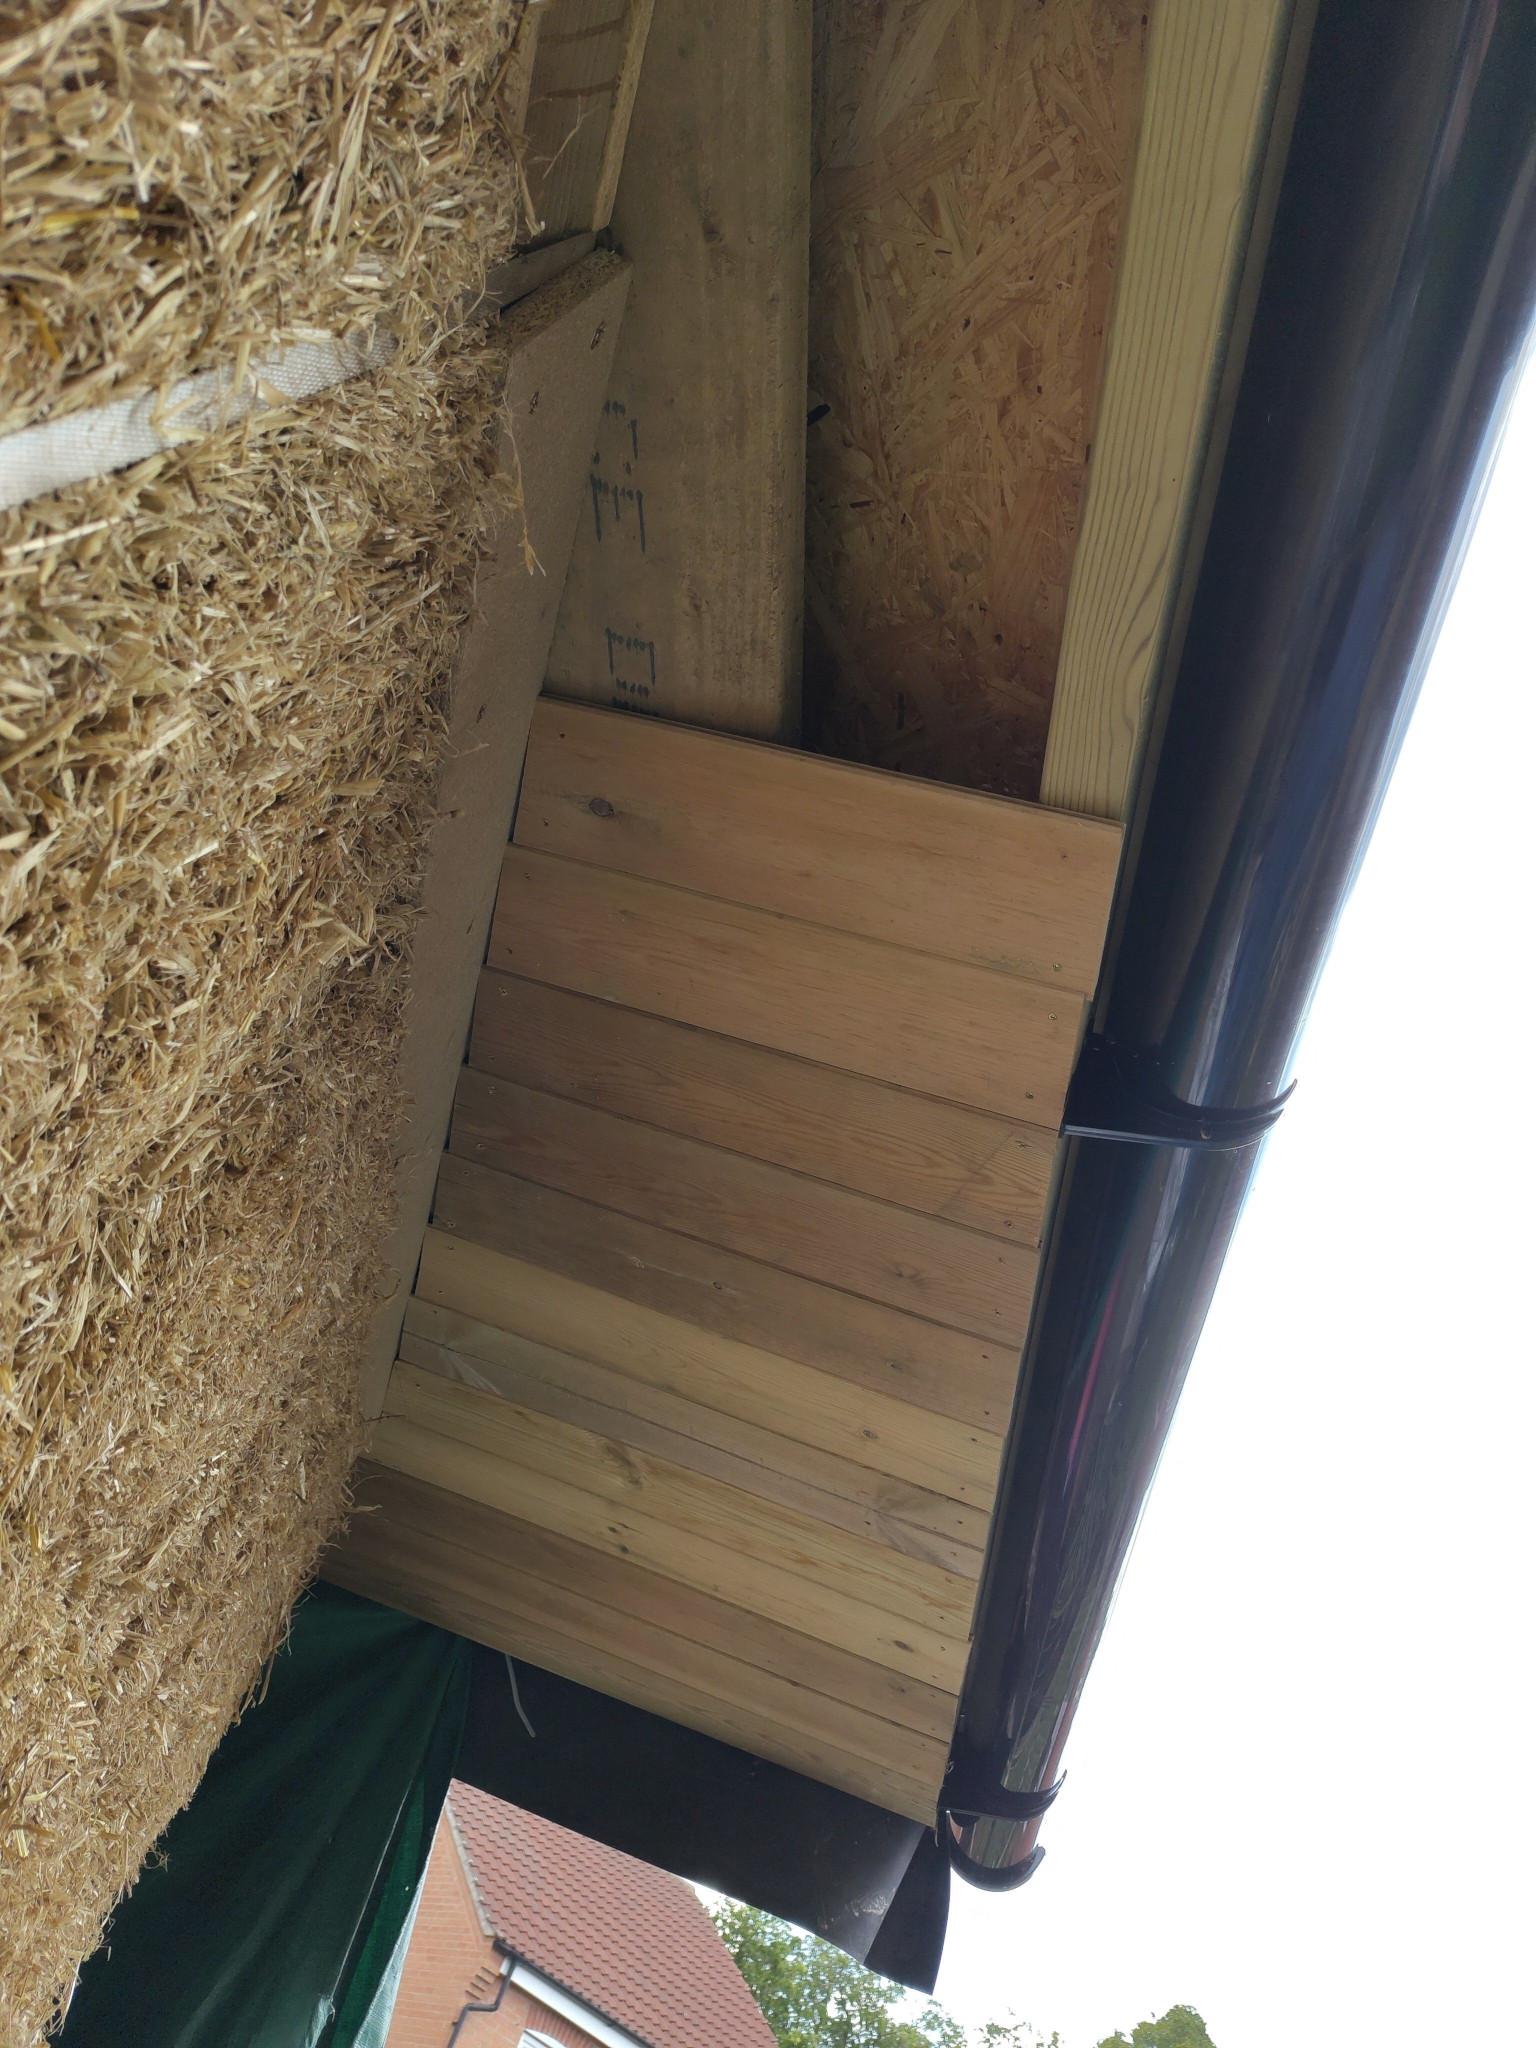
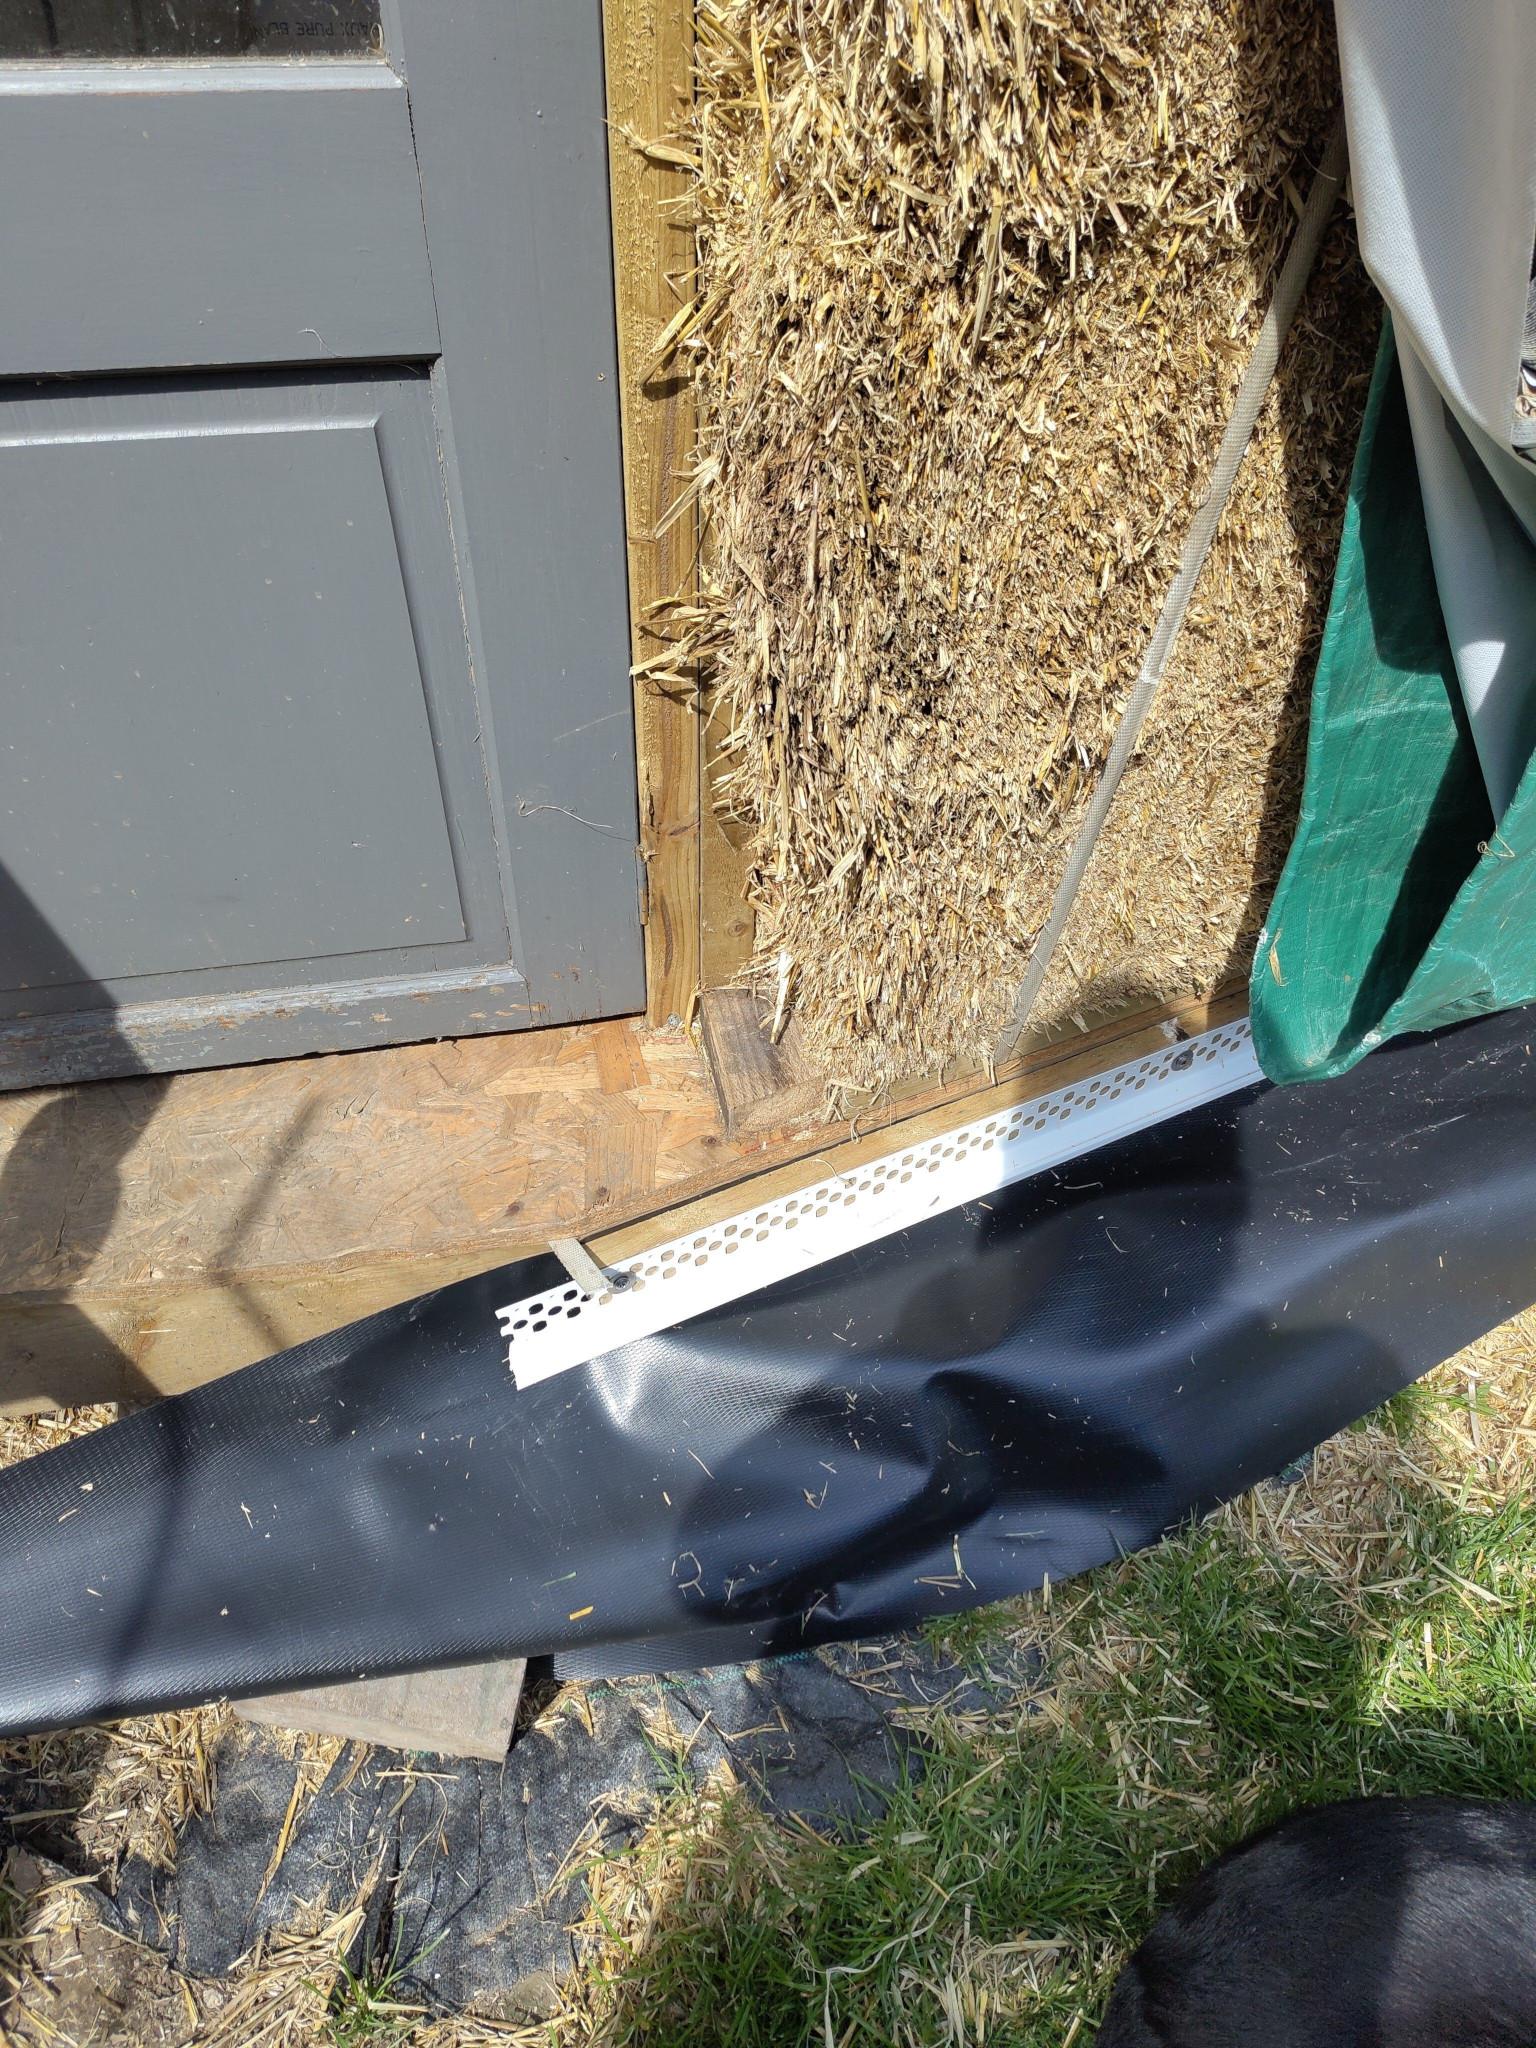
Now we're motoring. Got the underside of the roof clad and finished covering the roofplate with particleboard: There's a few rough edges to it, but it hid far more of them than it introduced ^^. Installed bellcast render bead and DPC skirt at the base, all around the perimeter Really need to trim them back and work out how the render is going to look. The pictured corner is the worst one since most of the bale's "ear" is gone down there. I'll end up sculpting it with lime-straw mix, I imagine. Finally, got some stainless steel expanded metal lath covering the roofplate and the junction with the straw. Apparently it's more usual to use hessian or reed mats to cover over wood when lime rendering, but I'm a bit skeptical of it. Time will tell ^^. I've got it (and the beading) fixed with stainless steel screws and washers at 600mm centres, but apparently 100mm (!) is better, to minimise movement of the lath. I'll do that with some staples, I think. I'm going to experiment with moulding a door and window head using more of the lath; I figure I can make a sort of J shape with the mesh by fixing strips with the screws then pulling up, so the screwhead is on the inside of the lath, and fixing similarly to the roofplate, overlapping the lath that's already there. It should be a pretty shallow angle, and if it doesn't work, I can just cut it off and do the cladding approach, I guess ^^. I've just ordered the sand for rendering; I'm hoping to get the inside trimmed, then start dubbing out uneven sections and hollows early next week before moving on to a stipple coat.


 2 points
 -
Hi all, a quick intro as I've been reading posts for a while but only just signed up. We are building in a house and annexe with double garage in Suffolk. Building with timber frame and using hempcrete just to make things complicated. The hempcrete will be laid with an experienced local builder who has worked with hemp for several years. This will be lime rendered on the house with timber cladding on the annexe. It hasn't been simple so far to get a timber frame designed that works for the hempcrete that a structural engineer was happy with but we have got there and have started building our annexe building. I'm building the frame myself with a local carpenter helping to erect it. The grind for walls went up this week. My background is joinery so building the timber frame is simple enough. For the main house we have a local timber frame company build the frame to keep that moving forward this year. This should be delivered and up in the next 6-7 weeks. We are living on site, in a static, and are concentrating on getting the annexe watertight first so we don't freeze in the static over winter. Life is very busy so I'm not online that much but I've be using the site for research a bit and thought I should start posting. Johnny1 point
-
Hello, I am a new member, a retired historic buildings carpenter and earlier a timber framer. Though based in Czechia my original contact was with reference to a property I have in the UK, a small terrace cottage with no outside space only foot access at the rear. Having read about air source heat exchangers being fitted in the Netherlands on just such terrace roofs I wanted to ask what the posibilities were in UK.1 point
-
Imprinted concrete is long lasting and come in a multitude of designs and colours1 point
-
https://www.tarmac.com/products/asphalt/ulticolour/1 point
-
Check any mortgage details or prospective one, ours allowed it from architectural technician1 point
-
You can unscrew a bookshelf from the wall, but you cannot unscrew a pregnant wife. Or send back to Screwfix for a refund.1 point
-
You can get PIR boards without the foil vapour barrier. https://www.secondsandco.co.uk/product-page/pir-boards They would probably be OK as by the time the VCL/MVHR has done there business, and the fact the PIR is on the low temperature/Lower RH side, there would be virtually no mass of water vapour to condense/freeze. This does raise the question if what sort of roof you want to fit, Warm (would be my choice), Cold (just why) or the Hybrid (horrible). The reason this makes a difference is because it can change where the effective moisture release areas are. My feeling is if you control ventilation and heating, which is really just another way of saying keep the internal RH as low as comfortable, once the building has dried out fully, you will not have a problem.1 point
-
Please report back as good fixings on PB are not easy (IMO)1 point
-
Thought I’d try these on the pb
 1 point
 -
Cheers. That’s worth a try. Let you know how it goes1 point
-
Funny isn’t it . It’s only 4 screws - but so much that can go wrong !1 point
-
My kress will go through a corridor of 60cm.1 point
-
My worry would be weight! Books are heavy and those fixings small, especially through plasterboard (what’s behind it?)1 point
-
Large piece of cardboard covering the back of it, poke holes through marking the fixings, hold cardboard against the wall and mark for drilling 🤷♂️1 point
-
Wow, brilliant, thank you Iceverge. I’ll use those as a starting point. I did read somewhere on here concerns about the permeable membrane being inside the PIR but other than that that build up might be perfect (with the addition of a 25mm service void for cables and a skin of ply or osb just under the PB).1 point
-
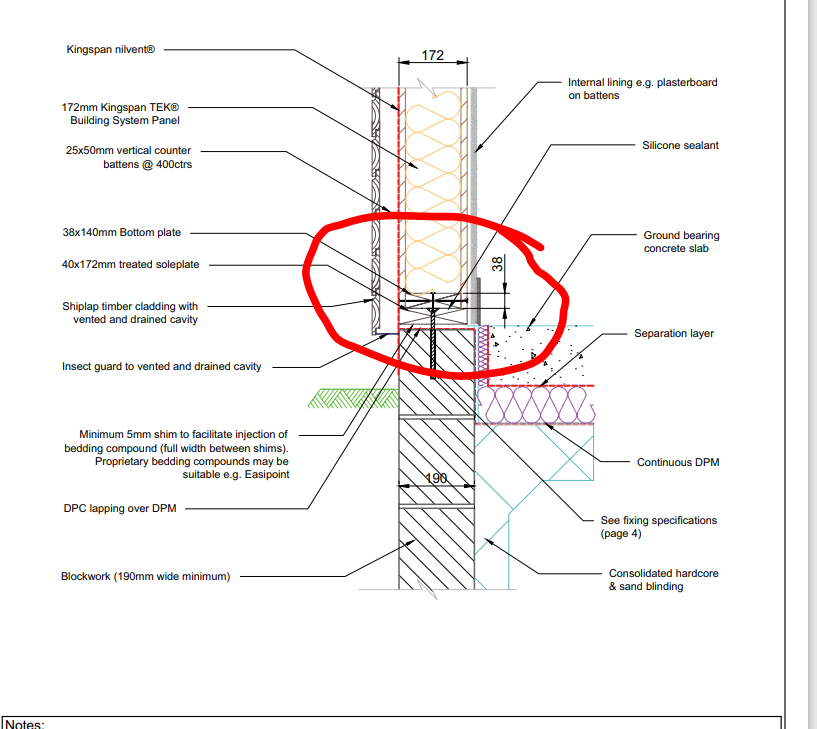
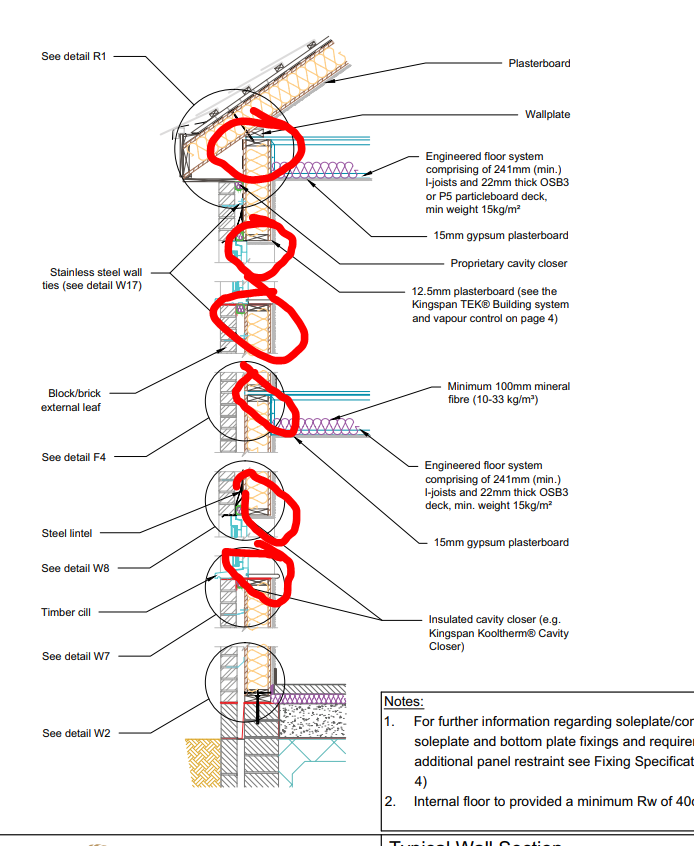
@G and J I've been loosely following this. The essentials are you want a low U-Value Wall, with minimal thickness on a site that constrains the use of high overhead machinery. If you really want to dig into the weeds on this I'd advise that you try thermally modelling the entire wall, not just a simple U value calculator, in order to account for thermal bridges. Once you get towards any acceptable U values thermal bridging becomes really significant. Particularly around windows/doors, the floor wall joint and the first floor ceiling band area. You'd be surprised how the promised performance of a SIP wall worsens, once taking these all into consideration, as SIPS often require solid timber blocking in these areas.
 1 point
 -
From the Heatmiser manual. I’ve wired in hundreds of them. Pretty simple.
 1 point
 -
Hiya all. I totally get your enthusiasm. But you are all spending a lot of time an effort juggling numbers, could be the JH spread sheet could be some nice high end software.. I too have some fancy software in my office but recognise that it's just a tool to give you a heads up. Some folk on BH actually think this will happpen in real life for no extra cost and you will be able to russle up a builder who will play the game.. you are living cloud cuckoo land. The reality is that you need to be able to get a local builder to execute your output and get material off the shelf.. Honestly as a self builder if you get so anal at this stage you have little chance of making your self build a success. I have self built my self and also built houses for othe self builders.. My advice is to use your calculations as a concept model and then adapt to what can be built at a reasonable cost to your specification. A good 50% of the above looks good on paper but is complete bollock in real life. If anyone has a problem with this then you can find my mobile number on my web site or just give me a call on 0771 308 1597.1 point
-
Just an update - had the last two weeks off. Ran a bit low on energy for first week and took a few days off from the build to step back and recharge. The bricklayers arrived onsite and I was able to collaborate with them and address any issues or questions they had as they started off. We're currently about 3 days from finishing - half way up to the 1st floor and it's giving me a massive appreciation for the hard graft/work bricklayers face every day. There are two of them and their labourer quit on the 1st day of my build. Apart from another young lad coming onsite for a day this week to give a hand they have been working between them to convey all the materials, mortar etc and mix the cement themselves without complaint (to me anyway!). I was facing a crunch a week ago - couldn't get a bumpa conveyor in time for the 1st floor and needed a driver to cover the insurance risk - we got a brilliant young lad who pitched in rather than sitting in the cab all day. Really made a difference, plan to get him an Amazon voucher as I wasn't onsite myself to reward him! The whole side of the house that's got a band of brick was finished a day ahead of schedule as a result!. Only hired for a day and it wasn't cheap but they lifted all their bricks/blocks up to the two scaffolding levels above ground and are set from that point of view. The cheap plastic bucket I bought them failed and they need to carry a lot of mortar up in the last few days, am looking out for a sturdy replacement if anyone has a recommendation? The Azaela Brick design is made up of 3 colours - got 4 pallets, probably 1 too many and they took bricks out of 3 of those to mix them up as each batch can be slightly different and this masks any variations. Will use the last pallet on the garden wall down the road..... I've been ferrying in water in 30 litre jerry cans, they use about 90 litres per day and around 6 x 25kg bags of cement. Bought more today to ensure they have enough to finish and top up the water regularly. Next up is measuring the soffit/fascia - 2-3 weeks to manufacture (metal) and although I intended to render the blockwork myself, due to my energy levels sagging last week, I'm getting a quote for a professional to see what that looks like. I can focus on the inside. Windows and Doors due Week 28, or mid July to the rest of the world! Internal Insulation and Air Tightness started - new skills! Have to keep ahead of the bricklayers though, turn your back and they are up a level and I don't recommend dropping anything down a 50mm cavity!!! It's very hard to retrieve! Penetrations like Electricity Meter Boxes are best prep'd in advance when you have full inside and outside access. Similarly my window preparations for the last window they reached weren't there and I almost lost the chance to finish it in time! I'm doing 25mm Bosig Phonotherm under the window and 40mm Gutex around the sides and top. The window is brought out to close the cavity (almost) by 47mm with this insulation in situ. There are batons to meet the window straps and the bricklayers come past this by 20mm if brick or match it if block (render will foll the reveal 15mm). That's the best I could come up with from the Architects drawings and some onsite photos they shared with me. It should help the windows perform well, we'll see. I'll close the cavity with a fire rated foam. I did have a worry over the DPM over the side window and when onsite yesterday this confirmed my fears. It has fallen down into the cavity leaving the window exposed below should the render fail. This corner faces 80% of the prevailing weather and is exposed as my new house sits proud of the existing one. I texted the bricklayer as they are onsite a lot earlier than me and when I turned up they had installed another DPM and this one was 100%. I marked three levels where I need to install weep vents (drill vents) on this window in my case but am much happier with the extra detailing and it was worth pointing out. The bricklayer came up with the idea of not using brick slips just below the window - although most of it would be covered by a aluminium cill, he suggested cutting bricks in half and facing them outwards. Less likely to move / get loose over time. He mocked it up and I approved, looks well don't you think?! The only upset was 4 stitches in my head from a scaffolding pole I rammed into just at the start of my holiday, I'll save you any pics, last thing you need to see on a Friday I'm sure!!1 point
-
We have managed to stay in our home for the majority of previous builds. This time we had to sell before we could buy the plot / donor house. So yesterday, we packed up from our 325 sqm house in Stroud, moved into a 114 sqm rental house, sold Stroud, purchased the plot and by coincidence the Planning Application was accepted by the District Council. A big day. https://planning.newforest.gov.uk/online-applications/applicationDetails.do?activeTab=summary&keyVal=_NEWFO_DCAPR_221599 We have a mountain to climb, but already we can look back on some good progress. We have a plot, we have a design, we have planning submitted and we are some weeks into requesting Timber Frame quotes. Many priorities, but one near the top of the list is talking to the neighbours to see if they will comment positively on the planning application. As a courtesy I gave the drawings to the immediate neighbours before planning submission. Good neighbours are invaluable, especially for demolition and a replacement dwelling.1 point
-
Someone posted some excellent advice on here which I followed which was to do a simple cost benefit analysis of every major decision such as floor build up or insulation for example. Pick a value you’re happy to spend up to then really question when you go above this.1 point
-
Yeah no idea. Anyway, we've switched broker and they seem to be on it, said this comes up occasionally and have lenders in mind who would be fine with a retrospective PCC. Hoping they come back with an ok rate! I'll report back...1 point
-
My advice is don't over think it. You're on the right lines. We didn't use Kingspan, we used a system from SBS via our installer NewForest SIP, but have 170 walls & 200 roof. Essentially same as your make up here but only have internal void if req. I deliberately designed service runs to avoid battening all the internal walls so just picked a few. ultimately to just save time & money & also have walls i can fix things direct to OSB like kitchen units. We also have batten & counter externally with 20mm half lap larch over glidevale membrane We didnt bother with vapour barrier or any special taping, i did externally tape the glidevale membrane with their recommended tape but TBH i think it was probably a waste of time. all panel joints were foamed on install & mastic around roof joint. we've achieved an air test of 2.56 (that's even with 14m of leaky sliding doors), an epc of A & the place is toasty warm with no heating on at all. it's very stable temperature, we also have MVHR.1 point
-
I woke up this morning thinking that the 300% efficiency thing is a bit of a red herring here ^^. If you export at 25p (peak) in summer, then buy at regular prices in winter (again ~25p) to put into your heat pump, it still gets the CoP boost - it ends up being the same number of kWh of heating or cooling, the only difference is that you actually need the heating in winter, whereas the cooling in summer is marginal at best. If your export is at the regular 15p in summer, then importing at 25 or even 35p (peak) in winter, then you take a loss - but it's 50%ish, rather than 300%.1 point
-
I’m more of a mind to trust it’s readings than anything clever with batteries. But as it doesn’t use an app it has earned me some very funny looks in the past.1 point
-
I did look, no one wanted to come this far north, so just did standard stripped footings and stub walls and did plenty of insulation below and sideways to stop heat loss as much as practical. Easy to get contractor to do that without much learning curve.1 point
-
I'm pretty sure most would be fine tied to rebar in a concrete slab, but if you want an absolute guarantee that that's OK from a manufacturer, here's at least one. WarmUp Forte Grid System - https://www.warmup.co.uk/underfloor-heating/water/forte-grid-system https://www.warmup.co.uk/wp-content/uploads/Warmup-TS-Forte-2016-09-29.pdf https://www.warmup.co.uk/wp-content/uploads/Warmup-TS-AL-PE-RT-v1.0-2016-09-29.pdf

 1 point
 -
Thanks. Its funny actually out of all the plots I found, the 4 acre plot was the cheapest (less than a third of others). It was by chance a owned by a previous self builder who built a passivhaus, who sold it to me for the very reason he wanted a self builder to have it, could have went for 3 times the price. A very nice man.1 point
-
I won’t test the supposed 116kg limit !!0 points
-
0 points
-
So, I’ve done my measuring with my water level. Oh dear. Ground level around my man cave if 550mm below invert level of sewer access manhole at the front of my site. Sigh. I will never truly trust a laser level again. I think that means a rethink …0 points
-
Why caravanners wife swap. I got an Avondale twin axles for mine.0 points


This leaderboard is set to London/GMT+01:00