Leaderboard
Popular Content
Showing content with the highest reputation on 01/12/24 in all areas
-
2 points
-
I actually remember reading about a case similar to this not too long ago. I have managed to find an article which covered it: https://localgovernmentlawyer.co.uk/planning/318-planning-features/47278-incorrect-plans-a-strict-approach The application was granted on the condition that the development complied with the plans. As the article mentions, the plans showed the development property as having a lower ridge height than the neighbouring properties. But, if it were built to the approved dimensions, the development property would be higher than both, in one case substantially. In the judge's view the plans showing the relationship to the neighbouring properties were not simply illustrative; they were a material part of the planning decision. The plans should have been capable of implementation and they were not. As a result, the whole permission was not capable of being implemented.2 points
-
20 .sq m would be a nice small job for a plasterer. If your going to tackle it yourself make sure you get angle bead and render stops in place first. You may need to coat the wall first with uni bond. Don't try it if temp is below 5° Use sand and cement 4:1 for the whole job, and rule off in sections with a straight edge. Apply with trowel and hawk, rub up second coat with a float. You can use a damp sponge to rub it up providing the second coat has nearly gone off. Remember professionals make it look easy, because we've been doing it for year's.1 point
-
Hi all, We have a 120mm (tape measured) stud partition (70mm MF with timber inside, 2x11mm OSB sheets, 2x12.5 plasterboards = 117mm). Not sure what I should allow for skimming, probably 6mm (3mm either side). Can someone please tell me what depth of door frame I need to order? Thank you1 point
-
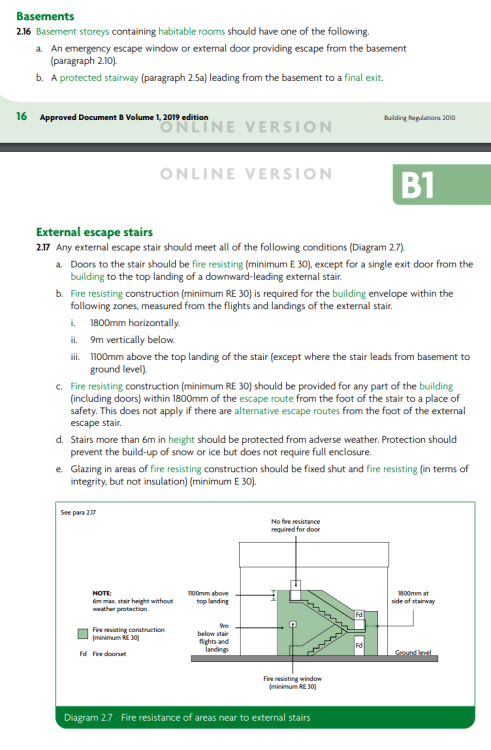
>>> you need an exterior stair also Or some other form of escape e.g. a window or the right sort and dimensions.1 point
-
The WiFi bit isn’t needed, save your money. Once it’s setup it’s basically leave the unit to it. I’ve clicked the boost button once on Christmas Day with family over. I just leave the integral humidity sensor in the unit increase and decrease the fan speed in proportion to the humidity increase from showers etc.1 point
-
It reminds me. The building regs used to be in a huge lever arch file. A couple of times i took this in to heavy meetings with a bco, and placed it on the table at the start. I could see their discomfort immediately. They knew that at some stage i would refer to it, or ask them to show me where it said what they were arguing. Only when they were being unreasonable or plain wrong. Only with LA ones as it happens. Fire protection of a basement stair was one such.1 point
-
Am really surprised by that. IME a window even slightly ajar has little attenuation particularly for high frequencies, I would have guessed 15dB for closed but only 5dB for ajar. Think how easy it is to detect when you have got a car window open just a crack. Also no distinction between single and double glazing (though for best attenuation you need much wider spacing than the usual 4mm).1 point
-
If you've not done it yet (we're in the same boat as you, holding out till the house is built enough to be able to go through BUS, while shivering with a 3kW willis and a 12kW shower), we're considering using these guys as they'll do the sign off and MCS paperwork for the BUS. I've been in touch and essentially they want £1.5k for the privilege, but if that gets you £7.5k it's still not a bad deal if you can DIY it. I've also got the advantage of being able to buy/supply the ASHP and install it via my ltd co (i'd still be doing it!) thereby getting the VAT back, which in itself is worth £1k or so.. https://www.unitherm.co.uk/pages/mcs-design1 point
-
1 point
-
Power on site nowadays is only really used for lighting and charging the odd battery. If using an extension, make sure the supply is properly earthed and protected, RCD etc. Ideally you'd want it in a protective conduit or even use SWA... you need allow an idiot factor. and for the extension itself, best getting the a spool of heavy duty blue (frost resistant) flex cable and cutting to the right length and putting on your own plug and weatherproof sockets.1 point
-
my unit Nuaire unit has a humidity sensor on it, but it's basic. I have another humidity sensor is the bathroom which is connected to an ESP controller and it boost that way. You are overthinking it, the boost switch can be done via so many wireless options you just need to decide what would work best for you. I also boost via another ESP controller via wifi. @Ajn could you please let me know what model sensors are you using for temp, humidity and CO2? I'm currently using some DHT22's, BME280, BME680 and Xiomi BLEs1 point
-
I installed a Vent Axia, very pleased with it. The humidity sensor worked well. Personally I don’t know why you need an app, it just runs 24/7 & you have humidity sensor & boost switch/controller.1 point
-
1 point
-
Many people will tell you how wonderful infra red, and far infra red heating is. I shall say it will be rubbish. It is just electrical resistance after all.1 point
-
in the end I managed to fit a second pipe through the ducting back to the RWH tank and so the discharge will go in to that and back to the tank.1 point
-
When I had my new electric supply put in it was to a box on posts right next to where the garage was being built, when the garage was built (with a hole for the meter box) I shifted it into the garage wall myself. I had already buried a suitable cable from garage location to the house.1 point
-
Do NOT have an extract in the pantry. That will just draw warmer room air in and warm the room, which is not what you want. It is not routinely occupied so does not need an air supply. Just leave it, and keep the door shut as much as possible. Against all expectations our pantry, partitioned off from the corner of the kitchen / diner seems to be sitting about 2 degrees lower than the main room.1 point
-
2. I put a supply in the pantry in the hope of keeping heat from the surrounding rooms at bay. It helps... a little.1 point
-
1 point
-
I'm assuming this is an external wall? From an amateur look at it I have a couple thoughts regarding thermal bridging and timber use. 1. I don't think noggins are required assuming you have a structural racking board one side of the wall. 2. There's an awful lot of jack studs, consider clips or splitting them. 3. Have a look at mindsparx video on you tube and his framing. Particularly the Hammer-Band as he calls it. It does away with individual headers and uses one of the top plates on edge instead around the whole perimeter. 4 The double bottom plate could go I think. 5. I'm guessing the breathable racking board is something like Medite. You could move to something cheaper like OSB internal to the studs as a racking and use the T&G Gutex externally on its own like @ProDave although I don't think rendering it is the way forward in a wet climate. Then tape the OSB for airtighess. WHat is your final external rain screen? Bricks/blocks or timber/fiber cement cladding.1 point
-
Maybe it's time to revive my idea of converting a room into a giant microwave oven and then just cooking yourself very gently; it's the perfect solution to warming the person and not anything else. Pot plants in the room might suffer, however.0 points


