Leaderboard
Popular Content
Showing content with the highest reputation on 05/23/21 in all areas
-
No the mixer is correct if you look at how it is piped, it’s the manifolds that are wrong. On some you can swap the flow meters for the actuators but it’s easier with these to slack off the grey nuts and switch the manifolds over.2 points
-
I’d be taking out a few of those slates and then cutting out where the crack is. New lead under the top section and over the bottom, overlap by about 100mm or so and then relay the slates That is a very shallow valley - is it a sarked roof out of interest ..??2 points
-
2 points
-
Yup. Mixer / plumbing to stay as-is. An hours worth of spanner spinning and it’s 100% sorted. ??1 point
-
You won’t get a finished product with undercoat, you will need to use a primer on the bare wood, then a coat of undercoat, then a very light sand down to get the details right, then another undercoat, then another sand and then two top coats. There is no short cuts to a good finish, no miracle one coat paint, it’s just lots of work and detailing.1 point
-
Anyone want to buy a time-share apartment, off plans, in Spain. This sort of thing is not new.1 point
-
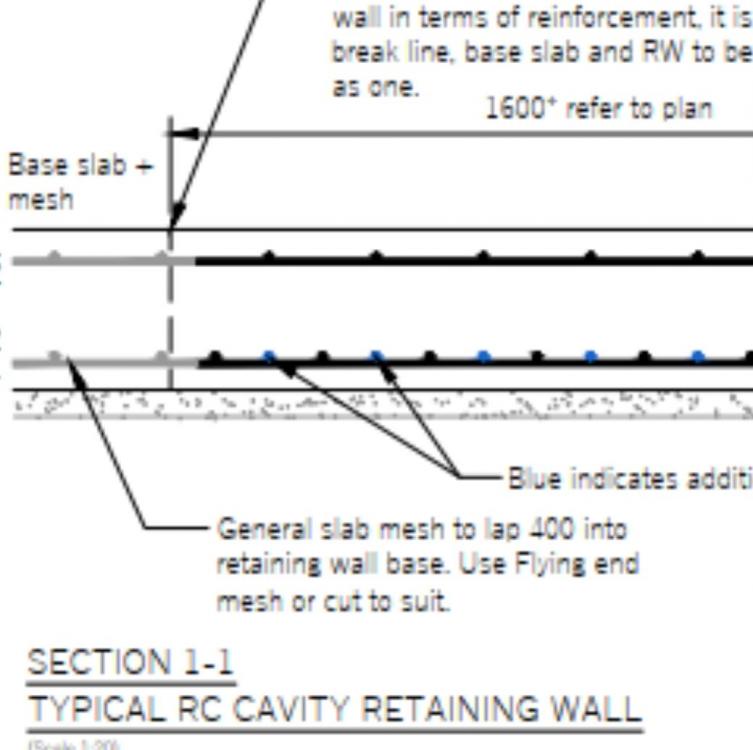
That mesh is heavy duty. Space your mars bars and deck chairs at about 1200 and you will be OK. I hope you have a machine to lift the mesh in.1 point
-
Definitely need to take the corners of at least the top sheet of A393 but more than likely the top 2 your detail even mentions that fact.just lay them as is and you'll know exactly what you need to cut then and it's easy to cut in place Yeah the MARS bars are all I'd use for bottom layer they are the right tool for the job, you can break them up by hand as required too.1 point
-
No, best thing to do is nothing! Is it leaking? you should specify what you want if it was mine I would want lead to LDA standard, should last 80 to 100 years it is possible to piece in a new bit of leas with overlaps. stick on solutions will only be a temporary fix. I could letterbox in a small tongue of lead that would last 15 to 20 yrs but that would be a ‘bodge job’ I can’t really see your crack but I hav seen it all before, lead should be laid in sections 1.5m possibly 1.8m long with overlaps1 point
-
You’ll have to email Norris Mucksquirter @guinessbookofrecords for copies.1 point
-
I would want to know what the buildup is. Maybe you could dig up a little bit (or even where one of the plants is coming through) and see. Should really have from top down, tarmac, hardcore, membrane. Find out the depths of the tarmac and hardcore underneath.1 point
-
Tony is correct with the product but you won't want 200mm ones as with 50mm cover top and bottom a 200mm spacer and the depth of 2 layers of mesh and the overlaps you'd be out through the top of the concrete. 150mm spacers would be loads for that. And even then use flying end mesh to avoid issues at corners with 4 way overlaps.1 point
-
https://www.steelaccessories.co.uk/products/continuous-high-chairs-wire-deck-chairs?variant=394873346131541 point
-
Ah OK, yes they were all 3 in 1 taps. So If it's a separate one no problem, but if I want a 3 in 1 then need something like the Quooker combi that does it from the cold water mains supply. Excellent many thanks!1 point
-
possibly slightly softer but not noticed any issues. And yes, hammer and a blunt chisel bit ..!!1 point
-
@Onoff correct on all counts. I wanted a stone / cream finish and the lime also made it compact slightly better. I used an SDS drill just pushed on to the boxing to get it to vibrate the bubbles up to the top.1 point
-
As installed our system has humidity sensors and automatically boosts. From watching it it seemed to me that the outside humidity level has a lot higher impact on whether the boost comes on than if someone has had a shower. In the end I just turned off the function as I felt it just caused the system to run at a higher speed more than was necessary. First I raised the humidity boost point, but in the end just turned it off. I then set it n a programme for speed 1 most of the time and speed 2 a couple of hours a day when people were most likely to shower. Then I decided it was all unnecessary and just set it to the lowest speed all the time, except when summer bypass kicks in. I think unless you notice loads of steam and humidity after a shower it will be fine. In fairness I wonder if it depends on the volume of your house. The regs allow for the same amount of ventilation no matter how big and how occupied your house is, presumably allowing for a worst case scenario. A shower in a 700sq foot 2 bed flat is going to have a lot more impact on humidity than in a 3000sq foot 5 bed house.1 point
-
Just a couple of concrete screws through the tracks will do it. It won’t cause any problems with the membrane - if you’re worried just a glob of LVT sealant under each hole to seal.1 point
-
Build a small services station at the electric meter point, run electric, utilities, broadband etc there and dig a single trench with four conduits in Electric, Water, Comms, Spare to the house from there. You cannot do that with the foul drainage although there is nothing to stop you sharing the foul trench with the conduits, it just needs to observe all the spacings. We did this its been a godsend as everything is in one place, we can isolate the house on all the services and everything is readable at the box. I have still to solve the smart meter transmission to the house as they all seem to rely on proprietary wireless and that is way out of range, there must be an answer to this but I have not run across one yet. (I can read it it via the APP but only after it has been to our supplier.)1 point
-
Our build is a bit similar to @Gone West, we used 300mm I joist but we formed the corners on site and our structural engineer, excellent service, was Steven Evans (http://www.evans-structures.co.uk/).1 point
-
With hindsight, the carpenter should have created space between the plumb cuts of the rafters over the Universal Column (ridge beam), creating space just wide enough to form chimneys either side of the ridge tile batten, but still under the cover of the ridge tiles. The rafters should not have met at the top in the traditional manner as there is no need with the dirty big steel ridge holding everything together nicely. Interesting topic on helping poor bats, good on you.1 point
-
I would use a two part resin car bony type filler and fill all the air bubble holes under where the rubber washer goes and sand flat first, then rubber washer will do it’s job ok1 point
-
@JFDIY thanks for finding that ..! I agree - manifolds wrong way up ..! @David78 you need to get the plumber to switch the manifolds over - Polypipe System isn’t too complicated and it’s a case of swapping the flow and return manifolds and their controls or putting the pump etc on the other end which tbh is probably a bigger job assuming the boiler flow is into the bottom pipe of the mixer.1 point
-
Yeah you just need to get summat like Siga tape. You have plenty of time, they won't wrap that bit till the floor deck is down and walls up. Looking at the pic you could get the membrane in. They working today? If they aren't working the weekend you could bob out and get some and do it quick time, will just need to lift each joist end up as you unroll. Any VCL will do at this point so whatever you can source. As you say, I left it hanging down the outside/inside if the house, once the floor deck went down I folded it back into the house and the walls went down on top of it.1 point
-
Why would the planners insist on grids? Stone is permeable, and can be more so if you select the stone accordingly. In any case, grass grids will need stone under them first, although the planners may not know that. Grids are not cheap unless compared to tarmac or concrete surfacing. If you do go for grid, be sure to choose one that will take the weight of the biggest vehicle you expect, , and to put enough structure under the grass grids or they will just sink too. There is a middle way, using grass mesh. probably the thicker one, like this, but I don't know your circumstances. I am reluctant to suggest costs, so it is best you check out the technical options first.1 point
-
1 point
-
From looking at your image from the inside of the roof it looks like the steel does sit inside the thermal envelope as the joists filled with pir rest on a ridge beam that rests on the steel. Re the vents - do you have the detail drawings produced by your architect/technician for the roof? Even before your change from sheepswool to pir insulation and bitumen felt, there would have been a 50mm ventilation gap specified for the structure?1 point
-
use them for the undercoats too, makes life easier and no brush marks0 points
-
I am a very recent convert to the Johnstones range of water based glosses: their Aqua range. The undercoat is simply awesome and the gloss pretty damn good for a water based paint. It dries quick with no real smell but has just enough time in it to brush out. Although a short fake mohair roller works best. Trick is not too put on too much of either undercoat or gloss in any one go and, paradoxically, don't overbrush it/stretch it out. If you do it loses its shine. Existing painted wood, use rough paper, eg 40 grit to 60 grit. For keying surface of painted wood I use 60 to 80 grit. For flatting undercoat or between coats probably 120 grade. I wouldn't consider 140 rough at all. For painting on top of varnish or lacquer try BIN 123 by Zinser: awesome methylated spirits based primer/sealer Cheers Neill0 points


