
Leaderboard


Popular Content
Showing content with the highest reputation on 01/22/17 in all areas
-
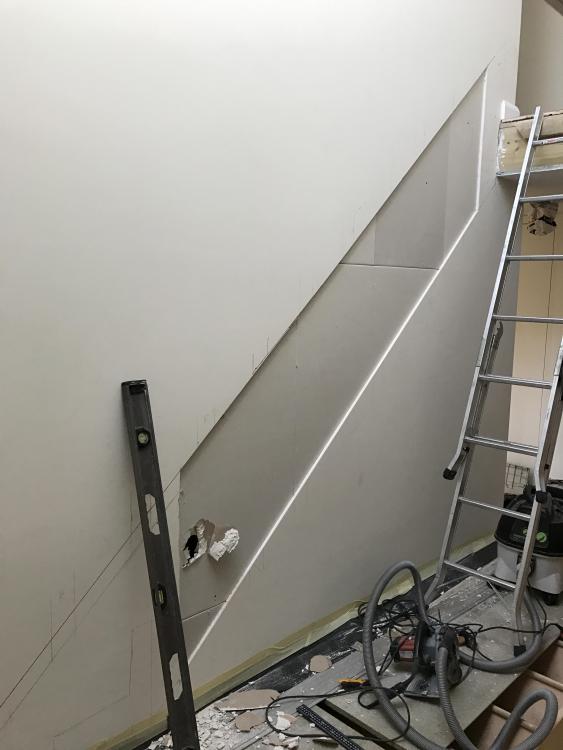
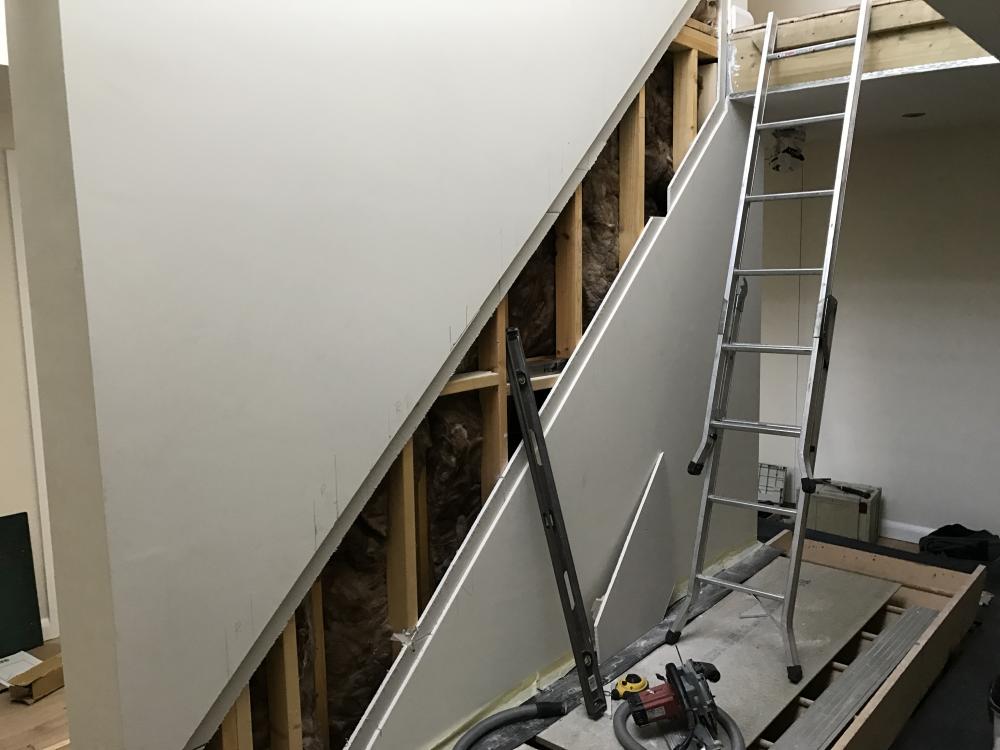
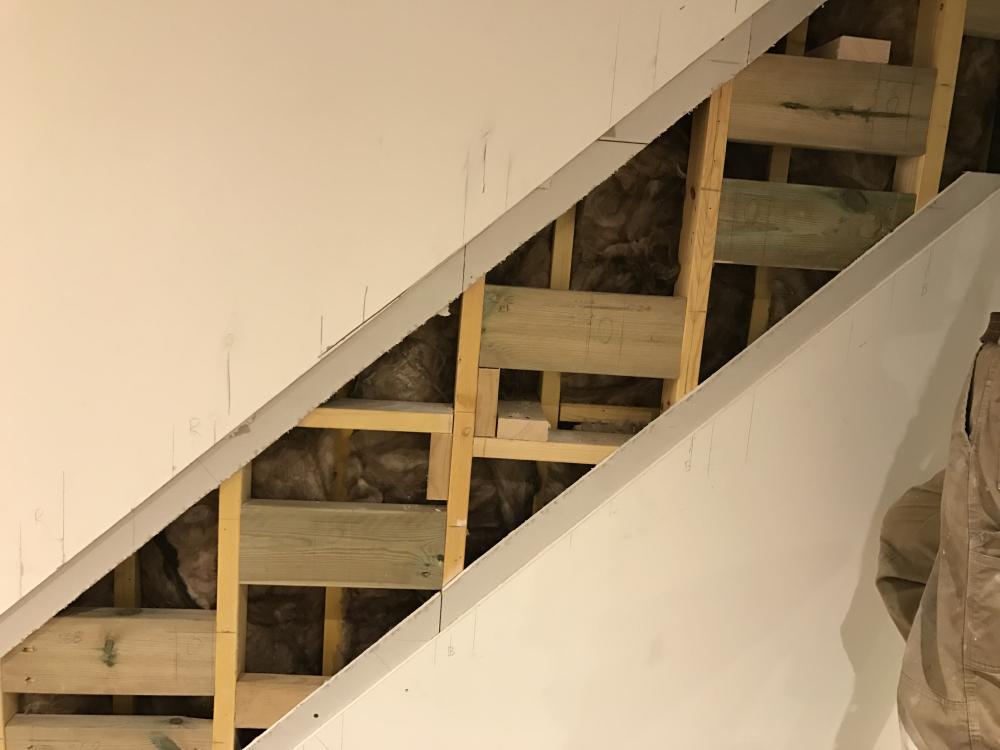
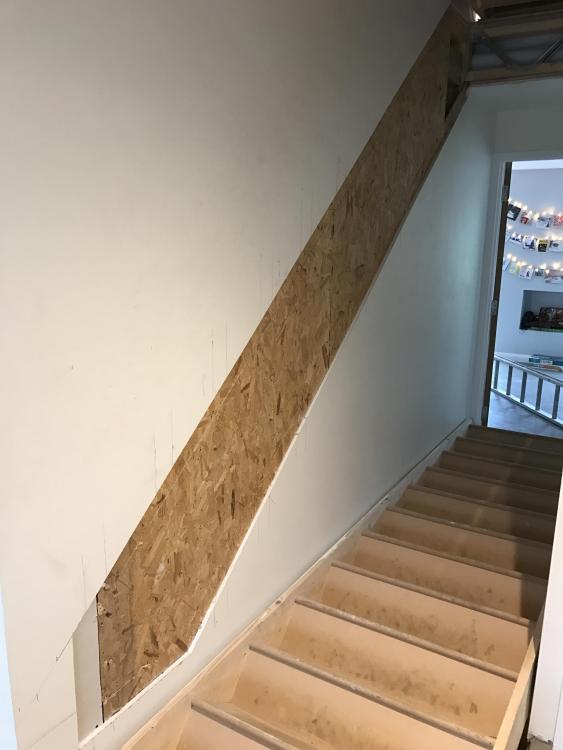
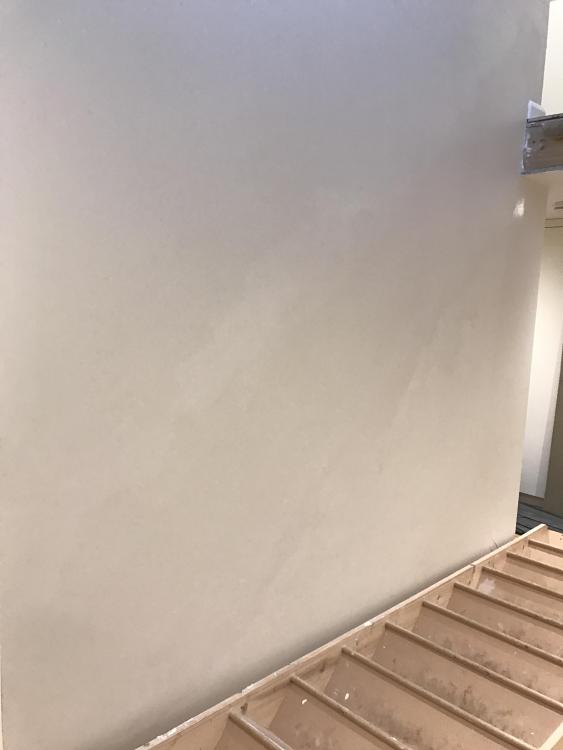
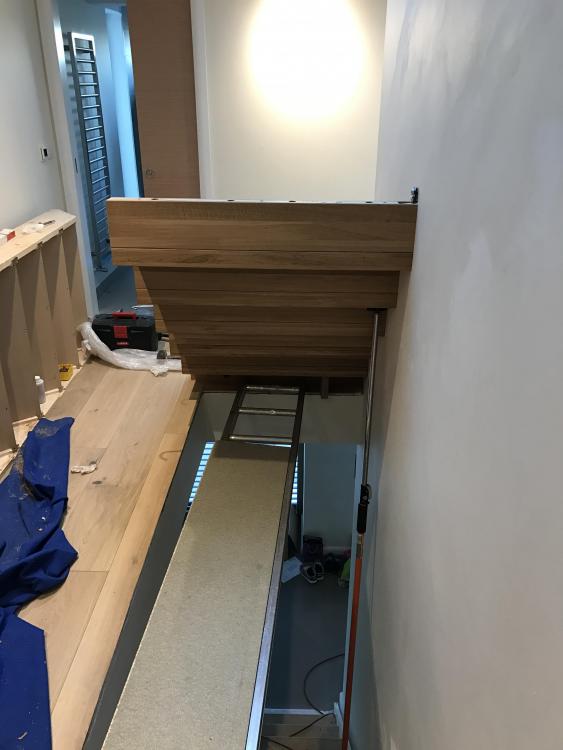
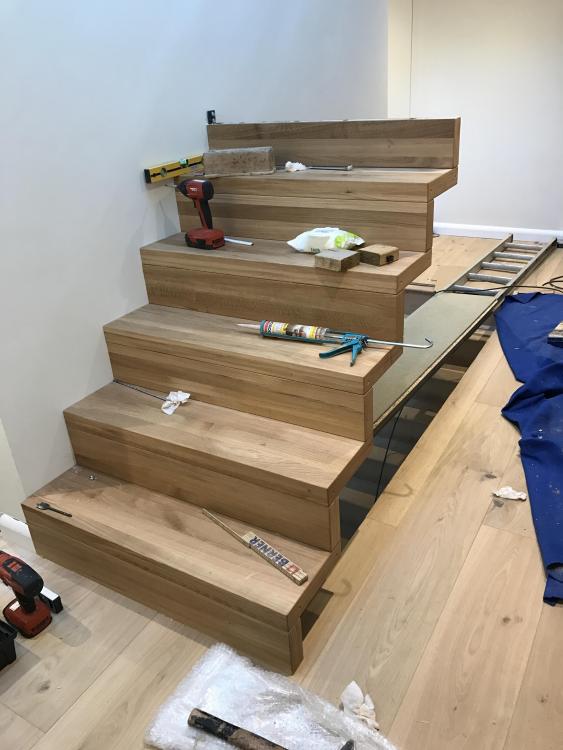
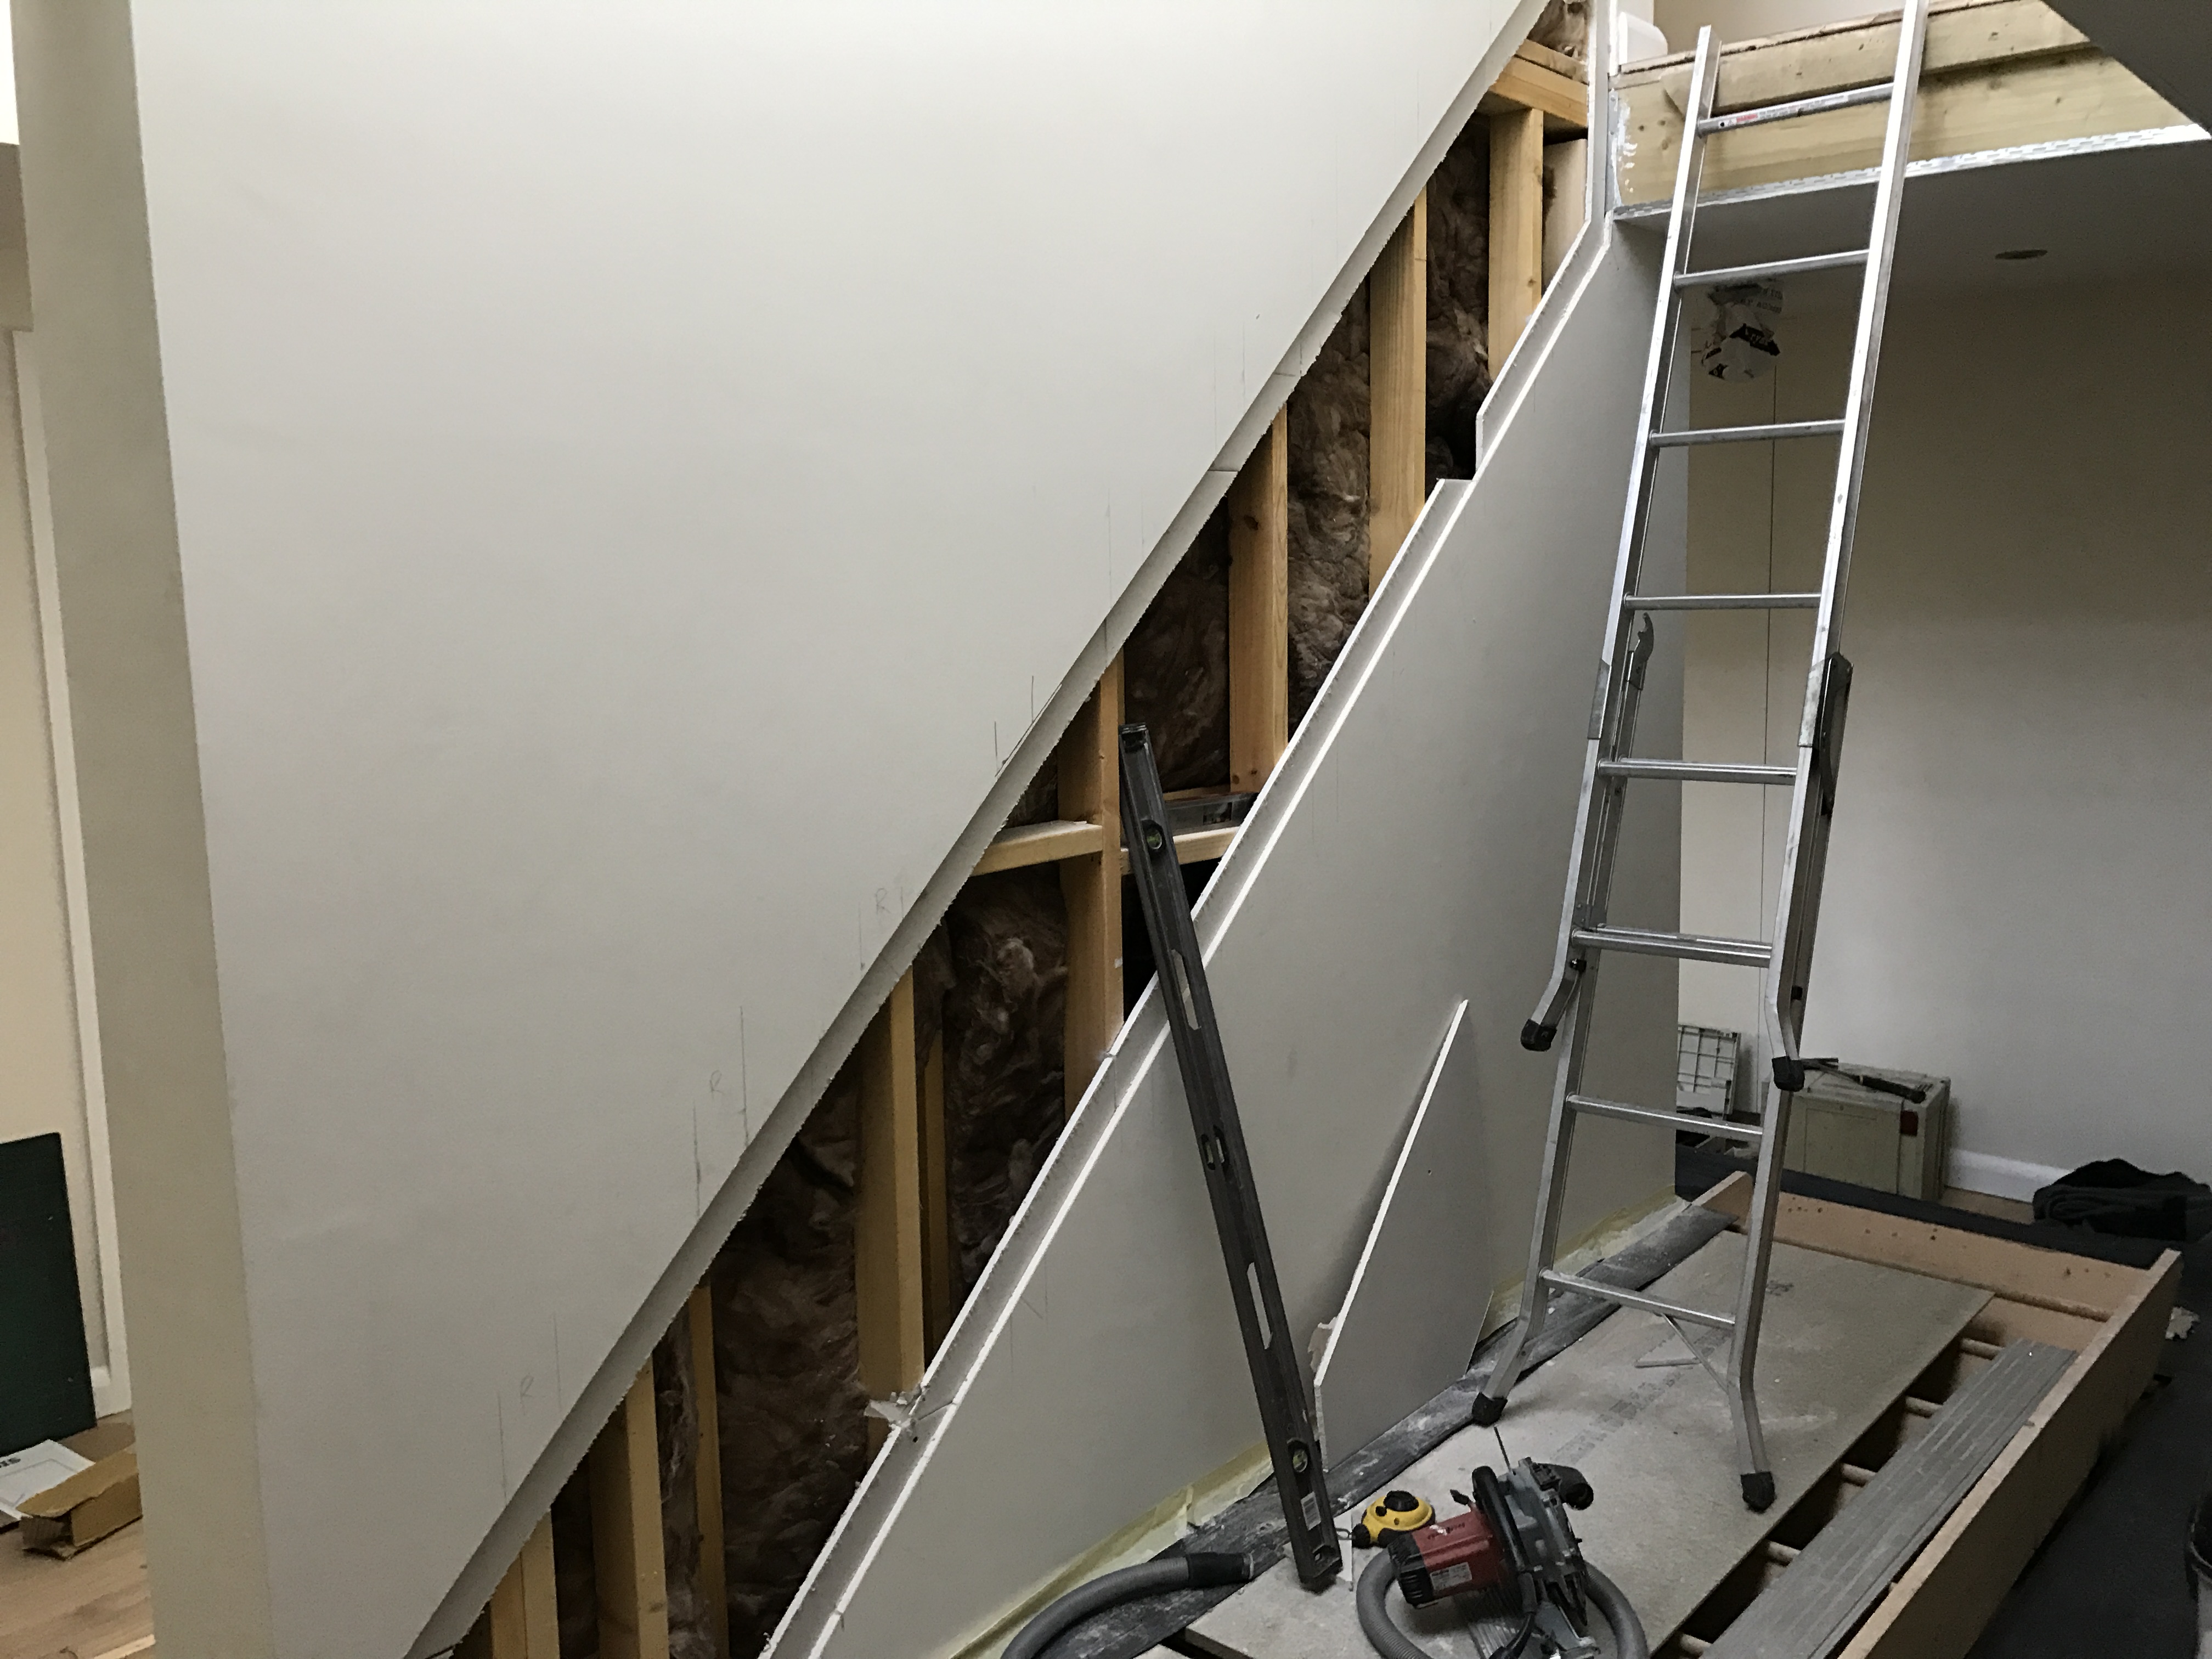
Back to the stairs. My joiner tackled the reinforcement after xmas, three days to chop into the wall, reinforce and make good. Stair guys came on Saturday and there were a few nail biting moments while they drilled that first hole. Almost finished now, just some glass to go in and a bit of detailing. Looks like the top floor is uneven, gains 10mm over a metre - likely the underlying floor vs the oak floating above. Stair guys will manufacture a new top piece which will hide the slope.

 5 points
 -
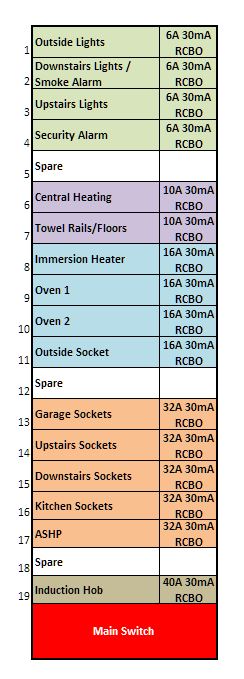
Personally, Bedrooms on 2x 16a radials, Living room on a 16a radial, garage, C32, (what about that welder?) Smoke alarms with U/S lights ASHP prob needs a C as well Be careful on your selection between Bs and Cs, makes a big difference. Just a thought,2 points
-
Gotcha!!! Not paying attention! http://www.tonyshouse.readinguk.org/tony.htm Not sure Tony invented it, because this sort of wrap is pretty standard on timber constructions, though most block-built houses are just allowed to leak from what I see1 point
-
Don't forget to put a fold in it before you attach it to the floor. It will allow the floor and roof to shrink and expand and not rip the vcl.1 point
-
Right... had a quick rework and based on a 21 way unit I've ended up here.. Just so we are aware, that boiler run is about 4 ft in the same room btw as this is all in the plant "cupboard"...
 1 point
 -
Not a lot happened over Christmas and New year while we waited for the builder, Patrick, to arrive to remove the pillar between the kitchen extention and the middle room. We initially decided to not remove the pillar but after great thought, it seemed to be the best thing - it would create more light into the dark middle room and hopefully it would make the kitchen easier to fit out. And at a cost of around £2k it was a large chunk of the budget. This is the view across the room, into the kitchen from a couple of months back. You can see how dark the middle room is. This one makes the room look bigger than it will be as we have removed the bathroom wall - it currently has an open plan loo.... The RSJ's in the garden - our only snow of the winter so far. Very exciting day when it all got going. but then, I am easily pleased...... The back wall of the house is a thick rubble wall while the kitchen extension was only build a couple of decades ago so of normal construction. But I dont think any of us realised how large the stones were in that rubble wall. Getting the RSJ's into position - I wouldnt have thought of doing that and then once all the props were in, I wouldnt have been able to bring in the steels. Good job we had an expert! This shows some of the rocks taken out of the back wall in the bedroom, above the middle room. The view into the kitchen! There had been a pillar to the right of the wall being removed on which the RSJ would sit but once exposed, Patrick was not happy with it. So he removed it all and build a new pillar. The unexpected advantage of doing this, is that now the new wall will be level with the rest of the kitchen wall, making it much easier to arrange kitchen units. This is the new pillar - much better! Patrick and the OH removing the current wooden beam. The new steels are in place and the middle room joists are refixed with steel hangers. Then its my turn to get busy. To avoid too much mess, I took out the bricks and stones individually and was able to clean off the lime mortar to leave a rather large pile of perfectly useable bricks. So this is how it looked on Saturday by the time we packed up. What a difference! we are thrilled. And we have now decided to have a U shaped kitchen with a breakfast bar where the rest of the wall is. Thats the next project for me - plan the kitchen units and get prices from Wickes, Howdens and Ikea. Hopefully before the sales run out next week. Even if it means storing them in the garage till we need them, if we can get a good price, it will be worth it. And does anyone need any large cotswold stones?? we have a few.1 point
-
Looks to me like a 'turn' lock. Ie. Locking the turn function, so it can only be tilted.1 point
-
He can't, sorry, due to copyright laws I just made up1 point
-
I'll gladly post you my home brew, Welsh designed rig to borrow. I'll change the 16mm fittings to 15mm of course:1 point
-
Any radials for fixed equipment I've ever put in have always been on either a 16a or a 20a breaker / rcbo and in 2.5mm2. The derating always got done at the termination point eg fused spur. There you select the fuse rating accordingly for the connected equipment. My choice here would be to install it so you can hook anything up later without worrying about loading. Fwiw I've never run a radial less than aforementioned, only ever deviating when it's outside lighting etc where I use 6a or 10a accordingly. Just can't see any point in running such a low powered radial unless you plan to run 2.5mm2 anyway ( which would leave you the option to upsize the breaker later on if so required ). I'm a bit old school that way tbh, but that's how I got taught as an apprentice spark with SWALEC. If your 101% sure it'll never be needed then take what I say with a pinch, but better to put it in now than later. Remember that you'll need a fused spur or a socket anyway ( so as to get localised fused connection at the termination point ) so not much more money tbh.1 point
-
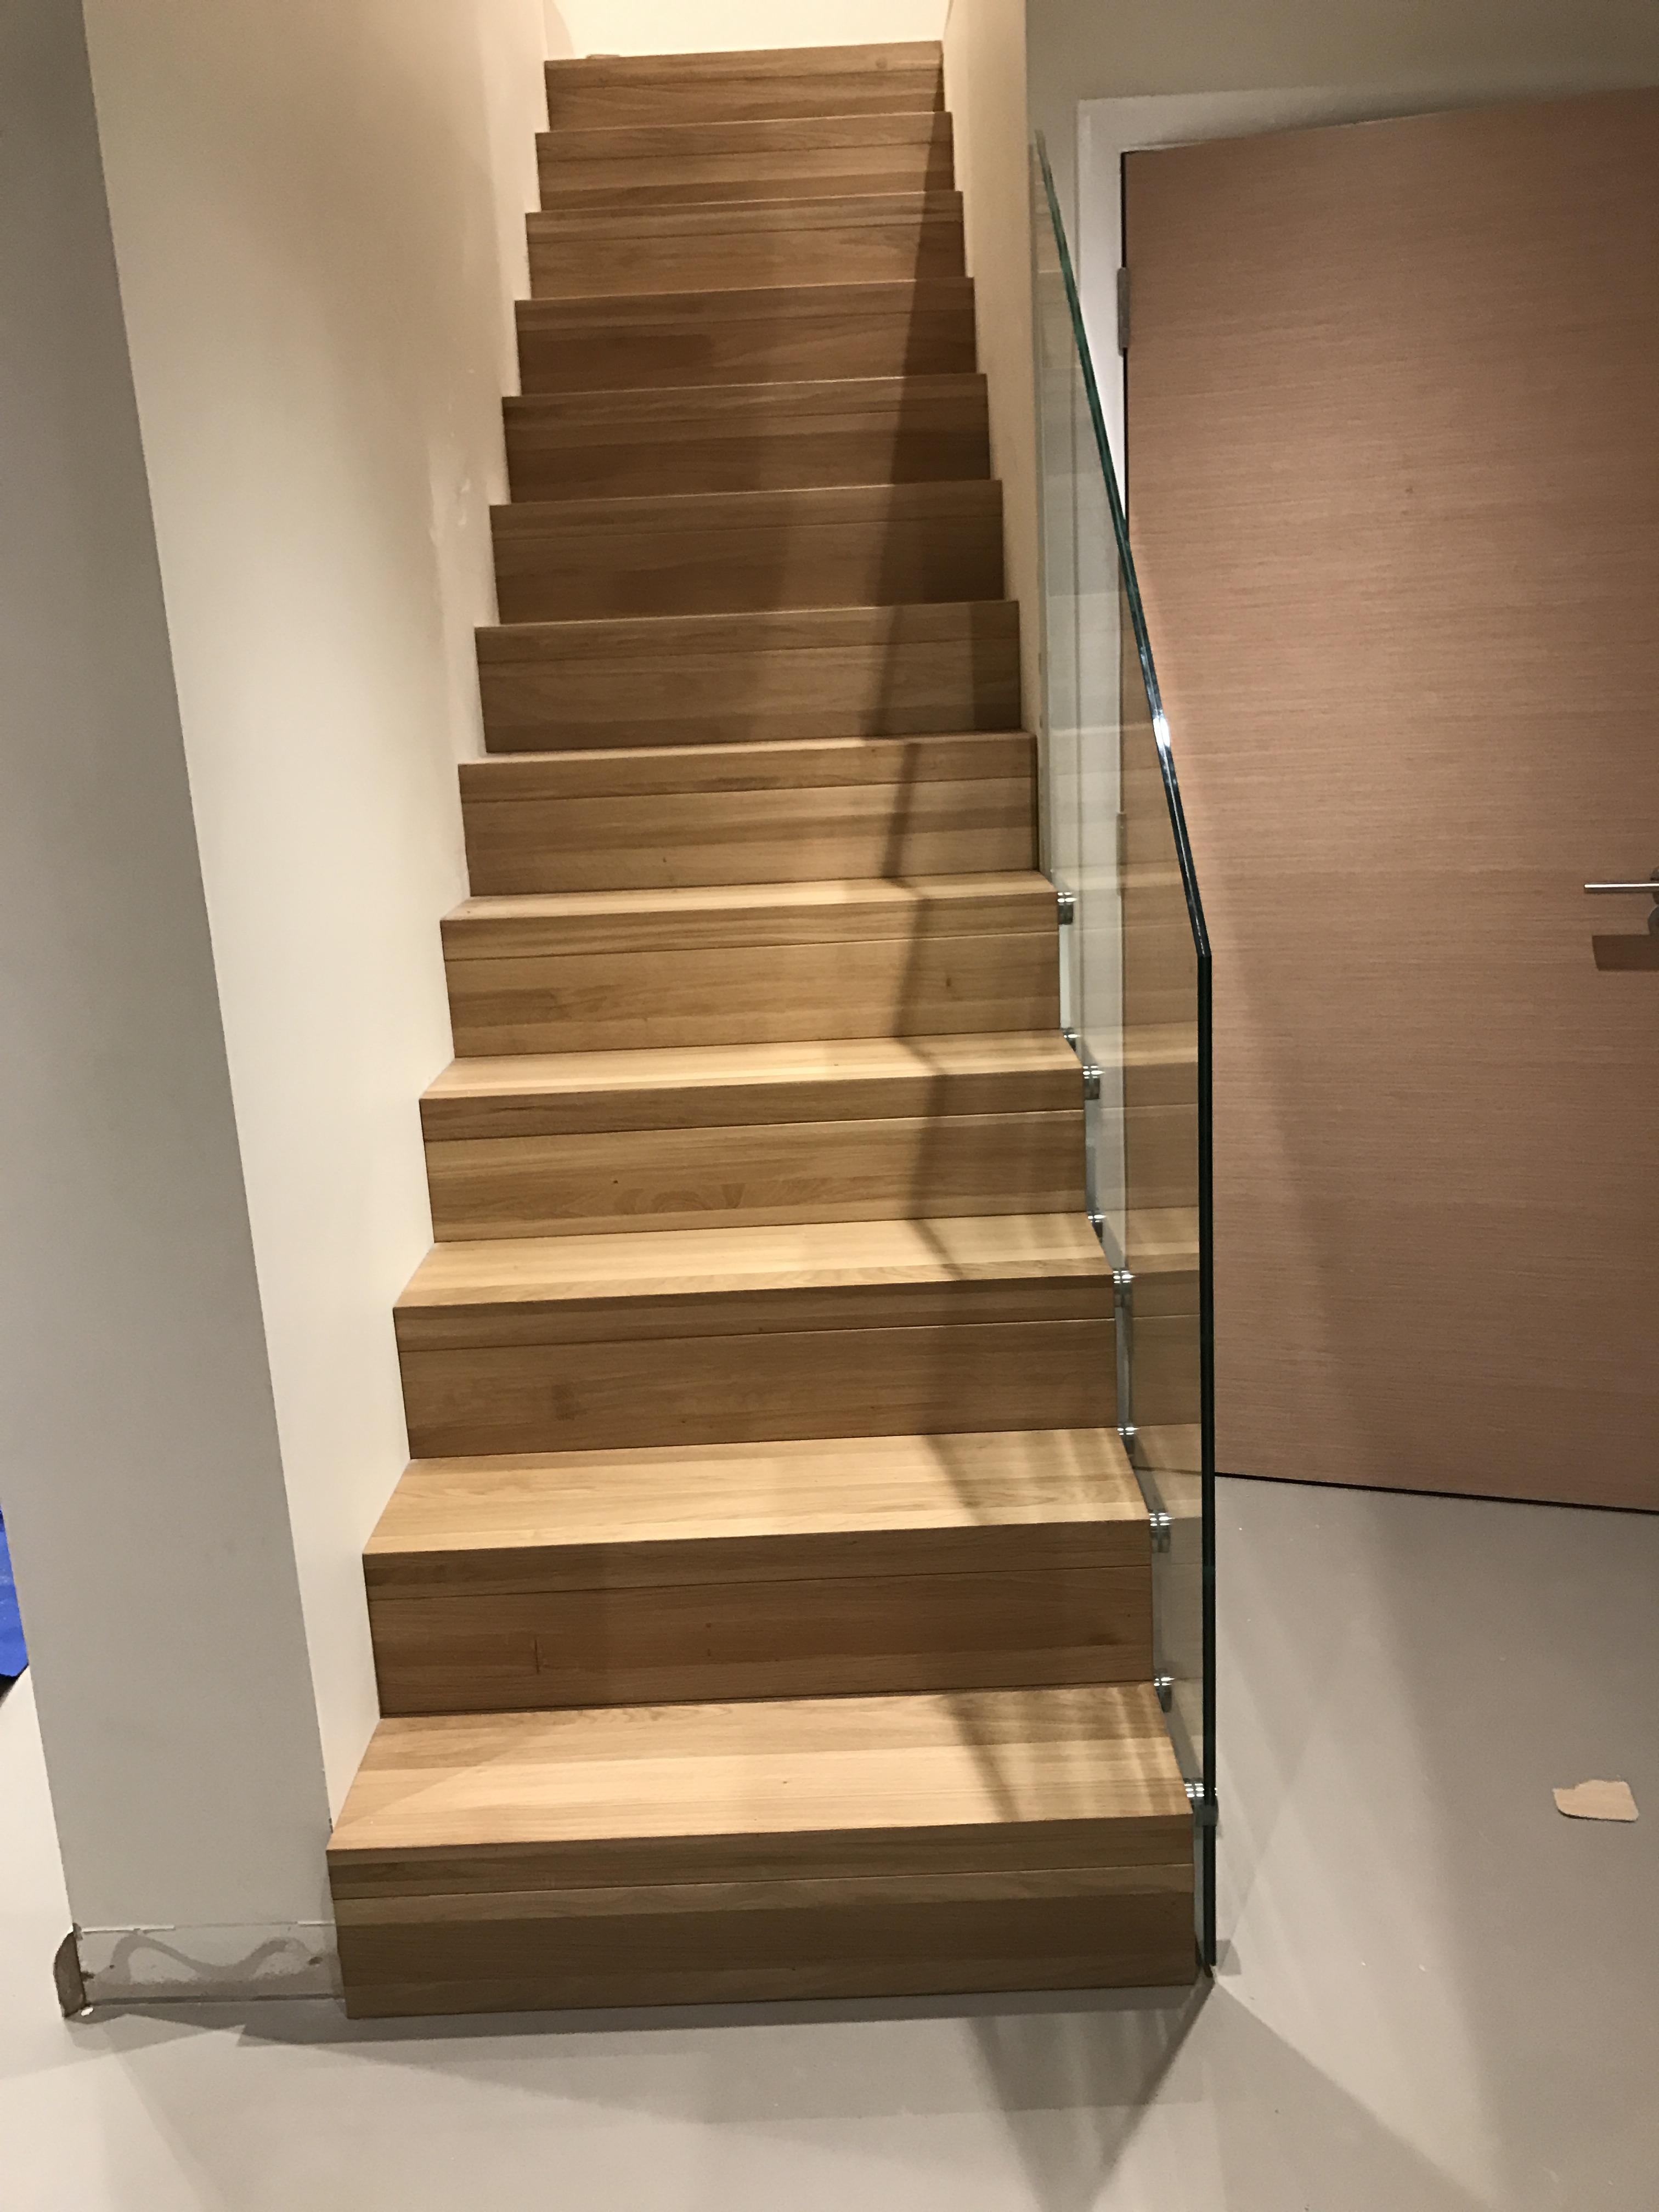
In conclusion I learned a few things from this: 1) don't order stairs until your finished floors are complete and walls are plastered - final dims can change from drawings and you don't want to be hacking expensive stairs about to fit. Also check what support your stairs need - if not sure a big wodge of timber in the wall to cover all eventualities is probably not a bad idea. 2) if you're after a certain look that's really important to you, don't compromise. I'm glad we held out and went for the more disruptive option to get the look we wanted. 3) most mistakes can be remedied and often are not as drastic as first though. 4) removing and reinstalling MDF staircases is a great way to stay fit. The three that we have must have been in about out a dozen times each during plastering, painting and this recent malarkey. Considering selling them as a keep fit accessory. Seriously though, what to do with 3 x Jewsons softwood & msg stair cases?1 point
-
Yes, we have laid no council tax for ages but I still put a bag of rubbish out when I stay in the caravan. No one told the dustman.1 point
-
Put the oven on it's own circuit as noted. Also make sure there are 2 or 3 spares ways in the CU, e.g. you might want an electric shower, and of course one for the solar PV. Mains drainage if not a circuit for the treatment plant. I have a broadly similar mix in a 20 way all rcbo board.1 point
-
Piranha nuts still require the gland to be made off in the same way, they are really useful for glanding into a non metallic box though, where a normal gland and nut is of no use. Its also very common to see the wrong type of glands used, and glands made off incorrectly. Even by so called electricians, the amount of times I've saw BW 's used when it should have been CW (IP rated) , and also quite often CW made off incorrectly, External supplies really do require a decent understanding of earthing and how to terminate the proper cables properly, its not really a diy job IMHO , beyond perhaps installing the cable as instructed by your electrician.1 point
-
From my experience you are right and the types indicated are low risk and will come under non-licensed work so you can remove yourself or you can ask your demo contractor to do it for you. if you go on the HSE website there are some standard method statements for quite a few situations which you can print and use.1 point
-
You probably do that all ready without having to do that !!! [tee hee].1 point
-
It seems I started something when I did this a couple of years ago, as an experiment (and it does work). As Nick says, you don't have to Y into the flush pipe. The flush pipe is open into the air space above the water level in the cistern, so you can just add a connection to the cistern, rather than the flush pipe. I used an unused knock out on the side of our cisterns to ft the extract pipes, there is a photo here: http://www.mayfly.eu/housebuild/part-thirty-two-more-on-mvhr-and-nasty-smells/ about three quarters of the way down the page. Space was a bit tight, so I had to cut things around a bit to get them to fit, and I also have to put some alloy self-adhesive tape around the lid joint to make the cistern a bit more airtight.1 point
-
The electricians on this forum are a bit more friendly and will try to help. You definitely can bury SWA direct in the ground, that's what it was designed for. And terminating it in glands is not particularly difficult, but I guess I have had plenty of practice. The concentric cable that the DNO's use is not recognised in the wiring regs (they have different regs to work to). And in any case it's only a 2 core cable. There is a variation on that, split concentric, where half the outer cores are bare, to be used as the earth, and the other half are sleeved, to be used as neutral but that does not strictly meet the requrements for direct burying.1 point
-
Check out Pratley boxes for imo the best you'll get mechanical protection wise.1 point
-
If you do a search this has been asked about on a few forums. for some bizarre reason, armoured cable questions seems to meet with real hostility! I had noticed that when searching and then I posted a question about the size required on a DIY forum and the vitriol from a couple of people was astounding! (I actually blocked them so I don't have to read the snide remarks) I think it's some professional electricians getting protective about people doing their own work (even if it's being properly certified). Which is odd as my father was a professional electrician and certainly was not like that, so it's not an "electricians" thing. My own understanding is that you MUST use armoured cable. But you will find the definitive answer as regards the regulations HERE1 point
-
Yup,Tony also mentioned the alternative of using hangers plus sealant, but be aware that you can get air leaks particularly in the risers between blocks if not fully filled; that's why the render suggestion is made. Alternatively is you haven't hung the joists just hang a strip of air tightness membrane around the wall at floor void level and punch the hangers through it and seal each one.1 point
-
Just wanted to say what a simple but genius idea, makes marking so much easier1 point


This leaderboard is set to London/GMT+01:00