Search the Community
Showing results for tags 'mvhr'.
-
Hi, As background we have recently completed a deep retrofit of my 1960’s family home housing three adults and three children. We added an extension, new roof and are aiming for an EnerPHit standard of thermal performance and airtightness. Measures included new triple glazing for half the windows, IWI and CWI insulation, lime parged walls, air tightness taping throughout the house, new air source heat pump and an MVHR system. A recent air tightness test has shown we have gone from a leaky 15 ACH to 5. The test was done with 14 year old double glazed PVC windows and an air conditioning unit left untaped, knowing they are a little leaky. So far so good. Three months ago, after a long wait, we switched on the MVHR system: A Zehnder Comfoair Q350 and steel ducts from 21 Degrees who also designed and commissioned the system. The commissioning process didn’t go to plan as a young engineer connected up the waste pipe to the wrong side of the machine, causing a leak a few days later. Fortunately, this was found quickly, and the waste pipe was switched over. Unfortunately, the system, hasn’t performed as well as I had hoped. I did ask 21 Degrees if it had been damaged and to their credit, they sent another engineer over who found it hadn’t. Here are the issues: The kitchen and utility rooms seem to be clear of condensation but the two bathrooms, after hot showers, remain damp after two hours and longer, so we have reverted to opening bathroom windows until the condensation has cleared. We chose not to have extraction fans fitted in these rooms, believing the MVHR extraction vents would suffice. Sadly, increasing the ventilation rate from the normal ‘2’ setting to the high ‘3’ setting makes no difference. I noticed the downstairs bathroom outlet has less suction power – perhaps a third lower than the others - unable to hold a paper tissue on the normal or high settings. I should say here, adjusting the outlet vents doesn’t make a difference. Questions 0. Are my bathroom extraction vents not working properly? 1. Should an MVHR system be able to clear bathrooms of condensation? 2. Speaking to 21 Degrees I was surprised to hear that they don’t expect the system to clear the bathroom condensation. Am I right to feel disappointed here? 3. Is it a balancing issue, whereby the supply and extraction vents need adjusting by someone, unlike me, who knows what they are doing and has the right tools? 4. You can feel the soft gentle supply of air from the supply vents but, unlike some MVHR users on this website, the circulating air flow sees lame, i.e. it doesn’t whistle under closed doors. My air supply flow can only be felt close up at the outlet ducts. Is something wrong here? I am about to lay my carpets and cut my doors to keep the recommended 10mm air gap beneath. If there any issues with the MVHR system I would obviously like to address them before this. I appreciate any thoughts and help with this. Thank you Ian
-
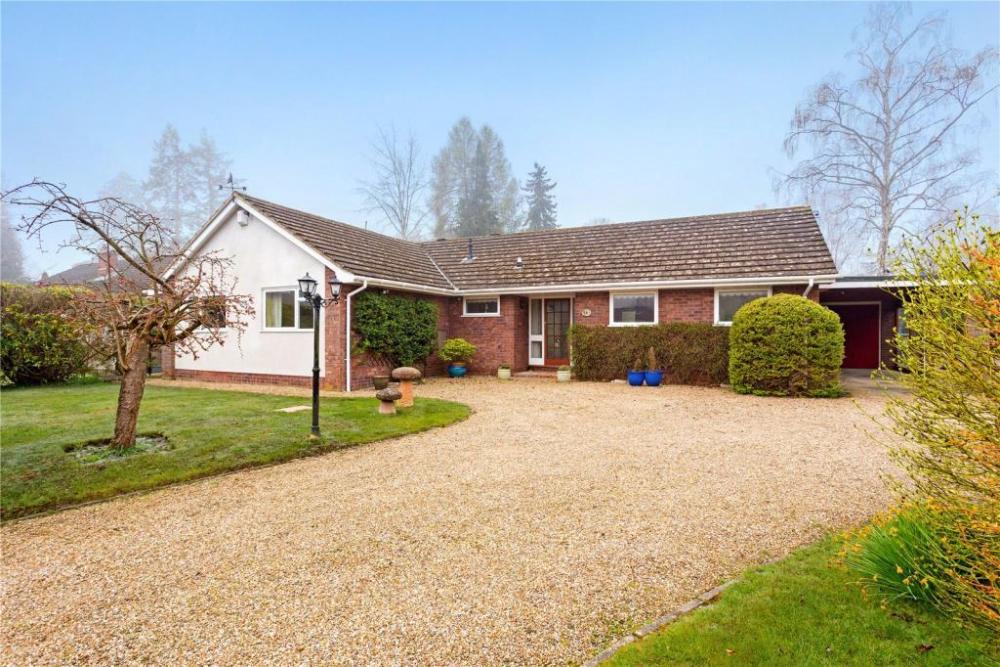
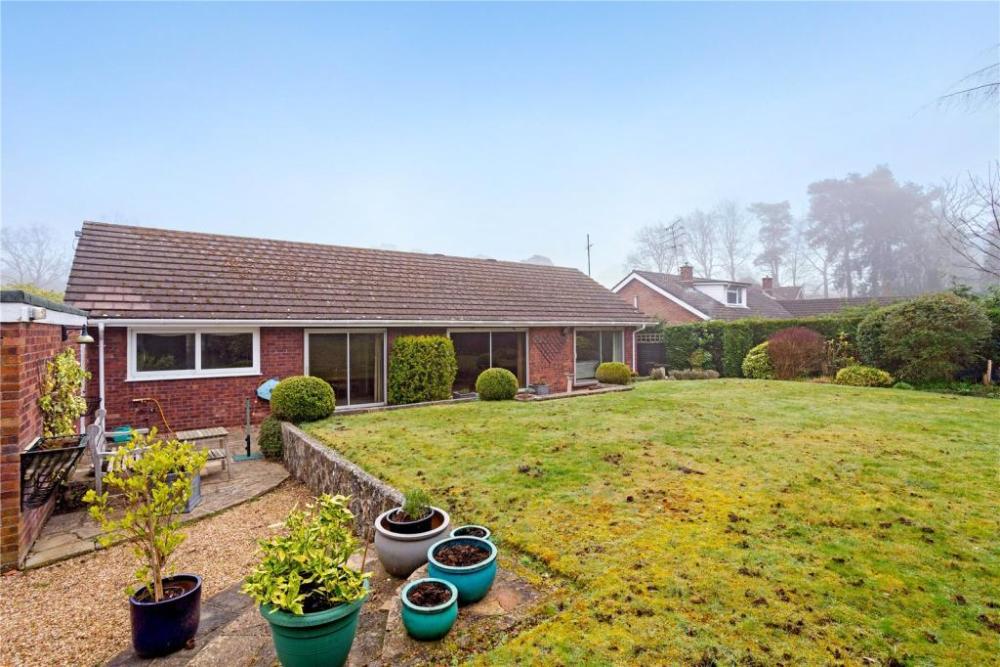
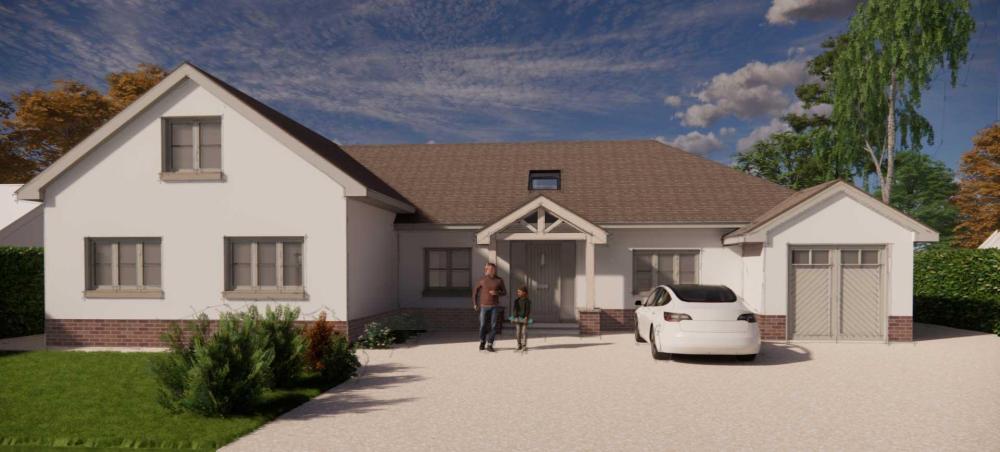
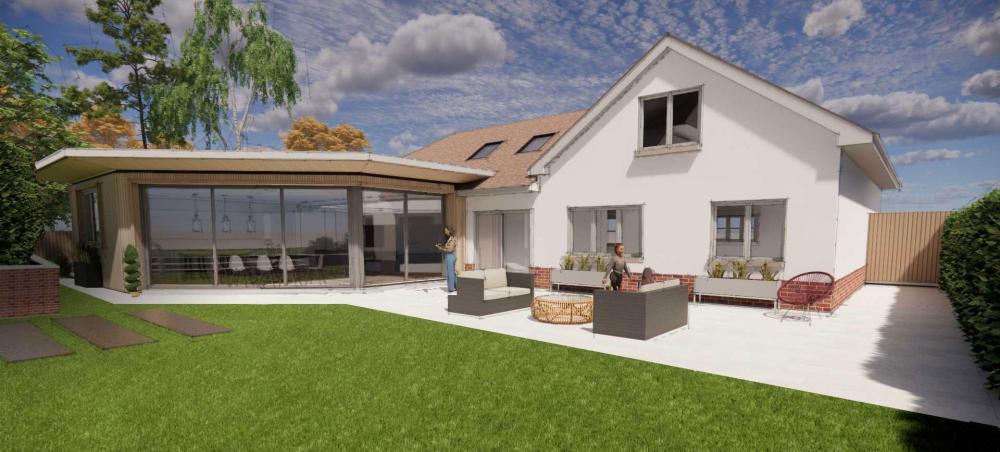
Hi all 👋🏼, I wanted to introduce myself and our project as I anticipate I'll be in hot pursuit of the forums thoughts, opinions and experiences in the forthcoming months. We purchased a 3-bedroom 1970's bungalow in August 2022 but had some planing complications due to a parish council policy that attempted to dictate that "a bungalow must stay a bungalow". 15 months later our planning application was finally granted, albeit with some compromises. Here's a few points on what we're attempting... Replace existing roof (& ceilings) entirely, building up the walls ~80cm, adding a new roof with 1.2m increased ridge height and steeper pitch Upstairs will accomodate two bedrooms, bathroom and "breakout area" overlooking hallway void Large single-storey flat roof side and back extension out to locate 65sqm kitchen/diner Complete re-configuration of downstairs layout Complete replacement of heating system (gas will be cut off entirely) New ASHP (current thinking Valliant Arotherm Plus, one-zone, no buffer) UFH all-round on ground floor (retrofit lo-profile UFH on top of the existing slab (Wunda?), insulated/screeded in new extension). Possibly fan convectors in bed-rooms upstairs Complete rewire I would assume MVHR (current thinking is a radial system installed through new posi-joists, manufacturer TBH but will get BCF to design) New solar panels, and battery (current thinking GivEnergy to unlock Octopus Intelligent Flux) New double-glazing all round (Residence R7 probably) also 2.7m high, ~8m wide sliding doors at rear (either Corteso Cor-vision or Minima) The biggest grey-area for us at the moment is how much to focus on/invest in improving the insulation and air-tightness of the existing exterior walls. I'll raise a separate thread for this in due course. Fortunately we were able to leverage a second mortgage and keep our existing home so we don't intend to live in the place whilst the majority of the work is taking place. The properties are only 0.5 mile apart so I am hoping I'll be able to keep a close eye on the build whilst I work from home. We are also intending to do a little of the work our-selves as possible (i.e. fitting MVHR, UFH, painting & decorating, airtightness membrane?, etc). Thanks for having me and in advance for any advice, Ollie Fleet, Hampshire Plans 24 OD - Amendments Combined.pdf Concept Images Existing Images
-
I am planning on upgrading my 10 year old PIV system to an MVHR. What kinds of efficiencies should I expect at current temperatures (-2.5c). My PIV churns out a draughty 7c and that is with the 400w heater enabled. i would ideally like something above 19c (internal temp is 22c 24/7). I have my eyes on the Zehnder Q350 which goes up to 96% but they do not produce charts on how that performance degrades as the temperature drops.
-
Hi all. I've just moved into to a new(ish)-build apartment with a Nuaire MRXBOX95. There seems to be no ventilation in the bathrooms, and the apartment management seem very confused about how the MVHR is meant to work. It would be great if anyone could confirm or correct my understanding of the system, which is this: The MVHR unit ventilates 24 hours a day on a low power "trickle" mode When a bathroom is in use, the system should operate in a high power "boost" mode Boost mode would be activate via the bathroom light switch (as my bathrooms have no dedicated "boost" switch) Does that sound like a typical system? Am I understanding "boost" mode correctly. Are there exceptions to any of the above? Thanks in advance.
-
I'm unsure if this is best posted in Boffins corner or MVHR being ventilation heat loss related. When planning my self-build heating and ventilation system, I've learned a lot of things, but some are a little out of my grasp to fully understand. It's very theoretical and I'm unsure how some of it plays out in the real world. So, I'll post what I have, and see if anyone with a good understanding of it all can advise me or correct anything I'm wrong with. You can over size or undersize a heating system, but undersizing is a more of a concern to me, especially with under floor heating pipe spacings. The property will be 200m2, masonry cavity wall construction. Without going into every sealing detail I've researched, I'll be applying a lot of attention to airtightness and aiming for the lowest score I can. I'd like to achieve 2ACH @50PA if possible and will have MVHR installed. I've completed a heat loss survey using some popular software, & tried various things to see how it impacts the end result. Being a self-build, I've been lucky enough to obtain the exact U values for all of the construction materials I'll be using, from the manufacturers, but there's still a couple of things that could have a large affect on my total heat loss. My maximum heat loss will be 5.7Kw, this includes me selecting the exposed area tick box to all rooms with an outside wall. I believe this adds 10% on, so if I removed it, the property could be 5.1 Kw I selected it to air on the side of caution with it being detached and 3 miles from the NW coast in the lake district, where the wind and rain can be heavy at times. I was told that this has less impact on properties with good levels of airtightness, should I leave it on or remove it? Airtightness: The heat loss software defaults most rooms to 0.5 ACH, except, Kitchen 1.5 ACH Toilet 1.5 ACH Bathrooms 1 ACH I believe 0.5 ACH derives from the worst case air pressure test result to obtain a pass. Building regs lowest pass limit was 10 ACH@50 PA, (Now apparently 8 ACH) which is terrible, I'd expect an average new build to be around 5, higher standard 2 ACH, and passive house 0.6 ACH. 10 ACH @50PA / 20 = 0.5 ACH. Is 20 the correct figure to divide by? If I achieved 0.2 ACH @50PA / 20 = 0.1 ACH. This lower air change per hour, input to the heat loss software would severely reduce my property heat loss. Without trying it yet, I'd guesstimate to be 3.5Kw which I'd not feel confident was realistic. If I should reduce the ACH from 0.5, how much do you scale the other rooms by with higher values? Do I play it safe and leave the ACH at their defaults, and if wrong, at least it's consistent for all rooms. Once the MVHR design is complete, their room by room air flow rates will likely affect this again, which I've glanced at, but one step at a time. The MVHR designer doesn't factor in heat loss and heat engineers don't factor in MVHR ventilation rates.
- 19 replies
-
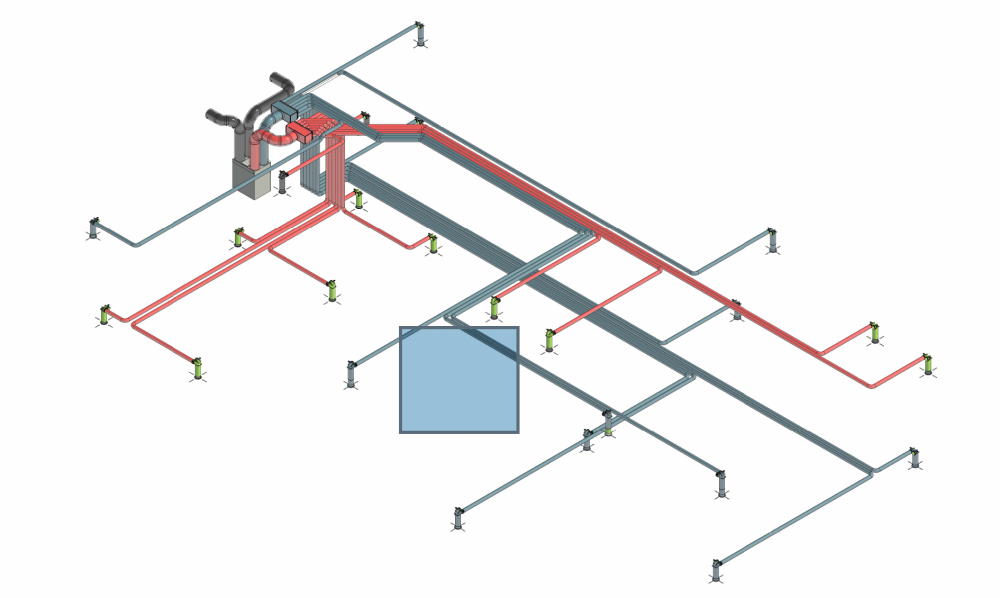
Leafing through the Frankische catalogue I saw the floor mounted MVHR outlets (as Blauberg, Zehnder, Ubbink et al all sell) and the penny dropped that this would simplify duct runs to the first floor bedrooms, cutting the length of duct runs in half and reducing boxing in and loss of wardrobe space. And it would position the supply at the opposite end of the room to the door, which the skeilings prevent if the outlet is in the ceiling (it has to be halfway across the room towards the door). Every manufacturer sells floor outlets, but hardly anyone talks about them. The only mentions I found on Buildhub were @jack in 2022 and 2017. In theory floor-mounting might result in slightly poorer mixing, or create draughts which wall and ceiling mounting avoid. Though for draughts the floor mounting opening is larger, so lower velocity air. Any real-world experience in addition to @jack's?
-
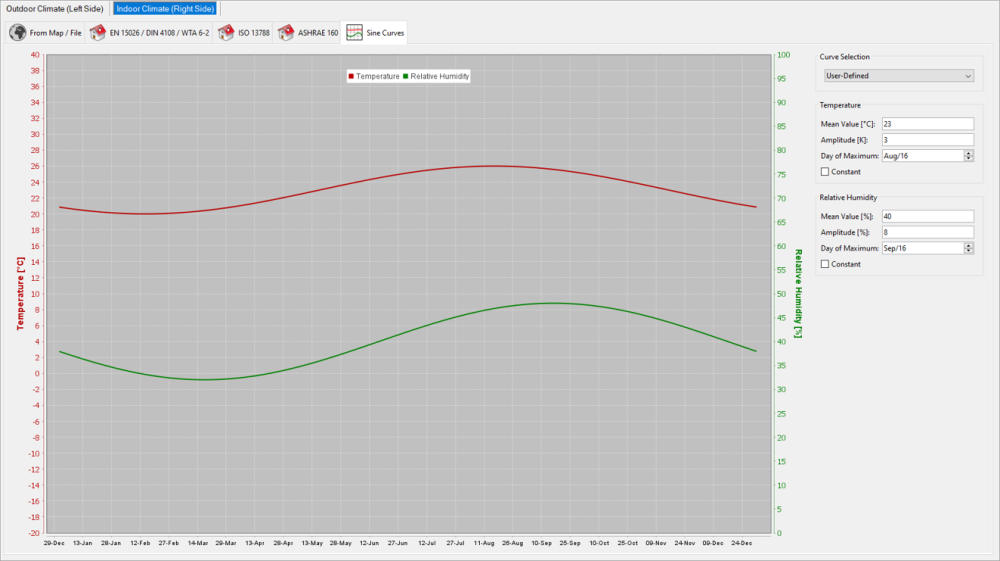
As per the title, I'm wondering if anyone with MVHR has kept a log of internal temperature and humidity data. I'm playing with the free version of WUFI, and while it can derive the internal climate by adjusting external climate data to take into account heating and aircon, there's nothing for MVHR. Which seems a surprising omission, unless it's only in the paid versions. In the absence of that, the next best option would be to define sine curves for the internal temperature and humidity, but there seems to be a lack of easily discoverable data on that. I've posted my initial guess below, but it would be good to have something to validate / correct this against:
- 40 replies
-
- mvhr
- relative humidity
-
(and 3 more)
Tagged with:
-
A wood burning stove question for those building an air-tight, self-build house with MVHR, I have two questions: 1. What is your stove of choice, as needs to be direct feed and air tight to not affect the balance of the MVHR 2. Can you self-cert/install, letting building control know you are doing so and signed off on completion of build?
-
I have read that dips in ducts can gather condensation. Is this only an issue for exhaust ducts carrying moist air? To explain, we are running ductwork along the eaves in the warm loft but then changing direction 90 degress to run parallel to the ceiling joists to the MVHR manifold. At some time in the future we would like to board the centre of the loft hence we would need to dip the ductwork into the void in the ceiling joists and then bring back up into the loft space the other side of the roof. Hence the dip in the duct under under the boarded area. We only need to do this for two supply ducts so hopefully no condensation and no issue. Also, is it ok to run the ducts on top of 400 centre joists or board the loft at the eaves first? Or am I overthinking it?
-
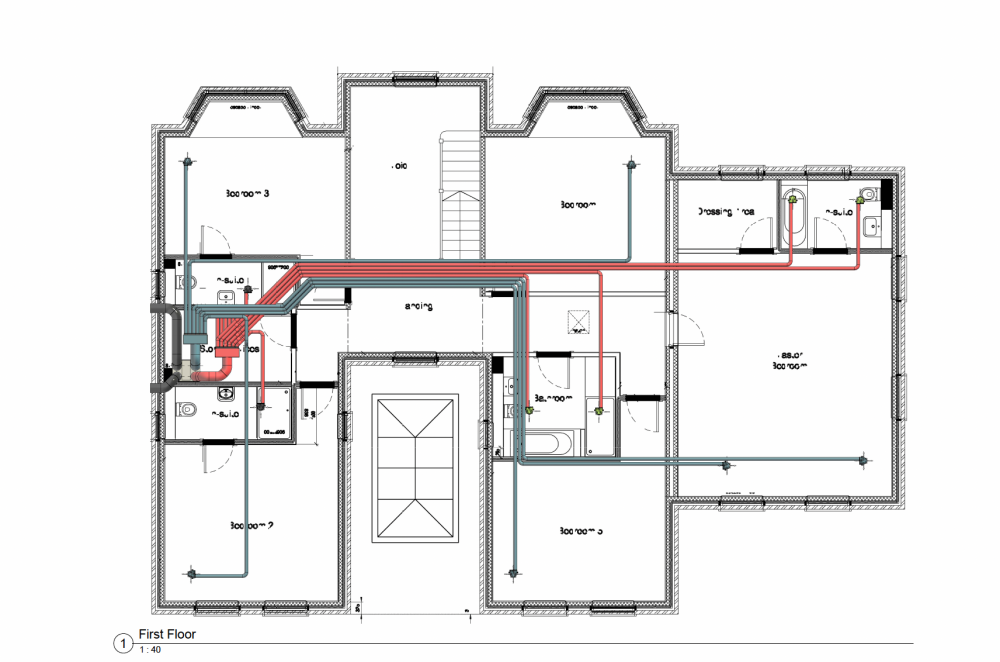
We are having MVHR installed as part of a new selfbuild project. The designer is proposing Zehnder Comfoair Q600 MVHR as per attached. The Zehnder Comfoair Q600 will be installed within the house as shown on the drawings We are having a cold roof with insulations at ceiling with 100mm across then 400mm over. Our questions are around air tightness and also not compromise on insulation. Do we need to run the ducts o the ceiling then run the 500mm insulation on top of the ducting? Any advise would be appreciated. Many thanks
- 6 replies
-
- mvhr
- mvhr ducting
-
(and 1 more)
Tagged with:
-
Hi All, I am writing to see if there is a good way to add cooling to an existing MVHR system. I have read quite a few topics from this forum on this, but they don't exactly seem to answer the question, mostly because I live in a flat where a split system is not feasible: This thread has the most information concludes that an ASHP seems to be the best option, which is not possible. This thread hints that comfort cool is ineffective. This thread stops quite inconclusively and is quite focused on a house. Here is a discussion about summer bypass, but unfortunately the unit that came with my flat seems to be the cheapest and does NOT have a summer bypass (MRXBOX95-WM2) This thread went off the rails a bit but has some ideas. The flat has huge windows on both aspects. I have done what I can to reduce heat gain with reflective film on part of the windows and big curtains, but outside shades are not an option. The flat is very well insulated and is on the 4th floor, leading it to get quite warm at night even without hot weather. For example, I aired it out yesterday and went to bed with it being 22C, but woke up with it at 25C despite the outside temperature being 12C. I suspect the cheap MVHR is part of this, but the bathroom does not have windows so I don't have much choice but to keep it on all the time. I can't seem to get it off boost mode either. Why not just open the windows at night? Unfortunately, it is quite close to a very active train line, and I find it difficult to sleep with loud trains going by constantly. As far as I can tell, these are my options: Portable A/C Pros: Cheap Cons: Loud, ugly, inefficient especially because windows are only inward opening, have to open window Get water cooled A/C installed Pros: Effective Cons: Very expensive to have done, loss of most storage space in the flat, increased water bill (??) Adiabatic cooling on MVHR, such as https://www.ventilationland.co.uk/en_GB/p/homevap-mvrh-cooler/9745/#pdpBlogs Pros: Goes onto existing system, cheaper than water cooled A/C Cons: Very little info on effectiveness (could work moderately? not enough airflow?), unclear if there are many who install these MVHR system with cooling, such as https://www.nuaire.co.uk/product-list-page/mrxbox-hybrid-cooling-system Pros: Same ductwork Cons: Can't find any reviews on effectiveness or cost I know this forum is more focused on homes, but I would appreciate any thoughts any knowledgeable folks might have.
- 19 replies
-
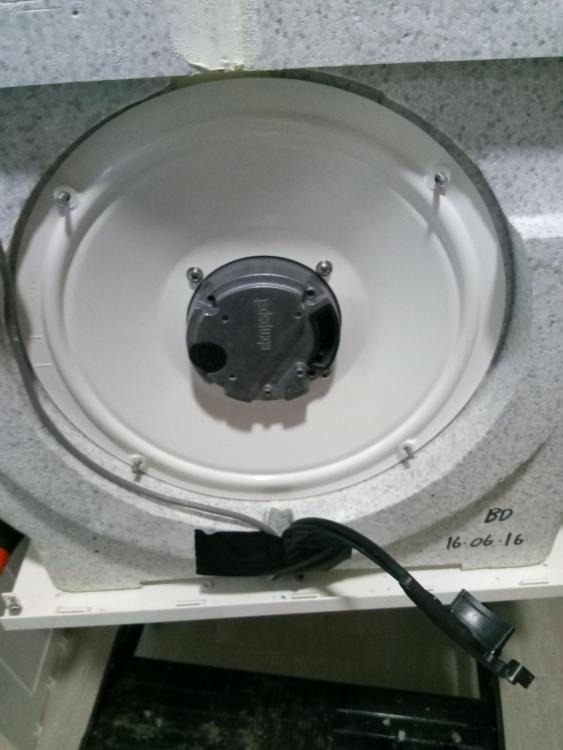
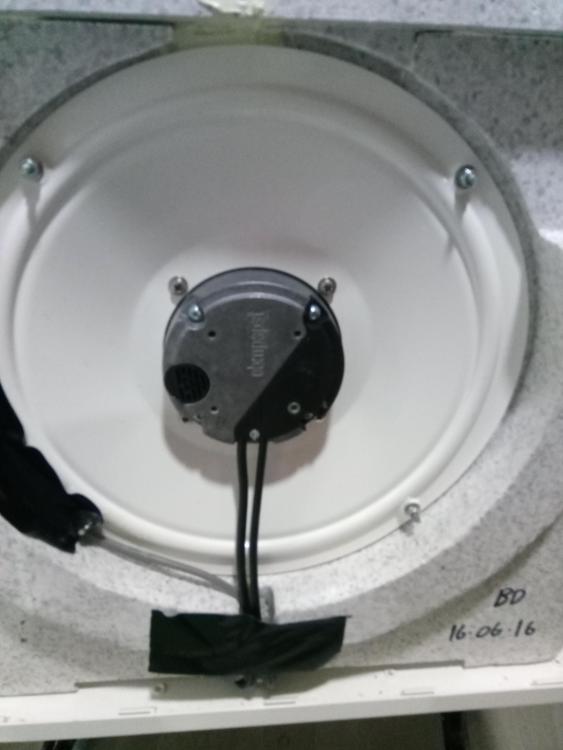
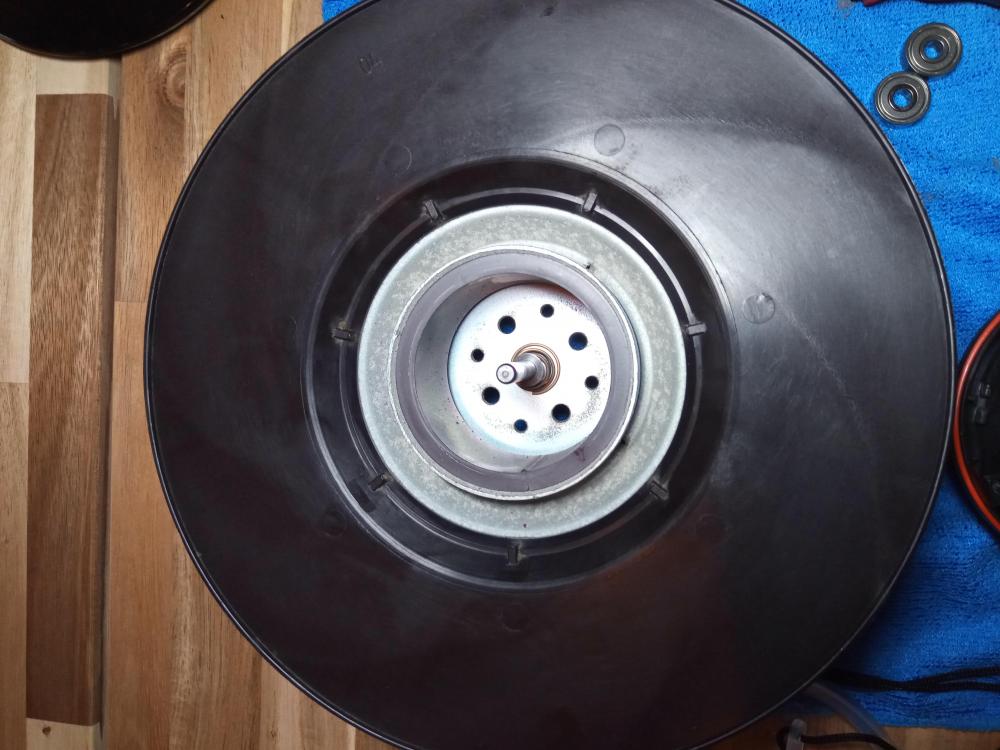
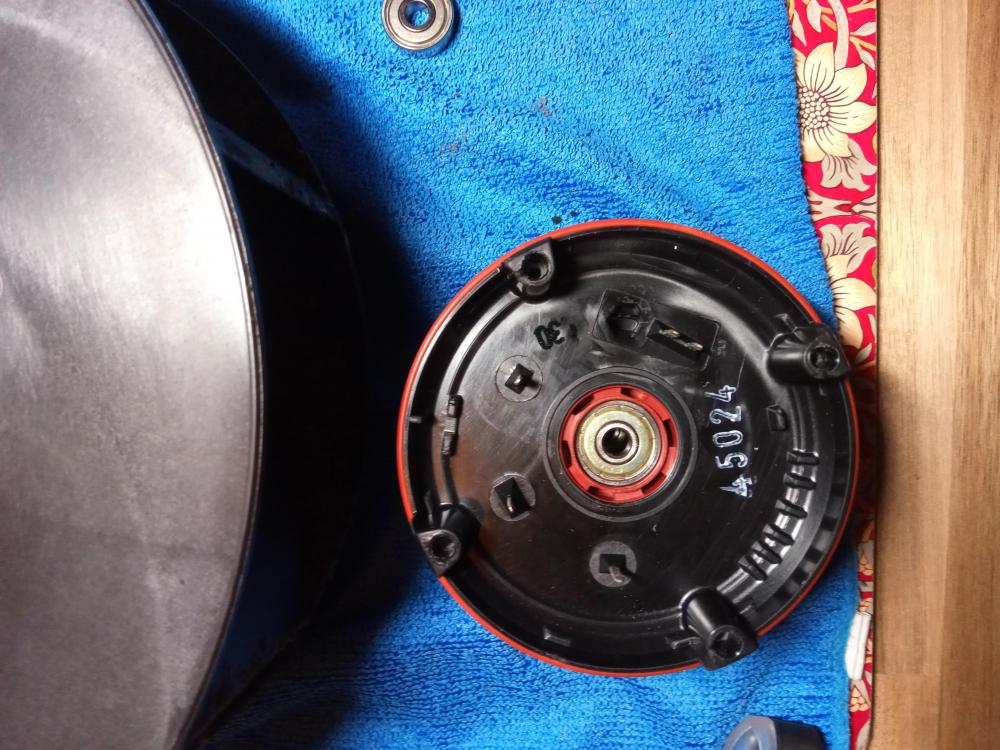
Following on from the excellent post by @DOIGAN where he replaced the bearings in one of the fans from his MVHR, this is a short post to detail the steps to replace the bearings in the extract fan in my Vent Axia Sentinel Kinetic Plus B (being a slightly different model and fan to that of the link below) The process I followed is basically the same as laid out by @DOIGAN in his original post. I've added a couple more pictures and descriptions below. To get at the fans, the unit has to be stripped down. First the duct spigots and blanking plates are removed. Both the back and front covers are then removed, allowing the top and side panels to be taken off - the side panels slide/interlock with the top and bottom panels. You should then have access to the fans on either side which are bolted to the poly core: I then disconnected the power connector to avoid having to try and unplug from the motherboard / cause any other issues. From this point I followed the process as per @DOIGAN Removing the circlip was a bit challenging, as for some reason the hub assembly would not depress, it turns out because the spring beneath wasn't seated properly. I managed to get the circlip off, but naturally it pinged up into the air and I spent several minutes searching for it until finally finding it some distance away. The bearings themselves (one on either end of the hub) popped out easily. I used the same bearings as @DOIGAN Reassembled and back into the MVHR unit. Cost - my time and £7.99 for a pack of 10 bearings vs £298.43 + VAT + shipping charge for a replacement fan from Vent Axia. Vent Axia were unable to give me any detail of the bearings used when I emailed to ask.
-
Hi, I have just powered up my newly installed MVHR system, a Vent Axia Sentinel Kinetic, 2 x 6 way manifolds and 50 metres of 90 mm semi rigid plastic ducting. It's a retrofit into the existing loft space. It seems to be working fine apart from the noise. Standing under the vents I can hear a gentle 'woosh' of the air coming out of the vents, but from even further away, I can hear what I'd call maybe a 'droning' noise, it's like there is an echoing in the ducting. Not sure how to describe it better. It's not massively loud, but loud enough to raise complaints from the family. As it's a cold loft, the Sentinel Kinetic has had a 25mm EPS foam box built around it, so it's sitting on a platform, with an EPS base. The same as the metal manifolds, these have 25mm EPS outer boxes too. The ducts are strapped to the top of the trusses. The whole lot has been covered with 400mm of new rockwall insulation. Any insight into where the noise is coming from and how to fix it are greatly appreciated.
- 30 replies
-
- mvhr
- mvhr ducting
-
(and 1 more)
Tagged with:
-
This week its all about MVHR. Most of the plan is sorted and I've read all the topics on here but a few stupid questions remain. Please help... 1. Voids From our ground floor kitchen we have a void that runs up through the first floor and into a vaulted ceiling with a velux. There are no openings in the void above GF so it is effectively airtight to the rafters. The void sits above the dining table and between the kitchen and living space. There will be kitchen extracts on one side and supply valves to the other side of the void. There will therefore be some passage of air across the bottoom of the void, but what about higher up where there is no ventilation? Should there be a supply or extract valve near the top? Would there be a condensation risk without ventilation? Would natural convection currents control humidity and I don't need to worry about this? 2. Pantry Should the 2m sqaure pantry have an extract or supply valve. The pantry has a single door to the kitchen with an extract about 2.5 metres away in said kitchen. 3. Fancy valves I quite like the look (and claimed acoustics) of some of the outragously expensive supply/extract valves like Lindab airy or Frankische or ergovent. Are they worth the extra dosh? Does anybody on here have them? 4. Balancing at the manifold I read on here somewhere that its better to balance at the manifold because there is less noise. Is that true?
-
A question for the non-smokers. My upcoming MVHR install, in an apartment, has only two possible places where the outside air intake can go: Within 1m of an external landing, where people sometimes smoke - and the smoke will sometimes get draw into the inlet. This option would have a short intake pipe, but a significantly longer exhaust (x 4). Within 1.5m of the top of a neighbouring SVP - and the smell from that will also sometimes be drawn into the inlet (not so often, but for longer). This would reverse the pipes - a short intake and a much longer exhaust. Due to space restrictions, the exhaust can only go in the other location to the intake, so I have to decide between a choice of smell-source vs exhaust pipe length. The pipes will be well insulated, but can only run through the ceiling space. In theory either smell should be eliminated by the carbon filter that I'll be installing, and if so I have a preference. But has anyone got experience of how well either smell gets filtered in practice?
- 9 replies
-
- mvhr
- carbon filter
-
(and 1 more)
Tagged with:
-
I would like to jerry-rig the MVHR unit to have it running over the winter months before I finally install it properly next spring. But how to mount it? I have about 6-weeks of cladding to finish off before I can turn to first fix. And then it will take me quite a while to get around to installing the MVHR unit properly. So realistically that won't be until next spring. I am very slow. I often camp on site as I work, treating my build as a (very well insulated) tent. The timber frame is insulated, weathertight, with windows and a temporary front door. Its also airtight (blower-door test of 0.47 ACH (n50) recently). The MVHR unit (Brink Flair 325) is sitting in its box waiting for me. And most of the ducting is already installed (with their valves). Hence, I'd like to temporarily set-up the unit and have it running over the winter months. - How to mount it? - The MVHR unit itself weighs 37 kg. - The walls are 240mm I-beam cassettes, filled with Warmcel and I know where the I-beams are located. - The external wall are currently bare 12.5 mm Smartly but will eventually be covered in 50mm insulated plasterboard. - I could power it from a 240V extension lead. - I could run the condensate drain to local external drain. Any pointers on how to do this would be gratefully received?
-
Wasn't sure where to post this but here's our observations after storm Eunice passed through. Initially we watched the storm gather, we could see that that the wind was strong but from inside there was no indication, no sound, no draughts. As the wind picked up something we were not expecting happened, we could hear and feel a draught. We have two fairly large sliders and at the peak of the storm, the wind was pushing against the slider so much that there was airflow between the slider and the fixed pane. Not much and not continuous but it was definitely happening. Our air test was done to passive standards (positive and negative pressure) so we're fairly certain there is no problem with the sliders because if there was then the negative pressure test would have exposed that. Anyone have a contradictory view? A short time later we had a power cut , that doesn't matter. The house is warm, the Sunamp is fully charged (minus two showers), what could go wrong? Well, we're fully electric so there was no cup of tea to sup whilst watching the storm play out. Information gleaned is that the power will be out for over 48hrs And of course there's no heating. But what does that matter because the house is toasty warm at about 21.5° and we've not had any heating on for days. And the house is almost airtight, apart from the few blasts that squeezed through the sliders. Thanks to @Adrian Walker's advice we have a CO2 monitor, well we bought a couple. It was quite amazing how quickly the CO2 PPM started to increase after the power cut. Obviously the MVHR was having a bit of "quiet time", so now we had a toasty warm passive house that was not working as planned. As night drew in it got worse because lots of candles were lit. The only solution was to open some windows and get some airflow. Out of interest, it was only the monitors that informed us of the poor air quality, it wasn't something we sensed. So, we have a toasty warm passive house but with no airflow so a couple of the 'tilt and turn' windows on opposite sides of the house were tilted. That fixed things, air quality wise, very quickly but it also meant the passive house was now going to cool down more rapidly than planned. There are no heating options, apart from the bio-ethanol fire) so we were getting ready to break out the cold weather gear. Fortunately power was restored about 12 hours after the cut. We have a fair amount of PV, and it was quite a sunny storm but of course the PV trips off in a power cut. We were meant to have a battery system but the that didn't happen. The M&E individual who specced that (and didn't provide) had wired in an emergency power supply from which we could run the fridge and freezer in the event of a power outage, which was a pretty smart idea, shame it never happened, but actually my advise to anyone building to passive standards, if they have a battery system then make sure that the MVHR will run off the batteries. That's the main thing we've learned. If you have built to passive standard and have a battery system, make sure your MVHR can run from the batteries in the event of a power cut, I suspect most battery systems will power an MVHR unit for ages. Without that, you're not in a passive house anymore. Oh, and we had the first BBQ of the season this evening. Bit nippy!
- 59 replies
-
- 13
-

-

-
On the last two mornings where its been pretty cold outside I've found a small amount of condensation on the insides of some of our triple glazed windows, I promised the good lady this would never happen!! The house is built to passive standard, has good airtightness and MVHR. Should I be getting condensation on the insides of the windows, and if not, what is going wrong?
- 131 replies
-
- triple glazing
- condensation
-
(and 3 more)
Tagged with:
-
Has anyone managed to find an off the shelf access hatch that can be plastered up to and on top of, that is also of a high standard of airtightness AND has some level of insulation incorporated? I am doing a basement conversion that has service hatches to rest of ground floor underfloor crawl space; house will be fixed up with oodles of insulation and MVHR hence I need something good here. In the absence of finding something off the shelf I will just get a well-gasketed plasterable hatch then inside it fix up a PIR inside a 3x2 carcass that can be screwed or similar to the inner reveal (which will be quite deep). Thanks, Tom
-
I need to improve my ventilation, and I am thinking about options. My house is a 2010 extended-upwards-sideways-and-backwards bungalow with three bedrooms and a bathroom in the warm roof - and I only have a limited number of remaining triangular roof spaces to play with. The house is reasonably well insulated, but was not targeted for near passive renovation or similar standards. One driver is checking C02 levels, which in a couple of places go up quite high, and do not come back down again swiftly (==> more ventilation should be considered). I do perhaps have room for the MVHR unit in the garage or planned to be extended utility, but also have limited spaces in which to put the ductwork etc. downstairs. Clearly an MVHR needs balancing etc, but how much benefit will I lose by not installing one in all rooms, if I can get to say 2/3 of the house? Perhaps an alternative is to adapt a strategy of a PIV upstairs, and constant HR low volume ventilation downstairs. I'm going to need to spend some time thinking about this, so I'll welcome any thoughts from anyone who has not quite been able to do a full MVHR, or has installed one in an older house. Cheers Ferdinand
-
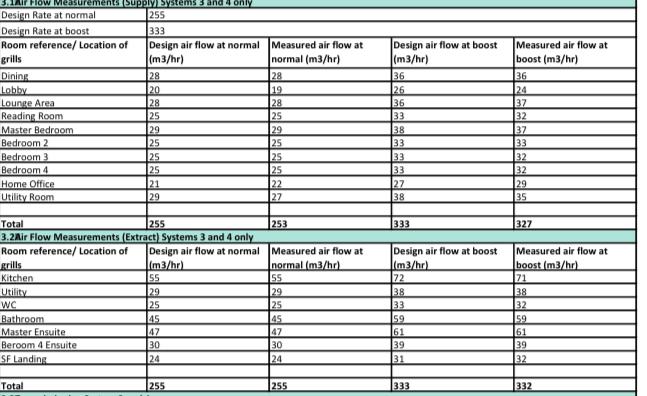
I have a Brink flair 400 My commissioning certificate says this: The options for my system (as commissioned by the supplier) are level 0. 50m3 level 1. 180m3 level 2. 255m3 level 3. 330m3 When I realised the system was a bit noisier than usual (as mentioned in my recent exchange with @jack), I started investigating what was going on and saw that it was operating at level 2, when I seem to remember that level 1 was recommended for default use. I have turned it down to level 1 and the system is definitely much quieter, hardly audible. I think level 1 is the correct setting I should run it at, but grateful if somebody could confirm this based on the commissioning certificate which definitely counts flow rate at the higher 255 m3/hour value.
-
Reaching the final straight, need to purchase the main MVHR unit. Was originally going to get an Adroit DV110 but the prices have rocketed, the Kinetic Advance SX looks a strong contender, however the limited reviews of the App on the Apple App Store do not seem very favourable... A key feature for me is being able monitor and interact with the MVHR when away from the property, (new build is over 100 miles away from main house) I've seen the Adroit in the flesh and used the 'cloud' function and whilst clunky it does what I need. Anyone actually got a Kinetic Advance SX, how are you getting on with it and the app?
-
Hello everyone, I am writing to ask if anyone has any experience using a MVHR unit such as the Vent-Axia High-Flow to provide the ventilation on their indoor pool? The Heatstar XF Units are essentially just a bigger version except with air heating and water heating however those two factors can easily be taken care of with UFH and a pool water heat exchanger? Thanks if anyone can help.
-
Hi all, We are looking for opinions and advice on the systems we have currently specified for our build. It’s a near-passivhaus build, with MBC timber frame on an insulated raft foundation. Our predicted SAP rating is 102. The Primary fuel will be electric, there is no gas in the village, and we don’t intend to install LPG or Oil. We plan on having a large solar array (just waiting to DNO approval at the moment) and Tesla Powerwall – using the Octopus Tesla Electricity tariff, so power diverters and smart energy management are off the cards. We are looking at having a Sunamp Heat battery, in place of a hot water cylinder, and heating the house will be Ground floor UFH, and potentially using the MVHR air. We would like to run the ASHP in reverse in summer to cool the ground floor slab and the MVHR – but would still need to run it forwards to charge the heat battery. The Sunamp would be the HP version, which has primary input of (High Temperature) ASHP, and a backup option of mains electricity. This suggests 2 possibly options for Hot water in summer: 1) Run the ASHP in Heating mode when necessary to charge the Sunamp – and disconnect the UFH and MVHR art this point 2) Always run the ASHP in cooling mode when actively cooling, and charge the Sunamp from electricity (surplus from the solar in summer). Sunamp specify ASHPs to work with the heat battery, one being the Valiant aroTherm which is reversible. We wonder if anyone has done this sort of configuration and can offer advice on how they achieved it / information on how it has performed. Is there a valve / manifold product available that could handle isolating the output of the ASHP from the Sunamp or the Heating elements depending on which mode is being used on each? Our main concern at the moment is that we like a cool bedroom (17 – 18 degrees) and want to make sure we can achieve this year round with the systems we install. Here is a simple diagram of the system we are trying to describe with this post.
-
Hi, have a question about incorporating the impact of MVHR when calculating heat loss. Background: New ICF build near completion. My Heat pump installer has calculated I need 8kw of heat at -1/21. However, after incorporating the 90% efficiency of MVHR into heat loss calculations, this drops to 6.5kw. This was done by reducing heat loss through ventilation to 10%. This also synchs with my UFH room by room heat demand calcs. Theoretical efficiency of the MVHR unit is over 95%, and my u-values are conservative, eg I have double bubble-wrap foil under roof but have ignored its additional R value. Same with impact of plasterboards, render etc. So fairly confident about the stated heat losses not being more. Issue: My heat pump installer INSISTS that I should ignore the MVHR because it could fail and if that happens in the middle of -1 degree winter I need to have additional capacity for heat. He wants to install a bigger system to suit the 8kw demand. The change to the bigger unit means my outside unit will double in size, which I absolutely do not want unless I really have to. My arguments has covered the following, none of which has convinced him: - extra cost of bigger system (£1,000) will take years to be recovered through multiple failures of MVHR just when outside is really cold - even ignoring the upfront costs, having to supplement heating with electric radiators/fans for a couple of weeks every few years (IF the MVHR fails), is not actually that huge. - MCS has been non-comittal on this and says it is a design issue for the installer to decide - What happens if the heat pump fails? What happens if there is no power for 10 days? Why do we need to assume the MVHR fails? But not anything else? What am I missing here? I realise I am a little on the borderline with the 6kw system which only has a couple of extra 100 watts of power at -1 outside, but I am quite prepared to supplement that with normal electric heating when I have to. MCS have not objected, and it is my risk to take. Any advice? Is there a rule about excluding the impact of MVHR when calculating heat losses? It is just so incredibly odd that my installer wants to disregard the heat recovery impact when working out ventilation heat losses, which sure.y goes against the spirit of MCS. Thank you!

