markocosic
-
Posts
979 -
Joined
-
Last visited
-
Days Won
1
Everything posted by markocosic
-
Would also build frame without OSB. Just a diagonal on the opposite side. Add OSB afterwards. Minimises weight to lift and you can square up the the house this way then nail it all before it moves. You can also let it get wet (the solid timber) if you must before having a couple of dry days going crazy with the OSB and getting it covered up before it turns to weetabix? Walls were built in max 6 x 3 metre sections here. 10 studs. Header and sole plate. 2x8s so approx 200 kg a section. 2 men to lift; 1 man to prop and stabilise with rope until secured.
-
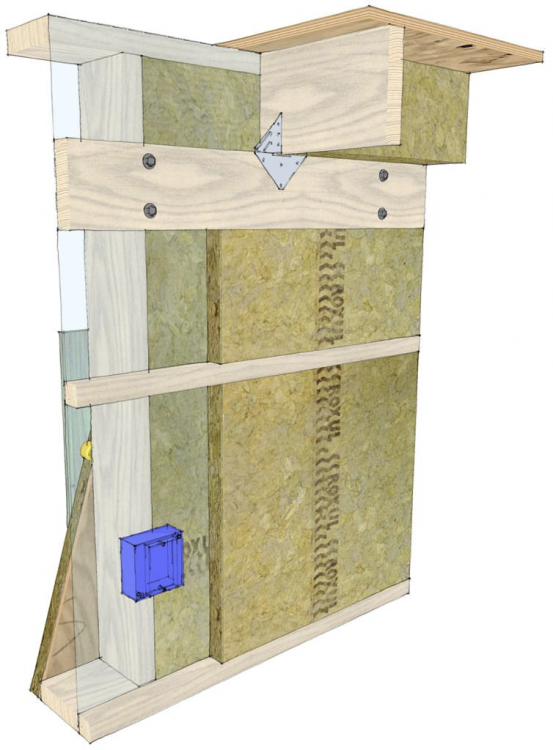
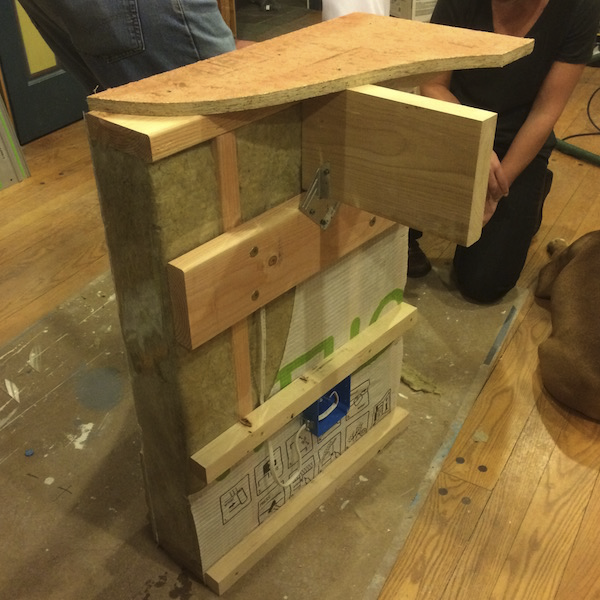
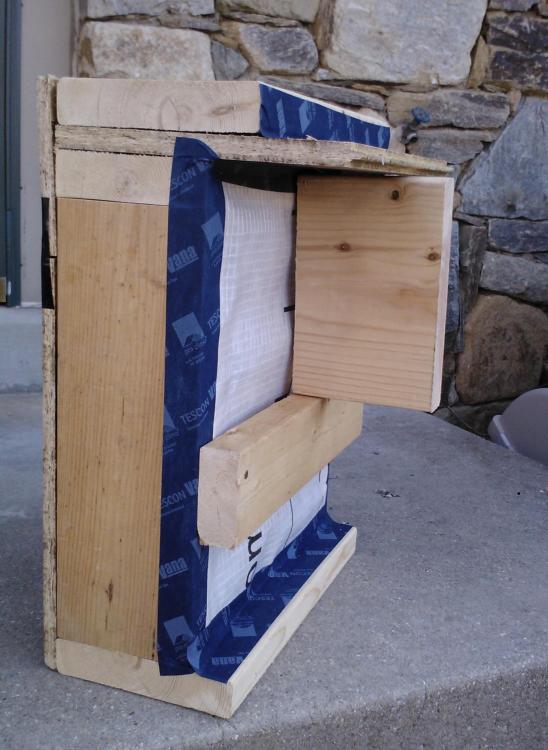
Use 18 mm for making structural box beams? 9/10/11/12 mm is PLENTY for sheathing to give shear resistance. It's also walkable on 600 centres for the purposes of adding insulation / putting on a roof etch as long as you're not a particularly fat bastard or jumping up and down etc. For headers...I would do this next time: https://bygghouse.com/wp-content/uploads/2017/02/Summary-of-Swedish-Wall-Element-Construction.pdf http://blog.lamidesign.com/p/swedish-platform-framing-info.html (single header, bring the wall studs all the way up to the level with the floor, then put your "second header" vertically against the inside of the wall to carry the floor load - after you've lapped your airtightness membrane over the top of the header ready to sandwich it under the floorboard. Tape the bottom piece of airtightness membrane down onto the floorboards before you build the next level of wall on top. It'll then be squashed down by the sol plate of the floor above. Roof trusses can be treated the same way. Those little diamond tiedowns pick up the roof truss at the top, then the header on the two side ears, and (if aligned) the wall stud on the bottom ear...but from the outside not from the inside. so that there's nothing to interrupt your airtightness membrane...that you remembered to lap over the top of the header, taped to the existing wall membrane, before you sat the trusses on top of it. Use some little tiling battens to squash the taped joint flat for extra security if you like.
-
Creating "frameless" look by overcladding frames?
markocosic replied to markocosic's topic in Windows & Glazing
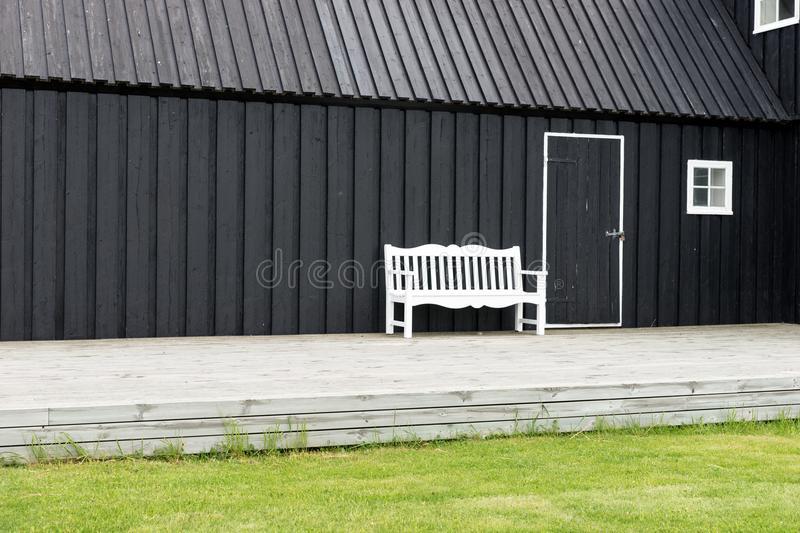
White: (and poking out past cladding) Dark: (but again reveals poking out past cladding) I can't find dark examples where the reveals sit behind the cladding. Probably because it'd be a PITA to make and swapping out the occasional rotten reveal isn't a dealbreaker.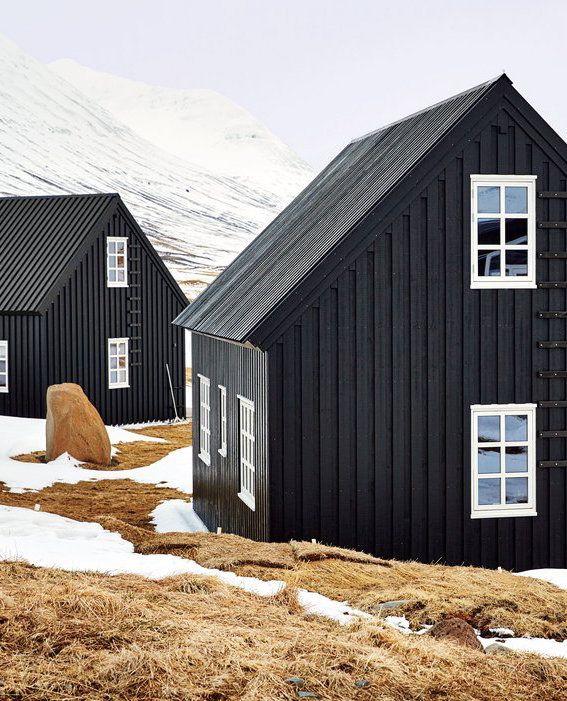
-
Creating "frameless" look by overcladding frames?
markocosic replied to markocosic's topic in Windows & Glazing
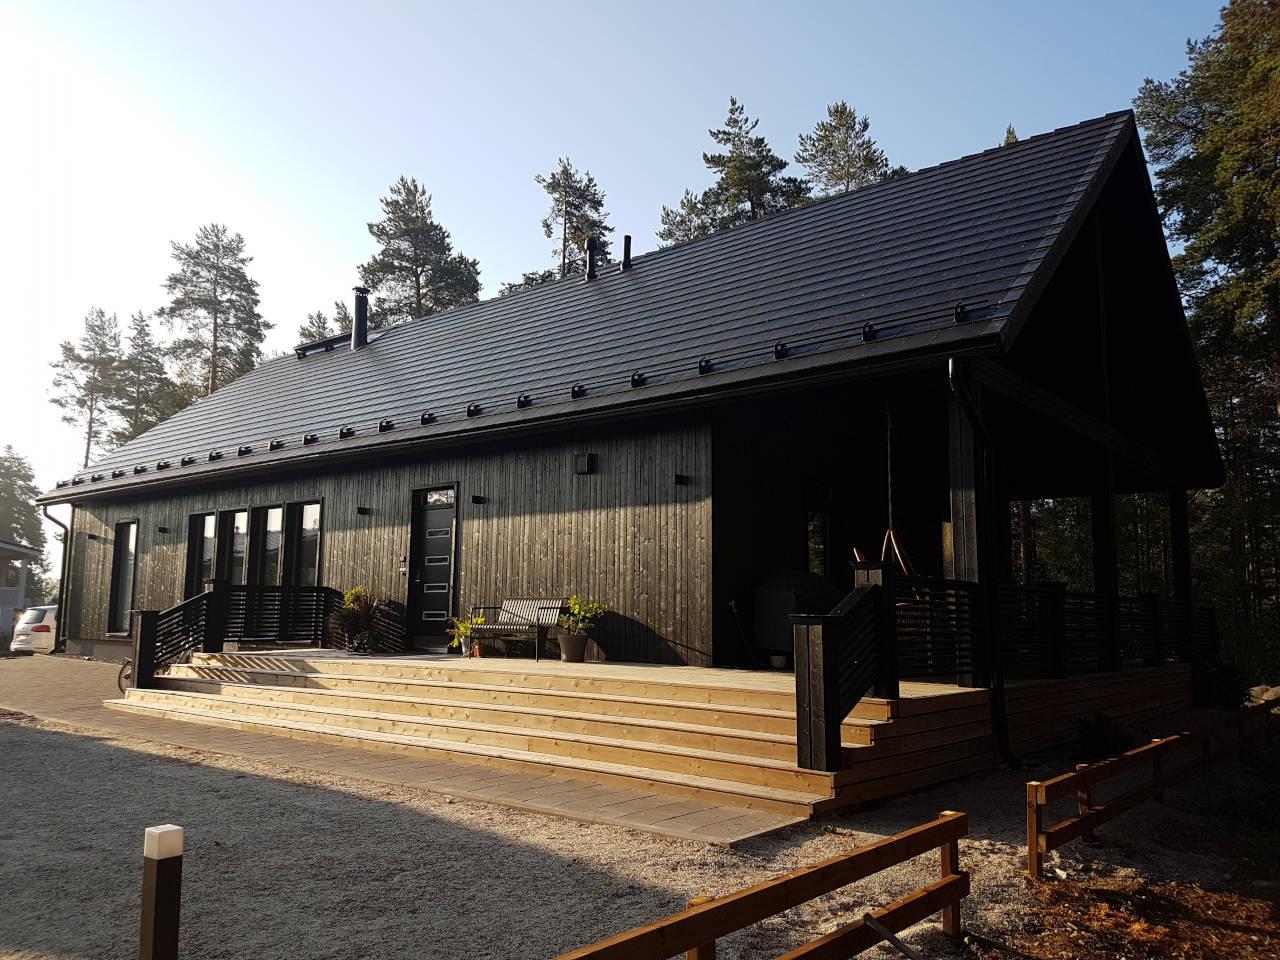
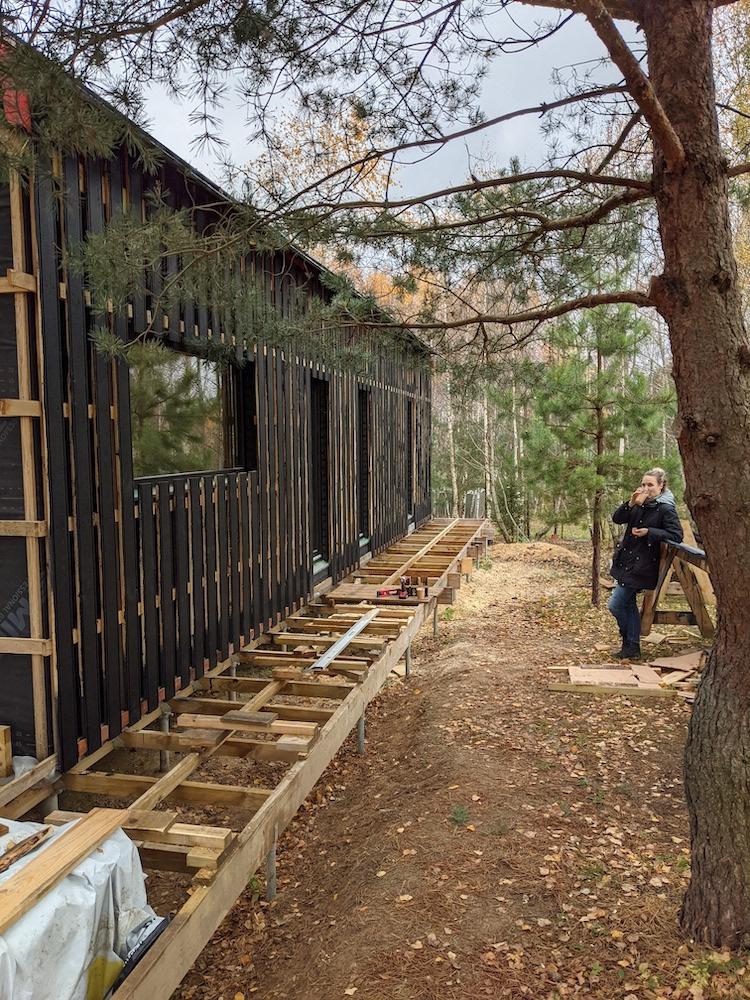
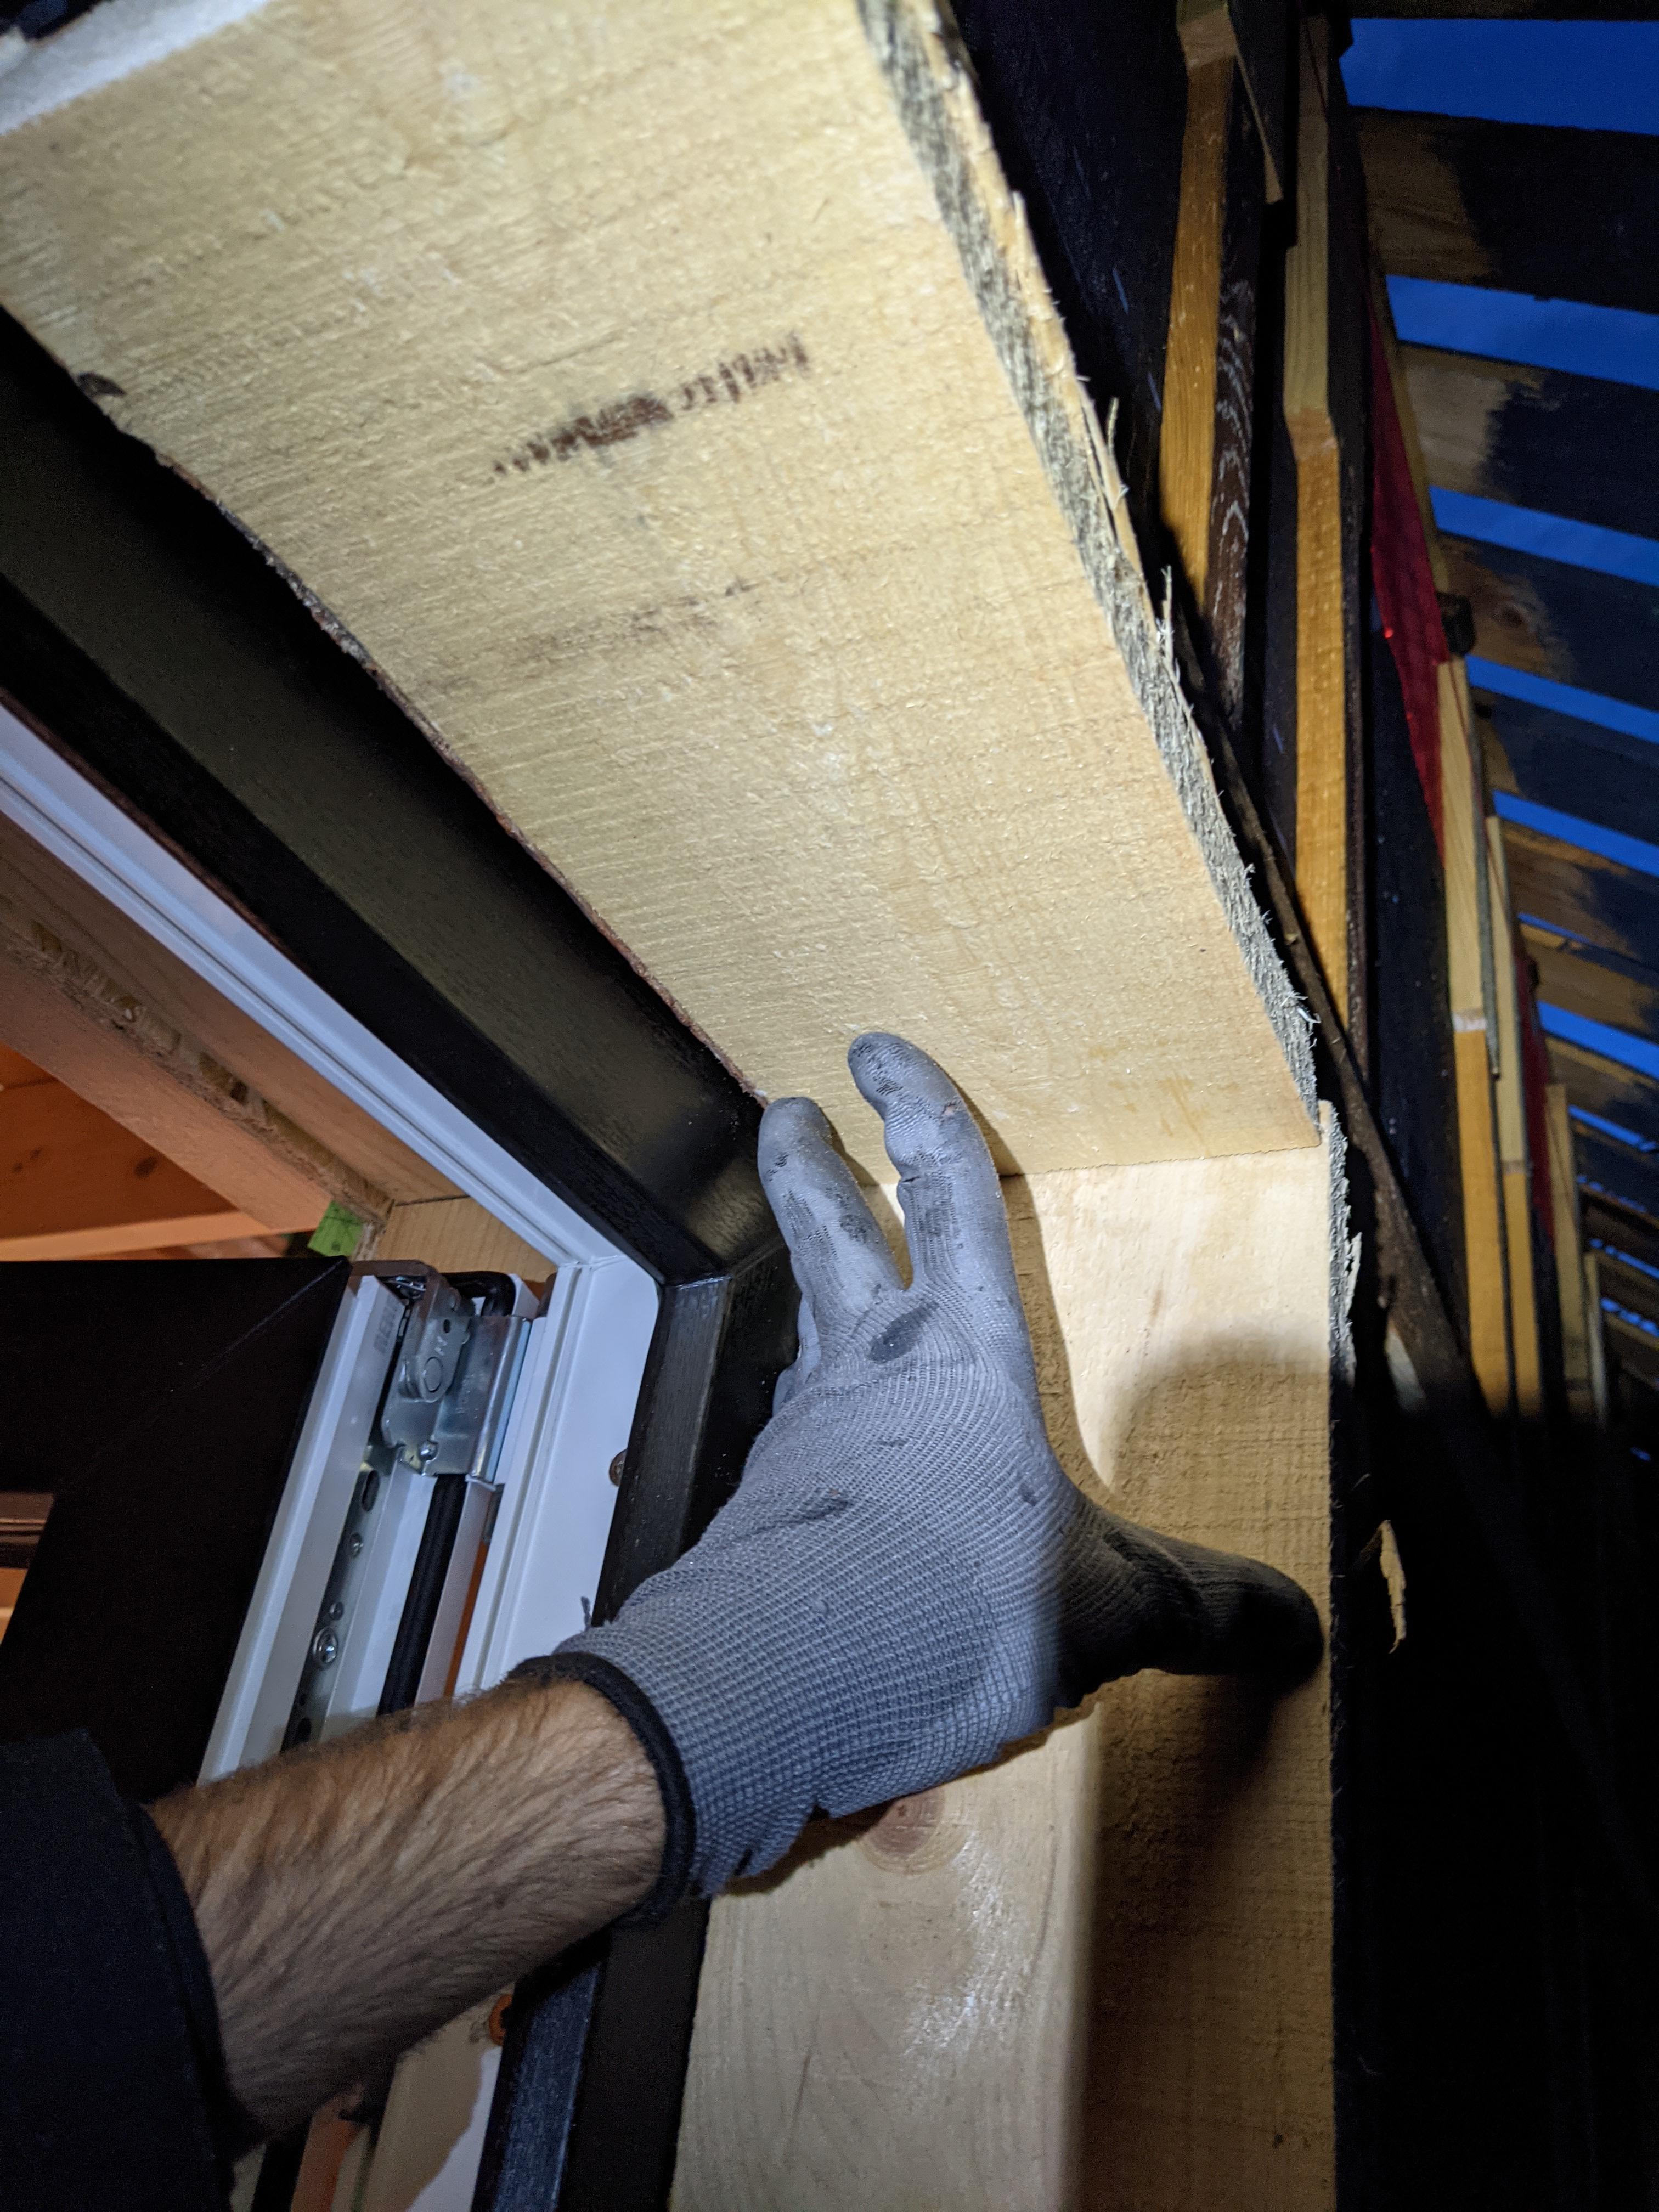
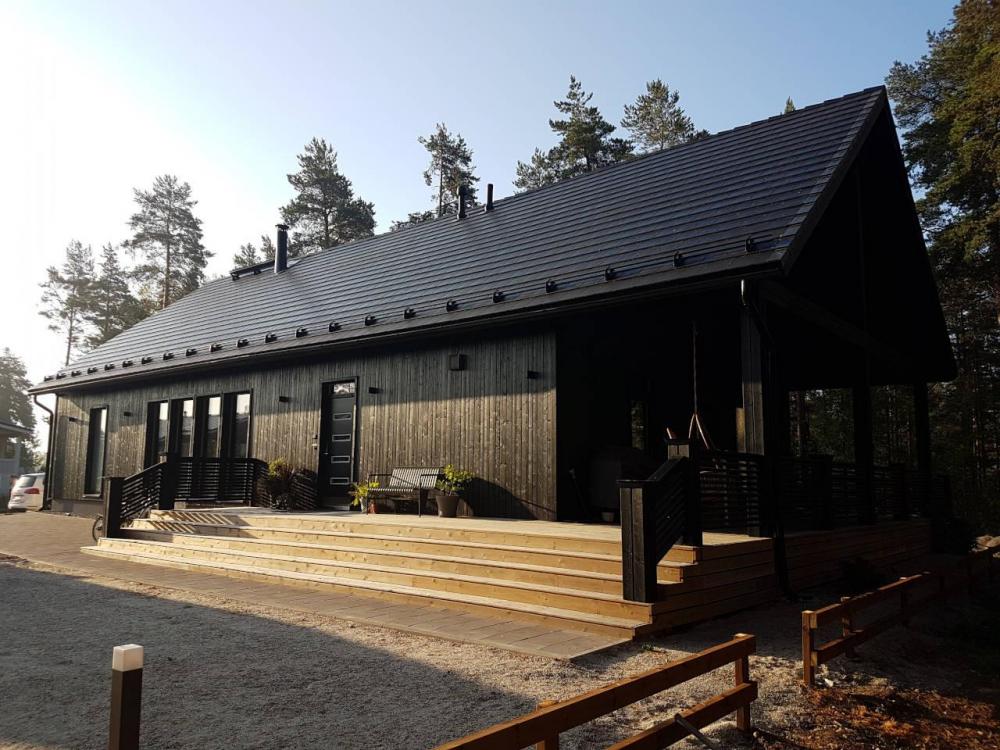
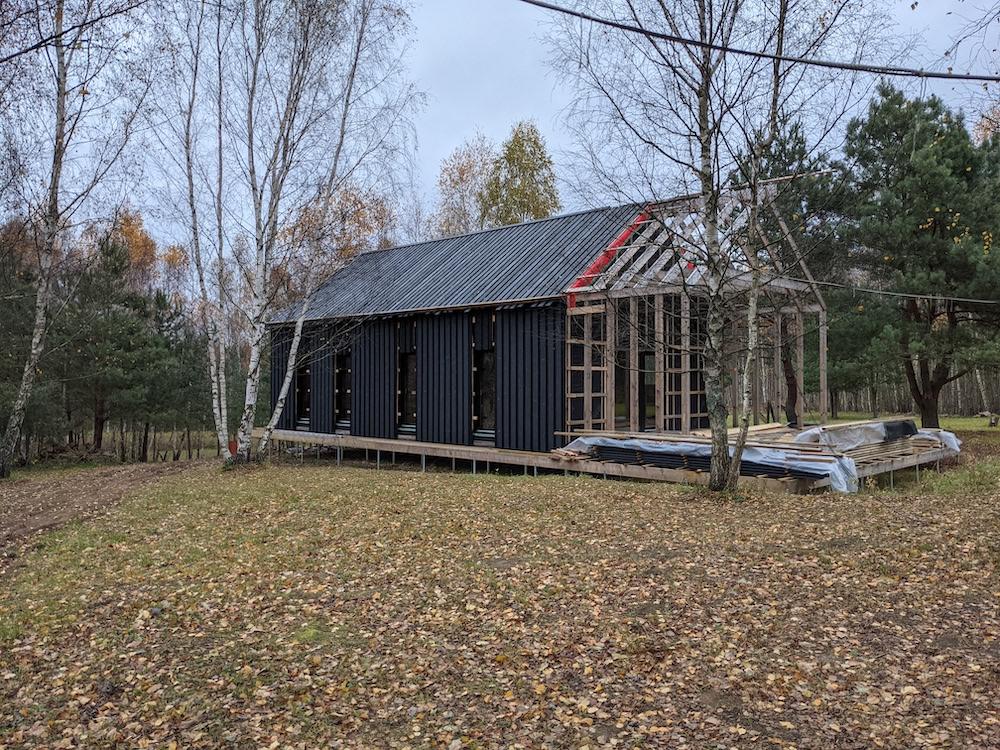
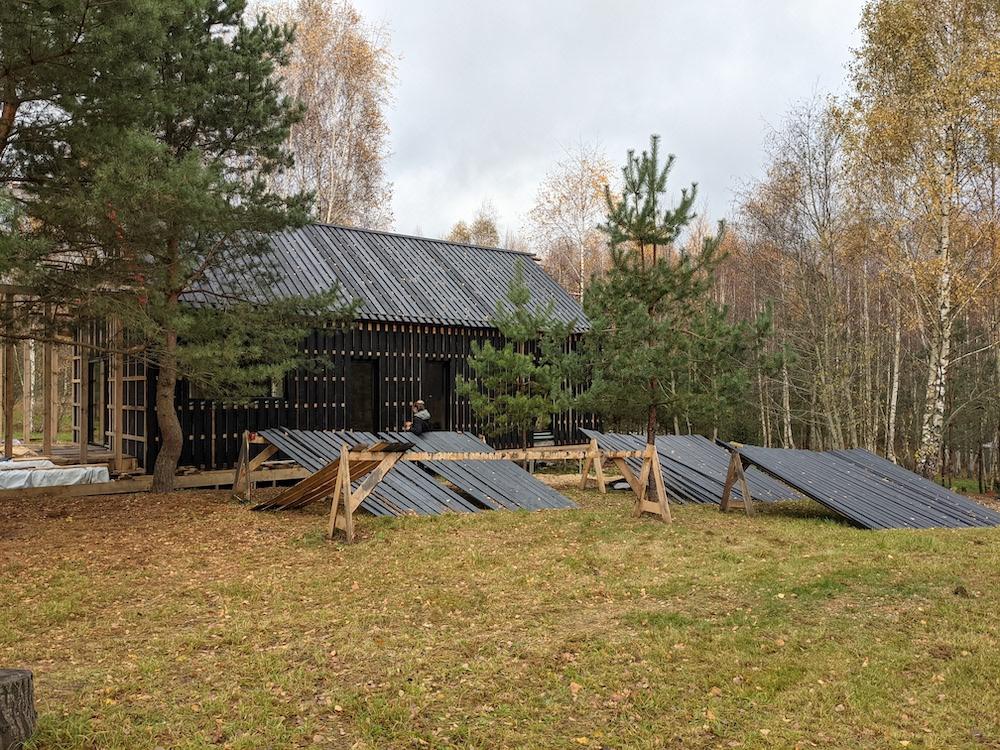
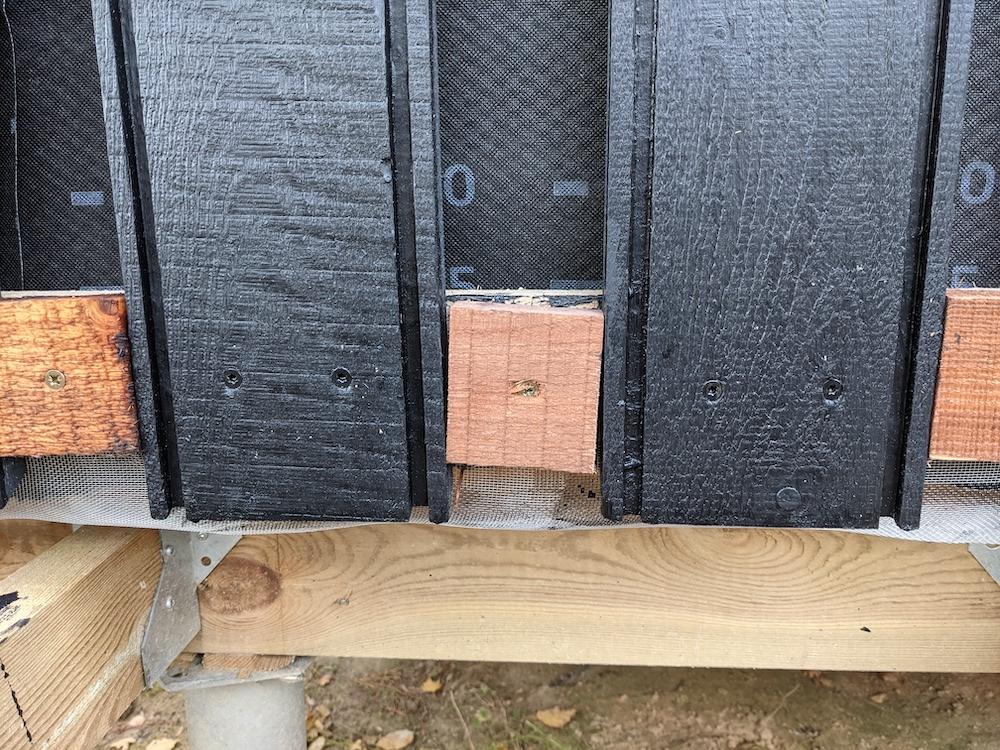
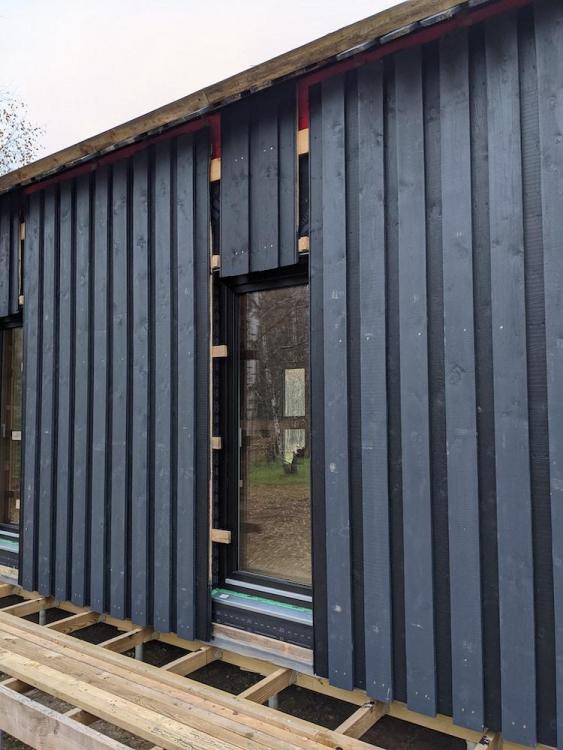
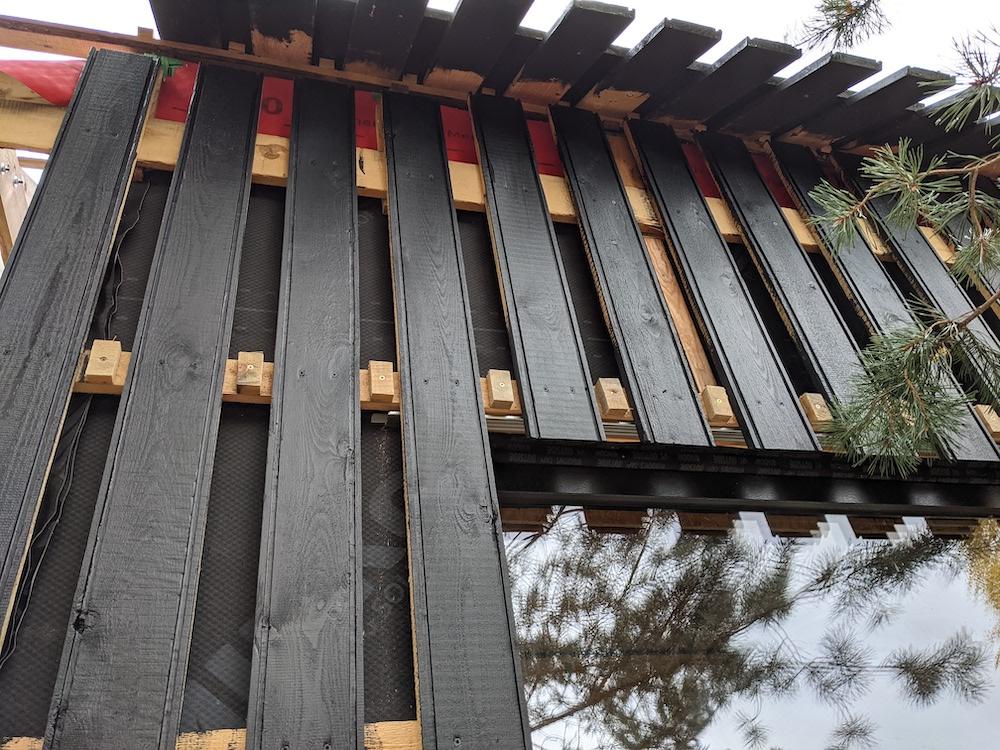
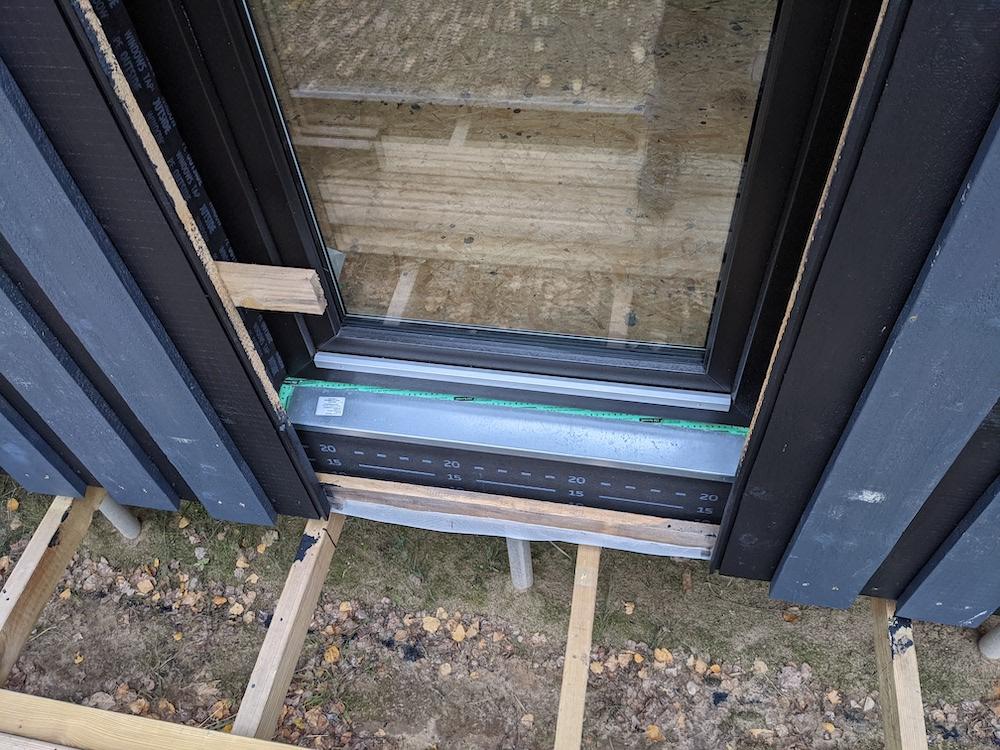
Screwdriver for window changes. I imagine that the UPVC frames will outlast the cladding immediately around the window anyhow. Progress has been made: Here's a tip for doing the bottom of board-on-board cladding. You need blocking between the 'inner' boards to close off the gap to avoid insects making it their home. (the ventilation happens behind the horiontal battens and is closed off by a "U" of metal mesh between the face of the horizontal batten and the face of the house) Don't cut these to exact length. Cut them short and fit them on an angle to suit the (variable) gap between each board. This is fast and there's no danger of them ever over-expanding forcing things apart should they find themselves damp. Mainly it's fast. Current window detail is this: There's a little metal channel above each window to catch any water running down the membrane. Probably total overkill but given that the roof is also wooden and there's a non zero chance of a knot falling out etc we might get water running down that membrane. This will keep it from falling on the horizontal cladding board above the window. You can see some crumbs on the wall membrane from where it was only membrane on the roof/walls (with these little channels above the windows) for 6 months. It did help keep water away from the windows during this time. Drip edge above is a 30 degree cut on the end of the boards. There'll be a horiontal board between the window frame and these to close the top of the reveal. Either side of the window finishes as an "inner" board to make the detailing a little less painful. This will be trimmed to width in situ then a vertical board fits behind it and across to the frame as the sides of the reveal. Perhaps I'll trim them back more and have the "sides" os the reveal poke out beyond the cladding boards like JSH's horizontal cladding in the earlier post. This is bottom of the reveal. A 'secondary sill' sits upder the window frame (frame drips are on the underside - this in hindsight was a mistake as it would be much easier to clean these and to seal frame<>sill if they were face mounted frame drips) and catches everything from the frame / window reveal tapes and dumps it outboard of the wall membrane but inboard of the cladding (i.e. anything getting in here disappears behind the cladding) Over the top of this is going to be a wooden sill / step that's loadbearing, pretty, and mostly waterproof but doesn't need to be completely waterproof. Now that my wife has an idea of what the finished item will look like (the outer boards still need all the screws putting in and their final coat of black rather than grey)... ...I think these are definitely not going to be frameless and it's all a bit RAL9005 at the moment. It might even get a decorative reveal in a contrast colour. I'll leave this detail until the 11th hour so that she can decide. Perhaps post a few photos for her to choose between too...
-
Creating "frameless" look by overcladding frames?
markocosic replied to markocosic's topic in Windows & Glazing
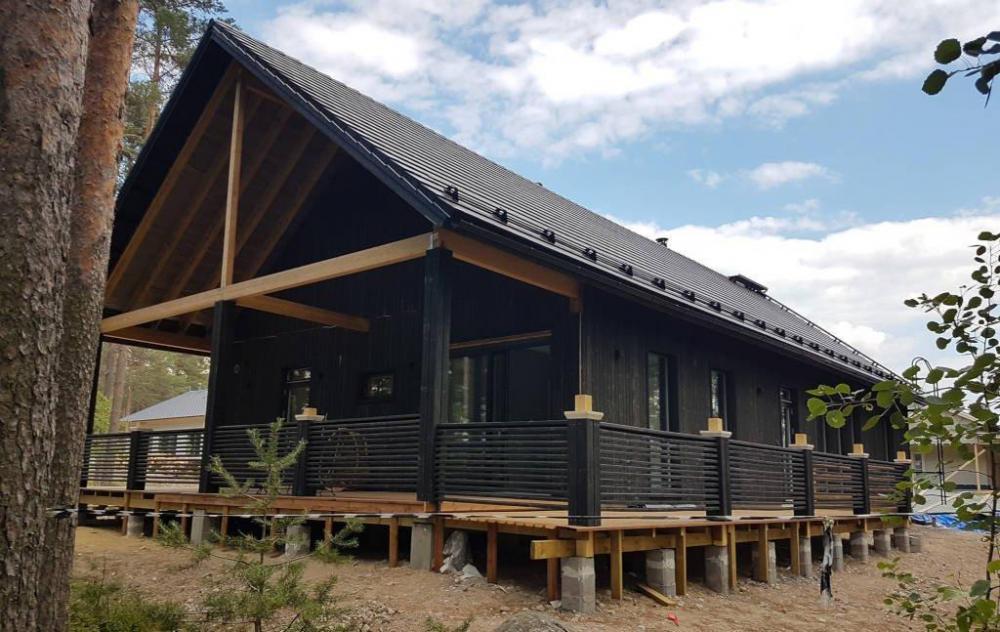
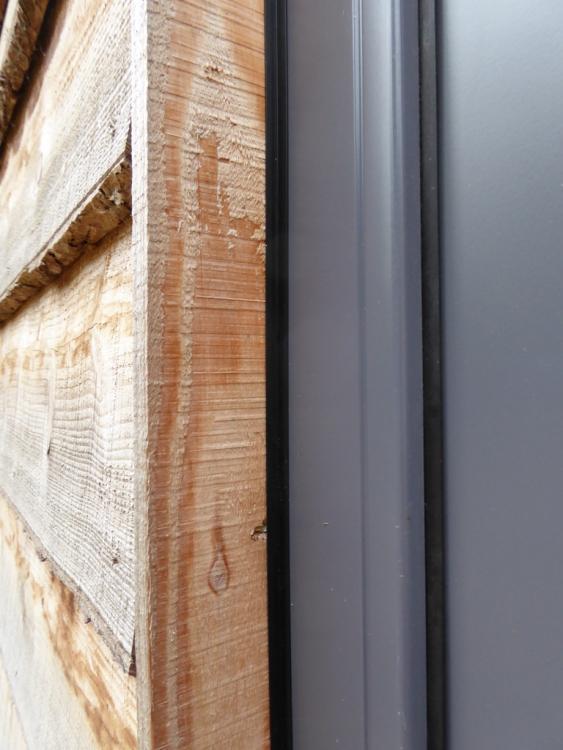
Thanks folks, We're not worried too about water for the frames / house - it's water tight as is and the cladding is more for UV / mechanical protection. Imagine this (incl metal sill pan under window frame with the frame weep holes into the metal pan) with the wood replaced by a membrane. That's the waterproof later. The cladding then sits on top of that, spaced away with battens, that should deflect most water but doesn't need to be waterproof. Sill detail is DEFINITELY going to match in terms of visible frame. Wooden sill floats above metal pan at the appropriate height too match the sides and top in terms of exposed frame. Metal pan drips between the membrane and the cladding. (i.e. not visible) If it weren't for insects I'd be tempted to leave a gap between the (wooden) cladding and the (uPVC) frame to aid drying of the reveal cladding. With insects to consider a seal is probably in order. I like the JSH finish here.. With dark frame and wood it should disappear: But perhaps sticking the angle the frame so that the wood can move without bringing the angle with it. (150 mm reveal could move +/-3 mm? ) Or just black foam strip and be done with unless/ until the insects cause trouble? Accuracy and long term stability if shrinking the reveal is a valid concern. 0-15 mm you'd see. 40-55 mm you'd see less. Wood moves. It's never going to be "right" if done "frameless" is it? Best argument for not doing it? We'll have a play. Probably they only way to really see if swmbo likes they look or not!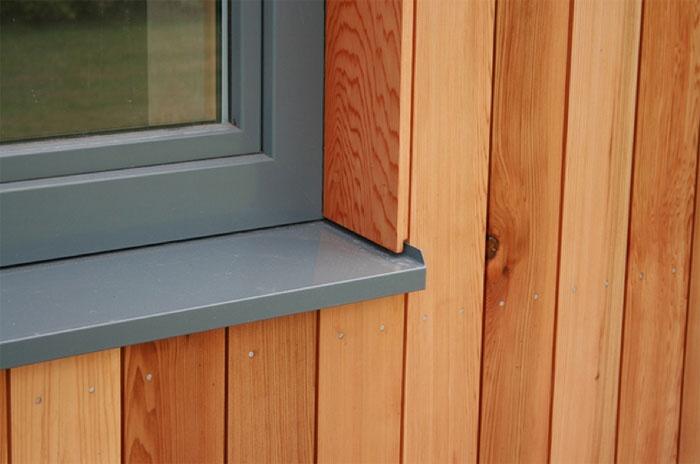
-
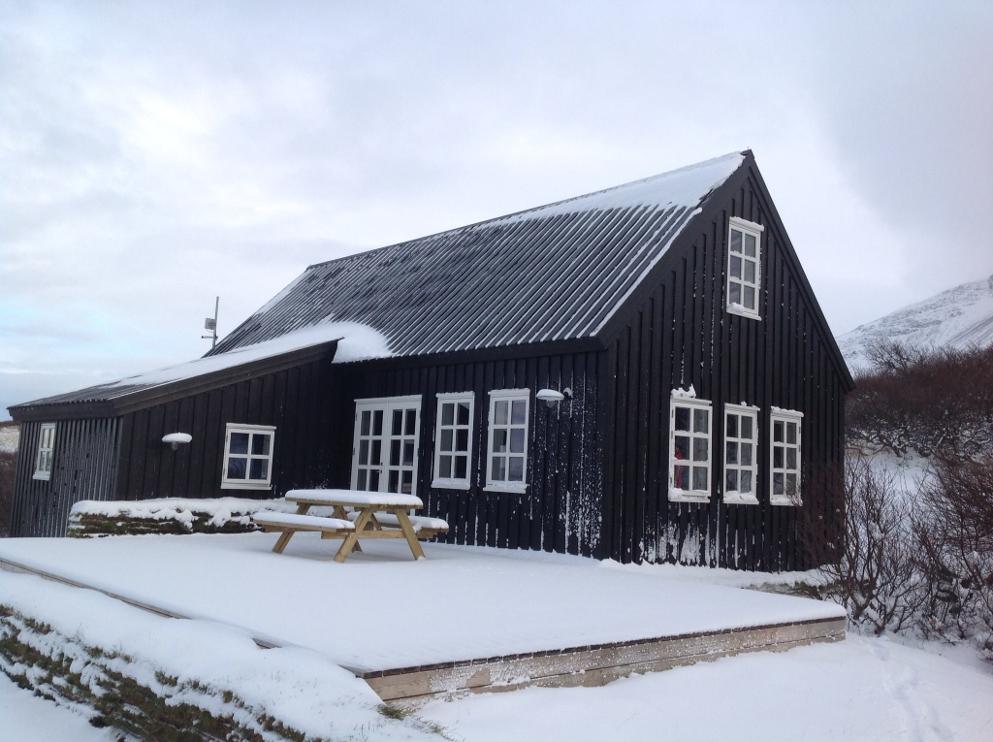
We have inward opening windows (Basic uPVC in 'near black fake wood' finish) We have a wooden roof and will have when clashing to match. This was going to be our window detail: (overcladding about 20 mm of the outer frame leaving perhaps 55 mm visible all round - the actual wall cladding is outboard of this 120-150 mm deep reveal) We could also move this to cover "all" of the outer frame leaving just the inner part of the frame visible. Anybody seen this done before? Does it look like a feature or a bodge? I can't picture it as it stands. Thanks

-
Dot and Dab vs adhesive for insulated plasterboard
markocosic replied to AliG's topic in General Construction Issues
Surface ends up about 4 mm render then 3 mm plaster on top of that. (the soft white stuff not the hard pink stuff) Compared with dot and dab then skim there's no chance of getting hairline cracks between boards. It's quite tough yet flexible and basically had scrim tape/mesh...everywhere. Waiting on new windows in this shot: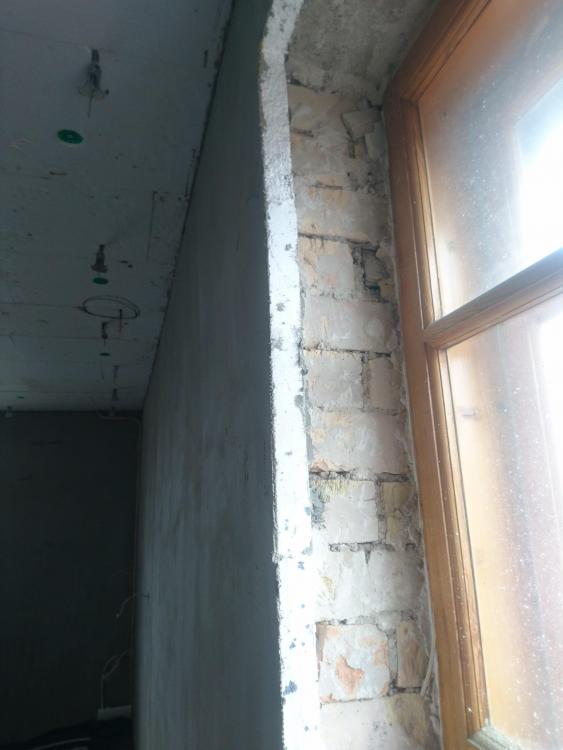
-
Dot and Dab vs adhesive for insulated plasterboard
markocosic replied to AliG's topic in General Construction Issues
The render takes picture hooks etc Long screws and wall plugs for anything super heavy. Angle them upwards to form a triangle (screw in tension and EPS in compression) for extra strength. To be fair we have almost nothing attached to these walls though. Of course now that enough grandmas have died they're renovating the whole block with ewi and new radiator pipework etc just too annoy us! ? -
Dot and Dab vs adhesive for insulated plasterboard
markocosic replied to AliG's topic in General Construction Issues
You can also 'EWI' the inside. - hack back to bare stone - parge coat to air seal - dot and dab large EPS boards on - mesh - render - skim Works well even without parge coat if you seal the EPS gaps incl sockets etc with foam. At the time EPS and mesh/render was cheaper than insulated plasterboard and the external wall insulators were looking for work over winter so the labour was comparable. Needs a good vacuum cleaner when they take the 8 foot rasp to the walls to plumb the freshly applied EPS though! ? -
Big clamps and metal spreader plates. Raid your nearest backstreet garage for suspension busy tools. For example: Hydraulic: https://www.sgs-engineering.com/cc10-10-ton-hydraulic-c-clamp Mechanical: https://www.ebay.co.uk/itm/265214345479 https://www.ebay.co.uk/itm/254286517085 etc Or better still, though not as fast, is a couple of RSJ offcuts (slit a big RSJ into two "T" pieces) and four lengths of chinesium grade M20 threaded rod from Screwfix (if you can drill 20 mm holes in RSJ - rough chain drilling a 22 mm hole using a 6 mm bit and a round file is fine) or high tensile strength (8.8 grade) M12 threaded rod (if your can't drill 20 mm holes). Squash together with spanners. These will easily apply enough force to seat press in nail plates. Clamping the timbers so that they don't move is there hard part. Drilling some extra holes in the spreader can achieve this.
-
Kitchen extract - Ever used/fitted/made a downdraught one?
markocosic replied to markocosic's topic in Ventilation
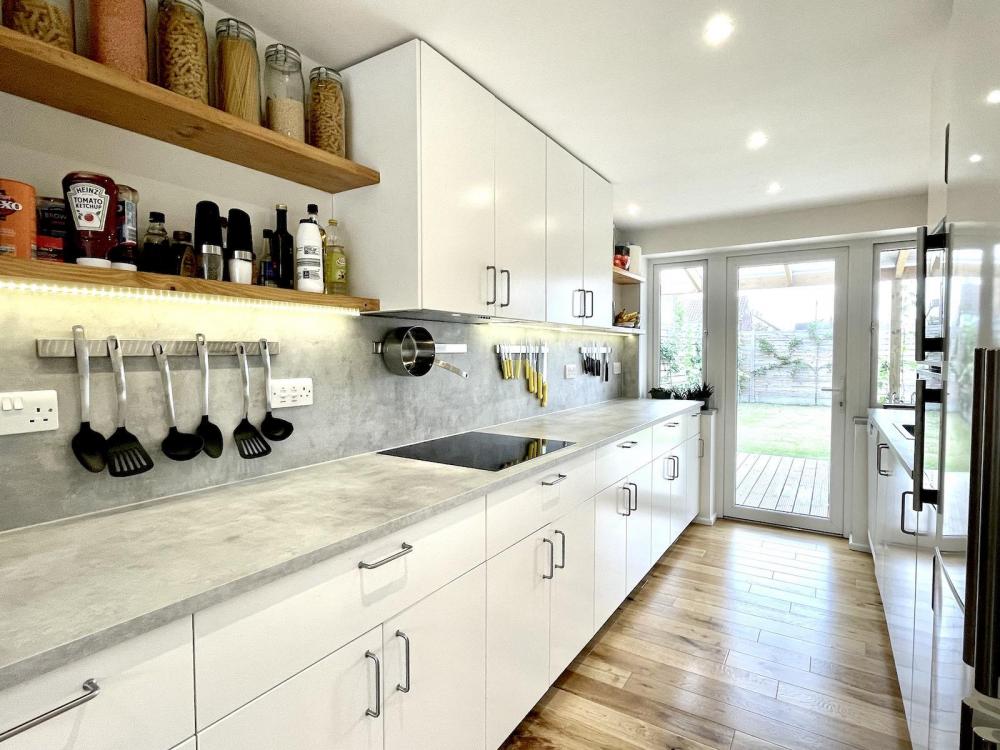
Recirculation is still up for debate. I'm sceptical because life experience of recirculation to date has been awful (shitty flats with grease filled asthmatic mouse recirculation hoods) whereas extract hoods have been decent (at extracting anyhow). Too sceptical to rely purely on recirc. It's a newbuild. It's tight and it's having MVHR. Hob would be going to the left of the bucket. It could also go in front of the window to the left but I fear that would be insanity unless you like drawing on grease or you had a pop-up downdraught extractor / splash guard behind the hob. (such as http://www.hobcoversdirect.co.uk/index.html very practical but icky style) The MVHR has a bypass on the extract. It's a proper* bypass with motorised shutters to close flow through the core and a motorised bypass to go around it. By default it opens when the indoor temperature rises too much. It can also be controlled manually. Boost flowrate is 500 m3/hr at 100 Pa drop. It is very tempting to pipe the extract the hood into this. "Low" hob extract = boost and bypass the MVHR (only) and extracts steam in near silence. "High" hob extract boosts and bypasses the MVHR and adds the hob extractor fan in series to counter the duct / filter pressure drop. "No" hob extract is also an option if it's only steam. (allow the regular MVHR to clear the moisture) Or extract to outdoors. Or setup as a recirculation hob with the option to shove it through the wall later. It wouldn't be done for energy saving. (bypassed MVHR is the same as pure extract) It'd be for noise as much as anything else. Extracting from the oven is also up for debate. (if you roast meat or you roast potatoes in fat etc then fan ovens vent grease) Perhaps we should extract into the oven then bake all the grease out occasionally... https://www.berbel.de/dunstabzuege/zubehoer/umluft-zubehoer/umluftfilter-permalyt/ *Another MVHR unit that I bought had a joke bypass. There was a tiny flap next to the core with a wax filled actuator that would - slowly - open as the temperature rose. No blanking of the core. Just a flap that in theory moved with heat and in theory bypassed some air so that they could tick the box for having a summer bypass. The same absolute jokers (Brookvent) also refused to sell spare parts so the entire MVHR unit needs to be replaced if anything fails.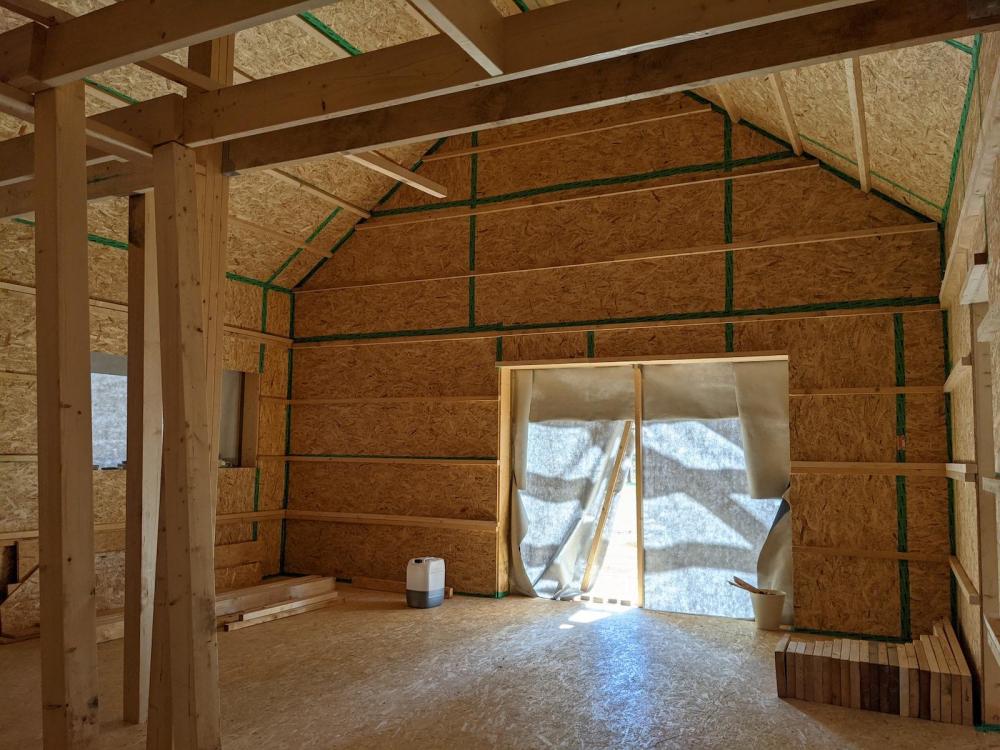
-
Woops there goes another one..... ! Nearly
markocosic replied to ToughButterCup's topic in Tools & Equipment
A cordless drill with bit and battery fitted taking a detour through your spine would also be unfortunate. Batteries out and rattling around bag for transport on site. Fire is slow. Batteries out of bag when it's in a vehicle! -
Kitchen extract - Ever used/fitted/made a downdraught one?
markocosic replied to markocosic's topic in Ventilation
A few threads. Consensus appears to be Novy, Bora, Gaggenau hobs (if you have to ask you can't afford) Consensus also appears to be in-hob extract better than pop-up extract (surprising; but could be as much to do with crummy mechanisms as the fundamentals of extracting at height?) IKEA are starting to do this style. Still rather spendy and Noisy as all heck though: https://www.ikea.com/gb/en/p/foerdelaktig-induction-hob-integrated-extractor-ikea-700-black-50449403/ If you wanted to DIY an in-worktop extract you could add a pair of smaller hobs. It'd probably be a pig to clean though and probably not save you anything once you'd finished faffing. https://www.ikea.com/gb/en/p/vaelbildad-induction-hob-ikea-300-black-20467592/ Probably time to hold this thought for a while. -
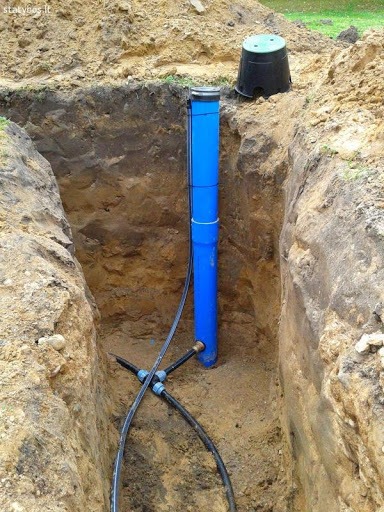
I wouldn't expect any of that lot to be fitted for investigatory works. When we had our borehole drilled they started by digging a chuffing great hole (about the size of a small car) as a holding tank for the drilling water; then they drilled until they hit water; gave it a trial pump at the desired flowrate; then a little further etc until the desired flowrate was acheived. The final test involved dropping a temporary pump down the hole; running it at a set rate for an hour or so (hence the chuffing great hole that they can fill up during the test); and noting the "dynamic level" at your desired hourly duty flowrate. In our case they hit an overtly clean sand layer (under a clay cap) at 35 metres so added 5 metres more and called it almost certainly good. Writeup then says: Geological data: 0-21m: clay 21 to 35m: sandy clay 35 to 40m: sand Borehole diameter: 125 mm Borehole depth: 40m Static water level: 21m Dynamic level: 37m to 3,000 litres/hour Recommended pump lowering level: 38m "Borehole performance" 2400 litres/hour "Filter level" from 35m to 38m (rated capacity is 2400 litres/hour) None of the "gubbins" are installed until quite a bit later. Borehole can still be in the wrong place but at this point it's just underground pipe/cable between it and the house. It would have to be very wrong (e.g wrong end of a 5 acre plot) to matter which doesn't sound like the case on an existing barn conversion? If you need water during the build you drop a pump down the hole with an open-pipe on the end of it and an on-off switch. Usually a cheapo Chinese one that you don't mind abusing. e.g. https://online.depo-diy.lt/products/6937#23391 You could build a shed full of gubbins but it'd only freeze / get driven over / pinched etc. Once the build is near complete do you trench the supply pipe into the side of the borehole, sink the pump on a permanent pipe/cable, and place all your gubbins inside the house.
-
System to provide filtered cool air to bedrooms?
markocosic replied to ashthekid's topic in Ventilation
For ventilating and heating/cooling bedrooms: - Fit the (noise making) air conditioning to the upstairs landing - Use a ceiling cassette that has a "fresh air inlet" for example: https://www.saturnsales.co.uk/Mitsubishi-FDTC35VH/1-Cassette-Air-Conditioning.html - Fit EXTRACT vents to the bedrooms - Run ducting in attic to an inline fan - Connect the outlet of the inline fan to the ceiling cassette This will cool (or heat) the air in the landing, then suck the cooled (of heated) air under the doors and into the bedrooms, and exhaust the extracted air back into the ceiling cassette for spreading around and cooling/heating again. If you're not worried about heating/cooling the air then just hook the outlet of the inlet fan to a supply cent in the landing. Keep an eye out on fleabay too. MVHRs come up from time to time at the kind of money that you're looking at just for fans... My first attempt was unsuccessful - I got f**ked over by Brookvent (the used MVHR that I bought had a dead fan motor but Brookvent refuse to sell spare parts and refuse to allow the fan manufacturer to supply anybody but Brookvent) My second attempt has been successful - I've just picked up a pair (one for our house, one for the parents house) of these @£275 each. Removed by the MVHR installer at the builder's expense and replaced with a more compact unit because the boiler didn't have sufficient clearance to the MVHR unit and was refused a certificate on its first service. https://www.ebay.co.uk/itm/265297462305 -
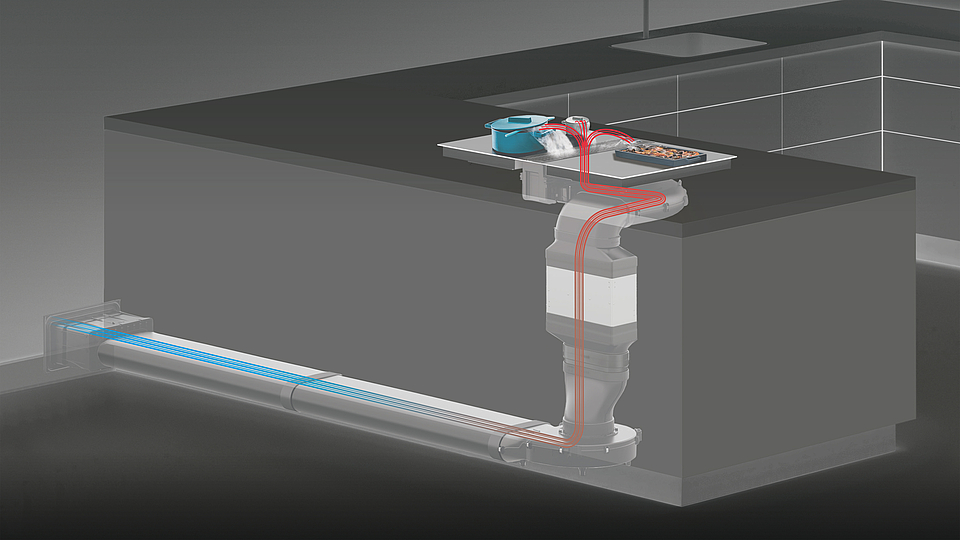
Kitchen extractors... Anybody used a downdraught unit? Fitted one? DIY made one? This looks attractive as a concept: Do they actually work? We have a cathedral ceiling to the kitchen/living space and would like a clear wall (1) for aesthetic reasons and (2) for cleanliness. I'm thinking of making one - perhaps the same thing but with the extract "grille" wall mounted into the splashback with a duct dropping down the service void. Hob will be electric induction. Why? I hate cleaning the things and she hates how they look. We have the IKEA 'underwerk' unit in the current house. It's relatively invisible (hidden in one cupboard and boiler hidden in the matching cupboard); it doesn't block your sightline and you don't smash your head on it (we're both 6'); and it can extract steam. Unfortunately the duct runs upwards before existing the wall and it drips condensation back when not in use. For example condensed grease from a previous steak fry gets softened by steam from a subsequent stew and will ooze back onto the worktop. (it has a mesh grease filter but it isn't enough) Or you get grease / tomato splashes up the wall and on the underside of the cooker hood that are a pain to clean. (you could say that we're clumsy) The buttons on the bottom of that...get sticky. That off white cupboard...also gets stickier and less white rather quicker between cleans than we'd like. It feels like a downdraught unit or a "letterbox" in the wall; with a clear wall and worktop; might extract the steam and make clearing up the grease/tomato/flying spaghetti from the flat surfaces easier.
-
@YeBullen You could use an overage agreement to cover the scenario where you've spent money (on a borehole or a planning application, etc) before you've bought the plot. "We agree that I'm going to spend £X on this improvement and when the land is subsequently sold or transferred I will be paid £Y" Usually these would be used by the seller letting you have land on the cheap (upfront) with the balance due after you increase the value of the land (e.g. by getting planning consent) but you could also use it in your scenario. https://www.taylorvinters.com/article/five-essential-factors-overage-agreements Write down what you want to do in plain English. Ask a lawyer how to make it legal. "I would like to buy this land. I am worried if there is water readily available. I agree to spend £X finding out. We agree that if the land is then sold or transferred (to anybody except me) I will be paid £Y." The seller ought to agree because you will have increased the value of the land. There will be some discussion about what X and Y are. Or "I would like to buy this land. I am worried if there is water readily available. I agree to spend £X finding out. We agree that if I find water you will sell me the land for £Z and I will buy it. We also agree that if the land is then sold or transferred (to anybody except me) I will be paid £Y." Or "I would like to buy this land. I am worried if there is water readily available. I agree to spend £0.5Z on the land now. I will agree to spend £X finding out if water is readily available. I will pay you another £0.5Z if water is readily available." Or "I would like to buy this land. I am worried if I will get planning. I agree to spend £0.2Z on the land now. I will pay you another £0.8Z if planning can be secured." etc Don't worry about the mechanics how this is made legal. Work out what you want to do achieve first.
-
Do the Swedish style couplings help? You don't want ANYTHING above ground. I'll freeze. So you drop the borehole then dig a metre or two down alongside it and tee through the side of the casing to make the water connection. The pump has a "hangar" connection on its outlet. You drop it down the hole, latch it onto the tee, and there's naff all visible / in the way above ground. (just a small service cap) I'd buy - at a discount - without the water and gamble on not having any issues. The alternative is a binding contract that agrees the sale price in advance and that either (a) the sale to you will proceed or (b) if you back out then when the sale to another person happens you get your cash back. Overage is the word. Risk of people not doing what they agreed is fixed by contracts.


-
I wouldn't sweat it. Budget for the borehole... ...but tap into the neighbours supply for the initial build and for as long as you're able to do so in order to save on faff initially. Private re-supply is fine. Pop a meter in. Where the water was originally supplied by 'the water board' they are legally only allowed to recharge what they paid plus a £10 admin fee. https://www.ofwat.gov.uk/households/your-water-bill/waterresale/ (but could also reasonably charge you rental for running the pipe across their land; with the right to terminate with X months notice; etc - something that they would be wise to do such that they're able to sell their home in the years to come without there being a legal embuggerance preventing it) Sewage will cost you more to install and maintain than the borehole. Electricity and internets might be the bigger question. Those you can't just dig yourself and you may end up trenching in supplies for 1 km after all. (again potentially not the end of the world vs build cost)
-
GSHP planned but not hot water??
markocosic replied to Selfbuildsarah's topic in Other Heating Systems
Many (most?) GSHPs and ASHPs will have a direct electric backup. The heat pump provides the base load. When it's too cold for the heat pump to provide the full capacity required; or the heat pump is broken; or you need to reheat stored water quickly; or you want to heat stored water to a higher temperature than the heat pump can operate at; you turn on the direct electric backup. You might be surprised what you can do with this. e.g. the little GHSP i'm using has a nominal output of 6 kW; plus three 1.5 kW direct electric elements (for 1.5/3.0/4.5 kW extra) Reheat time for 180 litres from 10-55C is 95 minutes on the GHSP alone; or 55 minutes with both the GSHP and the direct electric elements running. That's enough for pretty much back to back showers in one bathroom in a limit cas "loads of guests" scenario: Assume 10L/minute shower at 40C; from hot at 55C and cold at 10C. That's nominally 6.7L/min of hot and 3.3L/min of cold. A 10 minute shower is 67 litres of hot water gone. Say it takes 10 minutes of brushing teeth / having a poo / getting naked before shower / getting dry and clothed after shower. In that 20 minutes that the guest is in the bathroom the 6 kW GSHP and 4.5 kW direct electric element can reheat (20/55) * 180 or about 65 litres of hot water. So provided that you set the controls for "On, Boost" you can back to back shower 10 people through a single bathroom over three hours without running a 180 litre tank at 55C empty. Two bathrooms is trickier. That'll eat 135 litres of hot water whilst you only refill 65 litres. If your tank starts out full and the controls are set for "On, Boost" then after three goes (i.e. 6 people in one hour) you've drained the tank and need to wait an hour before the next 6 people. Bump up to something like a 12 kW machine with a 3/6/9 kW direct electric backup and you're laughing. (300 litres from 10-55C in 45 minutes) That'll effectively run 2 bathrooms continuously even with a small tank. (assuming 10 minutes of brushing teeth / having a poo / getting naked before shower / getting dry and clothed after shower etc) With a 300 litre tank you might not even need the direct electric backup. Even if your space heat load is only 6 kW it'd be worth having the 12 kW capacity available for the DHW in your 10 guest scenario. Note the ground loops don't need to be twice the size if it is only for occasional use. (you're sizing on the average rate of heat pulled from the ground not the peak rate) Useful tools for quick calcs: https://myboiler.com/calculators/hot-water-recovery-time-calculator/ https://www.spiraxsarco.com/resources-and-design-tools/calculators/water-mixing/water-mixing -
It's probably designed to vent into the outdoor unit, drop on the pan along with condensate from fins, and drop on the ground.
-
Houses are usually the same (G1/2"?) thread on ends. Hose must match rail. Hose doesn't need to match mixer or shower outlet. Colour tone difference between 'chrome' and 'chrome' may annoy you.
-
35Kw Combi Boiler - Which make
markocosic replied to NewToAllOfThis's topic in Boilers & Hot Water Tanks
That viessmann 'issue' was refusal to RTFM about how the boiler is supposed to operate and set it into an appropriate mode... Vaillants are decent. One thing to be aware of is their choke flow valves. Combis could be overloaded if the hot water flowrate is too high. That would cause the water to run cool and screams from the shower. It is considered more useful if the temperature was maintained but the pressure drops a bit instead. (then your thermostatic valves shuttle across and rebalance flows to maintain the outlet temperature at a lower overall flowrate) They achieve this by limiting the water flow rate through the boiler with a choke flow valve. (even with loads of pressure the flowrate will never get high enough that the boiler cannot achieve 45C outlet with 5C inlet temperature. Sounds good? Maybe yes if you're in Europe and you have good (say 30+ litres/minute at 3+ bar) water pressure. In the UK the water pressure is often lower than that which the (European) boilers were designed for, and you can find that they never achieve full output sure to insufficient flowrate OR that achieve the output but so much pressure is lost across that boiler that none of left for the shower. Ditch the choke valve (e.g. on a vaillant 824 it is the cold inlet valve that had the tiny orifice - swap for a plain hot water outlet pipe and an external full loop) and they'll work a little better on cold supplies that are less brilliant. -
Freeholder withholding consent for alteration
markocosic replied to bupieker's topic in Surveyors & Architects
I think send a letter that requests confirmation that you are looking at the same version of the lease text, with regards the section of interest, and requests that they provide their reasonable reason(s) for withholding consent that the inadvertently omitted from their previous correspondence. The reason might be "contravenes building regulations" Get the reasons in writing first. You then show that it does not (by asking a professional to say that they're not contravened) And you ask if now that all of their reasonable reasons(s) for refusing have been eliminated they would like to provide consent or if they wish to proceed to challenge the subject matter expert in court. You send it to the moron that you're currently dealing with. You carbon copy it to their head of in house counsel (Christopher Ashplant) with a covering note apologising for this trivia ending up on his desk as a result of minions with ideas above their station. He will probably have a quiet laugh then beat the moron about the head with your letter and remind them not to create work for him / liabilities for NHG... -
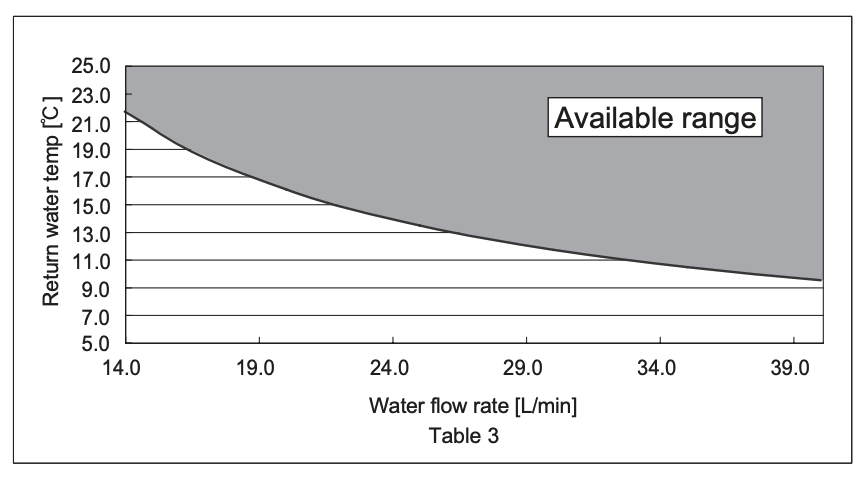
This is the installation manual for the hot water cylinder; not the hat pump. A quick Google for PUHZ-HW140 confirms your flowrate requirements though. Flowrate and return temperature needs to be in the range below in order for the unit to operate. If the flowrate through your secondary system (the rads / UFH) and through the 4-pipe low loss header is HIGHER than the flowrate from the heat pump through the 4-pipe low loss header then you're going to have temperature dilution issues. I would set UFH flowrate to 18l/min, DHW flowrate to 18 l/min, and radiator flowrate to 22l/mum (max, with all TRVs full open) And the heat pump flowrate to the maximum. Now you can run: - DHW only - UFH only - UFH and DHW - UFH and any amount of radiator up to 100% open I would set UFH to 18l/min, DHW to 18 l/min, and radiators to 22l/mum (max, with all TRVs full open) Now you can run: - DHW only - UFH only - UFH and DHW - UFH and any amount of radiator up to 100% open That will resolve your dilution issue. I would also fit a buffer (a volumiser if you prefer) on the heat pump side of the space heating circuit (flow or return; return probably better) to reduce cycling when the load being drawn off is lower than the heat pump is able to modulate to. 50-100 litres. A small direct unvented hot water cylinder will work. I would also eliminate the 4-pipe header and drive everything directly form the heat pump; using zone valves for the different circuits instead of using pumps. And that's your priority order for biggest bang per buck.