markocosic
-
Posts
979 -
Joined
-
Last visited
-
Days Won
1
Everything posted by markocosic
-
Engineering Flooring in Bathroom and En suite
markocosic replied to Drew1000's topic in Wood & Laminate Flooring
Lifting section: (shower needs desperate clean... :-o) Could be fixed by removing silicone, lifting, and re-gluing. Or by leaving the mat on top. Engineered wood itself is fine if allowed to dry IME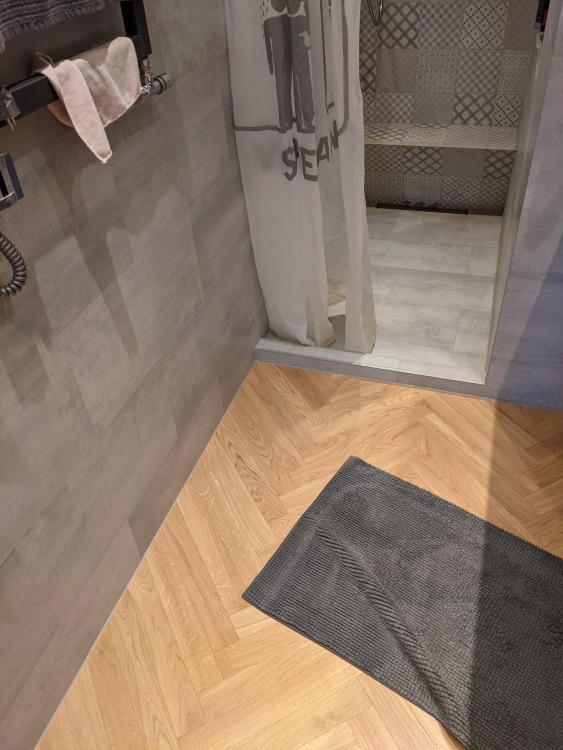
-
Engineering Flooring in Bathroom and En suite
markocosic replied to Drew1000's topic in Wood & Laminate Flooring
Currently debating what to put in the next house... For what it's worth this is entirely possible. We've got engineered wood in bathrooms - in a house in the UK and the apartment in Lithuania. You don't need the UFH. Wood is warm underfoot and if the bathroom is ventilated then you don't get moisture and this will air dry to the room as well as through drying through teh chipboard / OSB underneath if it's a 1st floor. UK: Cheap 14 mm planks glued onto 18mm 1st floor chipboard with some 4 mm packers and a 4mm thick electric heating wire (never used though...as wood is warm) underneath it. Commercial 2-pack floor varnish over the top after being laid. (which has cracked a the joints pretty much the second it cured, so it isn't waterproofing the joints) Installed by me so glued to all heck. Maintenance? Take care to keep it dry. One bath mat sat in the "centre" of the floor that is moved regularly. House has MVHR with ridiculous boost extract from bathroom so bathroom air is never humid. Been down 2 years. Looks the same as they day it was installed. 8 mm expansion gap with silicone in it to the bath side and to the tiles around the edge. Lithuania: Herringbone oak parquet glued onto screed. No UFH. No varnish on top. Installed by general purpose builders so probably very lightly glued onto dust in a hurry. Minimal say 5mm expansion gap to tiles because she doesn't like to look. She also insists on keeping a mat right by the shower right up to the edge of the floor. As such...it can never dry...and the parquet is loose where you step into the shower. Completely undamaged by moisture though. Just lifting. This has been down 5 years: Wall hang the sink and toilet. Much easier to clean and you can set them at a height for adults instead of 5 year olds. The cheap 14 mm UK boards run into the hall, then transition nicely to 11 mm underlay plus carpet in bedrooms. No height difference; standard thresholds. I also have it throughout the downstairs including the kitchen. Only real maintenance tip is to RAISE all your appliances by the same height as the cupboards and put a plinth under them. Seal the gap between the plinth and the floor BEFORE somebody spills milk. Much easier to keep clean.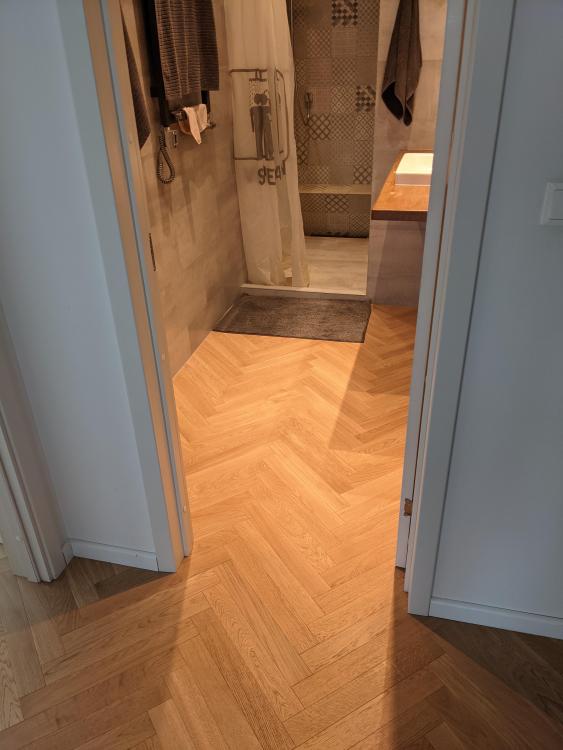
-
Counterbattening on vertical cladding
markocosic replied to ToughButterCup's topic in General Joinery
You're getting it done quicker than we are! ? -
Counterbattening on vertical cladding
markocosic replied to ToughButterCup's topic in General Joinery
1 mm gaps are "too small" for bugs to enter. 100 mm gaps are "too exposed" for bugs to enjoy living behind them. At some point you reach an optimum between "big enough for ease of access" and "small enough to offer protection from the elements" that the bugs love. 10 mm and 30 mm is different. You might be approaching small enough for the bugs to think it's a great place to be. We had a similar debate - open-gap-bloodyexpensiveUVmembrane-and-risk-bugs vs boardonboardand-and-1mm-mesh-to-openings - which was resolved after 2 murder hornets and 3 sets of wasps set up shop in the house even before we got the cladding on! Depends what lives in the area and what their other choices are as much as anything else. On the counter batten: I'd put a floating batten just above the bottom of your cladding. It doesn't need to be attached to the vertical to "keep the ends of the boards tied together in a nice neat plane" as it were. -
Viessmann Vitodens 200-w - initial impressions
markocosic replied to larry's topic in Boilers & Hot Water Tanks
Hang on a sec...re-reading the initial thread....you have set this to 'continuous heating' mode and are surprised that it is....heating continuously? In that mode it will keep the heating pipework up to temperature...continuously. So unless your controls are setup for this (with valves that close off each zone when the desired temperatures are reached) is the boiler not doing exactly what you've asked it to do? (keep space heat hot 24/7/365) And you're noticing a "fault" because your heating system is "calling for heat" (by virtue of having open valves even though rooms are at temperature) even though your rooms are up to temperature? i.e. The consumer side controls aren't designed appropriately for a 'continuous heat' source. -
Viessmann Vitodens 200-w - initial impressions
markocosic replied to larry's topic in Boilers & Hot Water Tanks
To try identify your issue: Boiler fires when flow sensor detects dhw flow. Boiler should divert flow through dhw plate heat exchanger not through space heating circuit when there is dhw flow Boiler should modulate burner output to match the dhw flowrate The boiler will fire whilst there is dhw flow. It will keep firing until the plate heat exchanger is up to temperature. (so that you can restart a paused shower without getting a slug of cool water) There is flow into the space heating circuit when there is dhw flow though. This flow is big enough that anything less than 10% burner results in so much heat thing into the space heating circuit that the plate heat exchanger never reached the set point. Why is there flow? - diverter valve fault - diverter actuator fault - controls fault driving diverter open - external driving forces that shouldn't be there (e.g. external circulation pumps) A service tech should be able to identify the first three. You check the first one by closing the valve by hand and seeing if you get this back flow. You check the second by removing the actuator and verifying how it moves. The third is identified if the first two pass. The latest is possible. System diagram? If the latter I'd guess your previous boiler either didn't have the "keep plate warm after hot water is used" feature or had a different diverter valve arrangement that wasn't as sensitive to external driving forces. -
Adapters for radiators tubing height
markocosic replied to Bruno's topic in Central Heating (Radiators)
Balance the radiators. All rads should heat up evenly unless the house is absolutely mahoosive. The pre-setter or lockshield valve controls the peak flowrate through the radiator. This is what balances heat output during the warm-up phase. The thermostatic radiator vakle (trv) is what controls the flow rate through the radiator once the room is near to the set temperature (which is controlled by the trv NOT the thermostat). Most houses are unbalanced. The pre-setter or lockshield is to far open and achieving nothing. This means that time nearest the pump steal all the flow until they have neared their setpoint and the trv starts to regulate flow. Only then does heat flow to the distant radiators. In a correctly balanced system all radiators will heat up evenly if you turn on the heat source / pump and remove the trv heads. If they don't do this then you have balancing problem not sizing problem. Very, VERY, common. Also very, VERY common for the room temperature never to be controlled by the TRV because it's set to high and the heat up period is too short. The only challenge comes when the house is SO big and the pipework is SO uninsulated that the water had time to cook in the pipework before it reaches the farthest radiator. In a care home or hotel this matters. A bit. In a typical (<200m2) host it's irrelevant and even in larger houses can be fixed with thermostatic bypasses. Schematic of system? Description of how you distribute flow? Photo of what is under that white cap and the trv head? CLOSING there other lock shield valves then cracking then open a rich to force water to the most distant rads is likely what you need -
Ventilation Boost switches
markocosic replied to Stones's topic in Mechanical Ventilation with Heat Recovery (MVHR)
Interesting @Nickfromwales Dampers might also be fun in the 'open plan kitchen' scenario - dampers to deliberately unbalance the MVHR by opening up the kitchen more than the bathrooms; to create a net flow towards the kitchen rather than there being an equal suck on the kitchen side and the bathroom side of any open plan area. Dad had a system back in the 80s (!) where the kitchen extract hood was integrated with the MVHR. There was a damper in the extract hood such that 'normally' it had a small hole and was evenly balanced with the bathroom extracts / room supply. When you 'turned on the extractor' (which had no fan of its own) it boosted the MVHR unit and opened a damper within the cooker hood so that it had a 6" hole not a 2" hole. (it wasn't a fire damper) The HX was a metal affair that REGULARLY had to go through the dishwasher courtesy of grease + dust (not a good idea running kitchen hood extract through the MVHR unit). The idea of "unbalancing" the MVHR to prioritise the "general kitchen extract" in an open plan setting probably has some merit though. -
Ventilation Boost switches
markocosic replied to Stones's topic in Mechanical Ventilation with Heat Recovery (MVHR)
I've got a flow sensor on the hot water from the boiler; and set this to trigger a boost on the MVHR (a Triton unit) if it's used for more than a minute and to run on for 5 minutes afterwards once triggered. This is faster to respond to showers than humidistats and clears the steam before you've filled the bathroom rather than afterwards as it were. (important if you have a decent shower in a small bathroom that's very tiles/has very little vapour buffering) Unlike a light switch it doesn't boost when not needed and the regular extract (only one bathroom in the "house" on the MVHR, with the other in the "addon porch") is enough to deal with regular loo smells. Exceptional smells are banished to the "addon porch" by the wife. In hindsight... I should have made provision to put this on the hot water feed to just the shower rather than to the entire house...as the hot fill dishwasher also triggers it. I would add a manual boost for curry night if you don't have the luxury of a large house. (this place is only 70m2) -
Suggestions for new 12V gel lead-acid 200Ah+ battery?
markocosic replied to DamonHD's topic in Energy Storage
Ah, space constrained rather than supply of panels constrained! I'll need to look for somebody else to split a forklift pack then... https://www.ebay.co.uk/itm/154427926929 (48 V / 500 Ah for 24 kWh nominal @ £1500 - it really wants a full roof and a 2 kW inverter to carry any single appliance except an induction hob) -
Suggestions for new 12V gel lead-acid 200Ah+ battery?
markocosic replied to DamonHD's topic in Energy Storage
Hello DHD ? Out of curiosity why 12V 200 Ah rather than 2x 12V 100 Ah in series? Smaller batteries to lug around. Thinner wires / lower I2C losses. A lot of automotive grade stuff takes 12-24v these days (LEDs, USB adapters, laptop adapters) or is available in straight 24v (pumps, motorised valves etc). I'm picking up 20 used 195W panels (£230 the lot...) next week and would like to split these / experiment with running hotel load on PV inc overnight via storage. Somebody was offloading 50 panels the other day for £1200. Cut cables slightly sketchy to rejoin but at that price I was half tempted o use 'em as a ruddy fence! -
Viessmann Vitodens 200-w - initial impressions
markocosic replied to larry's topic in Boilers & Hot Water Tanks
When it comes to tightness testing you'll need something like this: https://www.ebay.co.uk/itm/363143285529 https://www.ebay.co.uk/itm/254953023280 I'd expect to see a radiator system - except for the expansion vessel and the boiler / pressure relief valve - tested to 10 bar cold. I'd expect to see potable water systems - except for any cylinder / expansion vessel / pressure relief valve - tested to a minimum of 10 bar cold; preferably 20 bar where the components (pipe, taps etc) allow this. Most will. Bring it up to pressure. Wait 10 mins for everything to stretch/settle. Bring it up to pressure again. Wait 20 minutes. Bring it up to pressure again. Wait 2 hours. Check how much it's moved vs what the pipework vendor allows. (the initial stretch in PEX is a LOT; in copper it's not a lot / anything more than 0.5 bar is a massive red flag) You rarely see this in domestic installs but you should. It quickly finds all your iffy / forgotten joints. You see it more often in district heating land (many old systems are drained every spring and pressure tested over the summer - cold - after all the annual maintenance before they're allowed to be filled hot) and in newbuilds (the primary pipework on 50+ storey towers is at thoroughly decent pressure; and your insurers will want to make darn sure that the penthouse isn't about spill it's guts onto the deputy penthouse below) -
Viessmann Vitodens 200-w - initial impressions
markocosic replied to larry's topic in Boilers & Hot Water Tanks
Strongly disagree. Nice old iron systems have corrosion allowances. You fill them; you let them corrode; this consumes the oxygen in the water. The boilers god first. They corrode from the inside and they corrode from the outside (all the acidic nasties in the dirty wood / coal / oil that you're burning that eat the heat exchanger even if you try to prevent condensing operation by keeping return temperatures high enough). Pipework doesn't tend go because systems are arranged so that all the muck and air end up in the radiators. 100 years isn't a problem. A pH between 8.2-10 is fine and that's what you water ends up at naturally due to corrosion by-products. More recent open-vented systems with copper pipework, thin steel panel radiators, and noncondensing iron boilers are ok provided that they're not leaking and the header tank is being used for expansion not for constant fill. The rads and boilers last 30-50 years; at which point the rads are scruffy and the valves have all stuck or started to weep and the boiler is at the end of its service life etc. You replace the lot and you're fine. No inhibitors. Muck about replacing them piece by piece and yes, I agree, you'll keep on introducing oxygen that soon turns to rust and sludge. It's that sludge that'll kill you (bunging up the pump and valves and boiler) before the corrosion allowance on the radiators or boiler is a problem. Bunging in some inhibitor instead of replacing the pumps, rad valves, and boiler at the same time and leaving it filled for another decade isn't smart though; and if you do maintain it properly then you don't get that regular topup that introduces oxygen. A pH between 8.2-10 is fine and that's what you water ends up at naturally due to corrosion by-products. If you stick inhibitors in you New closed systems with stainless boilers and panel radiators or oxygen-barrier-ed underfloor are fine. You fit 'em. You flush 'em. You fill them. You bleed them and top them up once the corrosion has happened. You leave them alone for a decade. You drain them. You replace the expansion vessel. You fill them. You bleed them. You leave them alone for another decade. No inhibitors. They're not necessary in these systems that don't leak and don't break and don't require regular topups. If they do leak all the time and break down all the time you've got other issues. (low quality install; low quality equipment) Again a pH between 8.2-10 is fine and that's what you water ends up at naturally due to corrosion by-products. The nightmare scenarios are: 1) rubbish old system that gets converted from open vented to closed and runs at 2.5 bar not 0.5 bar; with valves whose seals weep and joints that aren't tight; so it it leaks like a sieve; plus an el cheapo boiler with aluminium heat exchanger; and an energy efficient circulator pump that contains permanent magnets to ensure that all the sludge builds up inside it. Now you've got a constant oxygen supply to turn into sludge and you simultaneously need to keep the pH low (for the aluminium - between 6.5 and 8.5) whilst also keeping the pH high (for the steel - between 8.2 and 10). You can do it, using buffers to control pH and inhibitors to control corrosion. It's a finicky (impossible) thing to maintain though. 2) new system installed by monkeys; preferably underfloor heating without an oxygen barrier (to ensure that oxygen keeps coming in even though you're not toping up the water); paired with an aluminium boiler (difficult to protect); filled from a high conductivity salt-softened supply (conductivity speed corrosion); kept under-pressurised (so that you get lower pressure around valves etc that sucks in oxygen through the seals); and installed with an energy efficient circulator pump as above. If the system is godawful then inhibit it. If the system is tight then fill it, forget about is for a decade or more, then do the occasional major service including *preventative* maintenance (replacing the bits that you know will fail) every 10 years or whenever a major component fails. Expansion vessels should be oversized and installed external to the boiler (give them an easy life) Isolation valves should be exercised annually. (so that your pump or even your boiler CAN be swapped without a full system drain) Valves shouldn't be toolfix own brand specials. And don't buy boilers with aluminium heat exchangers - unless the system is entirely underfloor heating and/or aluminium radiators. You're planning for failure by doing this. I'd avoid thinwall carbon steel pipework unless employing a water treatment professional too. It can work. It can also go very badly wrong very quickly. (you MUST flush it then immediately fill it and keep it filled - allowing it to dry will initiate localised corrosion and pinhole it in no time) (day job is district heating systems for what it's worth; so get to see lots of examples of water treatment done right on state-of-the-ark systems along with water treatment gone wrong on modern systems) Build the system from compatible materials. Keep it tight. Don't keep taking it to bits. Everything but the heat source and circulator pump/expansion vessel is capable of lasting longer than you'll be alive. Without inhibitors. There's a standard for it called VDI2035. If you don't follow that standard your boiler warranty - if a premium brand from the continent - will probably be void. There's a reason for it. Those trade mags and the 17 year olds in the blue vans sponsored by british gas and worcester-bosch and fernox are paid to spout everything that you need to know to make sure the system won't last 15 years. ? -
Viessmann Vitodens 200-w - initial impressions
markocosic replied to larry's topic in Boilers & Hot Water Tanks
Have a read up on VDI 2035 water treatment standards. Inhibitor isn't required on a tight (airtight) all-iron system willed with decent water. There will be some initial corrosion, which will use up all the oxygen and raise the pH of the system, then it stops and all is good. You get problems if there is a continuous supply of oxygen into the system. (systems with leaks and lots of top-up action; cheap underfloor heating pipe without an oxygen barrier) You MUST use an inhibitor with these (and keep replenishing it in the case of leaks) You get problems in mixed metal systems. High pH destroys (cheap) aluminium alloy heat exchangers. Low pH destroys steel. You MUST use a buffered inhibitor with mixed metal systems. Quality boilers will either have stainless heat exchangers or stainless-lined-alloy / copper-lined-alloy. Perfectly normal NOT use use inhibitors on these. You might dose them to get the pH up quickly if they're a large system. Else just leave well alone and if it's tight it won't rot as there's no supply of oxygen to drive the reaction. No chemicals down the drain. No chemicals attaching your plastic/rubber components. Fernox, Adey, Worcester and co all have massive marketing budgets. Systems are often leaky old rubbish (and you don't notice with open header tanks). Cheap boilers (Worcester et all) are all make of case hardened recycled coke cans and plastic. They will fall to bits without treatment. All the premium stuff usually calls for water quality to VDI 2035 instead. -
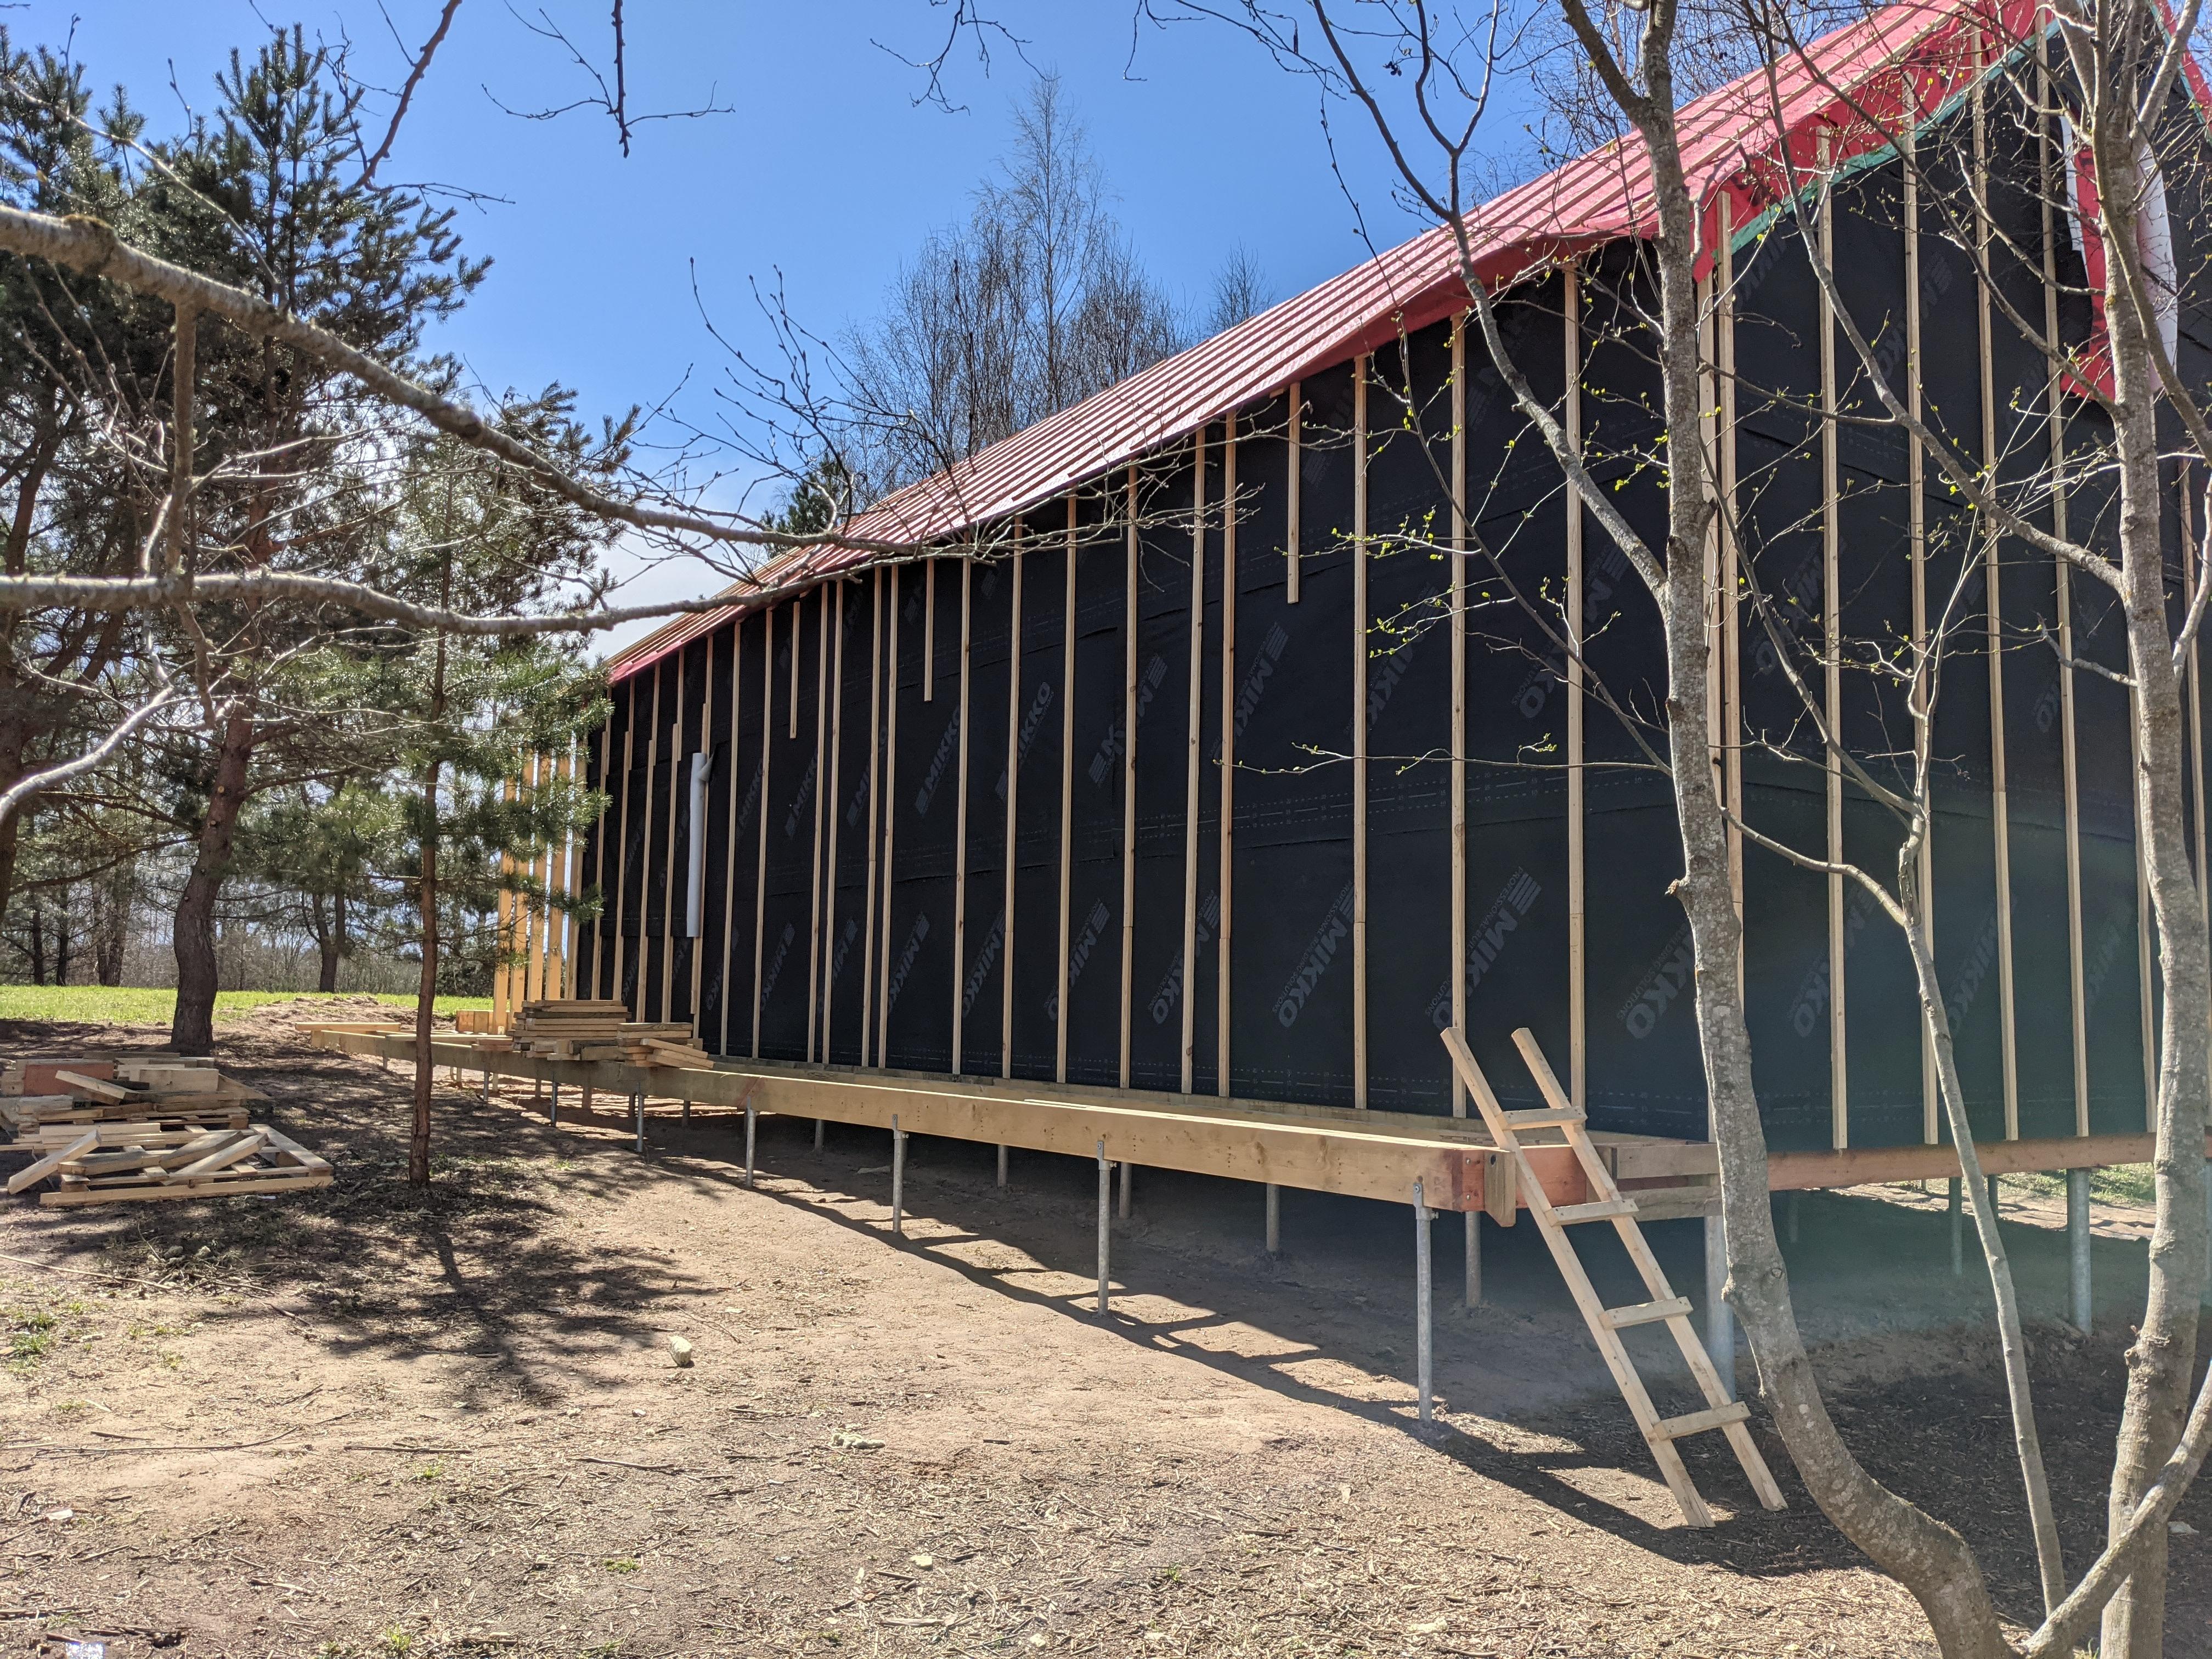
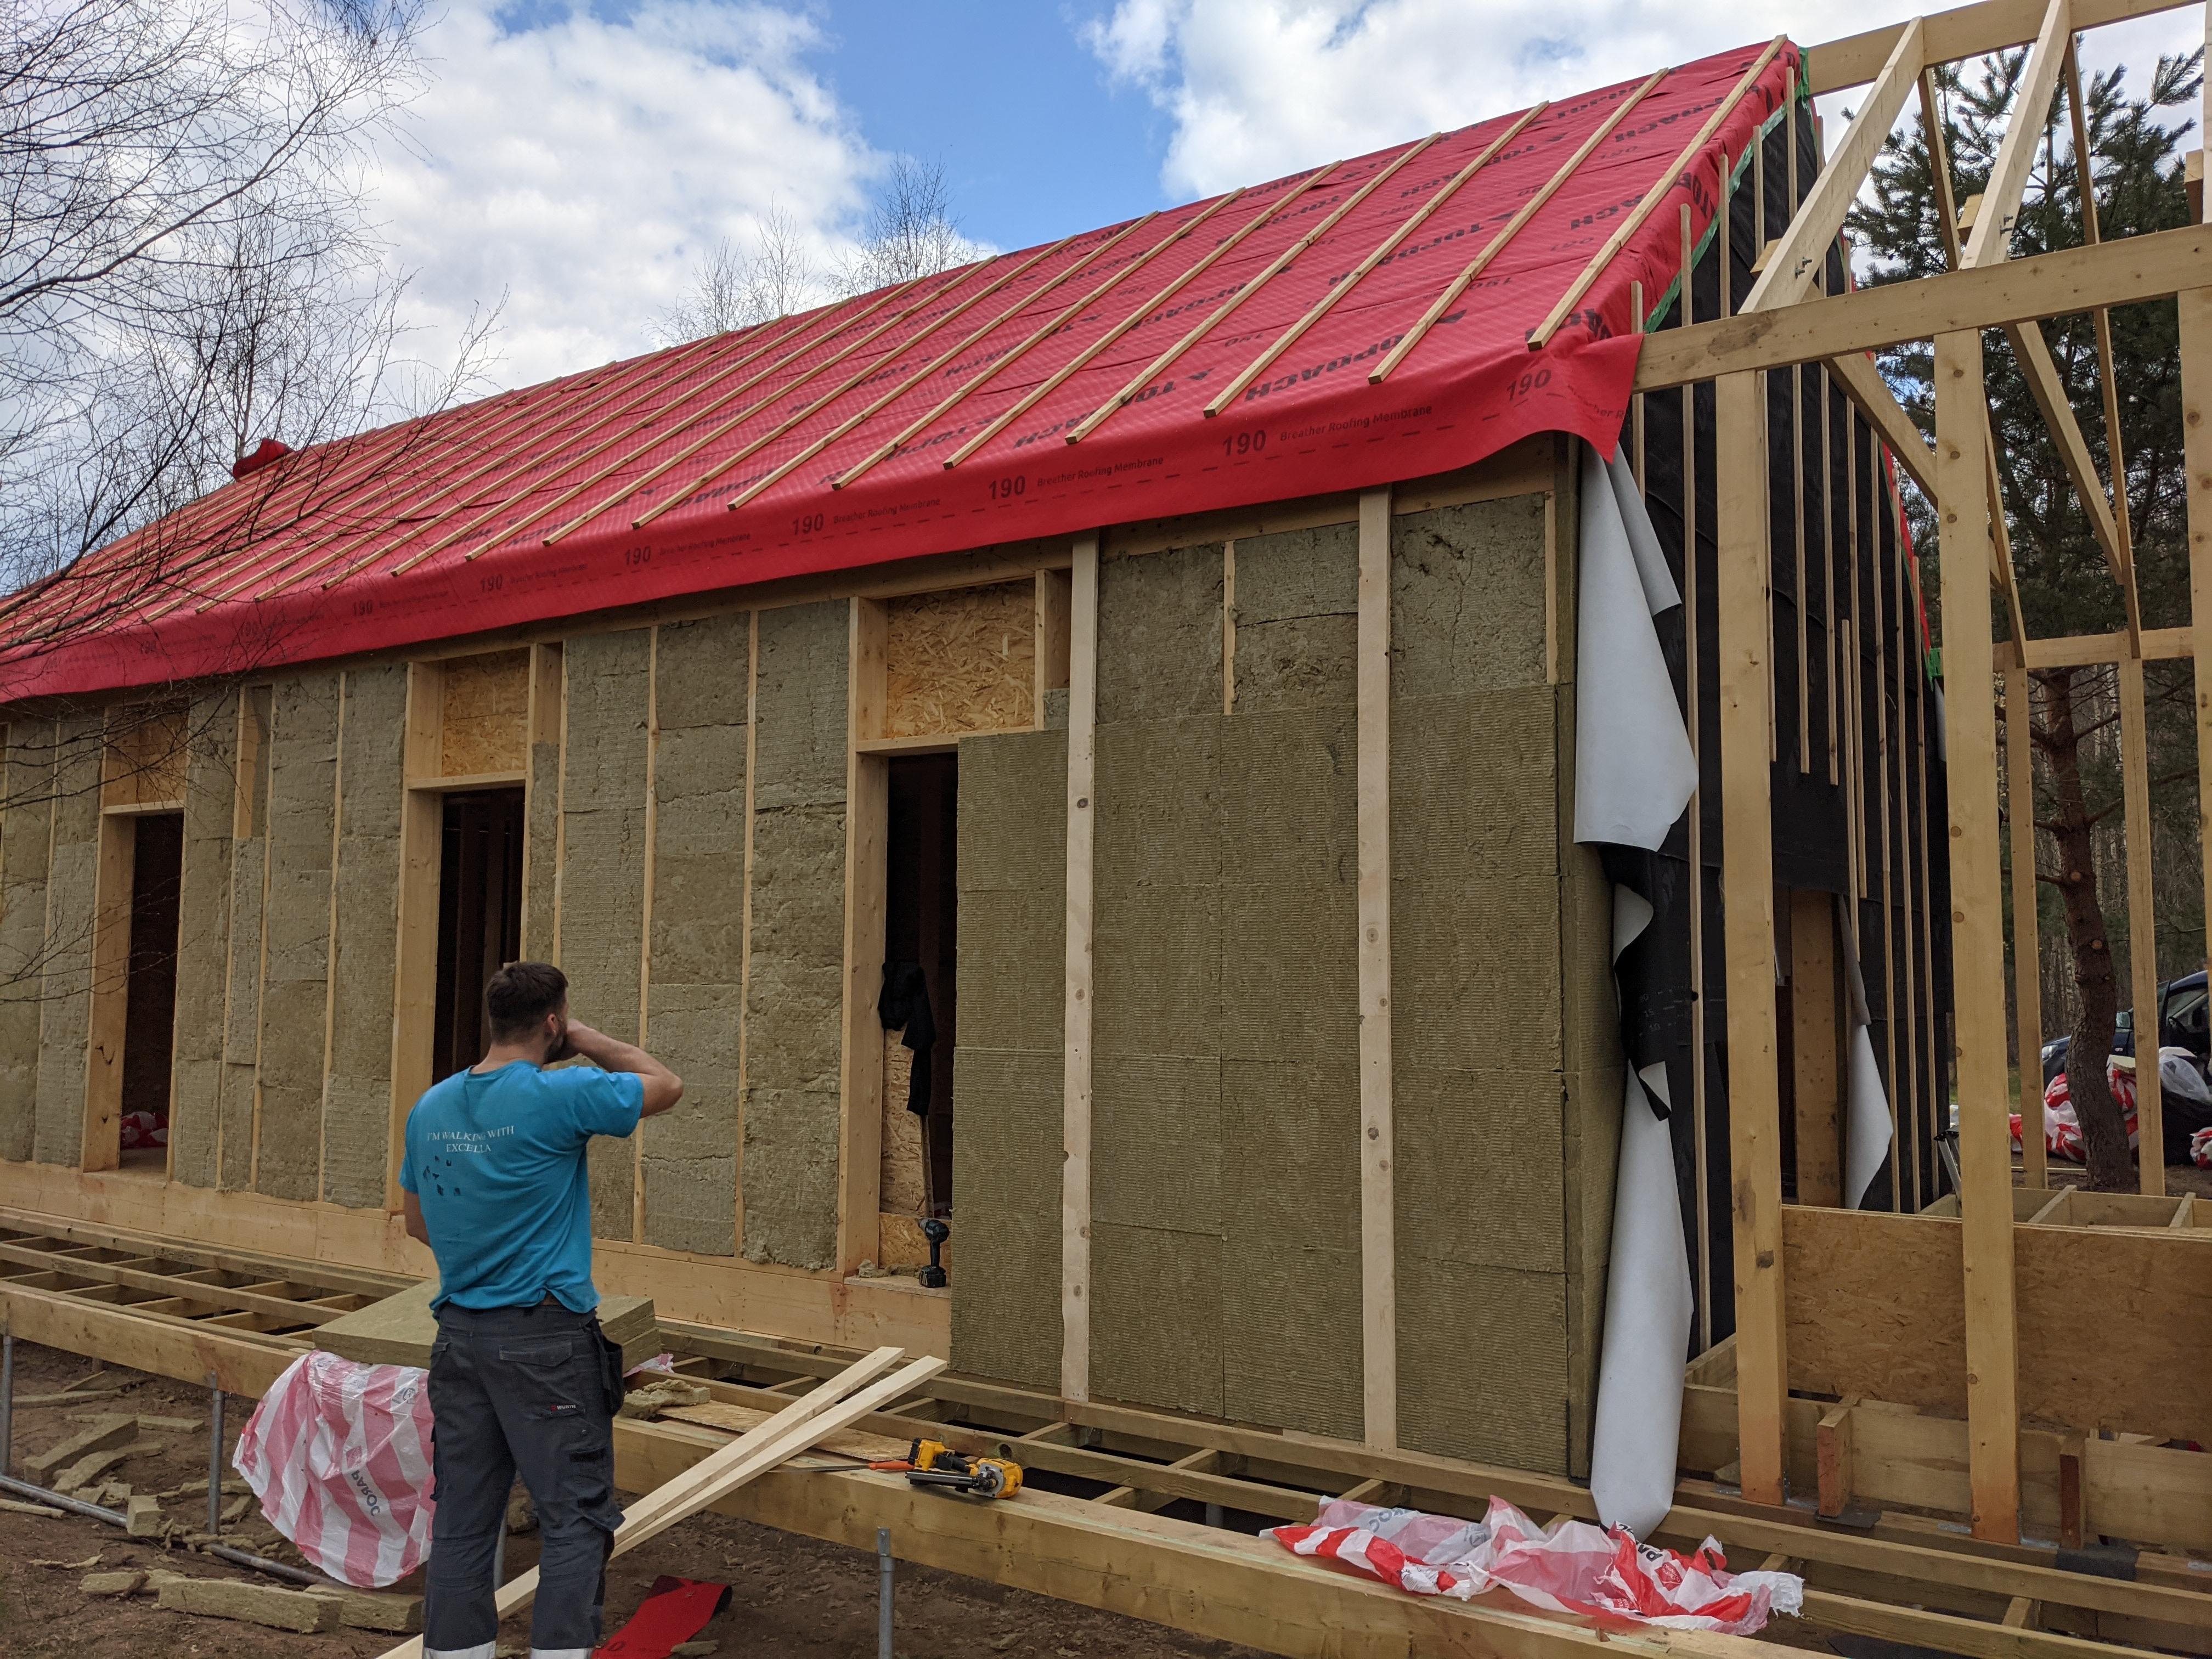
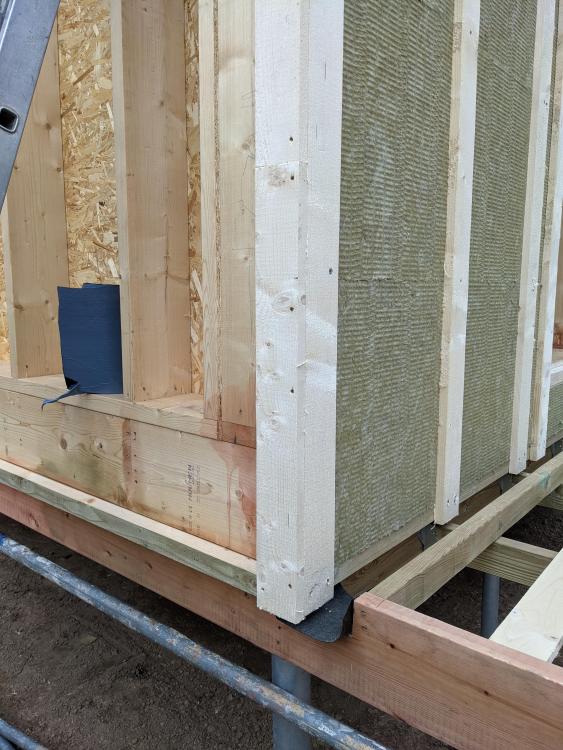
And some other details we looked at when switching from lightweight to timber cladding: That "create a truss using screws" model can work in places where it's too difficult to put a horizontal batten in place. We ended up using one (which goes in place if the insulation - 45mm for 69mm nominal insulation) at the footings and one at the eaves of the roof. Much like the second image but on a smaller scale!
.png.0207412096b970806ab0c8ce8f4a06a7.png)
.png.040896fdc61625bddcd2652d01108cf2.png)
-
You might find these useful: https://dmxsystem.com/en/group/wds https://www.varztupasaulis.lt/?gclid=CjwKCAiAmrOBBhA0EiwArn3mfNQLCp15vhFhjPkY8PQm5b-Hb6XhpSAtJ7PMB0vT2q_5A6cKgoUoeBoCJusQAvD_BwE&locale=en#!gid=a6f22c80-99ac-11db-8870-000423473dd4&details=3f33129c-e602-11ea-0480-000c2926ea9c&tab=1 It's a screw with one way barbs under the head. You screw it through the strapping and into the stud. The barbs grab the strapping. You can then screw it in/out and the barbs give you some pressure resistance - enough to walk on whilst you're building the roof without/putting the horizontal battens on anyway - whilst the heads give you suction resistance. I prefer physically locking the head by putting the horizontal battens directly on top of them though.
-
Showing overlapping screw detail. First vertical batten can't come away from wall but can "over squash" the insulation. When you lock it in with the second horizontal batten the vertical one can no longer "slide further down the screw" because the head it locked against the horizontal batten. You need to take care how you drive your screws with this method (heads must be flush - countersunk but not buried deep into the first batten) Drip edges on vertical batten. We laid some bitumen in a "u" shape to protect the (external deck support) wood from water pooling on it. Not the best detail in hindsight!
-
An earlier attempt without any horizontal batten. This works for lightweight cladding if fixing at 460 mm centres with 6mm screws. (we were going to use wriggly tin / bitumen originally then decided that it was just too ugly - the yanks use similarly lightweight vinyl siding)
-
Membrane and an extra layer of strapping variant. (ready for horizontal battens and in this case vertical cladding but tile.would.be similar)

-
Stacking insulation behind loose strapping (fix at 1200 centres first, then add the others later it makes adding the insulation easier)

-
mineral wool over frame filled with soft mineral wool. The horizontal batten is in the foundation frame (footing) not the rim joist.
-
Put a horizontal batten that is the thickness of your compressed insulation near the ground to take vertical load. Preferably on the (cold) footings not as a thermal bridge to the (warm) studs. Screw fixings to take shear load. Put vertical strapping (e.g. 25*100 mm) on the wall. The bottom is fixed rigidly to the horizontal batten. The top is loosely screwed in for now. Slide your insulation panels behind it. And membrane if your using one that goes directly onto the insulation. Then screw through the vertical strapping into the studs. Compress your insulation the required amount when doing this. You now have vertical straps that can carry suction load (pulling away from wall) and vertical load (via that horizontal batten at the base) Now fit horizontal battens ON TOP of the screw heads. Screw these into the vertical strapping. By "clamping" the screw head that was attaching the vertical strapping you prevent pressure loads from pushing the vertical strapping into the wall. It also locks the vertical strapping together in a horizontal direction. Tile onto that. Variation: if your membrane doesn't go directly on top of the insulation then put the vertical strapping on first, then staple on your membrane, then put more vertical strapping on top to "lock" those first screws in. Then go horizontal on top of those. Another variation: if your insulation has some compression strength then you don't need the bottom horizontal batten. Just put your screws holding the vertical strapping on in at an angle (upward towards the studs) so that the screw is the tension member and the insulation is the compression member of a truss. (Rockwool USA approach) You can't nail in this application. Will dig out some photos...
-
A theory: Cheap and nasty products can use "RC Droppers" as power supplies. At 0 Hz (DC) the capacitor has "infinite resistance" (won't pass any current) At 50Hz the the capacitor has "some resistance" (passes "some" current) At high frequencies he capacitor has "no resistance" (passes all current) An electrical arc contains lots of high frequency energy (nt just 50 Hz components) If you trip the breaker this high frequency arc energy (on the house side) has to go somewhere. It can go "straight through" your "RC Dropper" power supplies and blows up the connected equipment. So the arc energy comes through the mains and is dissipated by the equipment that draws the most current at high frequencies. Perhaps the telephone exchange was that connected equipment? (via your cordless phone power base station) I once had a loose neutral* that violently exploded the mains smoke detectors of all things for this reason. (diagnosed by a friend that was a better electrical engineer than I) *Taylor Wimpey build...bent the (through wall) meter tails into the main switch in the consumer unit...tightened the screws...but the meter tails were BEHIND the clamps so they clamped fresh air...worked fine unless you bashed the lid of the consumer unit hard enough to rattle the meter tails by putting something on the shelf next to it.
-
Video calls you want diffuse light coming from in front of you and a quiet room. North facing window. Desk with you looking at screen and out of window. Light comes from behind screen onto your face. Or desk facing white wall and a desk lamp (or two) face away from you, bouncing off the wall, and hitting your face. Windows? They go in walls. Same problems as downlights for an office. Noisy in the rain too for calls. Difficult to seal around. Difficult to fit blinds to. Get covered in bird poo. No windowsills for plants and other ticky tacky. Roof? Make sure it still has a fall after all the wobbliness of the roof. Make sure that your drainage detail can't go wrong (e.g. all water falls ff the side into an external gutter rather than any internal drainage) Then pick a covering that's adequately waterproof and will remain so after UV, extremes of temperatures, birds pecking at it, cats with sharp claws dancing on it, etc. I don't have any experience using EPDM for a whole roof. That stuff is attractive for being one piece but 1.5 mm doesn't sound like a lot. Ask a pro flat roofer what they'd use on their own home. Probably 3-layer felt applied properly if they have all the tools. It's laborious but will last >30 years. Porch? Entry door overhang for rain?
- 27 replies
-
- 1
-

-
- outbuilding
- garden office
- (and 4 more)
-
Kinda yes to your build up. If it were mineral wool then nothing between ply and the top of the joists. It will all air dry. Leave those channels above the insulation "open" to the outside air by venting them into the soffits. That is how any moisture going through your roof will be cleared. Then vapour control layer where you've drawn it If PIR boards and you mount these PIR boards level with the bottom of the joists then the foil tape over the gaps as Nick described. It will be cheaper/easier than a membrane. The barrier is still in the same location as you drew. You can't make holes in it which I think answers your downlighter question. The "insulated" plasterboard will give you somewhere to hide any ceiling cables. (router / gouge out a little of the insulation so that you don't push the PIR boards upwards and tear the aluminium tape) That works for surface lights and for surface mounted spotlights. What about slim downlights you ask? (e.g. 25 mm depth for 40 mm void) Careful. These usually need ventilation from above. They're meant for fitting into an uninsulated "service cavity" not a "pocket" in insulation and will cook if you try encasing them in insulation. Many also have remote drivers that you'll need to find space for too. For example here @ 40 mm: https://www.expertelectrical.co.uk/aurora-enlite-slim-fit-shallow-led-downlights#product-info-dimensions Maybe you can find something that doesn't need ventilation. Personally I hate downlights especially for an office. You'll have horrible hard reflections off all horizontal surfaces; such as your desk; and also off your angled screen. I fitted them once because she who must be obeyed wanted them and apart from vacuuming/scrubbing the floor - and the bathroom - they're never used. Spotlights will be better but you'll end up trying to bounce the light off walls rather than directly lighting objects. This kind of light is soft and forgiving on the eye and on the workmanship: https://www.ikea.com/gb/en/p/hektar-floor-lamp-dark-grey-60216549/ https://www.ikea.com/gb/en/p/ranarp-floor-reading-lamp-black-00331378/ https://www.ikea.com/gb/en/p/ranarp-wall-clamp-spotlight-off-white-50231324/ Install sockets* that are switched form a light switch to make turning them on and off easy. Lights inside shelving units; desk lamps (usually bounced off the wall /ceiling instead of facing the desk); also good. If you'd like to see ALL the painting/plastering imperfections in the wall / ceiling then go for something like this: https://www.screwfix.com/p/lap-charcoal-grey-led-up-down-outdoor-wall-light-2-x-350lm-5-3w/4732x It's small and practical and gives a nice light to work / eat by but oh dear lord does it shadow at the slightest imperfection. Likewise anything that you would see in a shop that's meant to catch all the twinkles. *Sockets are good. If you're not sure which should be ring-main-sockets-for-stuff and which should be switched-from-light-switch then you can run the cables and blank the ends. Think double socket next to a single socket. Double socket is always on ring main. Single socket can be fed from a light switch. Or it can have a spur from the double socket next to it. Or it can be an Ethernet socket. Pull the cables before you close the walls and blank the unused ones if you're unsure how the space will be used / lit?