
ProDave
-
Posts
30810 -
Joined
-
Last visited
-
Days Won
427
Everything posted by ProDave
-

Been a funny ol day
ProDave replied to Russell griffiths's topic in General Self Build & DIY Discussion
Is that to cut the sheets in half, or cut a long thin hole in the ceiling? -
I wired a loft conversion a while ago where the window was too high. BC insisted they made a 1" high fixed step in front of the window. I suspect the step did not remain long after the completion certificate was issued.
-
Living with mvhr
ProDave replied to jpinthehouse's topic in Mechanical Ventilation with Heat Recovery (MVHR)
All the time. We even left it on when away on holiday. -
Dual flush toilets waste water
ProDave replied to Ferdinand's topic in General Self Build & DIY Discussion
It's not "dual flush" that is the problem, it's the modern release valves. These often leak a trickle regardless of whether they are dual or single flush. Lets all go back to syphonic flushes. They did not leak. -
Graf waste water treatment plant, any thoughts?
ProDave replied to joe90's topic in General Self Build & DIY Discussion
It can't be that close to your back door, building regs set a minimum distance to a building. when first powered up part of the casing buzzed with the pump running. I forget the details, but I had to add a few screws here and there to stop adjacent parts "buzzing" together, and I found a big bit of rigid foam to stand the pump on. Now it's just the quiet purr of the pump. The top of that vent regularly gets knocked off by the mower, it just pops back on. -
UFH 8 zone Heatmiser System Under Floorboards
ProDave replied to AshleyH's topic in Underfloor Heating
2 bar is plenty, that won't make a difference. What you need to do is adjust the flow meters. Pop the red plastic cap off and the flow meters will rotate in their housing to adjust the flow rate. What you want to do is speed up the flow rate to rooms that take a long time to warm up, and slow down the flow rate to the rooms that heat up quickly. Be careful, if you unscrew them too far they will come out then things get a bit wet!!!! I don't know if all zones were on when you took the picture but some are flowing at a good rate (flow meter well down) and others hardly at all (flow meter well up) Your temperature is somewhat high, you don't normally need to run UFH at > 60 degrees. You adjust the temperature with the knob below the pump.- 57 replies
-
- 1
-

-
- underfloor heating
- ufh
- (and 1 more)
-
Loft boarding on angled trusses
ProDave replied to AliG's topic in Lofts, Dormers & Loft Conversions
Can you do something like that that I did in our last house?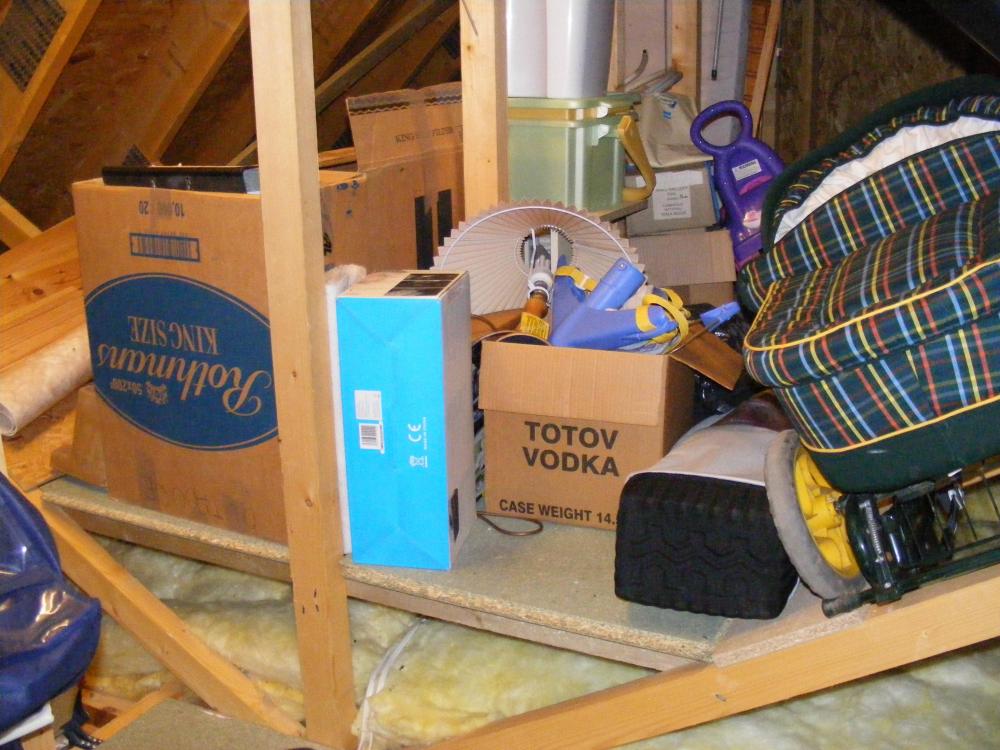
-
Be careful. I may be mistaken, but that looks like a lead pipe connecting to the bottom of the stopcock. So you don't want to be putting undue pressure on the stopcock. When you turned off the outside stopcock, did you see if your neighbours water went off? Are you sure you turned off the right one? to try and free the stopcock, first clean the shaft with a wire brush or wire wool etc. Then slacken the gland just a little, that is undo the little nut that the shaft goes through, while holding the bigger nut behind it with another spanner so you don't put stress on the pipes. Then see if it will move at all in either direction.
-
A developer wants to put a drain through our land...
ProDave replied to Conor's topic in Party Wall & Property Legal Issues
In that case, you need a careful plan of what you (or someone else) might build in BOTH those scenarios and make sure any pipe is not in the way for either activity. It that makes it impossible to route the pipe through your plot then tell them so and say sorry. Or I would certainly want the payment from the builder to exceed what you might get for selling the strip of land to the neighbour if allowing the pipe made it not viable for your neighbours extension. I think our neighbour (previous owner) might have been badly advised. He has a large garden that would certainly have supported a new build house. but 10 years ago a 33kV underground electricity cable, serving a wind farm, was placed under his plot. With the clearance distances you have to leave, you now can't build much there. -
Graf waste water treatment plant, any thoughts?
ProDave replied to joe90's topic in General Self Build & DIY Discussion
Very pleased with the conder. Easy to fit as it has 3 legs that it sits on while you pour the concrete. The blower pump sits inside a box in the top of the unit (though I see no reason why you could not remote mount it) and that box is only for the blower pump. There is a separate cap you remove to give access for pumping out. (I understand the Biopure requires you to lift out the blower pump box for pump out access) This is the finished thing, this is all you see. the big round lid gives access to the blower pump and the small round lid unscrews to give access for the pump out pipe.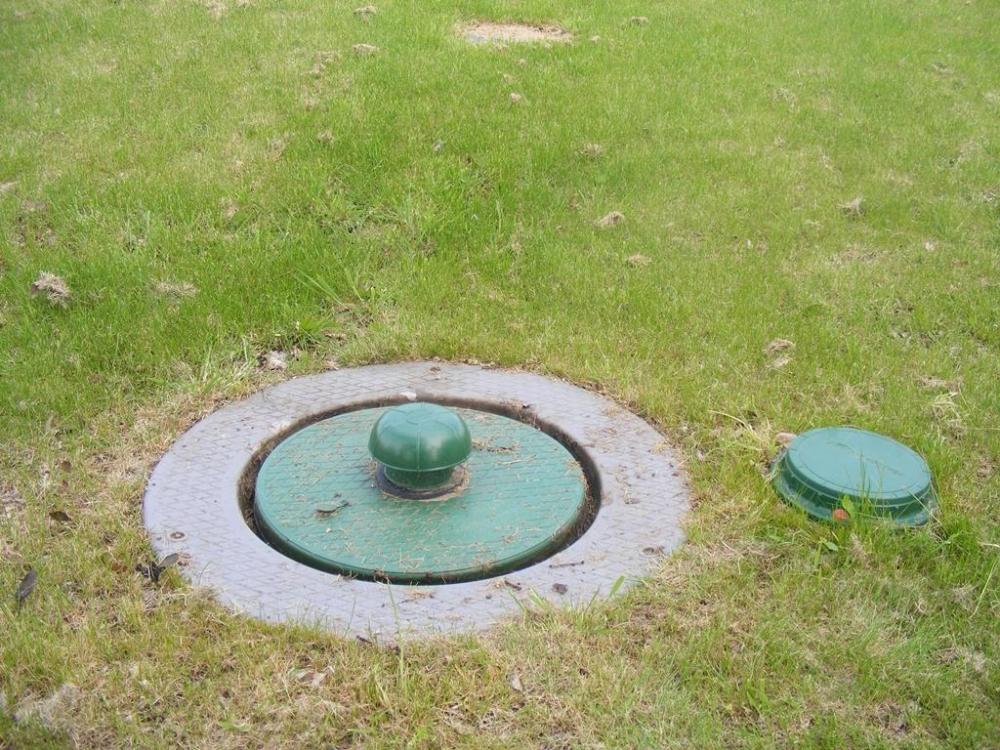
-
That suggests the float switch got stuck under something so it could not float up and activate. With the "water" level low have a good look at what pipework etc there might be that the float switch could snag on and see if you can re jig the layout so there is nothing to snag it.
-
My new hob has odd labels on cable
ProDave replied to SteamyTea's topic in Electrics - Kitchen & Bathroom
DON'T pull the old cable out. Leave it there and fit a cooker connection plate in a back box on the wall to join the old cable to the new cable https://www.screwfix.com/p/crabtree-capital-45a-unswitched-cooker-outlet-plate-white/7359k It is bad practice to try and thread the cooker cable all the way to the wall switch. -
I rewired an old cottage a few years ago and that had a retaining boundary wall that was bulging quite badly, this cottage was on the lower side. The other neghbour was not bothered, taking the attitude it has not fallen down yet. So the person renovating the cottage paid for a new retaining wall.
-
That is the height of lazyness.
-
No 1, make sure on completion the FIT is transferred to your name, make that a condition of the contract. you then submit a quarterly generation meter reading and receive a quarterly payment for that. Easiest way to self use most of what you generate is to use all the big appliances like washing machine, tumble dryer, dishwasher etc close to the middle of the day, one at a time. the solar iboost just works on it's own to send any surplus to the hot water tank, so best to arrange the hot water heating to not heat the tank in the morning so there is plenty of capacity to dump heat into the HW tank. If you are heating just by electric heaters, then run those in the day as much as possible, though with little insulation you won't be able to avoid using them in the evenings. a new heating system would be my No 1 priority. Gas, Oil etc or if you can make the figures work, an Air Source Heat Pump, but you need a pretty good idea of the heat loss from the house to work out if that will work. e.g my little 5kW ASHP heats our well insulated house nicely but would barely scratch the surface of the heat needed in an old stone house.
-
Yes it will be crimp, becoming popular and looks very neat. But not really for DIY as the crimp tool is very expensive.
-
A developer wants to put a drain through our land...
ProDave replied to Conor's topic in Party Wall & Property Legal Issues
If they have no drainage, they won't get building control sign off and won't be able to sell the houses. So my opening response would be "how much are you offering for a wayleave agreement? " -
My new hob has odd labels on cable
ProDave replied to SteamyTea's topic in Electrics - Kitchen & Bathroom
What that is showing you is the brown and the black could be connected to two phases of a 3 phase supply, where there would indeed be 400V between L1 and L2 Assuming you only have single phase, then both Brown and Black go to L What matters is the voltage between L and N which would be 230 in any of those situations. I doubt you will need Wago's for this. Assuming you are terminating the cable into a cooker outlet plate, there is usually plenty of room to get both the brown and the black into the L terminal (except on some really rubbish CCU plates that have ridiculous terminals) -
Re the noise thing. I wanted to avoid a split unit for 2 reasons, first is it requires an F Gas engineer to leak test and gas the system making DIY install not possible, but second the noise of an internal compressor. Why would you choose to put a noise source inside the house when it can be outside in a monoblock unit? The only noise we suffer is the water circulating pumps, which in spite of being one Grundfoss and 2 Wilo pumps are still audible as a low level hum, but you would get that with any wet heating system. It was a lot worse before I changed the "no name" UFH pumps for Wilo ones.
-
Kitchen layout options - an island too far?
ProDave replied to Moonshine's topic in New House & Self Build Design
All of the island options would fail Scottish building regs..... I just don't see that kitchen as large enough for an island. -
I would not give tenants access to an UNFLOORED loft. In the course of my work I see loads of lofts and some, with not a floor board in sight and the amount of junk piled up, mostly resting on the plasterboard, I am amazed the ceiling has not given in. But in our rental house the tenant has access to the floored loft space.
-
I like all the advantages of an insulated passive raft, but like you, we have a sloping site, and the only way I could see is to build up a lot of the site level with a LOT of infill, compacted in layers. The snag being you also have to level an area extending beyond the actual house footprint. So we opted instead for strip foundations and an insulated suspended timber ground floor.
-
The flashing kit is the main thing that gives the window it's water proofing, creating internal gutters for anything that drips off the tile edges a safe route down the window onto the roof. If he bothered taping the felt to the window upstands as per the instructions that should have been pretty watertight but "draped the felt" does not sound like dressing it correctly and taping it.
-
I don't see why you cannot just re route it yourself. you would obviously need to notify the other houses when their water was going to be off.
-
Word on the grapevine, is it is impossible to give as bad review on those sites as the bad reviews just get deleted.


