


Gus Potter
-
Posts
2384 -
Joined
-
Last visited
-
Days Won
34
Everything posted by Gus Potter
-
Building Control and MCS sign-off for a DIY PV installation
Gus Potter replied to andymb's topic in Photovoltaics (PV)
Hello Andymb The inline system pv panels tend to weigh less than the slates. But if you want to really future proof the roof you may want to allow for an extra 20 - 25 kg / square metre of dead load applied to the rafters. To put this into a bit of context. Broadly speaking the weight of a modest vaulted concrete tiled roof may weigh about 1.0 kN/ (~ 100 kg)square metre on plan, slates may weigh a bit less depending on type etc. Added to that is an extra 0.6 kN (~ 60 kg) per square metre to account for what is called roof access load. If you live in parts of say Aberdeenshire the snow load can be greater than the access load. These loads get factored up in different ways but you can see that roughly the extra weight of the solar panels is a fairly modest increase in loading. If you really want to future proof the roof then it's worth looking at what ultimate form it may take. For example will you settle for a flat ceiling at wall head height..? do you want a bit of vaulting.. this may take the form of what is called a "raised tie truss" or do you want to go for the full volume right up to the ridge. This will influence the future proofing more than the weight of the solar panels as the whole method of constrution of the roof changes. Maybe the best thing to do is to take the approach that you are going to go for the full internal vaulting, design for that as you can lower ceilings etc later on. The material and creating the strong points for the roof supports will cost more but the labour cost should increase at a lesser rate when you consider the roof as a whole. For example you'll probably need to bed the wall plates, provide gutters, flashings and so on. In other words you get to keep the materials to some extent. Alternatively, it may be that you are able to create a habitable attic space? in which case the floor loadings are an important part of this cost / benefit calculation. As always it's all to do the available funds! Once you get a handle on the structure then this sets / underpins matters for any accreditations etc you may feel you need for the actual pv installation. -
Fixing Ceiling Joists to Steel Beams and Wall
Gus Potter replied to DerekSharpting's topic in General Structural Issues
Hello Derek. Post more photos and probably as helpful if not more would be the floor plans. A video would be a bonus. That portion of masonry holding up the end of the floor transfer beam is one of the things that stands out as something that needs a closer look. Often you use new timber stud walls to restrain bits of brickwork but is really important to connect it all together correctly. Examine the info the SE gave you. Don't hesitate to phone the SE if you have any doubts or if anything has changed (even small changes) since the SE did the calcs etc as it easy to get caught out by thinking that it's ok to move a door say, then all of a sudden you remove something that the SE has relied upon to provide stability to say a main load bearing element. If you work through things a bit at a time you'll get there. -
Architect Invoice Much Higher than Expected - Options?
Gus Potter replied to greido's topic in Surveyors & Architects
Hello greido. I'm a bit west (in EK) of you but here are a few observations... and a bit of a story. It's a bit late so a bit of food for thought. I'll work through your post. Circa 1930 bungalow. I used to live in Edinburgh but in the 1930's they were still skint after the first war to say the least . Some bungalow roofs were still built using the pre first war method and rules of thumb to size the rafters and so on. This gave you a roof that was more conducive to modern conversion. But in the 30's they started to introduce lighter weight roofs. The intrinsic difference being that the sizes of the timbers were much reduced as they had worked out to some extent how to make the roofs function more like a modern day prefabicated roof truss. I'm cutting out a lot of detail here. From memory (happy to be corrected) if you take say the Blackhall area they were still building the roofs the traditional way, slightly steeper pitches with larger timber sizes and so on. But in other areas they adopted the lighter weight roofs. Here the floor joists forming the attic floor / rafters were thinner and the position of what we call the soldiers (the upright bits) , collars were relocated in such a manner that they are "in the way" when you want to convert the loft. As soon as you move these the forces in the main members of the roof change significantly, and just as importantly, the forces in the connections change such that they often no longer work when you try and move the soldiers etc. This introduces difficulty / complexity and thus extra cost. Now much depends on what type of roof you have as they are two different animals. I'm just guessing, but the previous loft conversion you have may be long standing and would not pass muster when compared with the modern standards when it come to converting the loft. The first approach mentions "replacing the roof", I assume that means that the whole roof is to come off. Doing this can give you much more scope to change the internal layout of the attic. It's also easier to estimate the price. But, it can often be much harder and more labour intensive to keep the existing main roof structure intact. If you have the lighter 1930's type of roof the rafters are shallower for example.. this makes it harder to design the insulation, deal with the condensation risk, ventilation of the sloping part of the roof and so on.. at attic floor level you often need to do a lot of strengthening and often there are a load of services in the way.. builders know this and charge accordingly. Turning now to the indication that your Architect gave regarding retaining the existing roof. Being pragmatic and speaking from experience. To do this takes much more thought and drawing effort. Often you think you have "cracked it" then you start drawing it / doing the detailed calculations and realise that there is a spanner in the works.. it can take sometimes days to figure it out! I suspect that your Architect may have fallen into this trap! It may be worth while being pragmatic. If you have a good personal relationship with your Architect then discuss it. They may be a bit less experienced at pricing their time ( just starting out on their own maybe) but great designers, maybe they are not the best sales folk and in their desire to please promise more than they can deliver. Discuss it with them if you feel you can. If that does not work out then consider meeting them half way and put it down to experience. You can refuse to pay and play hard ball but it will give you stress.. maybe best to move on. If you choose to move on then consider contacting an experienced SE who knows how to convert lofts and what the options / costs are as you seem to already have a conceptual scheme. Lastly, although you may feel you have had a bit of a setback try and enjoy the process as much as you can.. it is rewarding. All the best. -
Fixing Ceiling Joists to Steel Beams and Wall
Gus Potter replied to DerekSharpting's topic in General Structural Issues
Good point TonyT.. one avenue worth exploring. For all.. when you are dealing with older brickwork there is some uncertainty as to how much load a resin anchor say can carry never mind any of the expanding type fixings. Also, to get near the capacity of the declared manufacture's values you need to be installing the fixings near to the centre of the bricks. It's sod's law that just when you think you have a winner the coursing of the bricks stymies any hope you have. It's can be even worse when you are trying to do extensions say and trying to fix into brick with holes in them. For Derek the best thing to my mind it to sort out the basic load paths and key structural elements (if required to do so) then focus on how to fix the rest. Work out what is involved, the costs, what you can do youself, what you can practically justify as being structurally ok, even if it does not comply with the original SE design. I am being cautious, but Derek has not provided enough information to enable a view to be taken as to what loads are being applied at first floor level and also how the stability of the external walls is maintained. There could be a lot more load than what we can see from the photos! But.. there may be less too! Thus the the issues may be a lot less of a problem. Also, once you start to delve into this stuff you need to review the founds and underbuilding. If the builder has gone "astray" then you could over stress the founds.. there is quite a bit to look at. That said, although I seem like a gloom and doom merchant many of these things can resolve themselves.. but you need to be able to show that you have at least considered all of the parts that hold the building up and how they interact. For Derek it may well be not as bad as things first seem. The key here is to identify the key issues (load bearing and structural stability) and fix them if necessary, then suppliment this with the finer.. minor points.. which could be just a case of adding a few extra fixings. -
Drainpipe Saddle Branch 110, 87.5 degrees
Gus Potter replied to ToughButterCup's topic in Waste & Sewerage
Ah but.. yes saddle branches onto older pipes tend to leak for me as I'm not that lucky. Slip couplers seem great but if you are not used to using them day in and day out they don't "slip" quite as much as you think. Again maybe I'm not so lucky or need to learn more. But if you use a .. flexible coupler and follow Peter's suggestion.. At each end where it interfaces with the existing pipe you'll make life a bit easier as it's easier to slip them about, they are a bit more forgiving especially if the existing pipe move a bit when you are exposing it. They will cost a bit more but you'll save the skinned back of the hands and a lot of frustration.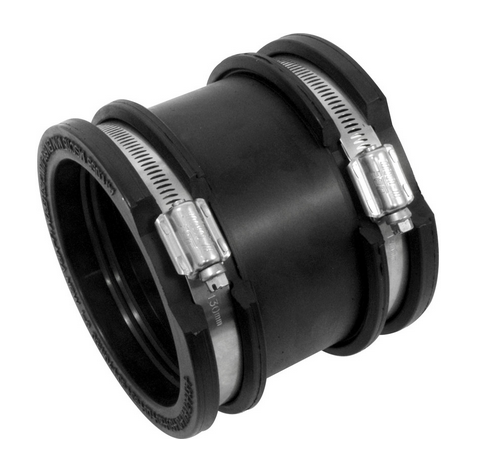
-
No Sole, it's not just you. I take the same view.
-
Fixing Ceiling Joists to Steel Beams and Wall
Gus Potter replied to DerekSharpting's topic in General Structural Issues
Hello Derek. As a word of encouragement many things can be fixed. The first thing is to make sure the basic elements of the structure are sound or if not, can be fixed. Then you can look at the other areas that require remedial action, the various options.. what you can do yourself, what you can't and so on. It may be that you can't do something as you maybe don't have the specialist tools or the expertise.. or time. I have had a quick look at the photos. The first thing that I noticed was that (I think the seventh photo) you have a transfer beam resting on a padstone on the end of an inside single brick wall. Just beyond that there is a concrete lintel and what looks like some timber infill framing. A concern I would have would be the stability of almost what is now a potentially slender masonry column which seems to be carrying a fair bit of vertical load. When you are working with older properties you have to make an allowance for the age / materials used etc and most importantly how the work you do will impact on the existing structure. Another key thing it to make sure the building is tied together. For example you can see the joists are roughly notched to sit on the flange of the beam. Normally I would expect to see some steel tie straps or some other method that ensures the ends of the joists framing into the beam are tied together so they can't slip off the flange for example. Also, by tying the joists they work more effectively to hold the external walls in place. Tying different bits of a building together is critical to structural design. I see this from time to time where people leave in a slender piece of masonry. Looks fine on a drawing / maybe you can get it to work calculation wise but once you get the builder in the rules of the game change! If you wish you can post some plans as BH members will be better able to see what you are dealing with and maybe make cost effective suggestions. In the meantime it would be worth while getting the thing checked out by an SE before you go any further. All the best. -
Lintel (or lack of) above a large picture window
Gus Potter replied to Oxbow16's topic in RSJs, Lintels & Steelwork
That might look quite good finished off with a bit of leadwork to hide the brick. Cut out a bit of the bed above the bricks and put in a lead flashing, the bottom would form the drip to keep the rain off the window. Make sure you use patination oil on both sides of the lead so you don't get staining. You may be able to pick up an offcut of lead to save buying a full roll. Code 4 lead would do the job.. not too thick and not too thin. Don't block off any of the weep holes. There is a limit to the length that each lead strip should be as it moves about. For a flashing in code 4 the max length of each piece is recommended to be 1.5m so you probably need to do it two or more pieces. -
Nice part of the world Matt. You'll get lots of good practical advice here (as I can attest to) that will help you make informed decisions... of which there will be plenty to make! The main thing is to try and set yourselves up so that you have fun doing it. Keep posting if you can and take lots of photos for memories sake. All the best with the project.
-
Hello Vijay. Take your time to start with.. get the coursing worked out both horizontally and vertically. Some days you'll get on great and lay lots. Take care with any corners and openings as if it's rough you'll just make a rod for your own back later. A 7 N/mm^2 dense block is fairly standard provided the wall is not to high between points of lateral restraint.. that could be the floors, return corners of a descent length etc. Check your drawings and SE spec. Remember to look after the blocks, specially as it's winter. Make sure you don't lay when the temperature is below 4 deg C or falling.. even inside! All the best.. once you get the bug and realise the savings it can be a very satisfying job.
-
Good point @oldkettle yes the kit will drive your insulation options to some extent. You can get prices for the basic kit with different wall thickness' for example. Thicker stud walls may result in less studs. For all, the timber studs have less insulation performance than the insulation so when you calculate the u value of the wall you need to take into account the stud density. There are so many variations to get your head around so hence the basic approach I mentioned to get you started. As old kettle says some TF suppliers may be making their margin in a different way... just on the kit with the offering of installation. They may have their own crane for example and a good experienced assembly squad.
-
Interesting reading this. Over the years the waters seem to have become more muddied by the TF suppliers making it harder to compare quotes. Scotland in some ways are more ahead with the TF concept.. long storey... in some ways we went though this journey 20 years ago. Just roughly a lot of the projects on BH are of a good size, some with a significant value. Given this it may be worthwhile just asking how much the basic TF costs.. walls + roof. Given many of the project values here on BH there could be saving to be made by looking at this and paying someone else to design the insulation, advise on the windows doors and other high cost elements... perhaps take your time to choose these elements and shop about your self. There is often not that much money in the structural kit compared with the rest of the job.. it is the extras that seems to be where the Tf manufacture's are making their margin. Also, as soon as you want to make any changes as you go then each time you need to go back to the TF to check out insulation values etc..and at what cost. maybe as a self builder you should consider the need for flexibilty. As you go you want to make changes. Maybe there is merit in getting the basic kit up, the roof weather proof and working with your local builder as you go?
-
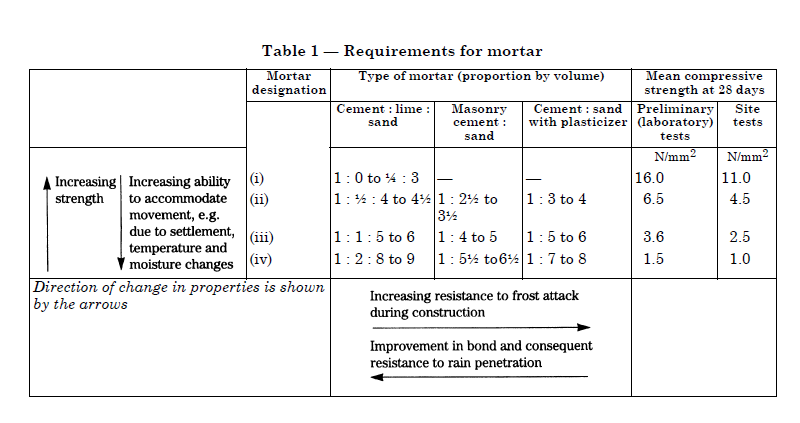
Hello Vijay. Well done getting the tools out. Below is a bit of text from a previous post. "Just on you own with a half bag Belle mixer, a good barrow, under cover, with not too many windows, tricky bits, and loading out the blocks each night for the next day, cleaning the mixer then with this amount of blocks I would go for 150 blocks a day (15m sq) if you are fit and tenatious. Expect this to drop off from time to time, well quite often, go for a hundered a day (10m sq) tops as you also need to order materials etc" Vijay, if you haven't done this before expect to lay say fifty 100mm thick dense block for the first few days. But the mix.. Oz07 @Oz07 is bang on with it being a learning process. Actually, a good labourer used to be worth their weight in gold to a brickie squad. Anyway here are a few pointers. 1/ Look after you materials. Get the sand, cover it up so it does not get too wet / or dry and to stop the local cats / foxes using it as a bog. 2/ Buy your cement in weather proof bags.. may cost a few pence more. 3/ Get some plasticizer for mortar.. 5 litres should about do. 4/ Get a half bag Belle or similar mixer.. bigger than that and you'll end up wasting mortar and having to dump it. 5/ Get two or three mortar boards.. kitchen doors work well, not OSB board as it splinters 6/ Tools.. string line, good bead etc. A bit of technical stuff. Below is some info from a common standard. The key here is to understand what type of blocks you are working with. If the mortar is too strong the blockwork will be more prevelant to cracking. Too weak and well.. that is just as bad as making it too strong. Roughly what you are often looking for is something around class two to three.. more leaning towards class three for practical purposes above ground.. provided you do you best to not remix stuff and really take care with the mortar, temperature, keeping the blocks not too wet or too dry (not on a boiling hot day or below 4 deg c or falling).. there is a lot too it.. but so long as you do a bit of research you should be on the way to a good job. You can see he above table refers to proportion by volume. This helps. Get a pail and pour half a 25 kg bag of cement into it. Mark the level. Now gently shovel the sand into the pail to the same level as the cement was. Tip it out onto a board and repeat. Now you have a pile of sand. Get your shovel and count how many shovels it take of the same size to move the sand into the mixer... note it down as you are learning. Don't whack the sand into the pail as you are not at the beach. As you go you'll get the hang of judging the proportions so you don't have to use the pail any more. Put half the sand into the mixer, Now depending on how dry the sand is you roughly need about the same volume or a bit less than the amount of cement. For the first mix of the day put the plasticiser in first following the instructions for how much you need for 12.5 kg of cement.. Now add water.. about half the volume of the cement measuring as you go. Now add the cement, a bit more water until it starts to mix and the back of the mixer is clean.. stuff not sticking to the blades... don't put your arm into the mixer.. Add the rest of the sand and very slowly add more water, it comes a point where you only need about a mug full to get it just right. Mixing should take three to five minutes.. don't over mix or under mix. The key to getting start is to make sure it is workable but not over mixed with too much air. It will take some time to learn how to do it but once you get the hang of it it can be very satisfying, so long as you take your time and set everything out carefully. From memory roughly one batch out of a mini Belle ( 12.5 kg of cement) will do about 25 number 100mm thick blocks. Do a bit more research and it's all doable. Lastly, just check that what you are building is a standard wall.. not some kind of specialist engineered wall with high strength blocks carrying high loads.. always check first.
-
Which plastic type for a temporary window glazing?
Gus Potter replied to epsilonGreedy's topic in Windows & Glazing
What about trying this? Try phoning up a few double glazing installers and ask them if you can rake their skip, you may get some full frames + glass that just need a bit of trimming of the opening with some rough timber or you may just get the sealed units, some may be misted up (failed units) but they will still let the light in. For the installers getting rid of the plastic frames can be costly so a few will be glad to get them off their hands. Also, they should help as they know that they will maybe get a shout at providing your new windows! The French Doors and windows in the photo are recovered from an old sunroom, now demolished. I have been dodging away building a bit out the back when not doing the day job. Been busy with the day job so have been at this on and off for a while! The doors and windows are to come out soon and this will leave an opening the width of the lintel. Basically I got the old plastic doors / windows and made a temporary sub frame from old timber. You can see there are timber studs each side of the doors.. these have a gap at the top. This is to allow the lintel to deflect a bit as the roof was built and the load goes on it... often technically called a deflection head detail. The idea is that you allow the kit to dry .. build the external skin and so on thus avoiding a sudden drop when you take out the temporary studs. Hopefully, over the next couple of months we will have the new windows doors in and I'll be looking to get rid of what you see in the photos plus another back door and another set of French doors. So for Build Hub members ONLY.. they will be free to a good home so long as you collect them. I'm in East Kilbride just South of Glasgow so if there is any interest I'll post the sizes. The doors have one set of keys.. the window ones are lost.. and it goes without saying that no guarentee is available! I will be a bit sorry to see them go as they have provided plenty light while I have been working away.. but that is the price of progress.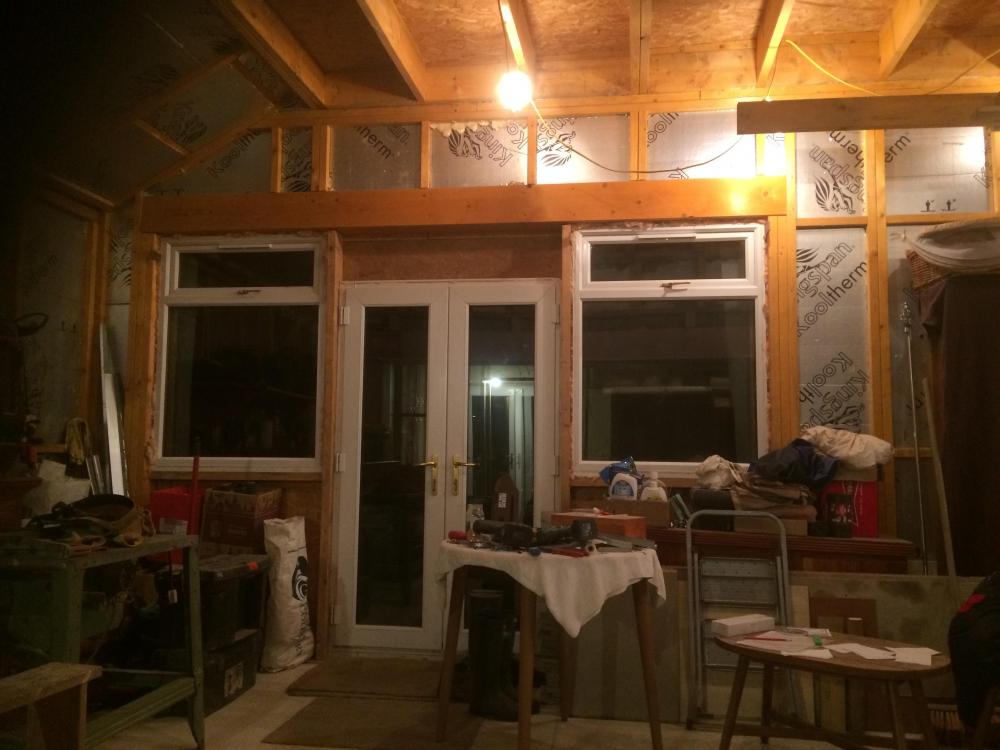
-
Interesting cost information for persimmon builds
Gus Potter replied to Moonshine's topic in Costing & Estimating
Hi all. Does this rule of thumb still fit? Take a green field plot, no contamination etc in a rural area with private drainage but with main services at the road side. You are a first time self builder and go for the full Architect design, plus tender, contract administration and site supervision. Then you could save about 10% on the build cost (excluding the land) compared with an equivalent house you may find for sale at an Estate Agent excluding agency fees etc. This is dependant on you shopping about and finding the right design team for you. You are a first time self builder and go for a basic design service, put a good bit of work and research into the job. You engage a main contractor, handle the contract stuff yourself and so on. Here you may look to save 20% on the build cost at the end of the day. You are a pro with the self build habit.. plenty on this site to help out with advice.. here the savings can be substancial... but remember that some of the folk here have spent years learning how to do it. Now once you have the hands on experience your are possibly looking at build three.. one is profit if all goes well...but you need to be a savvy plot buyer and so on. Just as an aside for an average standard.. say TF simple self build the material cost is about 2/3 and the labour 1/3 excluding the plot and services etc. However, while the above may disappoint some, bear in mind that if you go about it in the right way you will avoid the possibility of suffering from the numerous defects that many new homes built homes by big developers seem to suffer from. And thus, you can add an extra 10% saving for the grief and stress you avoid trying to get your "developer house" fixed. You also get a home that is bespoke to you. I wonder where the defects (after care costs) appear in the big developer costings? or are they not significant? Although the developers have the economy of scale it's not suited to one off plots, their overheads are different and so on. -
Introduction - self build newbies
Gus Potter replied to deancatherine09's topic in Introduce Yourself
Hello deancathrine09. Well done taking the plunge. You may want to post a site plan that shows the slope of the ground and so on. Also, any information you may have gleaned on the ground and services and so on. It may seem a bit early but if you can try and firstly understand how the ground supports (and how the insulated slab interacts with the ground) insulted slabs / eco type houses then this will help you make a more informed decision. Much of the financial risk and design is driven by what is under the ground. If you can get a handle on this early then it can give you more certainty as to how much you have available to spend on the finishes and so on. It may sound complicated but the principles are actually fairly simple... and you'll get practical advice here if you get stuck. The next step may to be to gain a deeper understanding of how the house stays up.. the structure. This can help you work out what you do and don't need, from say a TF manufacturer and thus what you can do practically do yourselves. You'll get plenty information here! Just remember to remove any identifying marks from any drawings etc so as to avoid copywrite issues etc. All the best and enjoy the journey. -
Pozi Joist deflection and cantilevers
Gus Potter replied to BartW's topic in General Structural Issues
It may be possible to "sister" the poszi joists on each side to take the weight of the cantilever. Maybe what you would do here is to use solid timbers at a good length spanning back into the main floor zone to get the back weight. They (solid timbers) are more torsionally stiff and you can brace them more easily to partly resist the torsion (twisting) effect that is prevelant in cantilevers. You can also take the shear out more easily and practically with a solid joist at the support position, as Peter alludes to. To all, pozi joists etc don't perform that well as cantilevers as they are "prone to twisting" which significantly reduces their load bearing capacity. Sometimes you can just add a few solid timbers in to skirt around the problem while keeping the ethos of an "engineered timber design" It takes a bit of extra thought as the "engineered joist" suppliers don't often have to much flexibility with their software, if it's a one off job then they will charge accordingly. Most SE's will just split the problem into two to recognise this cost implication and get on with an economic design. -
Hi Tom.. I'll have a stab at this. Assuming the following... You don't have designs on turning the temporary living space into some holiday let later? It's just temporary accommodation for say 18 months.. less but you use it for storage for a while. Let's also say you are not on peaty ground, say clay or better ground.. even some of what is called expansive clays.. sensetive clays.. these are clay soils that can swell, shrink by several inches. Also assume that your "lodges" are temporary and that you don't mind if the paint, finishes etc get a bit cracked.. not massive cracks but more than what you would accept in your finished house. A bit of technical stuff..Take a softish clay as a reasonably worst case. This would be a clay soil that can be easily moulded with firm finger pressure. This type of clay may well be able to support a house that loads the ground by about 40 kN/m sq. Now that equates to roughly 4 tonnes per square metre or ~ 400 kg per square foot. I'm mixing units here but the point is that this equates to about 4 large folk per square foot on an isolated "pad" foundation. This type of loading could.. all things being equal.. result in some 25mm of settlement? Maybe not so good for a house but ok for temporary accommodation so long as you account for it as the seasons change and the ground swells and shrinks. Here are some suggestions / food for thought, the tools, equipment you may need. The key here is to try and use stuff that you can recycle.. sleepers, hard core etc. 1/ Make a water level, I have posted about this before how to make one yourself but can't find it. It's basically a hose pipe with some clear pastic tube fitted to the ends. also by say a trolly jack.. usually a 1.5 - 3.0 tonne SWL jack is fine or just borrow one..think carefully before put your body under the structure when jacking. 2/ Dig a couple of holes where you want to put the temp home. 3/ If soil looks ok.. you should already have an idea as you have site info for the house. then scrape the site level. 4/ Put down a bit of hard core.. say 100 mm type one and give that a whack with a whacker plate.. don't over do it.. lots of folk try and whack it to death and wonder why it start's to go soft again.. storey for another day. 5/ Get some sleepers and lay them reasonably level, don't bed them on sand as this can wash out. Try and get the tops of the sleepers to say + / - 10mm. If your hard core is reasonably flat that will do. The sleepers will bed in. Make sure you measure carefully where the lodges need supported. Cut some timber ply wood packers.. call these shims and lay them on top of the sleepers.. make them all level. Don't fix the shims down as you want to be able to take them out later to drop the level if need be. 6/ Lift the lodge into position. Now you are nearly there.. but... you often need to tie these things down as the wind can get under them and lift them. Make sure you don't make the packing too thick.. keep the things say less than 450mm off the ground as the sideways wind will start to cause a problem. The simple way is to buy some lorry straps and put them over the roof, tie them down to some one tonne bags of concrete / building sand.. put some compost in the top and grow some carrots while your at it or veg that likes some free draining soil. As an aside if you go to a static caravan park you'll often see the underside side boarded in.. this is to try and stop the wind getting in.. primarily to stop wind uplift and also to keep the floor a bit warmer. Join the two units together with a cover plate so they can move independantly.. after all when you come you sell them someone may only want to buy one so try not to damage them. Every now and again you can jack the think up a bit if it settles. make sure you insulate the water pipes and if say in Aberdeenshire the soil pipe too! Once you move in use the sleepers for the garden, the hard core for the greenhouse base and the sand with the compost for that perfect lawn. Hopefully you can do all this for a bit less? Oh, and if it settles, one end rises a bit due to the ground swelling then get the jack out, slacken the straps and add a shim or two, then re tighten the straps. It's easier if you have a couple of slip sleaves etc on the soil pipe, and plenty slack in the electrical connection, broad band, gas pipes etc.
-
Hello Helen. If you can, then post your plans; make sure you show site boundaries, slopes if you can. Make sure you edit out any identifying marks. You can get help on this site that will guide you towards getting a good budget price, tips on how to negotiate, what to look out for and so on, make suggestions as to how you could progress. Your Architect should be able to guide you.. but it depends on what / how you have briefed them. Posting a bit more information should pay dividends. The main this is to try and make sure you enjoy the processs. It is possible! All the best.
-
Spot on @SuperJohnG it's always worth phonig up for a chat and asking for an explanation. For all it may be worth having a look about for Engineers who are local to you that can provide a similar service in case you encounter a soil / ground works problem. In this case if you have to have a few site visits then any initial savings may be lost? Also.. what is the cost of supervision. Often a local Engineer will just "drop in" to see how things are going! It's amazing how that can inprove the quality of the work.
-
Hi Duece22 It would be worth posting a loft plan. I'm wondering why the steels are in tandem? For the self builder who is doing a one off project then maybe it's worth looking at the bigger picture. You may on first appearance have say an 20 -30% extra steel weight. Take a self build rate for beams / UC sections with not a lot of holes, welding (shot blasted and primed) at £ 3000.00 per tonne delivered (Westen Isles excluded!) to be on the safe side. While the steel may seem heavy they can be simple to install. If in a rural area your local farmer will come with a telehandler and lift them in for you. If you are DIY hands on then you can lift them with a chain hoist, or just lift one end a little bit at a time .. story for another day. UCs (often called column sections) are mainly intended to carry vertical loads, thus they are more squat.. they have a thicker web than a UB ..universal beam that is mainly intended to carry bending forces.. like a floor joist. However, you often see them used where you need to try and keep the floor thickness down say. Yes, you have a heavier steel section which costs a bit more as it is heavier. They key here is to not make it too complex. Yes, you may save on steel weight if you look to value engineer just the steel but as you make it more complex you reduce you options on the amount of contractors that are able to take the job on, or they add an uplift which more than offsets the steel savings. Duece, depending on your loft layout you could introduce a steel newal post at the stairs.. but the stairs look like a key feature... almost free standing and making a statement. Also that post and other load bearing walls would need foundations. If you take skilled labour at £ 900.00 to 1100.00 a week you can see how a contactor who may be pricing will just say... This is the 10th job I have priced that this week, I'll add a "couple of grand" to cover me.. as the beams now are slim, fancy connections and so on. I know it seems rough but go for simple stupid. You could look at designing the roof / loft so that you hang the structure below from it. This is technique used often.. but it adds complexity and introduces buildability issues that your local builder may be less familiar with. All the best.
-
Hi all. This may seem like music to some ears... £££ savings possible here. Key points for pad footings, and any footings for that matter are to: 1/ Put them in the right place and at the right depth. Remember that deeper is not always better, sometimes we look to sit the footings on a hard crust rather than digging for glory. The hard crust spreads the load out so when it get to the softer lower area it does not load that softer layer so much and this reduces settlement amongst other things. 2/ It's actually better to have rough sides to the founds in virgin ground as the concrete gets into the vertical sides and provides a extra shear key, thus spreading load more. So have a think about that before you spend money and time on shuttering, maybe just spend a little more on concrete, it's worth weighing it up. 3/ Do not put services etc under foundation pads as you can compromise the design. 4/ Please remember that excavations can be dangerous and behave in unexpected ways. 5/ 34 tonnes is about 340 kN which is a lot for a single storey small span building unless you have some heavy masonry? 100 kg ~= 1 kN... 1 tonne ~= 10 kN... 6/ Oh, and as a teaser for the basement folk.. you often design for minimum surcharge load on the finished ground around the outside of the building of 10 kN/ sq metre ~ 1 tonne a sq metre. This is to account for someone driving a JCB etc around the building later, or someone changing the ground level, storing material. Sometimes this can drive the design even if you have a low water table, favourable ground and so on. In summary, it's worth having a chat with your Engineer. Pad footings can also resist horizontal loading so it's important to understand what the are intended to do. Are they for just carrying vertical load or do they also need to take some sideways loading.. often this happens when you have a "goal post" portal frame type of structure or the pads are designed to resist the overall sideways wind load on the building.
-
Hot Water Tank flow return differential.
Gus Potter replied to Fly100's topic in Boilers & Hot Water Tanks
Does not look to drastic to me, see @ProDave etc above, also Peter re sticky port valve etc, Steamy tea. -
For a bit of info and to provide a bit of backgound on the fire regs as @daiking mentions... it's weighty subject but hopefully this helps. I'm no JK Rowling but here goes. The fire regs are commonly thought to have been introduced after the Fire of London. They realised that the fire spread not just because of the sparks and flames that jumped from building to building but that also the buildings radiated heat, like an electric fire. We know that if you put something too close to an electric fire you can set it alight even though there are no flames or sparks. This paid dividends in the Blitz, but less so elsewhere in the UK. This is one principle that is recognised in the regs today. When you build close to a boundary (say 1.0m or less) you need to stop some things from happening. These are: 1/ You need to make sure that if your building goes on fire the flames and sparks don't jump the boundary and set light to a neigbouring property. This is called "integrity"which means that the cladding and underlying wall does not start to expand, buckle and force the cladding seems open etc, letting the flames and sparks through. 2/ You need to make sure that your wall does not heat up enough so that it radiates heat, like an electric fire, and that this radiant heat does not set light to another property, this is often called " the fire insulation" ... 1 & 2 are different properties. 3/ You need to make sure that the Fire Brigade can put out the fire without risk of (commonly, but not always) the wall collapsing on them. Thus when you have a fire boundary condition you need to design the wall so that: 1/ The structure (call it the skeleton) of the wall is sufficiently protected so that it will hold the cladding in place, gaps in the cladding won't open up letting flames through and so on. 2/ That the make up of the wall is insulated enough so that the wall won't radiate too much heat over the boundary. This often means you need to clad the inside of the wall with fire protective material, or directly protect the structural frame holding the cladding in place. 3/ That the actual cladding won't catch fire from the heat and same cladding won't then send sparks and flames over the boundary, hence the Class 0 cladding rating... which means that it does not catch fire.. unlike bricks which don't burn. 4/ That the fire boundary wall will stay up long enough so that the fire can be safely put out and ideally it won't collapse a bit later on on the fire investigators... but this (in my view) needs more devlopment in the regs.. they partly address this in New Zealand etc..here's hoping it will get more attention in the UK. The regs in England are a little different than those say in Scotland, but the same principles apply. If you have read this far then thanks. Hopefully what I have outlined will help some to make headway with the building regs and why BC are asking the things they do. In summary @daikingYou may be able to apply protective coatings to the timber to get class 0, but remember you also need to protect the structure so that the wall says up. You can find more info on the net. All the best and hope you enjoy your project.
-
Hot Water Tank flow return differential.
Gus Potter replied to Fly100's topic in Boilers & Hot Water Tanks
But how much cooler is the water going to the UF, after all the blending / mixer valve is meant to reduce the temperature of the water so it does not harm the flooring or give you sweaty feet.


