


Gus Potter
-
Posts
2155 -
Joined
-
Last visited
-
Days Won
26
Everything posted by Gus Potter
-
Perfect and pragmatic approach for the Reverend. Sometimes blindly following NHBC guidance or an inexperienced BC officer's view can do more harm than good. @saveasteading yes that looks like good ground. Well defined layer between the upper nutrient rich and the structural soil below. If you have a big tap root it may go straight down so if it rots (could take 50 - 100 years as no oxygen) then it probably won't have any effect as the soil will act as an arch at those depths. A way of explaining this.. say you have a 2 foot diameter tunnel 50 feet under the ground.. the ground will span over that and at say 4- 5 feet down from the surface you may not see any noticable effect. A 5" tap root going straight down will have even less effect. Also remember that you can only work from one side due to the boundary wall. You don't want to destabalise the wall. Also if you excavate a massive hole on your side then it will extend well into your underbuilding. What kind of floor are you going to use? Ground bearing slab or suspended floor? The first approach here as the Rev and Steamy et al advocate (the bridging concept was not my idea, the drawing was just to translate that into how you may go about detailing something like that) is to assume you won't get all the roots out and that over time you may get some movement and design for that. I would try this first as it is less intrusive and cuases less soil disturbance. I take it this extension is single storey, not two or three and that you don't have transfer beams landing over the tree stump zone? Once you start to investigate then that drawing I did may be quite conservative.
-
No you were bang on @SteamyTea and yes it was your idea first, so not taking any credit for your concept.
-
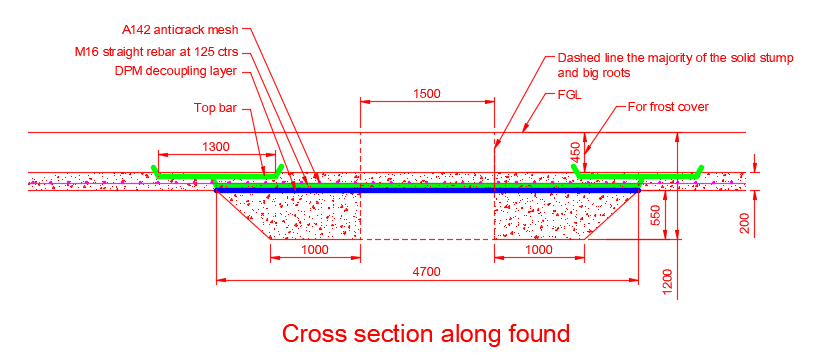
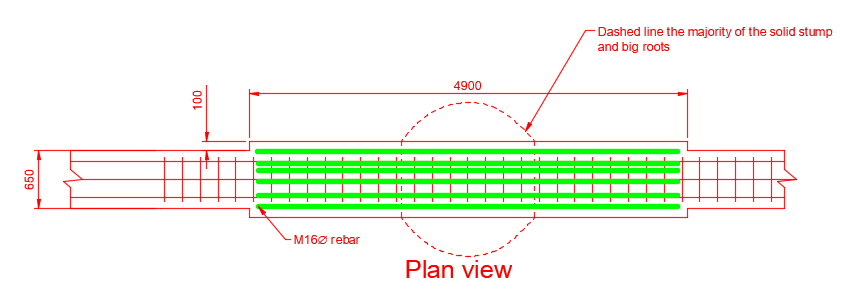
No an SE is not "duty bound". A lot of the NHBC information is for guidance. If you can show that the site conditions require a different approach and you can as an SE justify that then no problem. I made a long post before about the things you need to consider. If it was me and things looked promising I would have a look at something along the lines of the very rough sketch below and start to tweak the design to get it just right. I have not shown the top bars on the plan view. Key ponts are: 1/ The concrete is all cast in the one pour with the same mix of concrete. You pour the deeper trench fill bit under the blue line which is bit of DPM plastic. Smooth that off, go and pour concrete around the rest of the found. 2/ At the same time drop in the A142 mesh over the stump area and the M16 bars. 3/ Finish pouring the found over the stump area dropping in the top bars when you go. By that time the trench fill bit will have taken up a bit. 4/ The DPM decouples to some extent the reinforced part of the found from the deeper "trench fill" looking bit below. This means you don't have to follow for example the rules for steps in founds and if the deeper thicker concrete shrinks more than the rest of the found the shrinkage stress is less likely to be transferred to the strip or vs versa. 5/ Make the bar length so you can cut them from stock lenghts. Here the bar length are base on a stock length of 6.0 m 6/ The short 1.3m top bars are there in case the trench fill bit works too well and creates a hard spot that would cause the found to crack where the trench fill comes up to meet the rest of the strip found. 7/ The found is widened locally a bit just to reduce the bearing stress on the ground below.
-
Trial pits prior to groundworks, how much £££
Gus Potter replied to Post and beam's topic in Foundations
Yes loads of folk here on BH will be able to give you pointers.. and maybe save you lots of money. But to get the best out of BH you'll need to give us a lot more info so we can all mull it over and give you targeted feedback that applies to your site. -
This is a difficult subject to get your head round to say the least. Hope these general comments help shed some light. You want to do a loft conversion that turns you house from a two storey into a three and you have non rated doors, say traditional 6 panel timber doors with fielded panels. Timber and in particular hardwood doors (the timber is denser) can resist fire quite (talking 30 minutes here) well as the timber chars on the fire side and the charring provides an insulating layer which keeps the remaining timber cooler and thus intact. But you need a sufficient thickness of timber so you can get enough char to do the job. 32mm thick look a bit thin to me, if all other factors work in your favour then the Institution of Fire Engineers mention a figure of 35mm thick if the door has that thickness all over.. in other words a solid door. For me I would look at this as a possible practical / cost effective option for a non period house if the doors were 45mm thick or more and solid. A fielded panel is much thinner, that is a problem. Now it gets more complicated.. you can protect the fielded panels but you need to understand how the panels are rebated into the styles, rails and muntins. Next you need to examine each door for distortion, splitting and so on. Next we need to look at how we are going to install cold smoke seals and heat (intumescent heat) seals... do we fit them to the doors or the frame? Onto the door frame now. Do we have enough meat in the timber to fit hinges and closers in accordance with the manufacturer's instruction? How thick is the door frame, is there a gap behind it and how thick are the door facings protecting the masonry frame interface? The above covers some things we need to think about. In the old days we used to fit hardwood stops screwed and glued to the existing frame, maybe upgrade the fielded panels a bit and pretty much go to the pub. Changed days now as this sort of stuff is well scrutinsed, rightly so. To get this over the line with BC you need to do your research, develop the upgrade strategy, make the case, make sure your case will stand up to test by say the Institute of Fire Engineers and then hope that BC will agree. Anyone doing this type of design / upgrade carries the can liability wise so the days of doing ten minutes work and scooping up are over. Now the above can be challenging and exciting.. but it comes at a cost. The objective is to provide a passage way (protected route) to allow people on the ground and first floor (if not too high above the ground to jump out a window, it's the height to ground level) to escape. On the third floor they escape by way of the stair case. Thus for now assume you need fire doors on all the rooms (sometimes not all rooms but that is for another day) connecting to the staircase so that if a fire starts in one room the smoke and heat can't get into the stair well. Another thing we need to think about is this. When we create a third storey in the attic the attic floor becomes a structural floor.. that needs a 30 min fire resistance from below. If the ceiling joists are thin then sometimes you can't show that 12.5mm plasterboard directly fixed to say prefabricated truss bottom chords (89 x 38) gives the 30 min fire protection. But if your house was built with future proofed attic trusses the bottom chords may be 195 x 45 which usually gives you 30 min fire protection. It's not just the plasterboard alone that gives the 30 min it's also what it is fixed to and whether the plasterboard is skim coated or not. You can get round this by beefing up the ceiling joists if they are thin.. but you need to check the strengthening nailing pattern etc. If you have lath and plaster ceilings that BC query there is a fairly cheep fire emulsion paint that you can apply to upgrade a lath and plaster ceiling to 30 min or more. The above all sounds a bit doom and gloom.. but here a few ideas. Often when doing a loft conversion folk also want to make things open plan on the ground floor.. in new build you may have open plan ground floor also... both play havoc with the protected stair concept. But now we have misting fire sprinklers! The price has dropped a lot and they don't need huge tanks in the loft or a "special" water supply. Yes they do need maintained so there is a cost there. Hope this helps a bit.
-
You raise a lot of interesting and important concepts here. I'm thinking ICF, rafts and a bit of chemistry. Will mull this over as it needs a cogent response and a worthy response.. will take me a few days and sleeping on it.
-
Loft conversion and previous extension…
Gus Potter replied to Clueless2023's topic in Planning Permission
Hope this helps. First thing to do is to take a step back and do NOT identify yourself here by posting plans etc that could reveal your location. The reason is that it could impact on the validity of any indemnity insurance. Do NOT contact BC or Planning as this can make the indemnity policy invalid... check the wording. Next is to take several steps back an understand what you have on your plate, maybe you already have done this. I would look at the PD regs in force in 2019. Then see if what you have complies, get that nutted out. Then see if what you propose falls within the PD. You'll need to do a bit of work, spend a few nights reading, measuring your garden for curtilage etc, the heights of the extension, over shaddowing, daylight etc. This is the best way as you get to understand the issues and can make informed decisions. If it does then I would be inclined to submit an application showing the house without the side storey rear extension, a plan showing the side storey rear extension and a plan with your proposals. This would be accompanied by a written explanation of when the side storey extension was assumed constructed. Honesty is the best policy if you can back it up with a sensible argument. If your research indicates all is well then you can regularize it all. If this does not work then you'll get lot's more help here on BH. -
Hope all well at your end Steamy. .. but how do you know that they don't loose their elasticity over time for example. There was a few posts a while back on how PIR / EPS will maintain it's integrity.. in terms of load bearing capacity and elasticity. Looking ahead.. in SE Terms.. what happens if the PIR / EPS under all the rafts say we have been designing start to fail in 30 - 40 years time? Well if we are still alive we will be very worried that we have a major safety issue. Now what legacy are we leaving? But if it all starts to compress evenly then then it may just be a case of re levelling the ground and sorting the drains.
-
Softening the feel of a concrete slab floor
Gus Potter replied to Sparrowhawk's topic in Floor Structures
Good question. I'm very supportive of the Passivhaus principles and when I get a chance use that as a benchmark. I don't think I said that I was disagreeing with the principles was just pointing out how you may suffer disappointment.. with a bit of "drama" at my end. Hope the following helps you see where I'm coming from as discussion is healthy. I can see why you are asking and probing my argument. I'm always wary about accreditation schemes, not that they are wrong but they often attract cost. An example here would be the CE marking of structural steel products. There were plenty great fabricators in the UK who could turn out safe buildings.. they got lumbered (mixing materials here) with a lot of cost ( I know as I helped set up the CE marking scheme for a steel fabricator) and all this was passed onto the consumer. In some ways the CE marking for steel is good as it it to do with structural safety.. but a Passivhuas does not pose a structural risk.. of death. If you want an accredited Passivhuas then you have to comply. The earlier schemes and accreditation process was confining and carried additional cost.. part of the cost coming from the suppliers and all this was passed onto the consumer. That was a pity as the concept and intent was and still is admirable... but the reality was that only the well off could afford to be environmentally friendly. Also, the earlier schemes did not really consider embodied carbon, whole life cycle ( BS requires 50 years.. lenders often use 60 years as a benchmark, maintenance cost.. also a biggy.. and a massive elephant in the room) , loss of material performance.. and how homes are used by say a family of two adults, two or three kids..a dog /cat.. then by say an elderly gent.. and then by another owner.. long list. The Passivhuas Trust publish plenty papers but one from last year (May 2022) lets you see how they are dealing with and advancing on the "environmentally cost neutral house" rather than one which is just cost neutral to heat and keep at an even temperature. But also.. as Build Hubbers we would be a bit unchuffed if we thought what we are building is only going to be seviceable for 50 years.. where is your pride folks? The biggy here for me is that when I design a house I try and think.. yes we want it to be environment friendly / not fall down.. keep the bils / running costs down but we also need to design in such a way that the house holds it's value, is it easy to and cheep to maintain (can we source parts, can local folk fix things that go wrong) , can it be heated up if old folk visit, it snows and the kids are opening the doors. OR do we want to spend all that money just so the house can get some kind of accreditation or just look good on paper? @IanR I can see I may have rubbed you up the wrong way here, sorry for that. But if we design for say "difficult me" to make it a home it means that we need to over design and right there is where I think we are of a different view. If you over design a boiler the system is not efficient for example... but what price are do we pay for that luxury and how can we offset that intermittant price? What about those big ticket items.. 3g glazing.. have you checked the guarentee on the glazed units.. maybe they are under warranty for 7 -10 years? What then? I could go on at length but I summarise below and look forward with encouragement. Have you checked the roof warranty.. zinc cladding in a coastal zone? Now if the roof has to be redone that is NOT "Passive" in Cornish etc terms. The building regs are changing a lot in the wording. Previously they used to be along the lines of .. you must do this.. now it is.. well there are opprotunities to innovate and here are the targets you have to meet.. the future looks exciting as we can put forward all sorts of designs and ideas! @IanR I don't doubt your house suits you and if you are getting that stable temperature then well done.. you have made a good job. But please recognise that you may not be the only occupant.. in fact.. you have probaly built a house that will stand for well over a 100 -150 years.. yes you own it now but be proud of your hard work and the legacy you will leave. -
Lots of good information here. Agree no reason not to adopt masonry constrcution with beam and block floors. It's that attention to detail, good workmanship. A good thing to do is to try and build up you air tightness in layers.. by that I mean don't rely on the final air layer as the last line of defense. All buildings shrink and move as they dry out, settle in so if you can get the underlying layers of construction reasonably air tight they can serve you well as they at least provide some resistance to passage of air. Bit of lateral thinking here. If you have an oriface (a hole / gap) then you can sqeeze quite a lot of air / water gas through that. But if you have a series of orifices they offer much more resistance. For me it's about also trying to get the building staying airtight for say 50 years (it's design life). In some ways you get less movement with masonry / beam and block construction compared with a TF that moves about a bit more.
-
Softening the feel of a concrete slab floor
Gus Potter replied to Sparrowhawk's topic in Floor Structures
Thanks for the guidance. Think you also mentioned Schluter ditra.. a while ago.. you can deduce I'm making slow progress with my bathroom. -
Like have you have formed the posts supporting the canopy.. elegant.. accentuates the height and slenderness... I think.
-
I would check with your SE because.. and lets assume the inner leaf of masonry is load bearing. It looks like that is working as a raft, hence the A393 mesh top and bottom. Often the EPS alone is not able to resist the concentrated load at the edge of the slab so you use the slab to resist some of the loads (common in raft design) and this means the top rebar in the slab is in tension. But for the rebar to work it needs to be anchored at the ends properly. To get the rebar anchorage you can either bend the mesh down at the ends (can be hard to do, fiddly or needs special detailing) or extend the slab. Hence KORE's recommendation. But if you extend the slab you start to lose the benefit of the perimeter insulation. Speak to your SE before progressing as this is very important! But well done you for spotting this what seems to be a minor change.. but could have serious implications.
-
Good question. Can you post a detail or make a rough sketch on what you expect to end up with? The beam looks like it is on the inner leaf? What is the wall makeup?
-
Softening the feel of a concrete slab floor
Gus Potter replied to Sparrowhawk's topic in Floor Structures
Err no. I understand the principles... and the challenges you face integrating that with structural design. But also, understand the need to recognise how you need to balance that with how people live from day to day and what makes a home a home. -
Oh what an "interesting" thing you have there. Good points made by all so far, make for good reading. Yes, you have a special case. I'll throw a bit into the mix here and come at this from a maybe different angle, excuse the spelling and grammer please. Bit of context first. Let's look at the tree and the old wall. Yes looks dead. But here are things I would like to know about it's life, the ground and the old wall. 1/ What kind of ground do you have, clay, compact glacial till or a post glacial material (~younger than 100 k) years.. low nutriant/ higher nutriant.. harder / easier for roots to penetrate respectively with a topping of garden nutriant rich soil. . Also you may find the roots have grown up the sides of the wall where the ground has been disturbed. Do you have sandy or gravelly type soil, chalk or thin soil with bedrock below? Reason for this is to try and determine where the secondary and tertiary roots will might be. 2/ Which way does the prevailing wind blow from. Trees need structural stability and will aim to grab a hold of a chunk of soil to enable them to stay stable, call that ballast. Some trees have a big tap root and that also contributes to the stability. Reason for this is to try and gather info on where the roots may be going. They may be prevelant towards you neighbours and less so on your side... good news. 3/ What do you know about the ground water level. Do you live up north.. more rain or down south where you get more water stress. If in a water stress area roots can be deeper. 4/ What can you observe in the old wall. Does it look like it has uplifted, been repointed, leaning over. Again this provides information about what impact the tree has had. The old wall will yield clues as to what effect the tree had . All good stuff to know. The above is intended to allow you to understand this particular case and gather information to enable you to look at the other options. Lets say that the stump falls somewhere along the side wall and not at the corner for the moment. One downside of the trench fill is that it needs a big hole that could destabalise the wall as other poster have mentioned. But what if it turns out that once we know more about the roots it turns out that we have just a potential soft spot in the ground that could settle.. as the main stump / primary roots rots away over time. As it has been dead for a good couple of years the ground has probably recovered a good bit ( swelled back up).. Ok maybe settlement is the governing design factor. Let's recognise that we have a single story building (low loading) with a soft spot somewhere along the side wall but not too close to the corner. Can we just do a strip found here but make it say 250 - 300 mm thick and chuck in some 16 - 20mm diameter rebar to make a reinforced concrete beam that will span over the soft spot. Or if the roots are a bit deeper, put in a little trench fill and cast a heavier type beam to span a larger distance. This may need extra what we call steel rebar links which are much more like a reinforced concrete beam you may see in a carpark. The above options may mean you can avoid deep excavation near the boundary wall and all the problems that go with that. Also in some ways you want a foundation that moves about eavenly. Trench fill can create hard spots and that causes unwanted stresses. Last, what about the existing house.. if you start digging deep founds next to that then old house may be moving up and down while your extension is anchored solid. This leads to differential movement that can be undesirable. If you can get handle on these things you can put together a design that BC and all will be happy with. Once you see it all laid out you may think.. how simple is that!.. and if you think that then you probably have a good cost effective and sound solution. Now if the stump is near the corner you can deploy the same concepts but here you have a cantilever found and that is more complex. How complex you need to establish and then compare with trench fill.. but the trench fill might not have to go all the way round as you can do a bit of mix and match.. the bridging and maybe trench fill running perpendicular to the boundary wall. Hope this helps you a bit.
-
What a good idea, yes that would be a good bit of data to have.
-
Softening the feel of a concrete slab floor
Gus Potter replied to Sparrowhawk's topic in Floor Structures
Like that. Of course if you go down that route then it leads to more.. can you do passive stack ventilation.. can you use the adobe floor to balance and control moisture levels. Can it be used for example in historic buildings? Take an old Church you want you renovate and turn into a house. To comply with building regs you need to stuff in loads of insulation thus often shift the dew point in the walls detrimentally. If you have a moisture sink in the floor can you use these properties? Clay can absorb a lot of moisture. Is the adobe more enviromentally friendly, the processing can be I understand, but not always, less energy intensive (embodied carbon) than say making cement. I totally get the idea of low temp floors and passive house.. I'm a big fan of PH.. also a practical designer. As a designer of homes I think about making it a home.. it's not an office. Imagine you are unwell or your kids are off colour, an old person to look after.. it's good to have the option to crank up the heating and sod the bills. I know myself, how much and how good it feels to walk on a floor that is hotter than the norm. Build in that redundancy.. it's a luxury at not a big cost. Also, when we get say a "beast from the east" it's bit embarassing if your house is cold when guests come? yes.. the passive house is great normally but you can borrow my fleece and sorry the food is a bit cold and the red is a bit below temperature, and the old folk just want to go home as your house is bloody freezing. If you are a dog owner then you need to create cool spots in the floor for them.. I used to have a German Shephard and kept a couple of cool spots so the dog was not uncomfortable.. he was part of the family and we all shared the same space. These are the types of things you need to finesse to make it a home for all the family. Putting my SE hat on.. bouncy concrete structural slabs are a no no. Saying that for normal domestic applications your starting point is to say can we get a 100mm thick slab to work with the UF pipe, where do we need movement joints and that also drives the zoning of the UF loops.. another good reason to get your SE in early. Even with the best designed UF layout it is almost impossible to not get the odd hotter spot in the floor as the pipes cluster when nearing the manifolds. If you try and avoid it then there is no free lunch.. you probably need to compromise elsewhere in terms of floor layout.. you end up chasing the dream... the builder turns up and does something completely different! I take your point but they do work well if designed taking into account the anticipated floor finishes and the home owners expectations. Ok for me to profess but when you are in the thick of it as a self builder easier said than done when you probably have much bigger issues to deal with. -
Softening the feel of a concrete slab floor
Gus Potter replied to Sparrowhawk's topic in Floor Structures
Ta @Nod thanks for the heads up, much appreciated. -
Welcome to the world of garage conversions. I do a few of these and BC often ask how do you support the outer leaf of brickwork even the ten or so course below what is often a window above. Many of the jobs I do are on relatively new builds. Now the obvious solution is to get a hold of the "as built plans" that show whether the found is running continuously under the garage door opening. In practice this can be a challenge. If you can get this info and it shows a continuous found then the easy way is to excavate down and build off the found if niot too deep and it gives you more of a vertical zone to get drains past. But you may have a piled found.. can be a little more complex but best to try and find out now. If you can't then you can often span the gap with a lintel as you say. One secret of garage conversions is to make it easy for the builder to get stuff off the shelf. Steel lintels are problematic as say Catnic lintels are not design for below ground use.. so you need hot rolled steel.. then maybe an SE to design / check it and it needs to be hot dipped galvanised. That all adds to the cost and how much running around the builder needs to do. Ok lets put some numbers to this. How heavy is ten courses of non load bearing brick? The window is supported on the inner leaf. A standard course + mortar is 75mm high. 10 x 0.075m = 0.75m. Brick density 20 kN/m^3, say facing brick 102.5mm wide. The working load weight you need to hold up is 0.75 x20x 0.1025 = ~ 1.5 kN/m run of wall.. say 1.6 kN/m. Now if the door opening is 2.7m wide tops...the total weight of the wall is 2.7 * 1.6 = 3.2 kN ~ 320 kg just for a bit of context. For fun .. a 15 stone person weighs about 100 kg so we are talking about three folk standing on the beam. I think a Sumo wrestler weighs more but so does an elephant. "Interestingly" SE's have a number of bibles and an adult group of elephants impose a load on a floor say of ~ 320 kg per square metre of floor. Below is an extract from a concrete lintel manufacture, Robslee. The values shown below are what is called the permissible load, a working load, thus I have not added safety factors to the calculation above. A clear spanning type C concrete lintel (145mm deep) can carry a uniformly distributed load of 6.53 kN/m which is greater than the 1.5 kN/m we have calculated above. Now that looks like it works, provide that you drains are not clashing with the lintel as you can cut a hole in that. Ok the weight of a concrete lintel that long. Well you'll need 150 mm rest each end so the lintel you need to buy is going to be 3.0m long so weighs about.. 27 m of lintel = 1000kg. Thus a 3.0 m length will be about 3/27 * 1000 = 112 kg. In terms of price and availability the concrete lintel now looks attactive, easy to get a hold of and something the builder is used to working with. The good thing is that the concrete lintel generally works below ground.. provided the ground is non aggressive.. not full of acid soil and sulphates from power station ash say. . I'm just making caveats in case folk start to use my example for things other than a typical garage conversion say. @Kenc Things to check.. 1/ Your ground levels and DPC level. 2/ Where does the existing floor slab of the garage stop and can you put the inner skin on that.. requires another post. 3/ Do you have a gas membrane.. BC are certainly tightening up on this in Scotland so you need to make sure that if you have one it is detailed out. Hope this helps.

-
Spot on, mull things over, let us know, ask questions. But later if you make this work (all moved in and comfy) you need to come back and tell folk how you did it! That is the asking price!
-
Softening the feel of a concrete slab floor
Gus Potter replied to Sparrowhawk's topic in Floor Structures
Good for you and good thoughts! For a bit of context I have been experimenting with different solutions over the years. First go was on a self build with suspended timber floors some 30 years ago. It worked mostly.. but lets say I could have "done better" as I did not know then what I know now. I have to say.. this sort of thing crops up in my day job from time to time and I don't experiment on my Clients. I have been doing up my own ex council house. I added an extension, laid some hard core, insulation, DPM and then a 100 mm thick concrete slab with A142 anticrack mesh... yes it is still the structural slab. I tied the wet UF heating pipes to the mesh. Then laid a layer of I think about 3.0 mm thick foam and floated a good quality engineered flooring over the top. I wanted a floating floor as opposed to glueing it to the concrete so I can lift parts if it ever get damaged, say by water or me doing something daft. It has the give..and a bit of a spring.. me too am a big fan of bare feet in the house and a massive fan of UF. If you have a leather sofa then it's warm when you sit down as heated from below. In another part I had the old timber suspended floor. Existing joist depth is 150mm. What I did was to get 50 x 50 timbers and fix to them 100 - 120mm wide rippings of OSB with plenty glue. The solum space is tight so then put plenty glue on top of the 50 x 50 (OSB on the bottom side) pilot drilled the joist at an angle and cheek screwed the 50 x 50 from above to pull it up hard against the underside of the joists, leaving a 150 mm ventilation space under. I had to do it this way as there is not enough room below the joists to a battery drill in to screw from underneath. Now I had a 200 mm effective depth of joist with a ledge of OSB protruding. I then cut lengths of OSB nearly the width of the space between the joists and dropped them in so they rested on the OSB ledge. Next I cut 150mm PIR and fitted it tightly in between the joists. I went round any gaps with foam and then use silicont to really seal between the insualtion and the joists. Fixed to the insulation was the UF pipes, then a pug mix then the chipboardd flooring. This is to be a bathroom so from BH have been following folk like @nod and plan to use a decoupling matt for large format tiles. Going to have a stab at laying these myself.. if it goes well will let you all know.. if not.. maybe not. Now the down side of me renovating/ preparing an existing supsended floor was that is was very time consuming and to do it right requires a lot of attention to detail that a builder may not be that keen on. In other words it a great way for Build hubbers as a DIY project. Now technically I know that the foam layer is an insulating layer that reduces the effectiveness of the UF. But I took the view.. the heat has to come out eventually. In both cases I put extra perimeter insulation around the edges. Pratically I have learnt that it's a good idea to over spec the UF by way of closer pipe centres or larger diameter pipes, does not cost a lot. Reason is that my wife is a big fan of rugs and designer stuff. These rugs and their insulating effects far outwiegh my 3.0mm bit of foam. @saveasteading has got a lot of info and knowledge about this so have a look at past posts. He also knows a lot about perimeter insulation and how it can really improve the heat loss performance. -
Hiya. Your proposal is technically feasible. A few thoughts. On the plus side.. you have an eye for detail and I assume your are familiar with things like; logic, sequencing and programming events in terms of timing. Also, you probaly have a good idea as to how you assess risk. Hate to say it but the Rumsfeld quote is applicable.. the things we know.. On a personal level I think you may need to have a certain personality. Remember that you are not always dealing with other professionals. You have to be able to work with for example great trades folk who are terrible at communicating (they will do your head in from time to time) , sales folk, the whole gambit. Can you do this and not end up doing yourself mental harm? Can you cope with that over a sustained period of time? How are your IT skills? Do you think or can you work or learn to work a cad drawing package, just simple one. Something that you can use to convey construction concepts to others? You have time.. but if you have not done this before you face a very steep learing curve with the associated risks. I would go right back to the beginning and review what you know, how did the planning go?, what did you learn from that. Then look at the site you have, do your own desktop study so you understand the ground.. learn the technical terms and language used, you can find examples on the internet. The objective here is to get a handle and understand the things you know you know.. this builds your confidence. All the time you are doing this you end up reading around and gathering tacit knowledge that comes into play later. If you have a pretty good idea of how you want the Architecture to shape up then you can probably get quite a long way.. but you will make unforced errors.. that is why Architects take at least 7 years to train! If you want to get the likes of MBC and others to produce work packages then you need to know what they are omitting and what they are basing their design on. It's the gaps between the work packages and folk using different design criteria that cause big problems. One suggestion. Do the leg work, put together a document that summarises where you are. Imagine you are using this document to sell your project. Next try and find a local SE that is interested in the kinds of things you are interested in implementing. Remember SE's also do a bit of Architectural design. Or you could find an Architect who knows their way around the SE stuff.. the two professions cross fertilise. Some SE's will say.., give me 300 -400 quid a day and I'll not just give you SE advice but a whole load of other pointers about stuff they have picked up over the years and how you can design all these flashing details etc. It does not have to be an SE, could be a surveyor etc.. but all builds start in the ground and the structural concept.. particularly the horizontal stability system. Yes I know I have slanted this in favour of maybe an SE but.. The above is the best advise! Other than to add you need to find folk you get along with and can build a rappore and trust. Here you get it all for free and can explore without losing your shirt!
-
Yes your are right but in the round and to give folk a flavour of the things that occupy our minds..
-
Too right! Hi Alan. Hope this helps... there is a lot of prep work you can do.. seems like you have already started raking out a borehole log so well done. We call this a desktop study, often folk slag this off but what they don't know is that it forms part of the BS design codes to site investigation and good practice. Try and find out as much info as you can online, look at the BGS viewer to see what kind of bedrock you have and superficial deposits. Speak to the neighbours (very good to do as we weave this local knowledge into a site investigation report), well I do as it carries weight.. believe it or not. Ask say about flooding, were there any landfill sites, was it in a bad corner of a field that the farmer filled in? .. think of the things that might be relevant to your site, be friendly and get them talking. Sometimes they produce old historic photos and give you pointers, history of the site and real nuggets of info that can literally save thousands later on. Other stuff.. have a look at the services, if rural... then where are they, what services will you need.. drainage is a biggy. If in the town.. where do you think they might be and how deep to the sewer in the street, if rural have you available space for say a soakaway or easy access to a water course that does not dry up in the summer.. Next thing to do is to have several walk overs of the site and wander round about. Try and understand how the topography has been formed and importantly what has been changed over time. Are there culverts, how does the land drain, where are the water courses, are there big trees, if so which way are they leaning.. If you see the power company / water folk digging up the street stop and ask them about the ground! many of them are keen to tell folk what they know!.. sleep on stuff for a while.. be curious.. think of everything you can and try and work out why the things you observe are the way they are.. and write it down. The objective of the above is to try and encourage you to look outwith the site and understand what is going on round about. Do your best here and put all the info you have into a document with some photos. Now you have the makings of a desktop study and off the back of that you then plan the intrusive site investigation. Your SE and investigation company will meet you with open arms if you turn up well prepared and won't make a fool of your efforts.. if they do then find another SE GI company pronto. If you come to me and say Gus.. I want to build this house.. I'll say.. to do it right and do our best to avoid things coming back to bite us we need to start with the above. This way we take all reasonable steps to mitigate the risk to you and we can then focus our effort on the different designs knowing we have started out doing things the right way.. done the leg work. The above is the starting point of planning an intrusive investigation that reduces the risk of wasting money while at the same time providing useful design information that can unlock options for the building / basement.

