


Gus Potter
-
Posts
2383 -
Joined
-
Last visited
-
Days Won
34
Everything posted by Gus Potter
-
My passport says I'm a citizen of the "United Kingdom of Great Britain and Northern Ireland." I do not support Scottish , Welsh or English nationalism in any way. We live on a small island and face many global threats to our way of life. We have a massive immigration problem, some legal, some not. It is putting tremendous strain on us., some is stressing out our health care system financialy.. but there is a big threat from radical "Islam". It is the big elephant in the room. In Scotland we have this new hate crime bill. I have to be very careful about what I say as I could face 7 years in jail for posting this. What you folk don't really know is that if you say something that can be read on the internet in Scotland then you are fall under Scottish law as you are deemed to have published this in Scotland. You could be hauled up to Scotland in our courts. Also if I report you for a hate Crime even anonomously it will go on your record , thus if you are say a teacher in England and they do a full record check then this will flag up that you have been recorded for a hate crime. Do you know about this? Now most of us up in Scotland are absolutely against this law. Also in Scotland the next thing they want to do is to abolish jury trials for rape cases as not enough blokes are gettting convicted. But Imagine if this was your teenage lad that got a bit pissed, the girl is pissed.. now it is down to a single Judge to determine rather than 15 adults. To make matters worse the Scottish Gov have now taken control of our legal system. @saveasteadingI wonder if this is cultural matter that has to be worked around pragmatically. Yes it is. It's basically a contrast between say living in London and contracting where every one is shafting each other and a bunch of adults being fair to each other in Wales or up Durham/ Yorkshire way. If you want to go culture then a Yorkshire man is one of the hardest folk to deal with. I know as have just had a Yorkshire man as a Client, six foot two, retired Quantity Surveyor.. we are still friends. Most folk in Scotland don't get hung up on folk moving about the UK. Some get touchy.. say I trucked down to Cormwall and started shoving haggis down your thoats? Now for you folks that do think that you want to have a bash at English nationalism.. Up in jockland we have 1/3 of the UK land mass. Also we the sea bed and fishing rights that extend 200 miles from the Scottish coast, the defense envelope that comes with that and a bit of oil, yes we may cut out the gas but you'll still need to oil the hinges on your doors? Yes I know when you look at the BBC weather forecast Scotland seems small.. but that is the BBC for you. We also have the land that defends the high north arctic circle, the big submarine base with deep water access. For the English nationalist.. do you really want to give away 1/3 of your country just to get rid of the jocks? Oh and then you'll give away Northen Ireland.. yah dafties! @saveasteading'Can you come and inspect the drainage trenches'? Yes of course: 2 weeks on Tuesday at 11.30 and don't fill them in. No.. It won't work up in the islands.. it needs much more give and take.. also our ferries don't run if they turn up at all. The Scot gov have just spent £400 million on two ferries that are stilll being commissioned, we could have ones that work for £20.0 million.. so we could have had 40 working ferries by now. Bc are still ok but seriously underfunded. All of my posts about this is trying to encourage @JWHIT not to try and apply mainland rules to an Island situation. It won't work. rather get with Island life and enjoy.
-
@Conor has done a lot of good work, detemined fellow. Honestly, I don't as you don't use your own name but thanks for the kind words. I love helping folk as my job is also my hobby. I do have a wife who loves me though! I think you need to post some decent sketches with dimensions. I was floating some ideas but until you put some flesh on the bones there much more I can say. To be blunt I love a challenge. I'm on BH as I learn a lot.. from loads of folk on BH, it is a two way street. Look you need to get to the bottom of the drains / sewer and start to do a bit of the hard graft at your end. Stop speculating about cantilevers etc and find out what the water board will let you do and what they won't. I'll design you cantilever slabs all day long.. but not now or give you advice on this until you get the basics sorted. Frankly I'm surprised that you have got this far and non of your designers have said let's see what you have under the ground. I often say to folk.. I want to have a look at your title deeds.. Sometime I do this and the project gets abandoned at an early stage.. but these customers always come back to me as I have saved their bacon. Can you get your money back from the SE and designer? How did this happen where you got this far? How much money do you have to spend on this? Draw it out for your self and you'll soon see it it tricky and expensive. I may be sounding a bit tough but you need to confront the elephant in the room.. which is this big drain. Look closely at the drain diagram I posted and study..
-
Hiya. I'm Scottish base and have family that live on one of the inner Hebrides and have lot's of experience dealing with BC on the Islands. Also I deal with Scottish Building Standards on a regular basis and have done so for the last 40 years. Some of the BC officers I know quite well, we have a chat on the phone about our careers and reminisce on how good the old times were. In other words they are folk just like us.. there is the odd exeption but that is life. In the round though BC officers actually do have your best interests at heart. It would be great to have a BC officer or two join BH! On the Islands there is a lot of politics. Some Island builders are really shite, cut corners in a big way, some are better / good. BC know who they are so maybe you are getting a heads up and not just seeing the wood for the trees about the work that has been done by others. Now you are doing a bit of work yourselves.. well how much and when did you start doing a lot yourselves? It is in your own interests to build your house right? There is always friction on the Islands... BC know this but are not corrupt at this level. There are loads of other Islanders and folk moving there that do DIY projects so you are not the first and last. @JWHIT "surely this is trespass" My advice.. get this right out your head now. If the BC officer can access your site then you have a Health and Safety issue and they can hammer you on that. The HSE law is quite clear on this all over the UK, if your site is accessible then you are on a hiding to nothing. Have a looked at your site security? Don't pursue this route as you will likely regret it. Too late for that, BC can hammer you much earlier. There is no argument in law for shoddy HSE by saying.. hey I'm insured. Insurance is for when you have tried to do your best and things still go wrong. If they can see bad things from outside the site boundary then surely.. you may be making a cock up? If you try and play hard ball with them then they will pull your trousers down and you won't get to pull them back up until they have run you ragged. Now you may feel that the BC officer has turned up with no appointment.. but they are allowed to do this under UK HSE law (not just Scottish law) .. part of their remit is pubic safety.. they can hammer you on this too! To lay it on a bit thicker they may start to ask if your project should fall under CDM regulations., just to give you the run around. In summary: 1/ Yes there is Island politics, don't worry too much about the main Island Contractor not getting the job. 2/ Phone the officer up and ask when they are next on the island and arrange to meet them in person. This is so imprortant. You are on an Island.. you must get to know folk.. the emails you get from BC only show a snap shot.. sometimes they write stuff that seems really daft / aggressive.. but they are pushed for time and under funded. Cut them some slack and cut yourself some slack too. Keep an open mind as while you see this as a personal opinion then they may be able to give you good advice? Also if you hit it off with them then later on when you apply for a completion certificate you'll probably find that part of the process much easier and not get hit with a load of things that don't conform. 3/ Build a rapport with the officer.. recognise that they may be trying to help you rather than hinder. You may have a young and inexperienced BC officer. Be very careful here not to bully as their boss will then give you the big stick! Listen to what they are saying.. put forward your ideas and have a bit of fun.. seriously they are just folk. To finish @Kelvin may be able to give you some advice about how you deal with BC when relocating to the north of the UK ( Scotland) 4/ Some of my family live on Tiree. Clocked this at the end! Well it does.. Some of the building regs are open to opinion / discussion / detailed design. BC officers often hold professional qualifications / have great experience. They are entitled to question. As before one big stick they do hold is the public safety issue (I do it too as an SE) . Lot's of folk on BH think that this is their house and they can do what they want. BC say and I.. that house has to last for 50 years at least and you may sell it to a family in a couple of years time. Our duty is not just to you but all the folk that come after. Just copied this right at the end. The above is misleading as if it is deemed to be a risk to public saftey then the LA can effect immediate access as what they do will call on the Fire service, the Police , gas board and me as an SE. You see.. who knows what building regs have been compromised? Is it just an extractor fan of a serious structural defect that could cause a gas leak? If push comes to shove and I'm acting for the local authority.. I'll find a legal way of getting into your property if I feel there is a safety issue. You are pissing in the the wind! If you have nothing to hide then you should be relaxed about all of this.
-
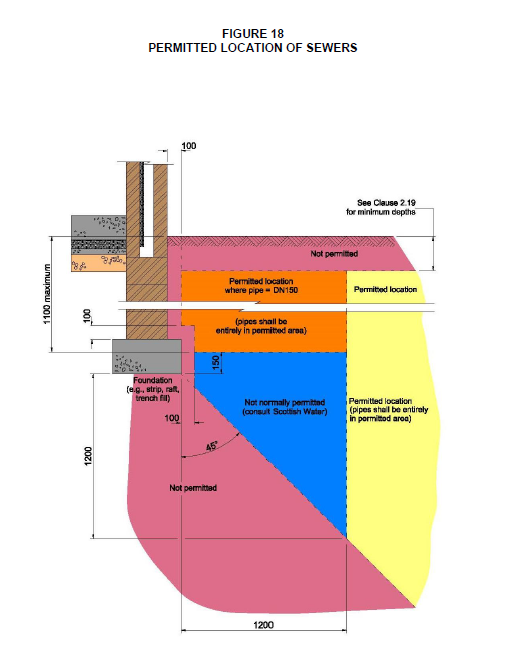
But you have now! Below is a screen shot from the Sewer for Scotland guide, same pretty much applies all over the UK. It's pretty clear that moving the sewer is not an option.. too expensive and where would you move it to? Also any type of deep foundation strip / trenchfill directly under the side extension could well compromise the existing house foundations due to it's depth.. you are getting into complex / costly Civil Engineering territory. The manhole up the side of the house is a big issue as you need to maintain access. However, this is worth a look at in principle. Say up the side of the house you put in two or three carefully bored piles near the boundary and then run beams / make a cradle from the gable of the house to the piles near the boundary. Your side extension then sits on part of steel cradle but avoids the manhole and doesn't extend over the line of the drain. At the rear, as you are piling anyway you just do the same maybe with a cantilever concrete ring beam. This could work and reduces the risk that if something goes wrong the water board come along and demolish your extension. It would only be two steel beams that span over their drain which you could dig under. I would draw this but have clocked off the day job. Sometimes it can work where you bridge over a sewer with a bit of structure (not a monhole) and negotiate access with the waterboard. In the round though.. unless you have a very high value property then it's unlikely going to fly cost / benefit wise, unless you work for / own a piling company.. I see this quite a lot where plans get draw by an Architect.. the SE does a design based on the plans.. but no one does a bit of due diligence to check the drains! The professionals should be much more alert to this early on. But often a Client doesn't want to pay for this fundamental early work. Some of the checks are really simple.. a site walk over, a walk round the surrounding area, topography of the ground and a service check. Undertake due diligence! The sewer may even be mentioned in your title deeds. Your drawing needs a bit more detail as dimensions of what you propose vs what you have are critical. In other words a decent plan existing and proposed plan is required.
-
Look folks. What is happening in Scotland has nothing to do with science and all to do with political ideology. Trying to rationalise this is not achievable.
-
Do a soakaway test. Your drainage Consultant is flagging this up and rightly so. You use the word "alarmed" and if that is what they are indicating then there probably is a problem with a normal soakaway. You seem to have a propensity for understatement in this case? But if that amount of money is at stake then there may be an Engineering solution available or a deal with a neighbour... yes it will cost you but you won't lose all your dosh. I find this stuff fascinating, the challenge, investigating and finding a solution. If you want a bit of help from BH folk.. there are a few folk that can help that know do their stuff but to get the best help.. then you'll need to post a lot more info... be careful before you do as it may compromise your position later.. as you know. If you do want to post info then basically the full shebang is required. Site plan (dimensioned) and address, any geotechnical info you have, the building footprint, pretty much everything you have and then you'll get some free advice. Yep a clever option. But are you over a major aquifer that supplies drinking water? You are in a zone one! Are you over the North Downs main aquifer? Good solution if you can get the neighbour or Water company to take it for a fee?. With a bit of attenutation you could actually win a watch as you could supply flow to say ditches that suffer from dry weather / intermitant flow. Just mulling over ideas. Ponds / swales etc can work if you know enough about the ground, flood risk, ground water levels etc.. What if you had no roof gutters and drained the water into a swale, raised planters ( attenuation), wide French drain or use a louvred edge roof detail. Or you can have gutters which is more traditional and do the same. Now your 5.0 m from the building no longer applies so long as you can show the structure won't be affected. There are lots of options. Yes this is a general rule to avoid compromising the founds ect.. as above I'm thinking... just say we look at all other options and nothing works or to do a deal with a neighbour costs too much. If there is this much money at stake then why not say deepen the founds and let the rainwater soak away under the building? like it did before the building was there? In reality what happens is the neighbour may see the pound notes flashing.. you say.. hey we have another solution.. push too hard and you'll get nothing.. The above is a bit of a glib statement.. there are many challenges to doing this, geotechnical and SE wise. If you are on chalk then is has up and down sides but fundamentally it should work.. but it will take a lot of work to convice all parties involved that it does. I would look at all the other simple options first. Some you can use to compliment the Architecture and look great if well designed. No gutters can be a problem as the splash zone impacts on cladding design etc. Hope this raises your spirits a bit... if required.
-
No, that's my Mum in the 1970's. Hi Conner a few points. Have copied text later and made points in line in italic. Hey, guys I appreciate your responses, especially Gus thts really helped me out, Ive tried to sort out the drawings a bit today but unfortunately spent most my time creating a render which turnt out shit but anyway. Rendering is tricky. I'm not very good at it. Sometimes I do it on a very basic level but I'm not qualified to comment. The only things I would say is that in render 2 you have picked out potential staining at the bottom of the timber cladding which is an elegant touch. Well done you. I'm not sure if you have shrunk the sections alongside the render but if you are going to dimension the renders then make sure the dims can be read at the scale you are using. If not take them out and put an info box at the side of the drawings that contains the finished floor to ceiling levels and the floor thickness. Also on your section (generated from the render) there seems to be something that looks like people / furniture but the apsect ratio looks off. Take them out as it clutters you work. Ive been watching lots of videos on cold briding and I understand the concept of not being able to break the insulation line but how can you attach anything to the outside it seems impossible. Ive tried to make the drawings clearer by following your guidance but ive got to the point when im just a lil lost at this point with the project, Id go to a lecturer but the way the uni programmes this suff is mad, we hav'nt been had lessons for past 3 weeks and the hand in is the first lesson back from easter break ,its like they want us to suffer What you are being asked to draw is very difficult. To put this into context.. I've been in the building trade and a designer / SE for 40 years and I find it hard. If you look back at my section through the roof you'll see there are cold bridges, there is discontinuity in the vapour control layer, I'm wrestling with fire protection, trying to get standard off the shelf brackets / standard timber sizes to work, a soil drain is weaved in there and I need a bit of ventilation. You are being asked to produce something equally difficult! For a bit of reassurance these details I posted too a lot of hours to get them the way I wanted. The roof section took several hours and a lot of thought, agonising to get a compromise that is buildable on a renovation type project which it is. Yes it is not perfect and has deficiencies but such is life. I totally get how you feel. Your Lecturer has gone AWOL and the online stuff is rubbish. No support.. left to fend for yourself.. shocking! Id thought I would post my progress, so heres the changes I've made so far plus some 1:200 plans and the shit render I made, If anyone would like the assess my entire project pm me and Ill send the entire project out Take care peeps Also ignore the added pv fin Im sure it wont affect things 😅 If anyone has any tips to sort out the Thermal bridge solution id pay you but im broke student lol Looks like you are pushed for time! Ok chase the marks and don't through away marks on the basics. 1/ Check your drawing title box, and double check. 2/ In the title box make sure you state say " Scale As shown at A3, A2" etc. 3/ If using colour note on the drawing.. state these drawings should be printed in colour. 4/ On your render add in a scale bar.. if you can as it is an Architectural drawing. Think you have one but double check. 5/ On your detail you use numbers to identify materials. They don't seem to match up e.g parapet detail item 22, item 13 on same for example. Fix this. 6/ Your material identification.. some start capital letters other not. Check this and sort it. Tiny things, good you have stated the dimensions but not "Dimensions(mm)" more Dimensions (mm) see the spacing? Remember your Lecturer starts at the top.. if you get the top of a list of materials right it puts them in a good mood.. if that is possible? The nitty gritty. Ok you have identified a cold bridge. Some of the stuff you have drawn is bit off, but ask ten folk like me and you'll get ten different answers! I think what you should do is use you drawings to show how much you do know but don't have time to detail. In the case of cold bridging say something like " potential cold bridge" detail to be further developed in consultation with product manufacturer and SE etc. Use a leader line to point to the area in question. You could use a italic text to highlight these areas, don't use a revision cloud as this has a specific meaning. The fixings.. there is no way you can be expected to know all the ins and outs. Again, say fixing details to be developed by SE and reviewed. In summary as you are pushed for time let the Lecturer know that you know the issues and leave it at that. Hope this helps, keep your head up! Oh and don't check my spelling / grammer!
-
You must get to the bottom of this before parting with your cash. I see this a lot.. the vendor claims no knowledge.. but I know they know that they are not offering a clean sale. Ask this.. are you the first punter that has pitched up or have there been others who have clocked that the vendor is not playing the game? I have seen this over the last 40 years.. If you can't get a rural plot soakaway or similar to work etc then the plot is often only worth the agricultural value.. it's a fact folks and there is usually no magic bullet. It may be that the plot is worthless.. you don't want to be the idiot that buys it. It may be that you can do a deal where they give up more of their land and you share the soakaway say, now the plot has value. It's time to say to them.. look we need to sort this out or we are off. If you are not firm now you could lose your shirt. Forget CCTV survey for now and get the big stuff sorted. Who owns what and what rights of servitude exist. Understand that first.
-
Good for you as you are thinking about things. I note you provide no details on the boundary wall and what is behind that! a Church? .. but no other info.. levels etc. This is the key.. you can't destabalise your Neighbours house or garden. If you can let us see what is over your boundary in a bit more detail.. just get it out now in the first wash.. Yes you see a terraced garden.. I see stepped / battered ground that the previous owner has planted up, and probably messed about with.. look at the crib wall! maybe already dug away ground that leads me to think that it (the stepped ground) was there for a reason. You have a timber crib wall.. date that and you'll probably see that previous owners have already pushed the boundaries a bit. I think you know deep down that if you want to level things up it will cost a lot.. I think you need to draw some cross sections that also show the ground on the other side of the boundary and where the other structures are, put some dimensions to all of this before anyone on BH can give some meaningfull input. Sometimes I look at a set of photos and think.. what is not included! if you want some advice then provide this information and enough detail so folk on BH can chip in with good site specific advice as opposed to try to second guess what you are thinking and what lies on the other side of your boundary wall.
-
Me too!
-
Well done you. As @ETC says annotate this up. Admire what you are doing, if you can get handle on this then the world is you oyster. Here are a few quick comments, some are obtuse but you'll learn this as you go.. don't be disheartened mind. Have a look on the internet for some of the terms I use if not clear. 1/ On the curtain wall where the glass comes down you show a flashing to shed the water outwards. Flashings need a safety lip. Show add that as the manufacture of the flashing will recommend it as a standard, so folk don't get cut on the sharp edge and it weathers much better for example, also stiffens the edge of the flashing. 2/ Make sure you show any mastic and note it as say flexible polysulphide mastic or similar and approved. BC can pull you up on this. Contractors will love you as it gives them room for manouevre. 3/ Your concrete anchors look a bit off SE wise. The two near the glazing are too close together (causes anchor spacing problems at detailed SE design stage, you could have to redraw it all!) and too close to the edge of the concrete.. all will trip you up later once the SE gets going. The two holding the I shaped section down are too long. Show them embedded into the concrete by 130mm. Also show the thread of the bolt extending above the nut by 5mm unless you are using expanding anchors. 4/ I think your mansard roof is too close to the box gutter as: (a) You'll need to get a drill etc into fix it... buildability. (b) The box gutter will have a run on it.. how do you achieve this and make all look tidy at the end of the day. (c) It will choke with debris / moss as the cladding is too close to the bottom of the box gutter (d) You will get spashing back up the cladding which could void the manufacture's warranty. BC regs in the spirit of things like to keep things 150mm above the spash zone. Simple solution.. just lift the cladding clear of the box gutter by 150mm? Ok don't get too hung up on the above. The best advice I can give you is to be brave when drawing. If you don't know something just put a note " to be confirmed" and then say why it needs to be confirmed.. it's ok to say you don't know! Below is a screen shot from a section drawing from one of my jobs. I use red colour to flag up a big structural safety issue and softer colours to pick out the bits that make the drawing easy to read. At the top there is a note where I say "also prop the ceiling joists to prevent punching through.." here what I'm doing it to try and communicate why I want something done in a certain way and what other folk need to do to make it all work. You'll also see how I'm flagging up stuff about temporary propping ect SE wise at the top of the drawing, no strong boys etc. This drawing also has a figure of a person.. bit odd .. I do this as soon as you open the drawing you get a feel for the scale, yes it's not true SE / technical detail stuff but my job is to make it easy for everyone to read an understand what I want them to do. I also dimension where I can the height of the person to avoid later "complications" and accusation that I may have shrunk / increased the figure height to make things look bigger / smaller. @ETC? surely not sir? But other's are not so honest as we know.. some folk alter the drawing aspect scale for planning purposes. The drawings above are telling a storey and targeted to the reader who will be a local builder, BC, the checking SE and the Client who has a technical background. The real objective is.. yes to provide the technical detail and that is what @ConnerR you'll probably get assessed on. But run this by you lecturer and see if they will add marks by using colour, adding explanatory notes which shows that you understand what you are drawing and how someone can take your drawings and build something from them. The annotation notes on a drawing are often as important as the detail. I'm not talking about the massive long text list down the side of the drawing.. more the annotation. I use arrows as the reader can see what I'm pointing at! It takes a bit more time but helps avoid errors. Contractors are busy folk and don't have time to read pish. Below is a bit of a fascia detail from the same job. Again I'm using colour and notes to try and pick out the important bits on this drawing. Also see how I offer alternative warm roof fixings to the Contractor but make it clear how I want them to penetrate the timbers. I use a technique to denote things on the near side and far side.. steel fabrication drawings often have this annotation. But if you do this you need to have a text box that explains the annotation.. It can be a good tool as it declutters the drawing if the annotations gets too congested. Below is a totally different style of drawing from the same job but using a specialist steel designer software package. It's two fabrication drawings for the steel fabricator..who take no prisoners if you get it wrong! The first is a general arrangement 3d drawing, the second is what is call an assembly drawing of beam B2. Beam B2 I hope the above gives you and insight into how we communicate by drawing what needs to be done and the different syles / ways of doing it. Keep posting as you make progress with your studies and all the best.


- 7 replies
-
- 3
-

-
- details
- curtain walling
- (and 3 more)
-
Using a diamond core drill. any advice?
Gus Potter replied to saveasteading's topic in Tools & Equipment
Here is a thing for all on BH to keep at the back of your mind when investigating say on old barn that you want to convert to a house. Below is some of the things we consider as SE's. Remember that the SE works for you and will try every avenue to show what you have will be ok (provided you pay them for their time) for you.. but also for the person you sell the house to.. that is just about how all SE's start out.. as Civil Enginners.. the clue is in the word Civil.. we primarily work in the the public interest.. it's just you that picks up the tab. You may want to reuse the existing barn concrete slab and build on top of it. It may well be that you have had farm machinery running over the top of it for years and you know in your heart it is ok.. but that is not enough for BC or an SE that is going to sign off to say it is going to last for another 50 years.. your mortgage lender may ask the same! The concrete ages.. suffers from sulphate / ammonia attack, concrete carbonises and offers less protection to any embedded steel, the rebar becomes prone to corrosion. I'm not saying it is all gloom and doom but if it is going to perform for the next 50 years you need to get your ducks in a row. Now I know that a lot of folk on BH are not a fan of Architects, SE's etc that can offer advice.. but if it all goes wrong what then? To recycle and old farm shed floor you need to know initially the thickness of the slab, how much the thickness varies, if there is any mesh in it, what that mesh is and how heavily it is corroded. You also need to know if the mesh has just been flung in or if someone took a bit of care when they cast the old slab. Now you could core one hole.. examine the sample and then say.. ok lets go to the design guidance.. which says.. sling your hook if you only have one sample. Minimum is three samples but from experienece the safety factors you need to then apply to only three samples often make a design unviable. I've investigated industrial / farm building slabs and found that the most economic balance is to take 5 no 100mm diameter cores and see if you want to send them for testing. It's a good balance as with 5 cores you can get a handle on how well the slab was laid.. if the cores look crap or too variable then no point in spending the money on testing! You know early on if the concrete / workmanship is rubbish and can see if the mesh (if any) is all over the place. If you get good looking cores then it is time to make hay! You get a feeling.. we have a good slab here .. lets take another two cores. Why you ask.. well the more cores we have the lower the probablity we have crap concrete and varying slab thickness etc.. it's to do with the maths / probabilty theory we use to assess the concrete slab strength..but the difference 5 and 7 cores could result in a 15- 20% increase in concrete strength.. which is a lot when we are in the no man's zone.. do we dig out or retain a massive floor? To test another two cores may cost £200! and that could have a major impact on the fundamental design decisions which can cost thousands... maybe more. -
This is where you get a bit stuck. You have the general regs that are conservative and for good reason. There is a balance to be struck.. do you pay an SE to refine the design or stick to the often conservative regs? On the face of it stick in some piers if you can live with that. As an aside concrete blocks are normally 140mm (actual size) thick rather than 150 thick (nominal 6") Be careful with the detailing here.. are you going to put the insulation on the outside or inside? Best to post a detail of what you are intending and you'll get lots of good advice.
-
Welcome to BH. Plenty of folk here who have been there and got the PH shirt, you'll get lots of suggestions and practical advice for you to mull over. With your background you can share what you know as you say, good for the sole! All the best.
-
88 new houses near Cambridge to be demolished.
Gus Potter replied to Temp's topic in General Self Build & DIY Discussion
Think you have nailed it A bit.. but maybe not? I do a bit of claims work and at times represent Builders for my sins.. but sometimes honest builders get bad Clients and grief from BC and need someone to stick up for them. Yes it seems they have made a bollocks of this development.. but the developer may/ is be doing something about it. If I was acting on behalf of the builder I would say.. look the houses were signed off by BC? and yes the problems became apparent quite quickly but could have taken say 2 years or more to manifest? I mention 2 years as no one has talked about the warranty provider and where they fit in. I think the Builder has a good case in fairness so my feeling is that BH folk and the press are not giving a fair hearing to the builder. The building process carries risk.. sometimes thing go wrong! So long as no one gets hurt that is the most important thing for me as an SE. I can see how this is turning into a barny. If I was acting for the Council I would look closely at the approval dates for each house and the time line. The law is pretty clear on this and the documentation is probably well recorded. But... I suspect this is a case of shoddy reporting and a lack of professionalism on the reporter's side... probably too young and too daft to be competant to pen such and article. If they had written a balanced article then this would help young folk getting on the property ladder and make good choices when doing so. It's click bate folks and winding you up! -
Me too, not a day goes by where I don't learn something.. problem I have is that older I get the more I realise how much I don't know! I went to University at forty, best thing I did as it gave me the tools to teach myself. Interesting background you seem to have. You're among kindred spirits here on BH, mind you be careful what you wish for. Seriously though, if you've done a few of these before post some photos on how you did it, the tools you needed, what is going on at the supports etc.. that practical stuff.. so new folk can see how it's done properly.
-
That's a good description.. reverse percolation test! Clay soils can be quite variable. In a site investigation report you'll often see that they captilise the dominant component.. like.. silty sandy CLAY. The clay in capitals means the dominant component is clay. Also when you are sampling and doing boreholes you sometimes see a blank bit in the site bore / sampling record.. often described as "no sample recovered".. this is a big red flag in some respects, mainly as it relates to the design say of a basement and how you stop it from floating like a boat.. what is it (the no sample recovered part of the log) and how much water can it convey. On the other hand it could be a gift than can be taken advantage of in a drainage design if it is indeed a permeable layer of soil. Now there are soakaways that we a famiiar with. You dig a trench, fill it with gravel and a perforated pipe and the water goes downwards never to be seen again.. problem solved. But sometimes you can design them so that the water goes sideways and mixes with the natural ground water. This can work well where the additional flows are low. Often less so for surface water unless you can attenuate. Funnily I did this on a self build on clay many years ago where I just added the water from the septic tank to the natural horizontal ground water flow. However you need to install it really carefully and it may some maintenance later.. it's often not a "do and forget solution". At the back of my mind is that the climate is changing.. more rain coupled with long dry spells so anything you do needs a bit of future proofing rather than just doing something that will pull the wool over the eyes of BC and the Environment agency say.. that a lot of folk are inclined to do. To be able to design a "sideways" soakaway you need to establish the hyraulic gradient over the site. Simply if you dug 4 holes and took levels of the ground surface and the static water line in the holes after say a week you can plot that on a drawing to give you a rough 3D idea of what is going on under the ground... the hydraulic gradient. Yes you may have say ditches nearby but they won't give you all the info you need. Alan.. To test this principle before embarking on detailed investigation.. what if you fill the hole you have dug from a bowser to bring the standing water up by say 200mm and then see how long it takes to revert back to the standing water level you see at the moment? It's not something that we could rely upon but it would let you see how something could work? Now if you have that "no sampled recovered" bit in the site investigation log .. it could be a great permable layer at a decent depth that you can tap into to get rid of your water. For all.. on a technical note.. I use the word permeable. This describes the overall behaviour of say a layer of soil. Say you have a layer that is made up of quartz gravel and sand / silt. The particles themselves are not porous.. like granite stones in a wall ("rising damp").. it is the gaps between the particles and density of compaction that is important and when we look at the layer as whole we call this permeability. Now the same principles apply when we are designing concrete for a basement so it is watertight. We want to reduce the cavities and the crack widths in the concrete. We reduce the cavities by selecting the right mix of concrete and reduce the cracking by using rebar and that makes the concrete more impermeable. Often if you have a house that has no basement then the problem can be decoupled. But if you have a basement then you need to make sure that you are not going to channel water back towards the basement which is in effect a large sump.. that you will have to pump out or drain in some way. Also..if your water from the septic / digester tank / car parking area ends up (although diluted) next to your basement wall then you could alter the soil PH and sulphate content and that could cause a problem as when we design concrete under the ground we consider sulphate and PH value. Never mind that.. you don't want stinky toilet water against your house .. often happens if your visitors / relatives behave badly in the bathroom. In the round if you look back over Alan's thread he is taking time to investigate and plan each step. This is good design.. you learn a bit.. review what you know, plan and execute the next step. It takes time but it's the best way of spending you money wisely. In the round if you have a flat site say Norfolk / Linconshire or up in Scotland round about Stirling for example where you have these types of non consolidated clay soils (the list is quite long) then while you can get the structure to work you have to get the design to perform holistically. No point in say an SE doing a basement or a heavily loaded found just for it to get messed up as you can't get the drains and services to work. For all. Alan's job I think is a good example of how if you work through the issues step by step in a holistic way then you don't waste your money. A duck pond! I built a few for my self build and kept ducks.. etc. Some of the ducks were negligant mothers at times at times when broody so we would take a few eggs and stick them in the incubator. Once hatched we stuck them in the bath to help oil their feathers up, then later introduced them back into the adult population. It was great fun. The point here is that there are often solutions to rain and foul water disposal that can be fun. The SUDS guidance can be flexible once you get your head round the seven or so hundred pages! The pond provides attenuation, dilution, habitat, a potential hydraulic head to drive water downwards and you can have a flow / oriface plate to regulate say discharge to a drainage ditch. For me I'm an optomist, on a self build see what the options are that compliment say the type of garden you want, planting etc and how you want to live.. sometimes you have to live in a different way, learn new stuff and that can be fun too.
-
Beefy ridge beam check and plan to reduce size
Gus Potter replied to NandM's topic in RSJs, Lintels & Steelwork
Conner is pretty much right, many roof structures don't need much if any fire protection.. but there are some cases where this rule is not applicable. If you look at the building regs you'll see a bit that says roughly that if an element of structure is contributing to the stability of an element that needs longer fire protection then that bit too has to have the longer duration protection. I've had this "experience" when working in and around party walls and boundary walls / walls close to boundaries that need say an hours protection. Past "unjoyfull moments" include attic conversions and adding and extra storey onto a single storey garage attached to the house.. I have sat down and worked out a structural solution, made myself a coffee and felt quite pleased with myself.. until is dawns.. oh no!.. I need that bit to have a longer protection.. bubble gets burst and it can be expensive (for the Client) and time consuming (for me) to sort that out. To finish it's worth trying to understand, if you can, how your building stays up.. it needs to carry vertical load but also all work together to stop it falling sideways either in the wind or by just being a bit off the plumb. Quite a lot is common sense.. a lot of folk have intuition. If you think about houses you have been in that have open spaces and say high ceilings and walls.. you just get that feeling that things look a bit too slender or the upper part of the building just looks too heavy / catches too much wind to be sitting on what is below? -
Probably not much.. depends on the loading. Good to see you have made a few in the past, they are elegant in their own way and are one of the solutions in my toolkit. For all.. in principle how they work is great for teaching material behaviour. We know that steel is stiffer and stronger than timber. But how do you how much load the steel plate carries and how much the timber? What we do is to recognise that as the timber and steel is bolted together then they must both bend by the same amount and thus we can work out how much load the timber and steel is carrying respectively. The detailed design is quite complex, especially if using the Eurocodes. There is bolt slip, bolt bearing, timber creep and list of other bits to consider in all the calculation. The timber creep adds complexity. Over time the timber creeps.. like a ceiling in an old pub and this "relaxation" needs a bit of thought as the apportioning of the loading changes as time goes by. Post a photo of the finished article! All the best.
-
I think you need to have a more in depth conversation. What about cavity trays, maybe cranked solum vents, weep vents, return corner details, some lead flashings, maybe working around some steel beams etc.. all the tricky bits that take up time. Going on a sq m rate for something like this is maybe not quite enough. Also sound out.. I'm a self builder. what happens if someone else lets me down.. will you cut me some slack? how do you see that working if there is delay etc? Your starting point is to say.. hey I don't mind paying a fair rate.. it's just I need to know how we deal with reality on a self build.
-
Beefy ridge beam check and plan to reduce size
Gus Potter replied to NandM's topic in RSJs, Lintels & Steelwork
Good question to ask. My own view is that it is healthy for your builders to query the design and I can see why they / et al ask as using a column (UC) section as opposed to deeper and narrower universal beam section (UB) immmediatly flags up.. why is the SE doing this? It is a long span and other posters are making suggestions as to alternatives. But I'll go with your SE and that makes me think.. why the UC or not say Glulam etc. I suspect that at the top of your stairs you need 2.0 m head clearance and the SE has struggled to get the structure to fit within the Achitectect's envelope that is available for structural members while maintaining BC compliance. Thus to make the structure work within the given envelope the SE has had to use a UC section that is inherantly less efficient for this application in terms of steel weight and assocaited conection cost. You'll see on the drawing you posted that there is a splice in the beam stated at 1/3 point. At 1/3 points there is often still a fair bit of bending force in the beam and that can add to the connection fabrication cost. I try and go for 1/4 in for the end splice as the bending forces are less and can simplify the bulkiness / cost of the connection. Now I mentioned the connection cost. If the connection requires a full strength weld (full pen butt weld) then some smaller fabricators need to get an inspector in to check the full pen weld .. this can add £300- 500 quid to the cost of the steel on a bad day! Or you can go to a larger fabricator who may get the inspector in at a lower rate or have in house staff who can do it.. but you pay for that in house service.. So you need to ask the question can we go for a 1/4 splice (with simple fillet welds) and also ask the Contactor if they can lift a 3/4 length beam instead of a 2/3 length beam. If so what is the steel price now? Sometimes DIY / BH folk get a steel price and wonder what the difference is.. it can be just down to a connection and the way it is specified / welded up on a small domestic project! -
Good first try but I think you're out of your comfort zone here. Flitch beam design is a bit of an art and to execute this well you have to have a good understanding of how the timber, steel and bolts interact and the support conditions. To put it another way.. this sort of thing is not taught to graduate SE's doing a masters course at uni, it is a bit of a specialist subject. Personally I like a flitch beam as they can be an elegant solution.. they are a bit "old school" but there is a place and a time for them and they can really suit the self builder / small Contractor, good for you having a look at this.. but it needs refinement.. well probably quite a lot! Yes you can get Kerto beams etc off the shelf but sometimes they don't have enough poke unless you make them bigger which defeats the purpose. What you have drawn with the steel off the centre could introduce twisting effects not least.. to be avoided. The easy way it to centre the flitch plate and use timber packers to frame out the beam. Sometimes the makes a void that you can stuff a bit of extra insulation into. At my end if I find a bog standard timber lintel isn't working I start to work my way up the timber grades. Ok we have C16 and C24 grades of timber. But a lot of Contractors I know are buying in prefabricated roof trusses and the truss folk use TR26 grade timber. Often I'll have a word with the Contractor and say... look we need 2/ 3 lengths of TR26.. get that tacked onto the order.. also a good timber merchants can rattle this up and buy well using their clout if it's part of a larger order. It may be that if push comes to shove TR26 could work rather than introducing a steel plate and the bolts.. the bolts heads clashing with other stuff etc. Now if you find say TR26 is still not enough then you can go back to C16 but 63mm thick with a steel flitch plate.. this helps centre the flitch plate.. makes the twisting often go away. Your 190 deep timber is pretty standard but you're 5.0mm out on the machined size.. normally the actual size is 195 deep for the C16 and C24 grades. The TR26 sizes are a little different so watch out for that as the sizes are "bespoke" to the truss folk, not much mind but just be aware. In terms of buildability... don't have the flitch plate on the outside.. bury it in the middle of the timber flitch beam and leave timber on the outside as this is much easier to fix other things to! Yes, can't say much more at my end either until we have an idea of the load the beam is carrying. Mr Punter has highlighted an intrinsic and key point that is in the design code. The timber shrinks, the steel plate doesn't so that is why we make the steel a bit less deep (aim for 8 -10mm) than the timber. So it is the timber that bears on the support rather than the knife edge of the steel plate. I mentioned earlier that flitch beam design is a bit of an art! Now buried in the design codes and design guidance is a tiny bit that says you need to check the grain of the timbers each side of the plate for the grain direction / orientation. If you have a timber joist often they way they are cut leaves timber on one side that is younger so it shrinks more than the older timber on the opposite side of the vertical face.. this causes the timber to "cup". For a flich beam with the plate in the centre you put the inside bit of the tree on the outside away from the plate so it cups away from the middle. The bolts on a flitch beam are staggered away from the horizontal centre line so that when the timber cups it doesn't split along the midline. Takes a bit of getting your head round all of that! Ok to sum up.. Don't be put off by my technical comment.. rather.. think about it from a buildability point first, material cost / time, who is going to do the work and how you are going to fit insulation / plasterboard to what you have.. I kind of hope you're going to do this yourself as you have taken the time to think it through.. and you'll probably take more care and end up with a better job than a Contractor would do.. the result is you'll get do something that is supposed to do what you intended for the money yiu have spent. Hope this helps.
-
Agree with George above.. I would look at the benefits of a box frame before ruling out.
-
Subsidence - is it always the fault of the tree?
Gus Potter replied to Allyzap's topic in Foundations
Help ma boab.. looks like I have had an IT breakdown and posted an unedited version and a woke one for the faint hearted. Never mind.. if you dont like one read the other. Any complaints PM me and I'll sort it out. BRE Digest 251 Assessment of damage in low-rise buildings.pdf -
Subsidence - is it always the fault of the tree?
Gus Potter replied to Allyzap's topic in Foundations
Hope this helps a bit. Have attached an old document that explains a bit about structural cracks. Have a read.. it will be the best thing you can do. Before you attribute all the blame to the tree you need to look at other things that could be exacerbating the problem.. it may be that you can address these and leave the old tree to do it's thing. Often this type of solution just transfers the problem to another area as you create a stiff point that doesn't move so the movement happens at the end of the stiff point and often makes things worse. With this sort of thing I think.. ok things are moving about.. many historic buildings behave this way but is the building a safety risk.. going to fall down? If not then let's see how we live with it moving about and do something that reflects that. Internally we can force the movement (once understood to say a shaddow gap in the interior decor, externally concealing by some clever movement joints or say a planting trellise.. with maybe some careful cutting of stress relief joints.. first let's to see if the whacky and sympathetic ideas work first before going the full Bhunna / sledgehammer to crack a nut. Structurally we maybe want to do some flexible ties that lets the thing move but not fall down in the wind.... here we are saying.. yes it needs some bracing to deal with the movement. This could even be some tensions wires like you see on sail boats.. that can work well if you want to give a room a Nautical feel or something more contemporary. As a rough guide a 6.0mm stainless steel tension wire with some connections to the wall will set you back say £500.00 quid, wire and turnbuckle / fork end is about £150 then the builder and resin anchor fixings takes you up to the £500.00 quid. I would dig well into my box of tricks before considering cutting down a tree like that. Once you cut the tree down there is no going back. I suppose it boils down to this.. are you happy enough to live with the tree and enjoy what that brings.. shade ect, a bit of life that attacts nature and in doing so accept that you have a bit of semi concealed movement inside and out or do you want to have a house that does not move and sacrafice the tree? If you go abroad to say France or Spain or other parts of Europe.. their houses move all the time.. in the UK we tend to worry more! You mention you concern that things may get worse. But if the tree is that old is it going to grow much more and the root ball expand? .. why not just say we are all of a certain age and lets live with each other.. as we get older and wiser? Be careful though as if you cut off one source of nutriants that old tree could get a dose of Viagra and send out other roots that may cause you another problem! Did your experts tell you that? BRE Digest 251 Assessment of damage in low-rise buildings.pdf



