crispy_wafer
-
Posts
1194 -
Joined
-
Last visited
Everything posted by crispy_wafer
-
Recommendation - private treatment plant
crispy_wafer replied to Lincolnshire Ian's topic in Waste & Sewerage
+1 on the rewatec solido smart, as once the initial capital is dealt with has lower running costs, which was more important to me. But there's loads of different ones to suit. Shallow dig/deep dig, submarine shaped, conical shaped. Installers probably have their goto brands. -
I was using the knauf stuff in ceilings but ran out with a few sections left. I purchased some Ursa APR to finish off. It's a lot more rigid, but it's also not the nicest stuff to handle. RWA45 is also quite rigid.
-
yep you are right, i guess I should have mentioned at DPC in my post
-
Speak to your building inspector, I was under the impression they are not always required.
-
Design load question for my build
crispy_wafer replied to Post and beam's topic in Electrics - Other
I'd ask for 3.ph then list out heat pump, air con, 3 ovens, hob and car chargers... Then get octopus or your choice of electricity supplier to give you a 3ph meter. You can still choose to use a single phase if that's how it pans out. -
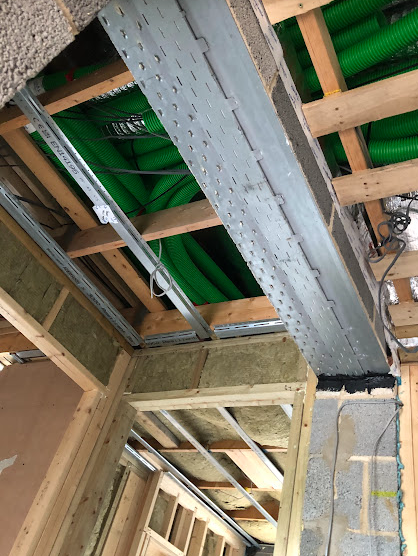
I've been jumping between d&d or wet plaster throughout the build journey, the block work in the loft spaces and areas that will be sealed off once boarded have had a good 2 coats of soudatight lq, so they are definitely better than bare blockwork. I also found the 32mm drain from the mvhr system that I hadn't taped up, it does have a waterless trap on it, but I suspect it wouldn't put up much of a fight during the permeability test, so dealing with that and the 80mm hole I missed will go quite a way to improving the result.
-
I've got a cavity wall running across my build, and one of these lintels spanning a doorway. I'd completely ignored this but since I've had a look online it appears these are open at both ends into the cavity, albeit with polystyrene wedged into it. Would it be ok to membrane over and tape up to seal it up do you think?
-
Theres a post here by @ProDave that gave me something to work with. As far as measuring pressures and voltage are concerned it's above my head at this point until I do some studying.
-
Irrigation pipe to pump issue
crispy_wafer replied to Pocster's topic in General Self Build & DIY Discussion
Might be able to get a brass fitting that would reinforce the hose under a clip -
-
Behold the draft finder mk 1
-
Irrigation pipe to pump issue
crispy_wafer replied to Pocster's topic in General Self Build & DIY Discussion
Wider diameter hose with a jubilee clip over the pump outlet, then a step down adapter from that into your irrigation system. Surely got to be something on Amazon or Ali that’ that’ll fit -
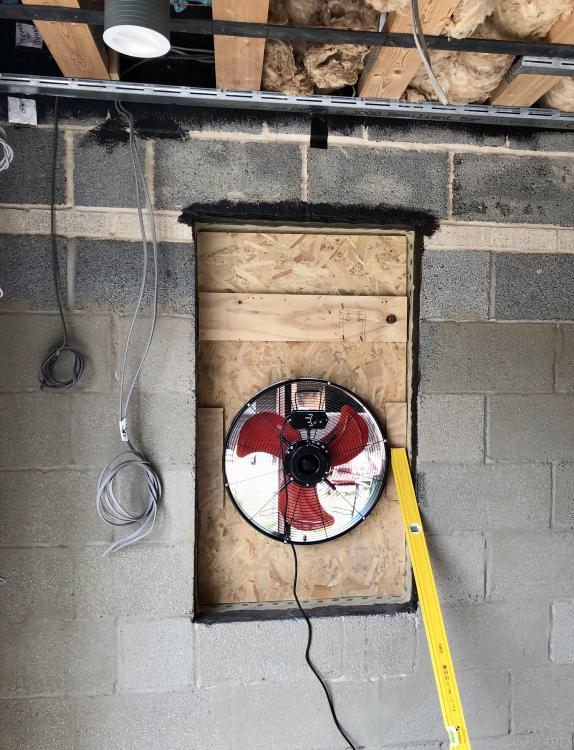
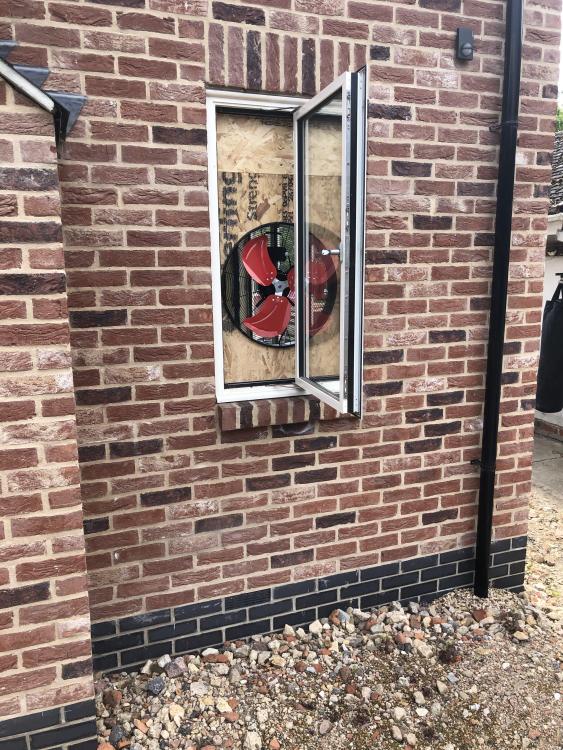
Thanks @RobLe you've gone above and beyond with the links. I've picked up a fan from machinemart this aft, and ordered another couple of tubs of soudatight. I'm just constructing something to block up a window opening, when I've done that, I'll depressurise and wage war on sealing what I can. The main problem was obviously the fist sized hole behind a steel into the cavity that I'd just overlooked. I've filled that now, just needs trimming back painting and taping over. I'm not sure how much of a culprit the mvhr system is, next time I'll disconnect from the wall outlet and seal at that point, taking the chassis and any internal leakage points out of the equation entirely. The restraint straps will get a good globbing all over with soudatight and also the point at which they disappear under airtight tape. The roof joints to the walls have/had all been taped, these will also get a good globbing over with airtight paint, paying particular attention to where the tape bridges mortar joints in the blocks. one way or another I'll get this nut cracked.
-
Yes, that’s exactly how I’m looking at it, I’m going to fix the obvious then fetch an industrial drum fan from screwies or machine mart and set to.
-
Just had a prelim air test completed, as I’m just finishing up, or so I thought first fix ready for plasterboard. Std brick and block build. And the result wasn’t great tbh so I wont publish it. Filled the house full of smoke, reversed the fan to try and ID the areas for attention… Windows, all taped up on perimeters, but the units themselves leak air in the corners, most if not all suffer from this, and my big gable window which comprises of 8 window units leaking along frame joints where attached to next frame - not happy at all with this. Restraint straps, air making its way down back of restraint strap between blocks and strap. Handful of small holes, and the odd crack in mortar that I’d missed. Big fist sized hole into the cavity I’d missed behind a steel into the cavity - Doh, poor attention to detail! And the mvhr unit, I taped off before the manifolds, maybe I needed to tape off at the building inlet and exhaust, as smoke billowed out the vents, are the units sealed up by design or are they quite leaky? To be fair the company I used (found them on the internet) were spot on, walked me around and helped identify the areas for attention. My local chap wasn’t interested in doing a test at this stage… £250 quid well spent, even if result was poor. Now I’ve seen it done, I need to build a rig to replicate. Now I’m going to have a cup of tea, and think about the challenges that lay ahead.
-
Treatment Plant discharge into watercourse
crispy_wafer replied to Lincolnshire Ian's topic in Waste & Sewerage
how close are the storm drains to your plot, if they are like less than a meter, id be tempted to dig an 18" trench right up to the storm drain, fill it with stone and your outlet pipe, either 4" soil pipe or 4" leaky land drain pipe. However that said, I'm down the road from you in lincoln, and have my pumped mdpe pipe running straight into a fieldside drain, all the neighbours are doing similar... BCO just said crack on, dont think he was interested tbh, more focus on the pipework around the build and distance to the wtp -
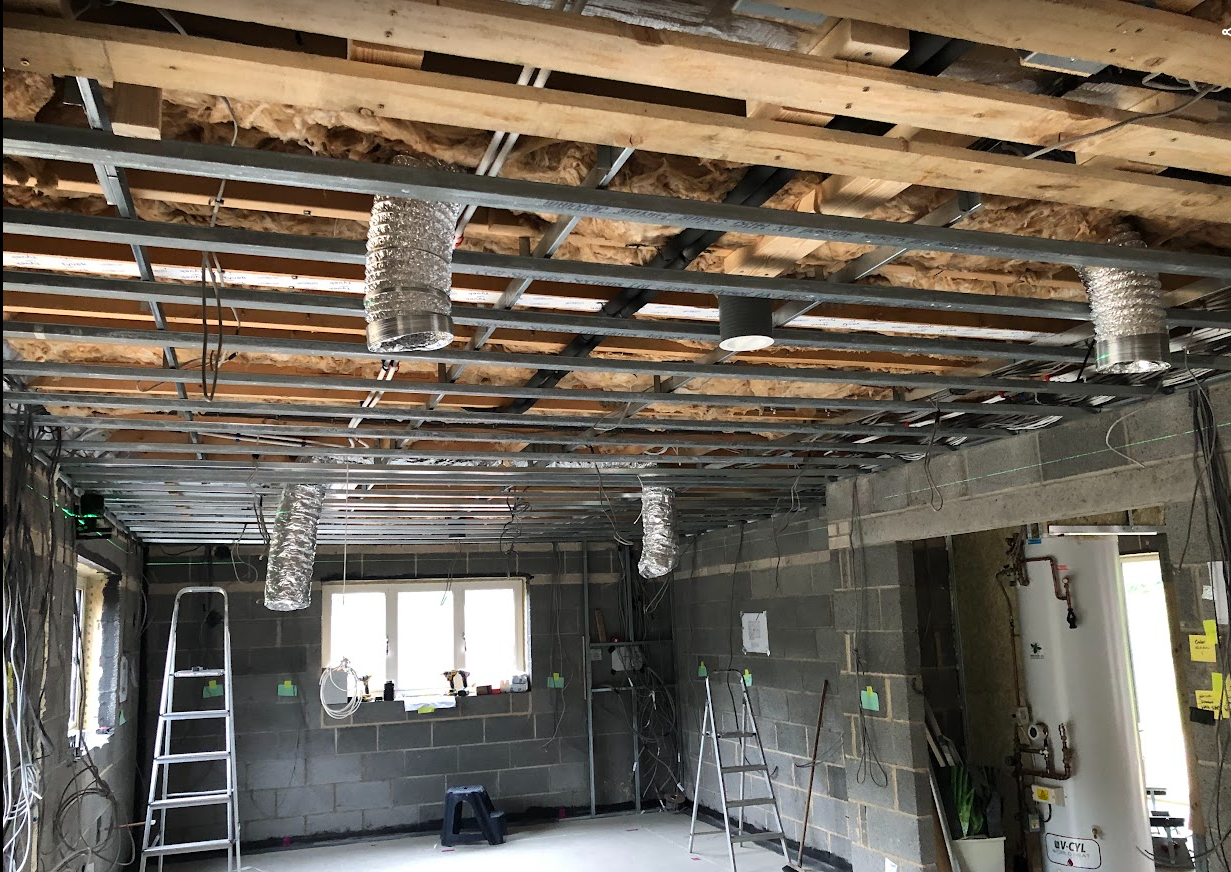
MF ceiling edge support and wiring
crispy_wafer replied to crispy_wafer's topic in Plastering & Rendering
Almost done... What's the preferred method of securing the top hat? Spring clips or screws? I've got both to hand

-
Inspection Chamber Install/Backfilling
crispy_wafer replied to BadgerBadger's topic in Waste & Sewerage
When I did/redid what the builder did on mine…. I sat mine on a concrete mix so it held level, then surrounded the chamber in pea gravel, pipes were supported on, and all around and above with pea, then covered with crusher run concrete, or pea then excavated material depending on where the pipe was (garden, or patio). -
Squeaking Joist / Noggin / don't know what
crispy_wafer replied to MortarThePoint's topic in General Construction Issues
Joist movement pulling against the nail, the hanger wasn't tight on the joist maybe a mm or 2 on either side at the bottom, so any really slight movement would be against the nail, I went with foaming wood glue and the screws, although most of the glue ended up on me and the floor... -
Squeaking Joist / Noggin / don't know what
crispy_wafer replied to MortarThePoint's topic in General Construction Issues
Can only speak for my own experience, but Joist hangers were a source of squeak on my project. I discarded the twist nails and used the appropriate simpson screws to resolve. Found the squeak by stepping on and off, but could reproduce by applying force in different directions from below onto the joists, which showed the smallest amount of movement in the hanger. -
Posts for raised decking: timber or plastic?
crispy_wafer replied to Lift span's topic in Landscaping, Decking & Patios
steel frame? then clad it, if you want a timber look! -
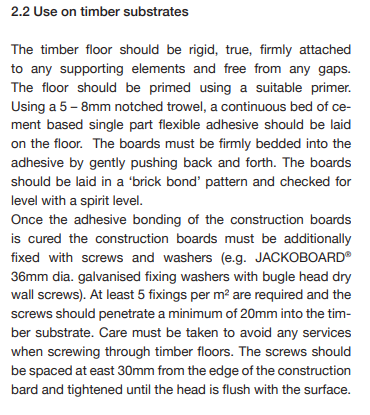
I'd prime the boards first, you'd lose nothing by doing so. Something suitable and not water soluble. and for the jackoboards
-
Stone resin shower tray issue - am I too picky
crispy_wafer replied to crispy_wafer's topic in Bathrooms, Ensuites & Wetrooms
one to two mm at worst. hopefully another replacement coming tomorrow. Fingers crossed they have checked the stock before putting it on the wagon. I'm just having one of those weeks on the build where nothing goes to plan, I just need to get a bit of perspective back. -
Stone resin shower tray issue - am I too picky
crispy_wafer replied to crispy_wafer's topic in Bathrooms, Ensuites & Wetrooms
Well it’s stuck/bonded fast and yes I could take a sharp chisel to it, but, if i damage the tray, tech support have told me that it’s on me and 350 notes in the skip. -
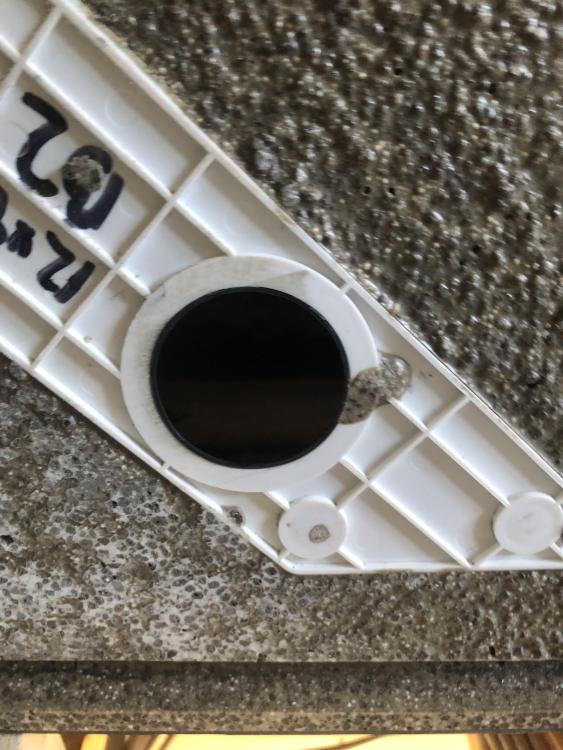
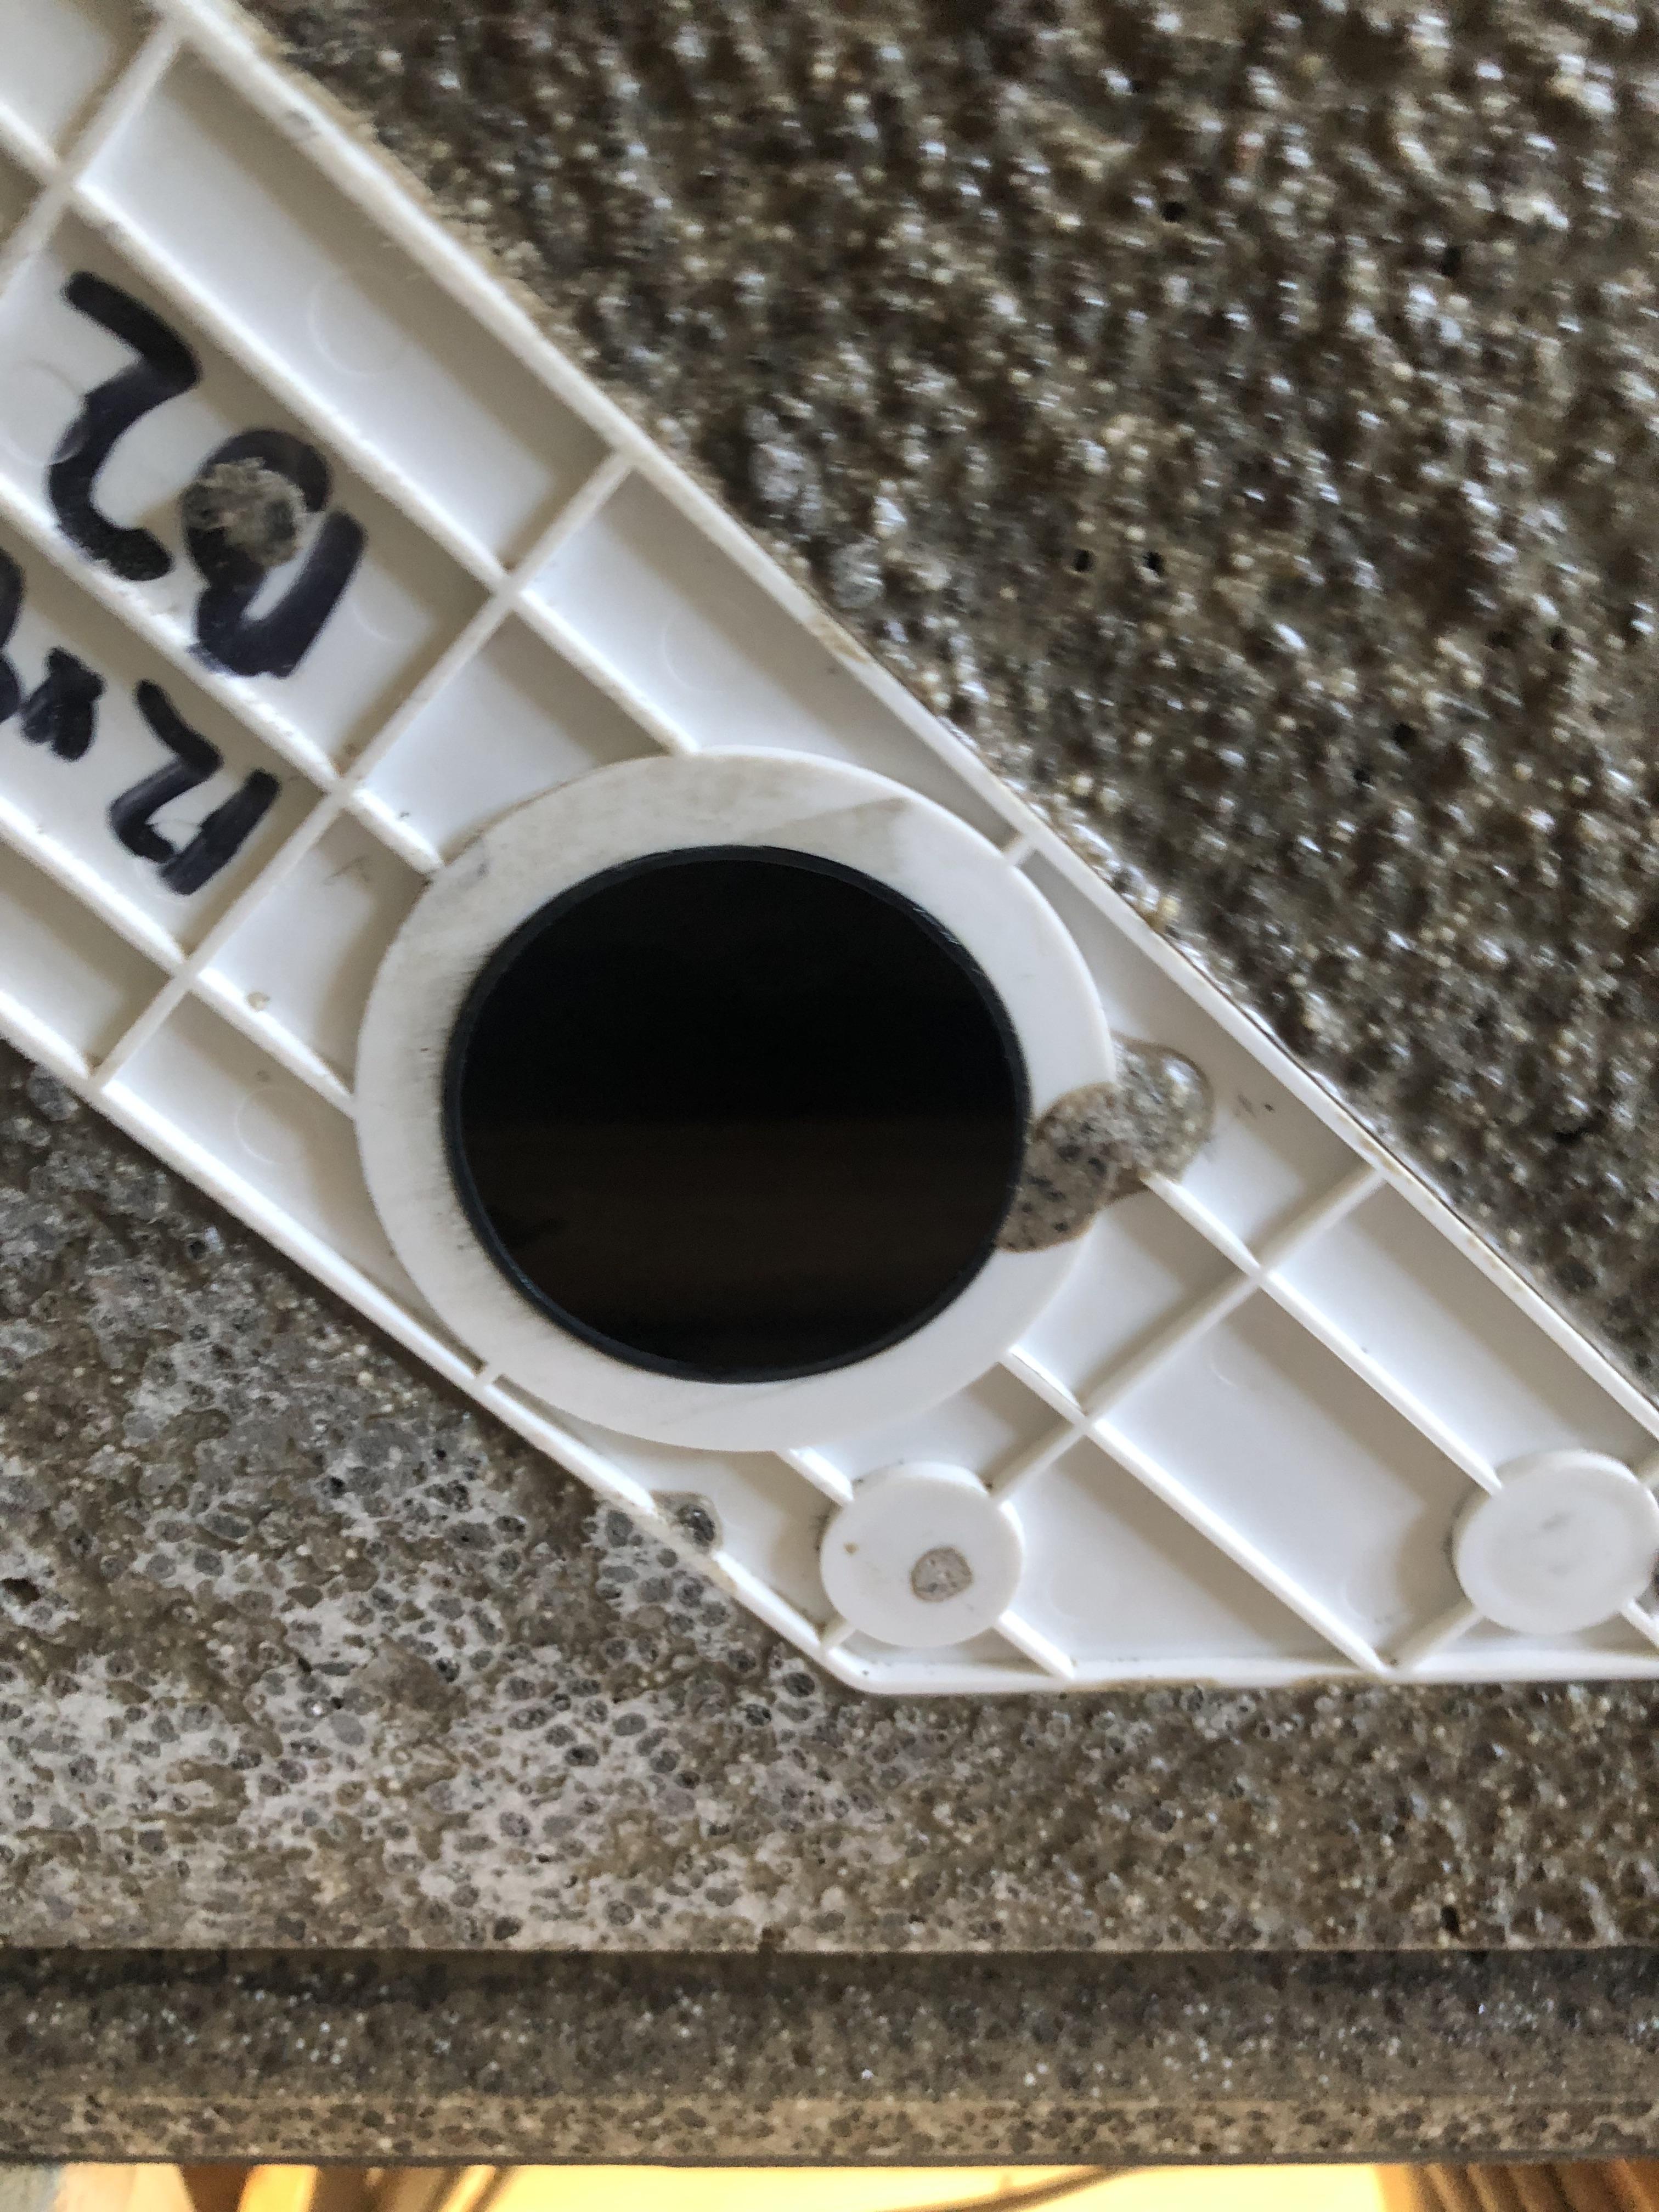
Stone resin shower tray with two outlets, manufactured so that if you have joists in the way you can switch outlet or use both in other circumstances. The Outlet has a stone resin snot on it, am I being unreasonable in rejecting? Technical support have confirmed with me that I might not be able to make a good seal on the trap. It’s just I’ve had 2 attempted deliveries of replacements showing the same issue, so I’ve started wondering if maybe I’m the problem not the tray🤣