


crispy_wafer
-
Posts
1194 -
Joined
-
Last visited
Everything posted by crispy_wafer
-
Would a thin flat rubber washer work? pressed into the cap?, or if all else fails a 32mm air test bung.
-
MF Ceiling for large'ish area
crispy_wafer replied to crispy_wafer's topic in Plastering & Rendering
I'm now looking ahead to framing the ceiling in my entrance hall, I've got 3 fixed walls to attach the perimeter channel, the 4th will be hanging from a 3 ply attic truss that runs along the inner edge of the stairs. Is there a go to way to deal with this. I'm thinking I could attach 3*2 to the inner edge of the attic trusses at 600mm's and fix the channel, but that leaves me with about a 140/150mm section with no support for when I plasterboard. My google searching is not helping me much, but I guess this situation is not too unique. What's the best way to deal with this?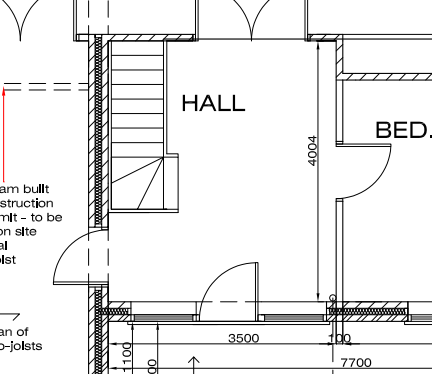

-
ASHP flow/return through wall
crispy_wafer replied to crispy_wafer's topic in Air Source Heat Pumps (ASHP)
That's actually neat solution @HughF. A picture of where the the HP will be sat, pipes into plant room through the scribble, It will sharing space with an A2A unit hence why it's over to the left... I've seen Trunking used for A2A units pipework, something like that I think would be ideal I think to cover the pipes and brickwork entry.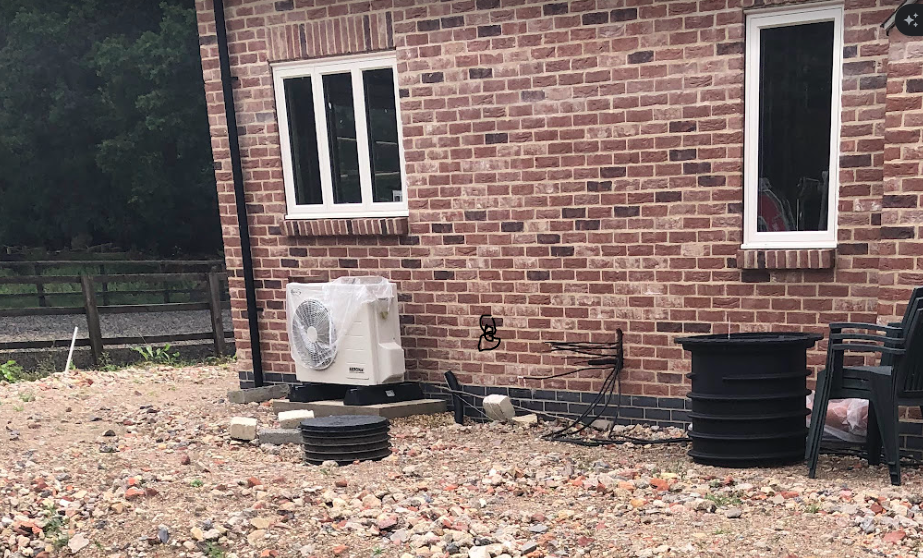
-
Got a mix of Origin OW70 and Origin OW80 here. They are not bad, and were reasonable cost wise, unfortunately the handles supplied are a load of absolute crap. Whatever you choose please check the handles 🤣
-
It's coming to the time where I'm planning on ruining my lovely brickwork by coring holes for ASHP flow/return. I'm at the point where I'm trying to figure out how to make it look presentable and finished... Because I'm using 22mm+19mm walled insulation, I have a 65mm core drill for individual holes if I choose, but I've also seen pictures of installs where a 120mm hole has been cored and both insulated pipes shoved through, looks a dogs dinner though. I've got various samples of insulation, solar rated, class o, even some plastic coated stuff, but having that poking out of the wall with a bit of sealant round it doesn't strike me as the most 'finished' of methods. How should I tackle this, 1 hole or 2. Is there anything I can clad the pipework with, make it look tidy (Would say professional, but some of the google images from MCS co's are far from nice on the eye)? What would you do, or have you done, had done? Pictures would help too if you want to share. Many thanks Marek
-
For timber, a strong magnet to detect the nails/screws is what the oldies used to use…
-
Network Switch & AP's
crispy_wafer replied to richo106's topic in Networks, AV, Security & Automation
You don't necessarily need to stick to the same manufacturer, look for an unmanaged L2 POE switch, this will bring your price down a bit. Plug it in and go. then connect up your ap's and configure. Unless you want to mess with segmenting. At work I mix a bit as it's easy for me to configure and install Aruba switches, and Ubiquiti AP's. Mainly because I cut my teeth on Cisco IOS, my new place uses HPE/Aruba so transition was relatively simple. For home, I've got TP Link Omada based gear as they were on offer a little while back. Cost based decision... Access points at about 100 each is about right though, some cheaper, some more expensive. -
Looking for a fairly discreet setup in my lounge, colleague at work showed me his setup that he installed with motorised lift/screen etc, looks great, just what I'd like to do! A big issue I have is that I'd like a projector lift in the centre of my ceiling (symmetry), problem with me having Pozi joists, I've got a ruddy Strongback in the way with about 150mm clearance underneath. If I offset the lift to the left or right of the Strongback would I have to move the screen from centre, or do projectors have the ability to deal with being offset and correct the image? Aside from that, anyone else play with screens and projectors, what ya got in terms of screen, lift/shelf?
-
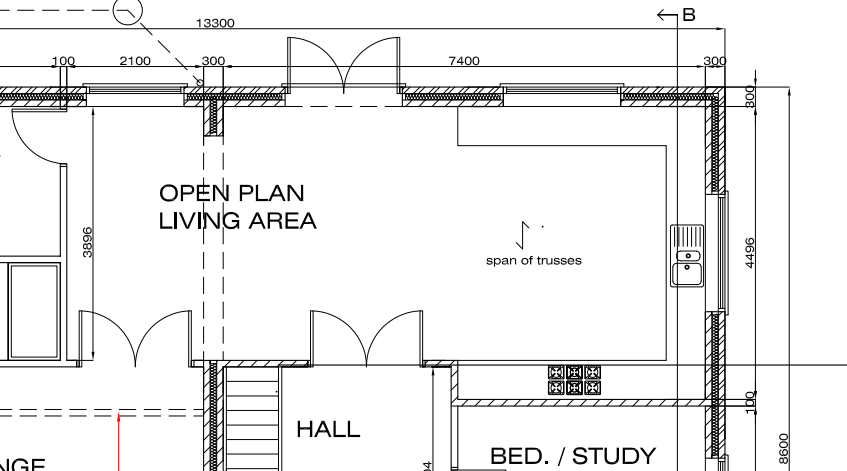
Just need pointing in the right direction really as I'm pondering over the best approach. MF ceiling for my open kitchen/diner Dimensions if split down are approx 4500*3800 and 3900*3600. This is borne out of now really knowing how many joins and connections an MF ceiling can really handle Is it feasible to treat this as one big area and install the MF with lots of joins in the MF7 and MF5? Or split it down into 2 rectangles by installing a couple of lengths of MF6 edge support across the middle, to try and reduce the amount of jointed Mf7 support and mf5 top hat.
-
Character building! 700, christ, I've done about 230 on mine, and a lot of them were silly little bulltish invoices for small amounts from the likes of toolstation or screwfix. Just add a second sheet with a vendor and VAT number and do a lookup for the main culprits and then fill in the anomolies.
-
@Pocsterclaim-vat-refund-diy-invoice-template.xlsx here is copy of the template handed out by HMRC, and a screenshot of the webpage it came from. Hope that helps...

-
This is Key, I'm considering Aerobarrier for my own brick/block build, I've been quite fastidious in membranes, taping, painting airtight paints at junctions, but I'm always thinking about how to make the best out of what we are doing, and at this point Aerobarrier does come into the equation for me. I think I'd need to do a pre plaster Airtest first to really work out if I can justify a decision to proceed.
-
Joist very close to wall, pipe entry?
crispy_wafer replied to Super_Paulie's topic in General Plumbing
what size pipework? 10 or 15mm, chase the wall slightly above the joist and/or just hide the pipe in the dot and dab if plasterboard -
size of excavator for baseworks?
crispy_wafer replied to sunflower's topic in General Construction Issues
2 days, a 3 ton machine, and a pro sorted mine, depth to 1m though. I’ve hired in various sizes since to do various jobs probably total cost of 1600 ish in hire fees. Wanted to buy one as can certainly make use for one but i think the capital is better spent on my build. Maybe when the vat payment comes in at the end 🤣 -
yes, installed by myself. Haven't moved into my build yet is the main reason.
-
That's what I installed last year. Pumped version though. Not used in anger yet.
-
Wiring for CCTV - At the endpoint
crispy_wafer replied to crispy_wafer's topic in Networks, AV, Security & Automation
I was being a wally, making more complicated than it needed to be, I'll just run the cables through the wall, then crimp some rj45 plugs. -
Wiring for CCTV - At the endpoint
crispy_wafer posted a topic in Networks, AV, Security & Automation
Just after a bit of a sanity check, or correction please. I've run unterminated my cables to the approximate Camera location, I'm pondering over what to do with regards cable meets camera... I'm thinking terminate the main cable into a faceplate inside the building then run a shortish patch lead from the faceplate through the blockwork to the camera, alternatively run the cable straight out and have a junction box of sorts at the camera with splice kit buried in it. What would you do? -
Cant answer that but try to look forwards and factor the annual running costs, might be more capital up front but lower running costs or vice versa, look at length of warranty, not that it means a lot these days, but might indicate a level of trust in their product by the manufacturer. As you’ve picked up, just stay well away from mechanical parts in a poo tank. Have a look at the bioficient if you are set on klargester.
-
I guess it depends on the ground water situation and what the manufacturers instructions say, I only a used concrete base and a complete concrete surround, just so it created a heavy tomb only because we have high water during winter, although simple answer to that is to leave it full and only de sludge in the summer. I might of gone a bit overboard tbh, who knows 🤷🏼♂️
-
If the works are open and no slab down, just make two runs to the ic outside, more pipe and a couple of fittings and an hour or two, but a batter solution that can be dealt with individually if the need ever arises.
-
My install - not that detailed but you’ll get the general gist.
-
I purchased rewatec unit, used travis Perkins, the delivery was on the back of a merc sprinter type flatbed. Direct from a yard up County Durham way (I think)…. We slid the unit off on some ramps that they bought with them. No need for the digger or crane - which I was fretting over.
-
Why do kitchen waste pipes after they emerge externally out of walls fall at steep angles as opposed to being straight up/down? Just something I just noticed when sitting in traffic this morning? 🤣
-
New (to me) nail guns. Where best to get info.
crispy_wafer replied to saveasteading's topic in General Joinery
This is so true, amount of times I've seen the nail skew out over the course of my build. I always keep a hacksaw blade close by.


