


TerryE
-
Posts
3822 -
Joined
-
Last visited
-
Days Won
30
Everything posted by TerryE
-
Even so my original comment applies: the MBC team will create a pad that is 1-1½m wider than the house footprint so any corner markers will get wiped out. All www or his surveyer need to do is to bang in 4 rebar spikes well ouside this area to give two taught lines: one for the front and one for a side wall. This will fix the slab precisely so the MBC crew will do the rest.
-
@NickfromwalesThe mental image of you standing bollock naked under one of those would put a sane man off his lunch.
-
Dave, IIRC you have a pretty thermally efficient house so the number of heating days (and even modest heating days) should be small -- even where you live. You need to do the maths on the sustained heating demands but reckon on roughly 7W/Km² where the temperature is the delta between the slab and the room temperature (RT). We estimate that we'll only rarely want the slab more than a couple of degrees warmer than RT. This is why JSH went for the approach of using a buffer tank at ~35°C and a mix-down to circulate through the slab at 25°C. This is the approach the we are going to adopt as well. This means that having an AHSP minimum O/P of 30% isn't that much of the issue. You need some control logic, but your ASHP will maintain the buffer tank in the 25-35°C range, and this will trickle feed the slab circuit. The "mark" length will be dictated by the heat required to raise buffer tank capacity by ~10°C in temp, and the "space" dependent on insulation-dependent heat losses around the tank and the draw-down into the slab. I need to play with the heating algos, but my current thinking is to prime the buffer tank at or near the end of cheap rate so the slab is up to RT+ 2 and the buffer tank at temperature by 08:00, then only do buffer tank reheats during the day if needed. As far as DHW goes, we are planning on using SunAmps heated by E7. The SunAmps are raised to full ~85°C using its internal heater overnight, and these are then used to via a heat exchanger and mixer to raise the CW feed from a year-round average mains feed of say 15°C to 45°C or whatever for DHW. In order to use the ASHP in this scenario I would have to preheat the CW via heat exchanger from the buffer tank, but this assumes that we are using the ASHP to maintain the buffer tank at 35°C 24×7 year-round. However we won't be using the buffer tank for slab heating ~10 months a year, so I suspect that the overall heat losses from maintaining the buffer tank at 35° will exceed any gains here. So the bottom line is that we've decided to use E7 only to heat the SunAmps. This keeps the design KISS and has minimal heat losses. Hence the price of the DHW will be the cost of heating actual DHW used by ~30°C (year round average) at E7 rates, except on the very odd occasion where we have guests and a high demand and therefore need a daytime boost. PS, the bloody planners stopped us installing PV
-
OK, if your underlying base is sand then MOT 1 makes sense. Unless MBC have changed their approach from every other slab that I know of, the same crew will do the ground works, EPS formwork, rebar and pour in one continuous operation over about 6-7 days. There isn't a nice break to invite your surveyor back. Have a chat with your MBC project manager.
-
I suspect that Nick is talking about the house in general rather than the bath tap. Congrats. We're only about 6 months behind you
-
BTW, just had a quick scan of your blog and you typically don't use MOT 1 for a passive slab, but MOT 3 or crushed gravel over a fabric membrane. This because you want the stone bed to be free draining. However the crew do prefer to use MOT 1 for the last stone layer as this makes it easier for them to lay the blinding sand layer. The general area around the slab will get churned up from the stone delivery and laying, and once the crew have laid the blinding sand layer you've got a featureless "bowling green" at least 1m wider on all sides than the former footprint. They aren't going to want to wait around for half a day for some surveyor to turn up, so you need to be able to quickly and accurately mark out the slab corners. So for this reason it is well worth you or your surveyor setting out some reference datum makers outside the dig area so you can triangulate or sight-line the former corners.
-
Large Downstairs WC or Separate Plant Room??
TerryE replied to Barney12's topic in New House & Self Build Design
@Barney12, sorry for the Androidisms when swyping. As far as the MVHR is concerned, you really want to get your manifold plenums as central as possible as this greatly simplifies routing the pipework, and makes it easier to balance the system. We have our MVHR unit itself about 3m away tucked under the eave in our storeroom and the inlet and outlet on a gable another couple of metres away. We are also going for SunAmp rather than a TS, which also helps with our footprint. -
@joe90Sorry I didn't mean to expose raw nerves, just underline to Grendel that when it comes to LPAs the rational thought processes that one might think apply sometimes does, but definitely not always.
-
Large Downstairs WC or Separate Plant Room??
TerryE replied to Barney12's topic in New House & Self Build Design
Just how often are you actually going to go into your plant room? Our house layout is a somewhat different design to yours, but we are putting our MVHR up in our warm loft storeroom, but our SunAmps, etc are going on the grounds floor. Our approach is to have a small ~1000×1400mm downstairs toilet with our G/F plant in a footprint attached to this extending the room by 800×1400. The SunAmps, buffer tank, manifolds, etc are behind a quick release removable partition panel which accessible through the toilet on one wall. -
Don't know anything about inflatable hot tubs, and in fact this post was when I learnt of their existence. But having watched a couple of YouTube videos they look like a good budget way of having a hot tub. However, we did have a conventional hot tub for nearly 10 years so I do know about the ins and outs of these. We liked ours and the kids thought that it was great when they were growing up. There's nothing like watching our pub next door's New Year fireworks display sitting in the hot tub with a bottle of three of fuzzy. But some things that you need to consider: They are bloody expensive to run. A typical hot tub will take 2 tonnes of water which you need to replace every month or so at least. You have to heat up 2 tonnes of water 20-35° depending on season each refill. Do the maths. This takes over 24 hours. You have to keep the thing at or near running temperature, because you don't want to have to plan your dips 24 hours in advance. Again estimate some rough U values, etc. and do the maths. Having that amount of water at body temperature is a fantastic vat for breeding at sorts of nasty buggies so you need to use some fairly nasty chemicals to keep them under control, and these linger on your skin, so you do need to shower when you get out. For the last few years I used to heat it and cycle the pump only during the economy 7 window and heat it to 40° then let it cool during the day. This meant it was as temp for a morning dip, and you had to boost it for an hour before getting in if you wanted an evening one. But this pretty much halved of running cost. When I sold it our electricity bill pretty much halved and there was a noticeable drop in our water usage. Your hot tub will have a far greater energy footprint than your house. Even so we and the kids really enjoyed it and in the days when I was earning good money, we could afford to run it. If you want to try one, then an inflatable one seems to be a fairly cheap way of dipping your toe into the water. Note that the inflatable tubs are usually a lot smaller than traditional ones and only take about a tonne of water.
-
@nod, my comment about optimising didn't refer to the volume itself but for this volume there's scope to squeeze the VAT eligibility and the ££ per tonne.
-
+1 on Peter's comment. If you are removing 2000 tonnes of spoil, then this is something that merits optimisation. Also if your new site levels are part of your planning requirement then this isn't a service but a necessary part of the construction and therefore either zero-rateable or reclaimable. That would be my thinking. We removed just under half that, but in our case we had to drop the FFL to achieve required ridgelines, so this was an integral part of the build.
-
You need to be careful here. Our builder zero rated all of his work including groundworks and spoil removal but this was as part of a bundle contributing to the new build. A quote for spoil removal on its own might well attract VAT. We had to pay VAT on services such as our geo survey, our archaeology survey, and scaffolding as these were separate contracts.
-
Dealing with the LPA is like Russian Roulette. Get the right planner and the can be constructive and quite good to work with, but get the wrong one and ... Ask @joe90
-
Another issue is that even if the LPA allows development, then that my impose strict conditions on the nature of the development, for example that any new build must have essentially the same footprint and elevation profile. This might be a real PITA if you want a more spacious development which makes better use of the plot.
-
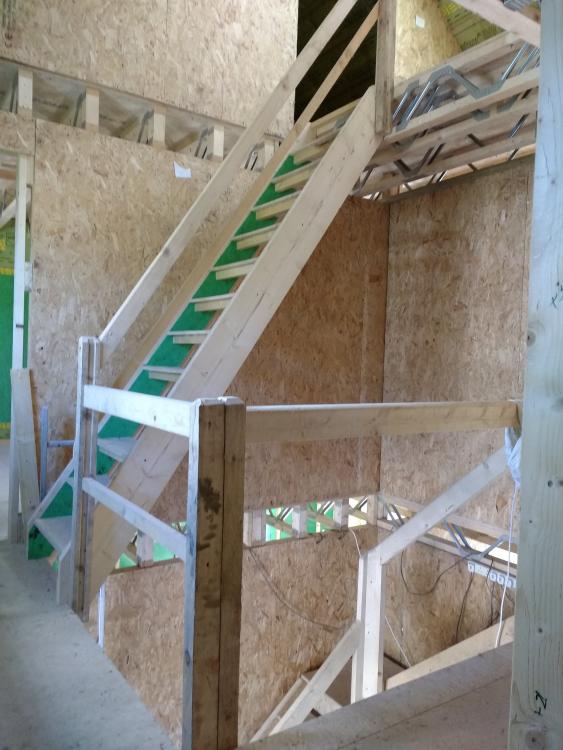
I used a couple of unused roof rafters as stringers and made up 13 stair cassettes in a jig again out of some left over floor board and OSB. Cutting the bits was trivial, given that I have a table-saw and chop-saw. The design, cutting and jigs were my work. Each cassette was made of two parallelograms of OSB, a floorboard tread with under brace. Jan assembled the cassettes (screw and glue), and then screwed them into the stringers one-by-one from the bottom working to the top. When she got to the top, all that remained was to add the rails. Here is the final result below. It's pretty steep because the final stair will include a ¼ turn, and this was a straight span. Still, a damn sight easier to go up and down than a ladder or the like. We added rails and the 1st staircase was going to be used a lot more so I did do this as a ¼ turn. OK, I am a pretty handy carpenter, but doing this is easy and the cost for me was a box of wood bolt fixings, so about £5 IIRC. The rest was leftovers from the frame erection. The stairs are designed to be taken apart for plastering and reinstalled until we fit our permanent stairs after we've painted the halls. I personally take a different view to Dave and Peter. If you are anything like us, then you'll be going up and down the stairs 100s off times carrying kit. You need proper stairs and banister rails, even if temporary. If you aren't confident making your own then do as Nick suggests as buy a cheap flight on eBay or whatever. My only regret is that if I'd realised that we were going to use the stairs for a year then I'd have built a ¼ turn upper stair as well (to bring the pitch under 45%).
-
Nah, do the longer runs first, and just think through the length mixes. There's no point in joining when you don't have to. One less thing to do wrong. We had 200m of pipe and we got a full 50m roll over plus a couple of bits 3 and 5m everything else was <1m trimmings.
-
I was thinking along the lines of Peter, and Richard does have a point. The cantilever is only 800mm or so and this should be doable with racked timber and Glulams or even ecoJoists / PosiJoists. Does your architect have much experience of designing passive constructions? Steel is a wonderful construction material, but also has a conductivity roughly 300 × construction grade timber.
-
Yup, the floating element is purely structural to move your footings clear of the neighbour's. And I've even question that -- more a dead area to collect weeds, crap and undesirable creatures! Have a word with the architect. There's no reason why you can't pack the void with EPS and take the skin (and the floor) down to G/L. Just take lots of photographic evidence during construction. As to the bridging, this is going to a matter of proper insulation of all of the exterior facing steel beam surfaces. The conductivity of steel is frightening and in relative terms will be virtually a perfect conductor of internal heat out to the surface. So what is critical here is that the exterior faces of the steel (that is on the outer sides) is wrapped with a decent insulation. Just do the basic calcs or ask your architect to do them and post them here or email me and I can double check them. If you have 100mm min insulation then you might get away with PUR but any less and I think that you will need aerogel or something of equivalent performance. Also be very aware of the potential cold bridging of any vertical steel into the foundation. The last thing that you want from a thermal perspective is to foot these in the foundation as this will suck the heat out of the house into the ground table. The only steel that you should need in this build is the U section at first floor level carrying the cantilever. There's nothing wrong in principle with a conventional foundation with beam floor -- you can just use the foam infill technology. @RandAbuildhas just done one of these and maybe he can comment. But you will need something like a Perinsul Foamglass thermal break.
-
Make house temporarily weatherproof - or leave it to elements?
TerryE replied to readiescards's topic in Brick & Block
+1 on the above comments about keeping the house weather proof. CLS or even 33×44 battoning and a decent heavy duty polythene or OSB will keep out 95% of the weather. You don't need them airtight; the ventilation will help dry out the house. I know that you are building your inner skin in blockwork, but it's just not worth all that mould and staining -- and you want the slab to dry out. In our case we have a timber frame build with an external stone skin. For reasons outside our control the frame was up for 9 months before we started the skin. Most of the movement / shrinkage on a TF is in this period so this delay has had an upside that the frame has done most of its settling before the skin was started. But having a weather-proof interior has meant that we've been able to do so much. OK, it's not worth going past 1st fit without the windows in, but you can be ready to board out as soon as they are fitted. -
IMO, I don't think that is it. We've discussed the use of intumescent rings, and I personally think that these are totally OTT within a single dwelling even with FD30-style ratings: by the time that they have activated then you've pretty much written off the dwelling if it has a timber frame or eco-joints. The issue is more one of safely evacuating the occupants. However, again I consider the case of a kitchen fire -- say a fat fire because someone leaves a pan on the stove. Such fires account for ~50% of reported fires in the UK. (Most of the rest are smoker-related, so if you don't smoke and don't have open fires, then kitchen fires are by far the biggest risk.) Here if the fire is contained in the kitchen then the evacuation risk to the occupants is low and the risk to the whole building is mitigated. But you don't want a smoke or hot gas chimney from the kitchen up through the fabric of the house, so any service voids or boxed in vertical risers should be properly air (smoke) tight top and bottom with some some of cavity barrier. Anyway, that's my view but I would be interested in any other comment.
-
@readiescards, you just need to remember that you will need to comply with the BRegs Part B when dealing with your Building Inspector. You also need to take sensible precautions to satisfy yourself. We've had some other discussions about this on other topics. In my view, the main issue that you need to consider here is compartmentalisation: for example if you have a kitchen fire, you don't want the smoke or fire quickly spreading into the rest of the house through your ducting. Here I am mainly talking about any boxed-in channels where you hide your pipe runs. In England for the most part, a single detached family dwelling can be regarded as a single fire compartment, but you don't want to get into a dispute over the advisory aspects. Take an example in our case. We have a warm roof so three storeys and our manifold plenums in the loft level. We have two double vents in the kitchen/dining room on the ground floor, so there is a duct carrying the 4 pipes from the loft void through our second bedroom down to the kitchen. I don't want this to act as an internal chimney if I have a hob fire. I have deliberately positioned the duct well away from the cooking end, and sealed around the entrance and exit to the duct with fire break packing. My advice is to think about the fire risks and address them sensibly and discuss what you are proposing with you inspector.
-
Are you using eco / PosiJoists? You will find it a lot easier to do your main runs along and at 90° to the joist lines. Think about where you are going to duct between floors and how you are going to fire-break these. I positioned my plenums in the loft under the eaves on the landing with the pipes snaking down into the floor void. I have a floorboard box arrangement which sits over the lot apart from cut-outs for the two main in/out pipes going to the MVHR unit itself. Avoid cross-overs but you will find some are inevitable, but space them so that you don't end up triple stacking pipe and have a Spagetti Junction rather than a Clapham Junction.
-
No, they don't; only the higher flow ones, typically. You have to plan out the runs carefully because the pipes running into manifolds end up like Clapham Junction, and you want to order them whenever practical to avoid cross-overs.
-
The aluminium custom folds have an upstand of around 100mm which is largely hidden by the rain gutter which sits in front of this. The horizontal section is ~200mm deep, but our stone skin has a 3 course stepped brick header which effectively steps out 60mm over the three courses. The aluminium steps out another 25mm so is just about visible from below. The remaining 175mm is used as an interface to brick up against. All of these high-jinks are needed because we had to put out slate roof on before we started lifting the stone skin. Having done this, I believe that this was also the correct order since the timber frame was fully loaded before we added the stone skin and this minimised any differential movement between the two. Our stone mason is still only up to 1st floor cill level, but when this is complete, I will post some explanatory pics.

