


TerryE
-
Posts
3822 -
Joined
-
Last visited
-
Days Won
30
Everything posted by TerryE
-
We use a concertina black aluminium roll the same as the one you showed above. MBC advised that the roof needed ventilation between the slates and the felt, so we went with that. Because we were slating rather than tiling, we needed a small kick at the eaves line. So we used a 3" arras rail with the long side to the sarking (we have a 45° pitch) with the felt on top of it and ventilation strip pinned on top of that. It was about 2cm high and slotted. The counter battens stopped just above the arras rail. Worked well. The slater had no problems .
-
Envy, envy. and it is a big garden.
-
Yup, I did a post on eBuild. We had originally planned to slate after the stone skin was up, pretty much as Ed @Construction Channel described in one of his recent YouTube videos, but my builder and his stonemason had a fall out and we had a small problem with planning enforcement which meant that we couldn't wait and had to do the slating first. The folded aluminium detailing saved our bacon and made this doable without compromising the look of the house. We did the detailing ourselves working ahead of the slater. This made sense to us both, as the corners were fiddly and took time to get right. This meant that the slater could bash on at what he was good at. A decent pair of tin snips and some round head outdoor Japan black screws are essential.
-
We used Kytun dry verges, and custom folds for our eaves and verges. The result is fantastic. Ordered direct from the manufacturer. Absolutely no issues. Both Jan and I are delighted with the result and the slater was impressed with the dry verge system. But it was a work of origami in aluminium doing the corners, etc.
-
I started to explain the physics of sharpening to Janet, but she cut me off after about 30 seconds with " I am really getting worried about you; you're becoming totally obsessed with this" and walked off. A truly sharp edge is formed by two mirror-like surfaces meeting at a V so that the edge isn't too cratered at a µm scale as "craters" are bowl-shaped regions of the edge that are blunt and which will crush the lignin chains rather than part them. But of course we can't obtain a truly flat surface in practice. Polishing involves moving a flat surface and a grit which is harder than steel against the steel, with a cascade of descending particle sizes of particles that are harder than steel, so a rough 120 grit diamond stone has diamond grains that have a mean diameter of 125µm. A 1000 grit wetstone has a mean diameter of nearer 15µm (remembering that the pit size / abrasive area effectively goes as the square but the volume removed as the cube ). So it takes less polishing as you go down the scale, so long as you don't make too big a jump between grit sizes. Stones can take you down to 1500 grit unless you are willing to pay a lot for a quality Japanese wetstone. It's a lot easier at this level to use a soft carrier surface (e.g. leather or MDF) and a fine grit -- a honing compound. A Cr2O3-based grit is down to the 1-3 µm size, and is normally sold as a powder or in a wax binder. (½µm is getting to optically flat dimensions). There are loads available on eBay, and specialist suppliers in the £5-£20 range. I don't have enough practical experience to recommend one as best value. Over to Ed @Construction Channel I think The WP article on sandpaper gives good background reading.
-
Heat loss and running cost
TerryE replied to Jeremy Harris's topic in Energy Efficient & Sustainable Design Concepts
In our current farmhouse it can be toasty downstairs with the log fire on etc. but is bloody freezing upstairs. Delta is just science / maths-speak for difference. If you've got no heating upstairs then any heat losses through the walls have to be balanced by air circulation and heat coming through the floor. The current BRegs for acoustic insulation between floors means that you've also got reasonable thermal insulation between floors, so if you aren't careful then you might end up needing some low background heating in the bedrooms that you use. -
Heat loss and running cost
TerryE replied to Jeremy Harris's topic in Energy Efficient & Sustainable Design Concepts
Three other factors that played into my decision to go for a twinwall (~0.12U) rather than a single wall frame were: Our twinwall is pumped fill rather than factor slab fill. There are less risks of voids and convection circuits in a twinwall. And the pumped filler significantly reduces the risk of air leaks, so the design is intrinsically more robust in its thermal performance. Decrement delay factor. A twinwall pumped with cellulosic filler has a DDF measured in days, so you really don't need to worry about those winter nights when the temperature can go far below 0°C -- you only need to design for actual average temperatures. House zonal variations. With a U value in the 0.12U zone the internal heat flows are significantly greater than external ones. The temperature delta ground floor to first floor (even with all of the occupants and internal heating on the ground floor) is less than 2°C in winter extremes: you don't need to worry about designing in "backup" central heating for the upper floors -- it will be a total waste of money. In simple terms you can be confident that you have the design margins with a twinwall construction to discount / ignore a whole bunch of issues that would add to the complexity and cost of the build. -
+1. Just make sure that your breather membrane is a decent non-tenting variety. Also remember that you will need breather access at the eaves and ridge.
-
Drilling the bottom chord of a posi joist.
TerryE replied to ProDave's topic in General Structural Issues
I've got the same issue my PosiJoists. I've attached a picture just before the lads slotted in this last joist on the 1st floor. Internal walls and gable panels are 47mm or whatever lower than the side panels, so the joist top stringer sits on top of the gable frames but is level with the side frames. The airtight membrane is taken up the internal wall and out to the external wall surface before the whole floor is floorboarded out (and so it also sits on the frame), and the membrane turned back in so the next storey's panels are dropped into position. The outer joists are hard against the panels. I am not sure what the structural / build rationale is here for positioning this just so, but as Dave says, they aren't load-bearing in the conventional sense as the floor boarding is full width so that it horizontally racks the whole structure. I am just going to drill out mine where needed. Luckily all of our wet piping is routed on the internal walls, so its only a case of the odd 12 or 15 mm hole for wiring.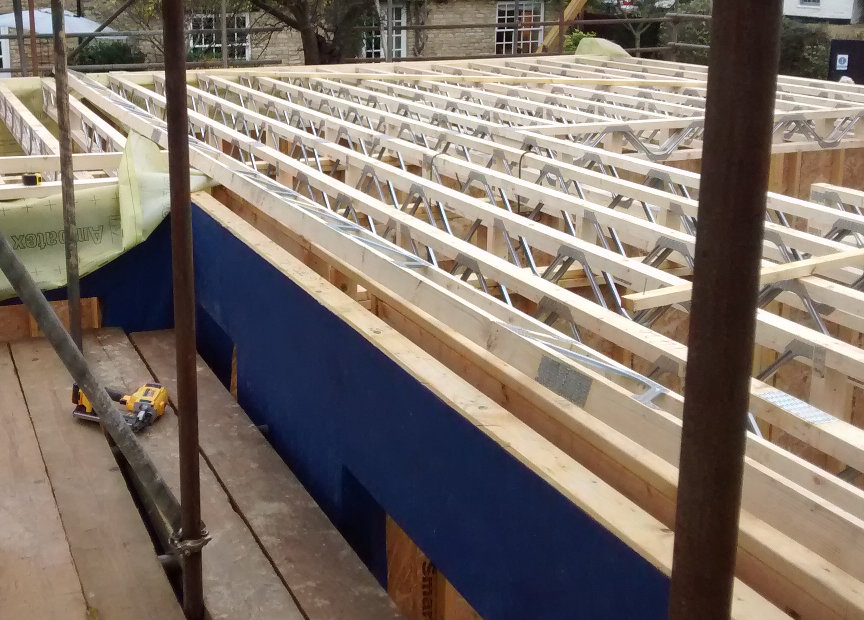
-
Also another useful tip is that a decent honing compound on MDF will give a fine edge. No need for a leather strop.
-
But Ian, you are a gentleman (not-so old age pensioner) and have the time to play and to learn the nuances of "digging". Vijay, you have to work -- in London, I believe -- and are building a house about 5 mins drive from M1 J15. If you want get get someone to give you a price for the foundations all-in then you can get that around here. If you want someone who is good with a JCB or whatever and can move earth / dig strip foundations under your direction then you can also get that and pay by the hour, but these are apples and oranges.
-
It's my roughest stone, but it's fairly easy to do with a diamond stone or valve grinding paste and sheet of glass. The trick realising that you should be doing this in the first place!
-
@Alphonsox Have a browse around the Youtube videos on sharpening chisels. The general advice is that a pretty cheap set of chisels properly sharpened is preferable to a set of expensive chisels that hasn't been properly sharpened. My inclination now is to do what Ed suggests: stick with a decent say 300/600 or 300/900 dual sided diamond block and a strop and 2000 grit paste. BTW the unanimous advice seems to be that you need to keep your stone flat to a few thou, and even if you get a set of Japanese wet stones, you will still need a diamond block or a sheet of glass and a course paste to do this, but I suspect that we will get a few more opinions correcting my naivety before we're done And the Rutlands site seems a find. Thanks
-
Jan thinks that I am a bit anal about keeping my chisels and hand plane sharp, because I like to keep a good edge on my tools, and I use a two sided oil stone for this ( and have recently bought a two-sided diamond "stone"), but I've realised that there are leagues of anality when it comes tool sharpening and leaving aside the Japanese carpenters, the purist hand tool workers seem to think a chisel is only truly sharp if the back has been polished to a flat mirror surface up to say 1,600 grit on a strop and the front likewise -- surgeon's scalpel sharp. At this sharpness you can hand cut cross grain easily. My rough side of my oil stone definitely has a slight bow on it, cause by many years of sharpening without reflattening. Oops. I do notice the difference if I take my hand plane up to 1000 grit sharpness, However, all I am doing here is tidying router-cut hinges etc. What would others recommend as a sensible balance between workaday and perfectionist sharpness? Any special tips / preferences?
-
Spontaneously exploding shower glass
TerryE replied to DavidFrancis's topic in Bathrooms, Ensuites & Wetrooms
The mechanics of toughened glass is best demonstrated with the Prince Rupert's drop. When it does fail then the very tensions which give that toughened strength become destructive and result in catastrophic failure. As to what tiny flaw actually triggered the failure, it's time to consult the Chinese philosopher Fook Noes. -
Thanks, I understand the swept bend issue, but on the ventilation loop, why do I need to take it up to an AAV in the attic? As it happens, I can do this as three is a party wall that I can go up. However, I would have just hooked back into the stack via a boss, but thinking about this the potential issue is spillover after blockage. The lowest spillover point is the shower tray in BR1 en-suite, then the bath and then the sink. Need to think a little more
-
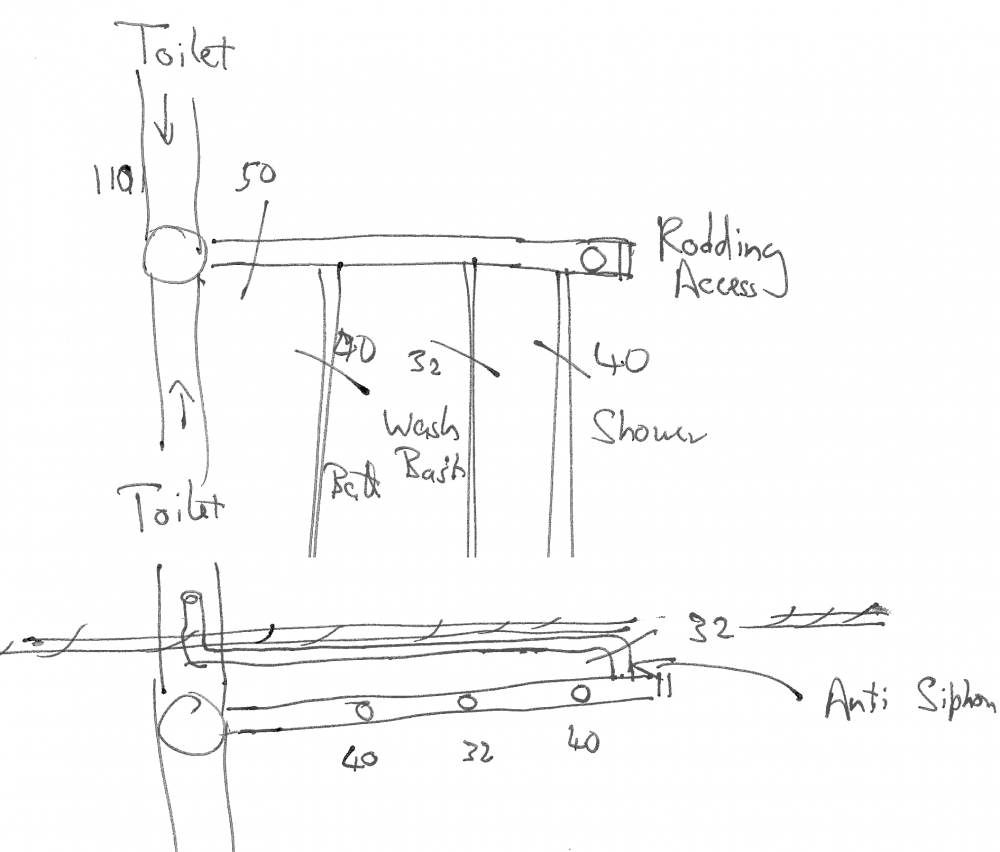
Nick, the challenge that we have is fitting the foul-water runs within the PosiJoists which prevents 45° runs, and that the bath, and (the adjacent BR en-suite) basin and shower have exposed or builtin traps so we can't use an anti-siphoning trap. My 1980s solution would have been to add an anti-siphoning loop like the diagram below. Is this still allowed / valid under BRegs. Any better suggestion?
-
Told you that all the hardcore under the garage footprint would be put to good use! And I am glad that the cement lorry got in OK.
-
We used to have TT, but because of load mis-balances across the phases along the street our neutral would often lift 6-8 V about ground earth. So a short between N and E would be enough to trip our main RCD. What a pain. We haven't had any probs since we switched to PME.
-
For my stonework jointers, I used to bend a very shallow S in 15mm copper pipe to get the right serpentine curve, then beat flat the pointing end and round. A bit fat for brick pointing, but great for stonework. Far better than the stock ones you could buy from the BMs.
-
OK, will someone please help me. AFAIK, Megabad only have a German freephone number 0800 634 2223, which still counts as an international call from the UK. I've tried Skype to +49 800 634 2223 but this doesn't seem to work, as Skype haven't yet added German 0800 support yet. Any suggestions other than paying BT's international rates? I am trying to find out what the shipping costs are and do these drop over 2000€ ?
-
@Nickfromwales God, you smooth bugger. I am just so in awe. Megabad, here we come!!
-
Richard, how is your sub going to get the concrete up the lane to do the pour? Its there enough clearance under that tree for a mixer to back up the lane?
-
Richard, this isn't so bad is it? You have to put a temporary base down in front of your house anyway that can take the crane and other plant needed for the build. We've had to do this at the front of our house, and it will all get stripped off to roughly 30cm below ground level when we done -- to make room for the decent topsoil in the case of the lawn / garden side and for the SUDS gravelling and pavier layers on the drive side. Such is life.
-
Snap!! They've got the best deal on Euro purchasing of all the cards at the moment. And thanks for the wider info.

