Jeremy Harris
-
Posts
26430 -
Joined
-
Last visited
-
Days Won
360
Everything posted by Jeremy Harris
-
I'm very seriously thinking of replacing some of our glass with this some time in the next couple of years. I know it's expensive, but it seems, from @NSS's experience, that it does a very good job indeed. One thing I really like is that it works both ways, and is so easily controlled. The reflective film we have fitted works well, but is like a one-way mirror, plus it lacks control. It reduces solar gain when we could use it, as well as when we don't want it. The icing on the cake is being able to use it as a privacy screen from outside to some extent - for us that is now a major consideration. I need to explore the practicality of retrofitting this glazing system into some of our windows. Thanks to @NSS for the review.
-
I love this idea. When we fitted the TV on to the wall in our kitchen/diner we had a problem. I couldn't find a suitable (read affordable!) TV with a built in, dedicated Freesat receiver (we need this, as we can't get a terrestrial TV signal). This meant buying a small box, but where to put it? The answer was an oak lined pocket inside the wall, with a slightly projecting shelf, which was just deep enough to house the small box, with space to store the remote control. My only regret is not having thought of this earlier, and designed in some hidden ducting to feed the cables up to the TV.
-
The BRE method is WUFI, and is generally well-regarded as a reasonable 2D steady state method, taking account of the limitations above when trying to model something that's both 3D and subject to relatively rapid change, due to a lower heat capacity than the model was really designed to work with. Bear in mind that a lot of the older models available on the web pre-date the use of internal vapour control layers (VCLs) and so assume that water vapour always moves from inside to outside. That's not the case now, as with a VCL all the movement is in and out from the outside.
-

UFH in slab or screed, eps or pir insulation?
Jeremy Harris replied to Tin Soldier's topic in Underfloor Heating
Ours is a passive slab, so the outer 2/3rds of the 300mm thick frame sits over a 200mm wide EPS 100 upstand, with only the inner 100mm of the frame (the load bearing part) sitting on the warm, reinforced concrete, ring beam around the edge of the slab. This means the edge of the slab has 200mm of insulation all around it, which pretty much prevents any heat loss out sideways. For other build methods you have to come up with ways of mitigating the edge loss and thermal bridging that can occur, and a great deal depends on the exact detail of your build. -
Same here. Around half a dozen or so forum members have visited us - we're around half way between Salisbury and Shaftesbury, about a mile off the old A30, in a small village called Fovant.
-
Adding insulation around the outside as a skirt is a reasonably effective way of mitigating the risk, provided you can also ensure that there is enough thermal resistance vertically under the supporting structure. Sadly there are a lot of details out there that are not well thought through, including some from major and well-known manufacturers. The tendency is to rely6 on well-known steady-state thermal models, and then just assume that they represent the real world. Sadly they don't, and the methods that BRE suggest, or that are included in well-established standards for assessing interstitial condensation risk are far from being foolproof. To be fair, most of these models and assessment methods were developed long before anyone dreamt of making ordinary houses with good thermal performance. As the PassivHaus Institut found, when they first put together the PassivHaus standard, things get far more complex, and dynamic, when you both increase the overall insulation level and decrease the heat capacity of parts of the structure. The dynamic problem that I've tried to explain here before is the major issue for the UK climate - we often get days when the overnight temperature may be well below freezing, where the relative humidity near ground level in the early morning, as the sun comes up, hits 100% (hence early morning mists) and where there is a high probability of water vapour moving inwards towards colder internal structures that may well be below dew point. The problem then is that the heat energy required to cause condensed water in these areas to change phase to vapour, so it can migrate back out again, is pretty high, and there may well not be enough energy available during the day to cause this to happen. After a few days it's possible to get to a situation where moisture will be present in those areas until the seasons change and the whole structure warms up, and it may well be that this is long enough to cause rot to start. If you can increase the thermal resistance of the foundations under the wall support, and then add external insulation to decrease heat loss through the outer face, then you stand a reasonable chance of mitigating the risk. I wouldn't wholly trust the well-established interstitial risk models for this, for the reasons given above, but if you can get the risk into the very low category using such a scheme then that may well be OK. I have a horrible feeling that we are going to see a repeat of the disasters of the 1970's, when a certain well-known mass builder introduced timber frame construction to England without enough knowledge to understand that what works very well in parts of the USA and Canada was a disaster when used in South West England (I have personal knowledge - a work colleague bought a new house in Helston around that time, where the timber frame rotted out within a few years............).
-
We're over that, around £1380/m², but much of that is our awkward site plus opting for relatively expensive interior stuff, like solid oak for the stairs, skirtings, architraves, door frames etc. These would have been around 1/3rd of the cost had we opted for painted softwood. I worked on the basis of doing as much as I reasonably could to keep costs down, so I did all the plumbing, hot water, heating, cooling and MVHR installation, as well as fit the kitchen, utility, bathrooms and WC out. I also did pretty much all the internal oak joinery, except hang the doors and get a hand to put the oak stairs in (because of the weight, mainly). I used a main contractor on a firm price, competitively let, contract, for the ground works and drainage, another main contractor (MBC) on a firm price, competitively let, contract for the foundation system (inc the floor slab with UFH), frame design, erection, insulation etc to the rain-proof stage. I then used other contractors (again, all on competitively let, firm price contracts) for the roof, fascias and guttering, solar panel install, external doors and windows. The laying of the travertine stone flooring was labour-only, as was the internal decorating, plasterboarding, plastering and first and second fix electrical work. I used a a local landscaping contractor to lay the drive, patio, paths, walling etc. I laid the bamboo flooring (and my knees and back still remind me about it..........). For that we have a house that is finished to a medium to high standard, exceeds the PassivHaus standard in terms of performance, generates more energy over the course of a year than it uses (so the only bill is the Council Tax, and half that is subsidised by profit from excess electricity generation). Including the house and contents insurance, the maintenance costs for the sewage treatment plant and borehole water supply, and the Council tax, the house costs around £700 - £800 a year to run. That includes about half the cost of running my car, too, as that charges from excess solar generated electricity much of the time. For comparison, our old three bedroom bungalow, built in the early 1980's, with gas central heating, good loft and cavity wall insulation and reasonably good uPVC double glazing costs a bit over £3400 a year to run, including all the bills, Council Tax, insurance etc.
-
UFH in slab or screed, eps or pir insulation?
Jeremy Harris replied to Tin Soldier's topic in Underfloor Heating
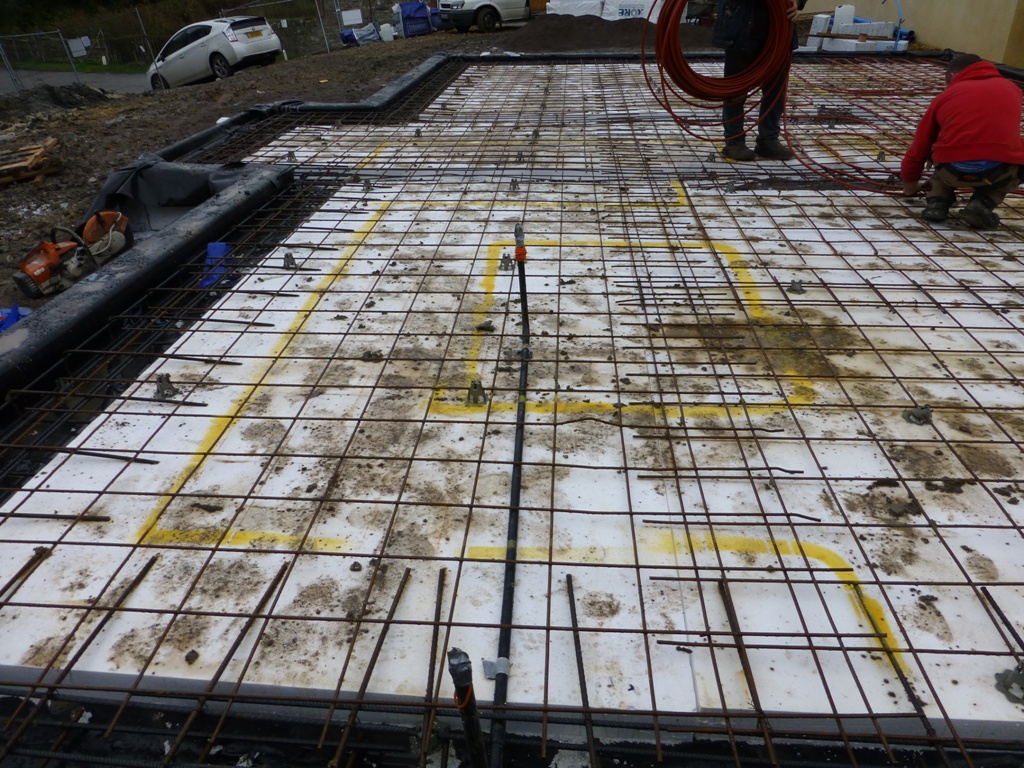
If you look closely, you'll see that the chairs were temporarily pulled out from the areas where pipe was being laid, then the mesh was lifted back up on to them afterwards. Get's around the problem and makes the job easier and quicker. -
For a run of 140m, moling between holes at approximately 8 to 10m centres (about as far as they can accurately go with the smaller machines), plus laying 32mm MDPE pipe, we were quoted £23k, about 4 years ago. This was under a road surface, so included making good the access holes to local authority standard. It didn't include the road licence or any closure fee, it was just the basic cost of digging, moling, laying the pipe and making good. IIRC, the mobilisation cost for the kit was around £600, and the rest was based on a cost per metre, so that would work out at somewhere around £150 to £160 per metre, plus mobilisation. That seems high, and I suspect that it's probably the fact that the contractor had to be local authority approved, plus that they were digging the access holes in the lane, and so making good the road surface afterwards, that pushed the price up. Does the whole 17m have to run under the block paved drive? I was told that they need fairly large (around 1m x 1m square) access hole to get the mole in and set and aligned at the right depth initially, so depending on where your pipe runs you may want to consider this.
-
UFH in slab or screed, eps or pir insulation?
Jeremy Harris replied to Tin Soldier's topic in Underfloor Heating
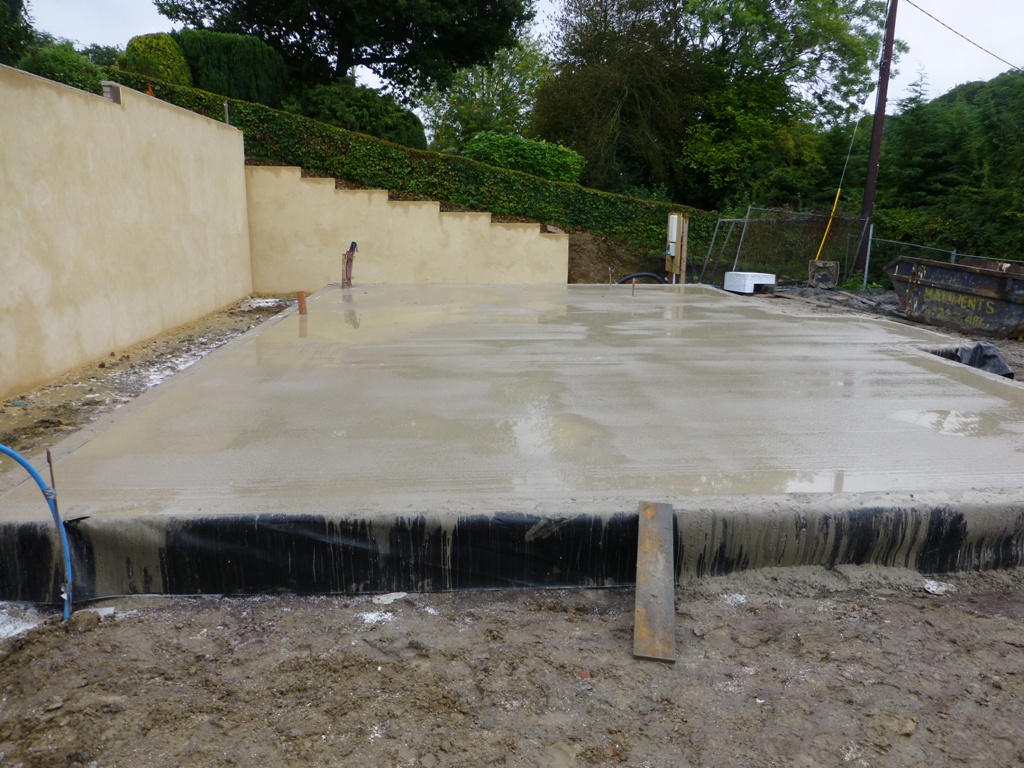
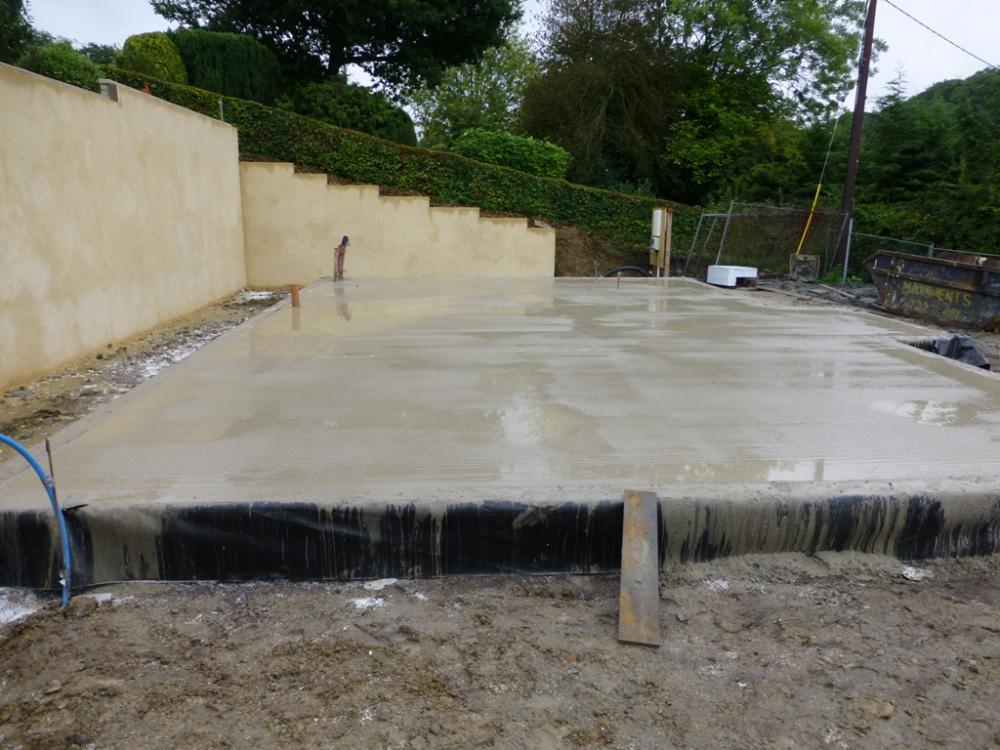
Something seriously awry, there. Our slab is 100mm, laid on 300mm of EPS 100, with mesh. The UFH pipes are tied to the mesh. At a guess it took two guys maybe half a day to lay and secure the UFH pipe, if that. There was zero movement in the mesh or the EPS, everything stayed dead flat, and there was no extra concrete used. Here are the photos: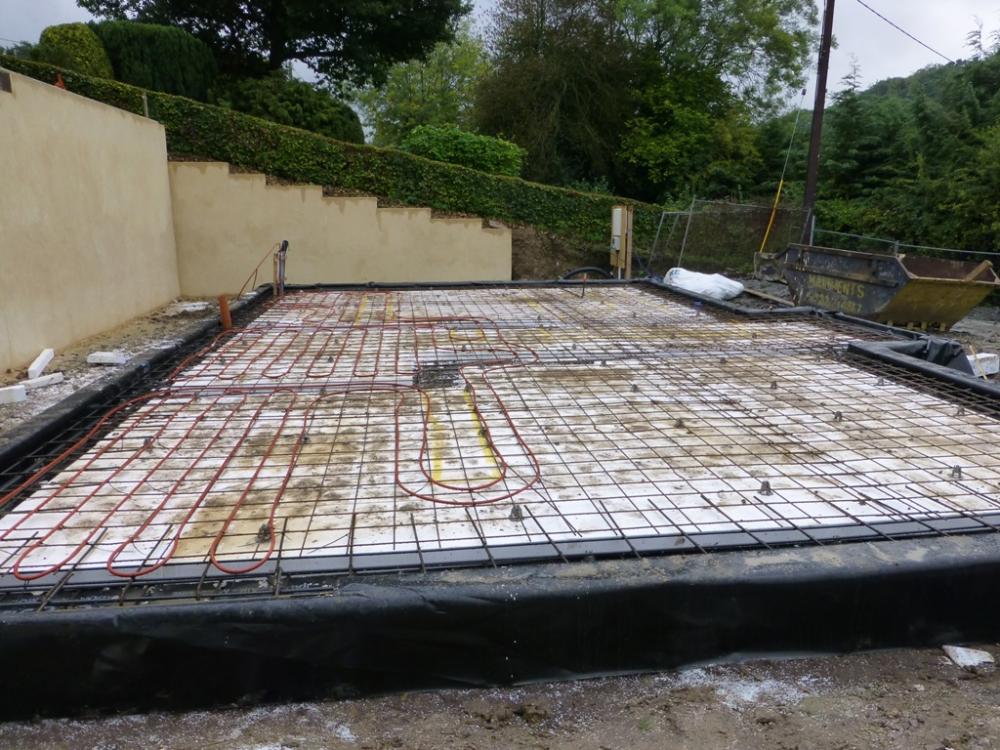

-
There are a few really odd costs in there, too, that need looking at. For example "acoustics" at nearly £3k, What on earth is that? For our build, with a very acoustically "dead" external wall structure (cellulose filled timber frame) the only additional acoustic insulation was 100mm stuffed into all the internal stud walls at a cost of around £250 for all the internal walls in the house, and 200mm in the ceiling (double the thickness actually needed, and which turned out to be a bit of a pain to fit) which cost around £500. Labour for fitting all this was less than 1 man day, so an absolute maximum of another £180, making a total cost of £930, and we went OTT by doubling up on the ceiling acoustic insulation. I doubt that you will spend more than £1500 absolute maximum on acoustic insulation, and could probably knock a few hundred off this if you shop around or did it yourself (it's dead easy to fit, anyone can do it). There's also some double accounting going on, I suspect. If going for an MBC frame, remember that this includes the foundation, the underfloor heating pipes, all the thermal insulation and the airtightness test, to PH levels. All the roof battens will be fitted normally, too, as will the internal service void battens, something that may well be being costed twice, in the roofing and internal lining costs, for example.
-
My benches have always been salvaged teak worktops from old labs (like @ProDave I "inherited" a few of them from Farnborough, years ago). The support for the main bench is a steel welded box section frame that I originally made back in around 1983 to hold a steel oil tank, inside our (then very large) garage). When I scrapped the oil system and gave the tank to my brother I kept the steel frame, which has been ideal for a bench, with one exception. As @Onoff says, don't fix it to the wall. The steel frame I made had flat plates that Rawl bolted to the wall and floor, with the big vice right over one of the frame vertical members. This time I've taken a very different approach, but looking carefully at what I do in each area of the workshop. Bashing stuff only ever gets done on or near the big vice, so that is going on a smaller, free standing, bench, with a cupboard underneath. The frame of this is going to be some 170 x 45 PAR timber that I have left over, so will take some serious abuse. The cupboard is there both as storage and to stop all the swarf and rubbish from getting under the bench where it's harder to clean up. That bench is smaller, because the area around the vice accumulates stuff - it's too easy to just put files, hacksaw, hammers etc down next to the vice. The main working benches are not free standing and neither do they have legs going to the floor. Both are a couple of metres long and 600mm wide and both are fixed to the 150mm thick wall timbers with gallows brackets made from studwork (89 x 38 PAR). This has turned up to be plenty strong enough for anything except heavy bashing, and one of these benches will house a bench top lathe and small milling machine, and will be covered with aluminium sheet, the other is covered with matt white formica, and is a "clean" assembly bench. I also have a trestle table with an additional 1" marine ply top added, that I can stick in the middle of the workshop when I need it, or hang it on the wall when not needed. Over the years I've learned that the hardest thing for me is cleaning up the workshop. Sweeping around bench legs etc, and the inevitable boxes of stuff that end up underneath them, is a PITA, plus any open boxes get filled with crap. This time I'm aiming to keep as much of the floor clear and easily swept with a broom as possible, in the hope that I'll be tempted to keep the place cleaner and tidier. There are also loads of shelves, on the opposite side to the benches in the main, so they don't get in the way. The single shelf over the benches will have a strip of 12 V LEDs underneath it to provide better light directly on to the bench, with no flickering. I've experimented with bench surfaces, and found that laminating two 2400 x 600 sheets of 18mm MDF works well, with a studwork frame around the edge and the gallows brackets fitted direct to the work surface, with their front edges abutting the inside edge of the front frame. 36mm of MDF, framed and supported like this, seems plenty strong enough, and has the advantage that, unlike the old teak bench tops I had, it has very little bounce - it seems inherently "dead". I had a small bench in my old workshop that just had a plain MDF top and that stood up to a lot of punishment and I didn't even bother to seal it. I reckon that for general use just sealing an MDF surface would be good enough. I've only opted to both seal and bond on aluminium to the machine tool benchtop as it will get covered in oil and swarf, and this will make it easier to clean. As a final idea, a friend of mine made a sort of modular workspace in his workshop, years ago. He set female threaded resin anchors in a grid pattern in the floor, each with a rubber bung in. He had things like a portable vice frame, his portable table saw etc arranged so they could be positioned over these holes and just bolted down wherever they were needed. The advantage of this arrangement was that he could position things for handling and cutting long lengths of stuff more easily.
-
As a guide, our build was smaller, 130m2 so roughly 2/3rds the size. This doesn't equate to 2/3rds the price, because of the fixed mobilisation costs for some of the heavy stuff. We have a 300mm thick wall, 400mm thick roof, cellulose filled frame, on a passive slab foundation from MBC - they do the whole package, passive foundation and insulated frame as a package. The windows are all passive house standard, triple glazed. Our ground works were very expensive, as we had a big retaining wall and over 1000 tonnes of excavation, and this alone cost around £55k, but £30k of that was the retaining wall, and the rest of the costs included all the drainage, including the treatment plant and all the ducting for services, as well as shifting all the soil. So leaving out the ground works, I can give some costs. Frame and passive slab foundation system cost just over £60k. Windows and external doors cost £8.5k. I did the plumbing and heating, but the electrician and all the electrical stuff came to under £7k, albeit with some labour from me. We didn't use an architect or architectural technician, so saved that cost. Roofing and fascias/guttering came to around £9k, IIRC, but over 2/3rds of the roof was solar panels, and they cost around £8.5k, I think.
-
TRVs generally need, as a bare minimum, an inlet hot water temperature that is about 5 deg C higher than the desired output temperature. So for 50 deg C out 55 deg C in is around the minimum. They work better with a higher differential, and there is some variation between brands as to how low a differential temperature they will still regulate at. In general, when the hot water inlet temperature drops below the threshold for regulation they just open up as far as they can go on the hot water side.
-
Anyone recognise this toilet cistern fill valve?
Jeremy Harris replied to ProDave's topic in Bathrooms, Ensuites & Wetrooms
Sorry, I've hunted high and low in the loft and can't find it, I'm afraid. If the Abertax valve would fit then you're welcome to that - I could stick it in the post tomorrow afternoon. IIRC it has a 1/2" BSP male thread and is extremely compact, much smaller than most cistern valves. -
Anyone recognise this toilet cistern fill valve?
Jeremy Harris replied to ProDave's topic in Bathrooms, Ensuites & Wetrooms
Hang on, I'm just going up to the loft here to see if I have one, as I'm sure I had something very similar. Failing that, I know that I have a spare and unused one of these: https://www.bes.co.uk/abertax-magnetic-water-inlet-valve as I bought it to fit to our 650 litre storage tank but didn't end up using it. It's very compact, but I'm not sure if it will fit or not. Back in a jiffy when I've had a dig around in the loft............... -
It is. We've twice stayed in the same cabin at Russell's neighbours place: https://loghouseholidays.co.uk/montys-retreat/ The only snag is that since we first stayed there the prices have risen a fair bit, largely because they have invested in things that frankly don't appeal much to us, like hot tubs outside. We like going there when it's bitterly cold, and the lake may well be partially frozen. Being in such a peaceful and quiet spot, with the only noise being the GSHP that keeps the place warm, is magical. We keep meaning to go in spring or summer and take the electric (solar powered) boat with us, but by the time we get around to thinking about it the cabins are always fully booked.
-
It was a local kitchen place in town, since changed hands, and frankly I'd not deal with them again, as they screwed up in so many areas including having to replace lots of parts and paying out for damage their delivery driver did to our drive and the front of the house, that they were a bit of a shambles all told. The kitchen units are definitely German, pre-assembled, less doors and internal extras, and not only was the packaging all in German, but the instructions for fitting the internal stuff, like the larder hinge/slide unit and the multiple recycling bin fittings, were as well. Not sure of the make, as I've binned all the instructions and all I can find from a quick look inside are a few " LGA qualitats zertifikat" stickers that I forgot to remove. The "rustic" oak doors, drawers, handles and end panels were from another company, but branded as if they were from the supplier.
-
TV aerial in closed panel timber frame.
Jeremy Harris replied to Moira Niedzwiecka's topic in Timber Frame
Glad you had a sensible outcome, Moira. The usual advice for a low level vent, in addition to the points he's made (some of which are moot - in the event of back flooding from a blockage inspection covers downstream would probably have already blown off, or the toilets downstairs will be backing up!) is to locate it within a flower bed or area of planting, as plants and soil are effective at removing any slight odour. A friend that had a problem with slight, very occasional, odour from a treatment plant vent relocated it in the centre of a hollow planter, so it was surrounded by soil and plants, and that completely solved the problem. The low level vent does not need to be the same size as the soil pipe, it's acceptable to reduce it down to, I think, 75mm diameter. -
Seems the obvious way around things. She will have her full tax free allowance, unless she already has a job that uses all of it up, so having her run the B&B seems to make a lot of sense. Not sure about offsetting the build cost as a part of the capital of setting up the business; it sounds like it should be OK, but I'm not at all well-versed in the rules.
-
This mirrors our experience. What we ended up with was a kitchen with German units and fittings, but UK made doors, drawer fronts and end panels. The major thing we noticed when it came to cost was that the small stuff inside some of the units was a great deal more expensive than bigger items, like doors. I'm still shocked at how much the glass and chrome slide and hinge internal larder unit was - it was probably the single most expensive item amongst the kitchen cabinet stuff. The multiple bin unit (separates everything for recycling) was almost as expensive. My only criticism of some of the German made parts was the instructions. Some of them were clearly only meant to be understood by people with a degree in kitchen component assembly.................. There's a subtle quality difference, mainly in small details, like the quality of the supplied fasteners, between the UK made parts and the German made parts, though, with the exception of the Silestone worktops - the guys that made and fitted them did a very good job.
-
How likely is it that Permitted Development Rights might be withdrawn if an application was made that excluded some of the items that could be added by using them? What I'm thinking is that you could make an amended application for the core building, then add the car port and garage part either under PD, or after PP has been granted by a material modification, using the argument that you could add these later without PP using the PD that would then apply.
-
A victim of their own success, maybe? Many people within Europe believe that German = The Best, so that encourages German, and pseudo-German kitchen companies to grow and spring up from nowhere. We've even seen British companies spring up with German-sounding names in order to try and cash in on the reputation gained by the better German companies. Perhaps there are now just too many suppliers in the market, and some are going to the wall, either because they aren't selling or because they are financially over-stretched. I bet the majority of the mass house builders don't buy expensive German-made kitchens, but do deals for bottom of the range stuff that outwardly looks similar to the well-known brands.
-
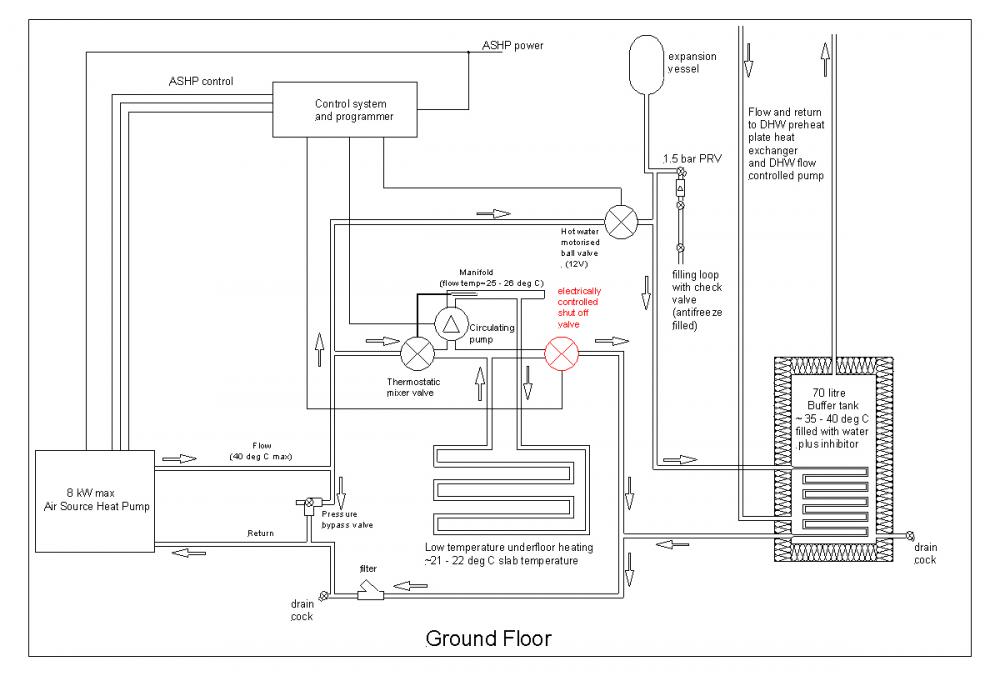
That's crazy! Our arrangement is the older style Wunda manifold, where the flow comes in via a normal radiator-type TRV at the lower left, on the end of the return manifold, but before the pump station. The remote sensor bulb for the TRV is in a long pocket inside the upper flow manifold and connected via a capillary tube. The pump sucks from a tee immediately after the mixed flow injection point and feeds the top flow manifold. The return comes for the right lower end of the return manifold, with an identical valve to the TRV, but with an actuator head fitted so that the UFH can be turned on or off, by just closing off the return. The ASHP flow and return are bridged by a bypass valve, as well as by the flow and return to the buffer tank coil, although the latter has a motorised ball valve to be able to turn off the buffer tank when the system is in cooling mode. This is what the system looks like now, with the new actuator in red:
-
Good find. Pretty much everyone here who has ended up using Buildstore, more often that not because it seemed that had a virtual monopoly, has ended up paying way over the odds. Nice to see there is at least one other option for more conventional builds. Low energy builds are covered pretty well by the Ecology BS, but you need to be building something like our place in order to qualify for one of their loans. Good value, though, and you get to deal with a real human being.