Jeremy Harris
-
Posts
26430 -
Joined
-
Last visited
-
Days Won
360
Everything posted by Jeremy Harris
-
Also worth noting that it is supposed to be guidance. As such, a planning committee can go against it if they wish, and it won't cause any significant issues for the planning officer, as it's easy for him/her to keep the record straight by just noting that the committee chose to not apply Policy 22 in as stringent a way as possible, as they took into account the relative impact of the proposed development versus what already existed on the site, and concluded that the proposed development was no less detrimental to the amenity of the area. My guess is that if it does go through at the committee, then the planning officer will try and get his/her pound of flesh by withdrawing PD rights, though.
-
If it's a standard size then you may be in luck. I have a feeling that the silver/grey kit that came with our sink had some odd sized pipes, as I looked at trying to use one of the bits for something and found it didn't fit a standard push or compression fit connector.
-
First off, do you know what the heating requirement is? 10 Kw sounds high for a decent standard of build, unless the house is pretty large. Realistically we only need about 1 kW of actual heating, even in the very coldest weather, that's for a 130m² house. Hot water is far and away the largest demand. If you have mains gas, then a combi with a high enough rating to give a decent hot water supply, plus a buffer tank in the heating circuit to stop the boiler short cycling when in heating mode, should be a reasonable option, with the boiler size being set by the hot water demand.
-
If you can hang on until Monday, then I can see if I have one. Our sink came with the same, or very similar, silver/grey kit, and I just binned it and fitted either the McAlpine or the FloPlast kit, having had a previous bad experience with the grey ones, but I'm pretty sure I binned it in the "may come in handy one day" box, so with a bit of luck it may still be in there, and there may well be one of those odd-sized seals still on it.
-
The McAlpine double bowl kit is easy to adjust to differing widths, as is the bowl and a half kit. They have a telescoping pipe arrangement that makes them a doddle to fit. This is the double bowl kit: http://mcalpineplumbing.com/traps/sink-kits/sk2-double-bowl-sink-kit and this is the bowl and a half kit: http://mcalpineplumbing.com/traps/sink-kits/sk1-bowl-and-half-sink-kit
-
The key problem here seems to be how the planning committee, not the planning officer, will view the proposed development, relative to what is really on the site at the moment. This is why I suggested that two models, one showing the existing site, with all the buildings present (even though some don't count as far as the planning officer is concerned) and the other showing the (hopefully!) less cluttered proposed development, with the larger house but no outbuildings. The idea is to convince the planning committee that the proposal does not make the site look worse, or more over-developed, than it is at the moment, or even to show that it will look significantly better. As an example, our site was heavily overgrown and had been used as a dumping ground for garden waste for years, before it was fenced in. It was an eyesore, with trees, shrubs, brambles that were head high etc. One of the planning committee members commented that by building on the site we would be getting rid of a village eyesore. I think much the same argument could be made here, and suggest that it may be a mistake to focus too closely on the wording of this Policy 22 and its interpretation. The bottom line is that planning committee decisions are inevitably driven by a mix of personal politics and opinion, not planning regulations or policy.
-

Oh the irony: the annoying irony
Jeremy Harris replied to ToughButterCup's topic in Electrics - Kitchen & Bathroom
I like heat shrink crimps, but I inherited a large box of assorted crimps years ago, and none are the heat shrink ones, but my fix has been to just add a bit of adhesive heat shrink over each crimp. I did pretty much exactly what Ian has done around 20 years ago, when replacing some wall lights. I made the cardinal sin of assuming that the wiring to the socket underneath and about a foot or so to the right of the wall light would run vertically up the wall. It didn't. Some cowboy had run the cable diagonally across the wall. What's worse is that after I'd chiselled out a hole to repair the cable, I found that one of the screws for the old wall lights that I'd replaced had nicked the cable, and had luckily only hit the neutral. It had been like that for years, since the extension was built I'd guess. It was just my stupidity in not checking that led to me running a hammer drill bit right through the cable, as the new wall light screw centres were different to the old ones. The daft thing is that I'd turned off the lighting power and checked that it was dead, but the cable I hit was the ring final for the sockets. -
Oh the irony: the annoying irony
Jeremy Harris replied to ToughButterCup's topic in Electrics - Kitchen & Bathroom
Was this the idiots guide: http://wiki.diyfaq.org.uk/index.php/Cable_crimping ? Looks pretty reasonable, with lots of pictures. -
Oh the irony: the annoying irony
Jeremy Harris replied to ToughButterCup's topic in Electrics - Kitchen & Bathroom
First off, get a cable/stud/pipe detector and get into the habit of using it all the time............................. (I know, too late, bolting stable doors etc) Technically you're not allowed to put junction boxes inside plastered walls, with the exception that a crimped and sleeved joint is allowable, as is a soldered and sleeved joint. I once repaired a fault like this by managing to cut a small hole, pull enough slack out to strip and join the damaged wires (only because the cable was inside an oval conduit, and there was a bit of slack in the roof space above) and then solder and double heat shrink sleeve the repair, adding a small bit of galvanised steel cable channel over the top of the repair before filling, sanding and repainting the wall. Repairs like bits of chocolate block, twisting wires together and wrapping with insulation tape, fitting a buried junction box etc are all verboten, and shouldn't be contemplated, tempting as it may be. Inline crimp joints are the easiest to use, but need added sleeving in my view. The crimped repair also needs adequate protection, and a short length of galvanised steel cable channel works well, as it can be bonded into the hole over the cable repair and then makes it easier to fill the hole without the risk of getting wet plaster into the cable joints (one reason I like the idea of adding a secondary heat shrink sleeves over the crimps in a repair like this - it seals the joints as well as adding an additional layer of insulation). -
I sort of agree, but there are fixed items where you have no choice but to have some flexibility in the connection. As an example, the shower feed in both our old house and the new one comes out behind Multipanel shower board. These outlets are held on by a nut from behind, so have to be fixed to the wall board before it's fitted in place. This means that the pipe work has to have enough give in it to allow it to be connected up and leak tested before the wall board is bonded to the wall. In our old house I used a flexi, without really giving it much thought, as all the pipe work was copper. In the new house I'd used plastic pipe, and that allowed enough movement to allow the wall panel to lean out from the wall while fixing things, then be pushed and bonded back when all was well. Another case where I'd have had to use flexis, but got away with using the limited flexibility of plastic pipe was with two of our cabinet mounted cisterns. These had side entry fillers and there just wasn't enough space to tighten up the fittings with the cistern in place. The only way I could fit them was to tighten up the pipework with the cistern unhooked from it's mounting rail and pulled forward, then use the limited flexibility in the plastic pipe to hook the cistern back in place. Finally, just about every kitchen mixer tap I've seen recently, including both the ones in our kitchen and utility room, came with special flexi pipes, with small bore fittings with O rings that fit into the base of the tap. AFAICS, there's no way to fit a mixer tap like this without using the flexi pipes.
-
Finally finished the front garden.
Jeremy Harris replied to Gone West's topic in Landscaping, Decking & Patios
I'm always amazed by the stuff that's openly on sale in shops in France. Everything from bottles of chemicals being sold on supermarket shelves to these explosive mole killers. The charges are about the size of a small banger, but do have an electric detonator, so would be ideal for use by terrorists making larger bombs. Just to buy the electric detonator here would mean holding an explosives licence with the right authority to buy and store them. It used to be easy to get an explosives licence here (I had one for a few years), no more difficult than getting a shotgun certificate, but I believe that it's now a great deal harder. These French devices have been on sale there for at least 12 years that I know of, as it was around 2004/5 when we used them to get rid of a few moles in my friend's paddock, and they are well regarded in France as being the best way to get rid of moles. -
Finally finished the front garden.
Jeremy Harris replied to Gone West's topic in Landscaping, Decking & Patios
There is an excellent bit of kit sold in the French equivalent of B&Q, Bricomarché . When staying with friends who used to live down in the Loire valley we had a play with it, as they had a mole problem in the paddock at the back of their house and had a couple of Irish Wolfhounds, a breed that is both pretty stupid and prone to breaking their legs when they trip over a mole hole when running. The website for the device is here: http://www.detaupeur.com/ and it consists of an explosive charge on the end of a couple of feet of wire, plus a battery box and detonating switch on a stake, that is positioned right at the entrance to a mole hole. What happens is that the mole climbs over the charge, pokes his snout at the plunger switch, and gets blown up from behind. IIRC the kit comes with a handful of explosive charges and wasn't expensive. There was a certain satisfaction to be gained from being woken in the night by a loud bang from the paddock, indicating that yet another mole had met it's maker. -
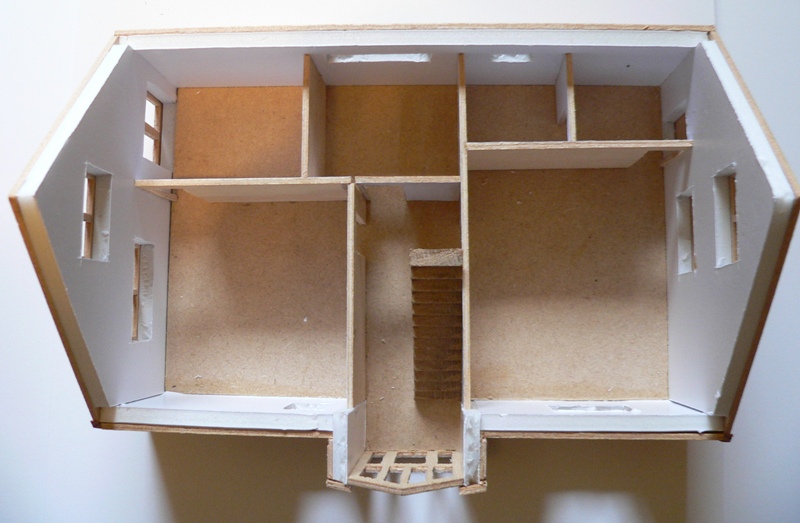
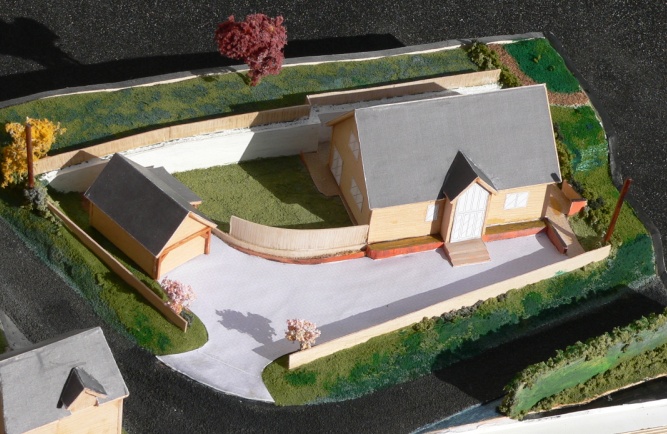
Mine's the same, and I had exactly the same issue with the size of the bathroom - she didn't want the shower to be cramped. My solution was to make a series of models as the design of the house matured, so she could see and comment on each area. This was the final model, and is pretty much how the house was built, with the exception that I added a walk-in wardrobe later: When the house was up, the first comment was "The shower is absolutely massive...............".


-
They were! I've told the tale before, but in essence our Parish Council Planning Committee meeting started with the chairman reading out all the past applications, the reasons for refusal and the 14 objections that had been raised by them to the previous application. At this point, a very outgoing elderly lady member, who had been looking at the model we'd left on the table in front of them, turned to us (the only two members of the public present) and asked if we were the applicants. I replied that were were not allowed to speak to members of the committee. The clerk reinforced this view to the lady member. She carried on regardless, saying it was a silly rule, asked a few questions, then remarked that this was nothing like the previous applications, and being set down in the hillside (to exactly the same level as all the previous applications that had attracted loads of objections) meant that she could see no reason why it shouldn't be supported. She then sort of railroaded the others, saying something like "Well, you all agree with me, don't you?". The result was unanimous support.............
-
The time consuming bit isn't making the model, it's getting everything from the topo plan to the building plan and elevations to the same scale and in the same CAD format. Once that's done, the model making is really just a bit like painting by numbers, with the glued on scale drawings as the templates. In your case, what would be useful would be to be able to show the planning committee "before" and "after" views of the whole site, to scale, so that they can see the relative impact of your proposal versus what's already there. The hardest part may well be getting scale drawings for all the existing buildings, as my guess is that you may already have them for what you're proposing. The key is really having them all in a format that can be made common. In my case, the guys that did the topo survey emailed me a .dxf file, I purchased the site plan map from the Ordnance Survey as a .dxf file (so used that for the base map) and I had done all the design drawings for the house in Autocad, that will happily read in .dxf files. This means that, with a bit of tweaking of units, I was able to get all the data to the same scale and in the same file format, which then meant I was able to make up printable sheets of parts, that were spray mounted to the material that had to be cut. The rest was just a bit of fun, and didn't take anywhere near as long as getting all the drawings together.
-
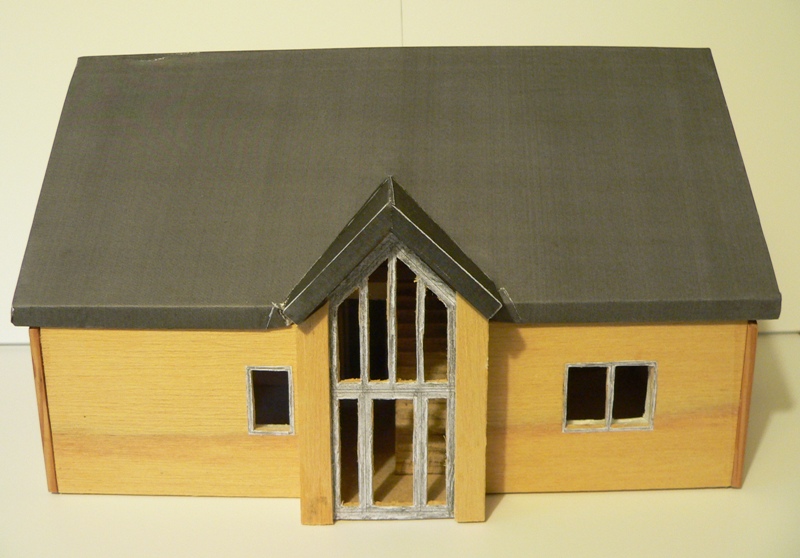
For the scale model of the whole site, I used ply base board, then cut out layers of 5mm thick foamboard to the contours from the topo survey. I just printed off the topo survey to scale and then used spray mount to glue the printed sheets to the foamboard, which then made cutting along the contour lines with a craft knife easy. A bit of polyfilla to fill the steps and I had a reasonable representation of the ground. The buildings were all made using 2mm liteply, a very easy to cut modelling ply, that's far more forgiving than balsa and yet is easily cut with a craft knife. I used the same technique, drawing up the walls and roof outlines to scale, printing them off and then using spray mount to stick them to the sheet of liteply. A steel rule as a guide plus a sharp craft work made cutting out the panels easy. To glue the buildings together, I used modellers super glue, the stuff that cures very quickly when glueing balsa or liteply (modellers seem to refer to it as "zap glue"). I did add textures to my model, using stuff from the local model railway store, who sold stuff like grass and gravel texture powder that you just sprinkle on to a glued surface. The same store also sold bits of died dry moss than worked well for adding shrubs, or making small trees (I used cocktail sticks, dyed with felt pen, for the trunks). I found that after I'd made the first model, which took a few hours, I could make additional models very quickly, less than an hour, as there is a knack to finding the best way to do stuff. On the final model, the bits of paper that I printed out for the walls, roof etc I pre-textured, so that a bit of water colour paint gave a more realistic looking finish. This was the model I took to the planning meeting:
-
Deliveries can be a nightmare. Our plot is fairly easy to get to, as long as sat nav directions aren't followed for the last mile or so. With every single order we included a special note for the delivery driver to ignore their sat nav and follow written directions we included. Despite this, around 70% of deliveries, including the one from Simply Paving, tried to come in via the very narrow top of our lane, which is impassable to anything much bigger than a Transit van. In the case of the paver delivery, the driver slept in his cab overnight and turned up back on site at around 8 am the next morning, very angry indeed. When he calmed down, I asked him to please read out what was written on his delivery note. He then read out the instructions that said not to follow the sat nav, and that gave the wide route to the site. He did calm down a bit after that.................... Often I used one local, independent, builder's merchant, not just because usually their prices were pretty good, but mainly because their delivery drivers were brilliant, and would always take care to put stuff exactly where we wanted it on site. Some delivery drivers just want to get unloaded and off as soon as possible, with the worst, by far, in our experience being concrete trucks. We had one concrete truck driver that took the wrong route to the site three times in the same day, despite having been told after every time that there was an easy route in.
-
When I looked at the prices for the permeable pavers, the best price was from Simply Paving: https://simplypaving.com/bradstone-driveway-infilta-permeable-block-paving-autumn-200-x-100-x-60-8-08-m2-per-pack.html and even our very good local builder's merchant couldn't match their price, in fact they said they couldn't buy them at that price. I will say that there was a snag with Simply Paving, in that we had to have two deliveries, by HIAB truck (it's not listed, but they do offer HIAB equipped delivery on request). We didn't have enough flat space on site to store all the pallets of pavers needed in one go. Their delivery driver ignored our instructions to find our plot, and instead of calling us, just turned around and headed back up to Coventry. At around 3pm I rang them asking what was going on, because I had the drive chap sat waiting for pavers to arrive, only to be told that they were sending the driver back, but he'd run out of hours and would not be delivering until first thing the next day. This sort of thing is one of the downsides with getting a decent price by buying from the web, I found.
-
There's a couple of very high end, high performance, exotic cars parked on the drive in one of the shots, which I think is what was being referred to.
-
My advice is to make two scale models, one of the site as it is now, one as it would look if your proposal was granted. People have problems visualising stuff from plans, and are getting mistrustful of computer graphics, but still seem to trust scale model representations. It doesn't take that long to make a pair of reasonable scale models, I found, and the one I made really turned the tables at the planning meeting. I'd go so far to say that it was the single most significant contribution in getting people on side.
-
Check the battery terminals. I had one that went like this, and it turned out that the terminals inside the unit were dirty and a bit corroded. A rub with a bit of Scotchbrite followed by a smear of vaseline on the terminals got it working again. Also, check the new battery. I've pulled a new one out of the drawer before now only to find that it's gone flat from being stored for too long, and was out of date................
-
It's flat at the top, but the mid-slope part exceeds the 1:15 maximum allowable by the planners, as I had to get a dispensation to exceed this. I think it's about 1:10, then the slope reduces at the bottom, where it meets the lane. Not only did we have to comply with SuDs, like everyone else now, but we also had a planning condition added stating that there was to be no run off from the development to the lane and hence into the stream alongside it. The permeable pavers we used were Bradstone Infilta, in Autumn: https://www.bradstone.com/products/driveway-block-paving/driveway-infilta-block-paving/ which work well. Instead of being laid on a solid sub-base and sand (like whacked MOT Type 1), they have to be laid of a free draining sub-base of whacked MOT Type 3 than 6mm grit, rather than sand, as the bedding. The same grit is also used to fill in the larger gaps between the pavers. In practice they don't end up looking any different to standard pavers, with the exceptions that you don't get ants under them (they don't like the grit) and water drains right through them. Our sub-soil wasn't permeable, except in one small area, so we ended up digging a large hole under the drive and fitting 20 off heavy duty Aquacell crates, wrapped in terram, to form a surge holding tank. This can hold nearly 4000 litres of run off, allowing it to drain away slowly over several hours after a very heavy down pour. It seems to work well, as when test pumping our borehole I pumped around 20,000 litres per day into it for a couple of days, and there was no sign of any water at the bottom of the drive at all, it had all soaked through the pavers and drained away via the surge tank.
-
Yes, I went through this, as I liked the look of the resin bonded surface, and there were several local companies that offered it at a reasonable price. I couldn't make a resin bonded drive comply with the SuDs regulations, though, as the slope on our drive was too great for a linear interceptor drain to deal with. We were forced to opt for a permeable surface, in order to comply with SuDs, so ended up using permeable pavers. These were a fair bit cheaper than a resin bound surface.
-
Sikaflex EBT for £1.75 a tube?
Jeremy Harris replied to Ferdinand's topic in General Self Build & DIY Discussion
It should be OK, as long as it's been stored in a cool and dry place. You can extend the shelf like of this a lot (as in months, maybe even years) if you stick the tubes inside a heavy duty plastic bag, chuck a silica gel sachet inside, suck as much air out as you can out and then seal the bag, either using a heat sealer, or one of those clips that are normally used to separate two pack stuff in plastic bags (I keep a few of these as they are a great way of sealing plastic bags). The clips I'm talking about are the ones where there is a round bar that clips tightly inside a U shaped plastic tube, sandwiching the plastic bag. If you then put the bag of tubes in a fridge they will keep for ages, as it's the combination of humidity and warmth that allows the stuff to cure from atmospheric water vapour. On a similar note, if you ever mix up too much two part resin, either epoxy or polyurethane (never tried it with polyester or vinyl ester, but suspect this trick doesn't work for them because of the need for free styrene during the cure) then you can do exactly the same -put the mixed resin in an airtight plastic bag and stick it in the fridge (if you want to use it within a few hours) or in the freezer if you want to use it in a few months. It will go solid in the freezer, but warm it up a bit when you get it out and it will liquefy and start curing as normal, with no adverse affect on the cured properties at all (it's how aircraft structure pre-preg material, like carbon fibre, is stored and transported - it's frozen and kept cold, then warmed up to turn the impregnated resin liquid and start the cure process). Mind you, you need a tolerant other half to put up with mixed up epoxy resin in the fridge or freezer.............. -
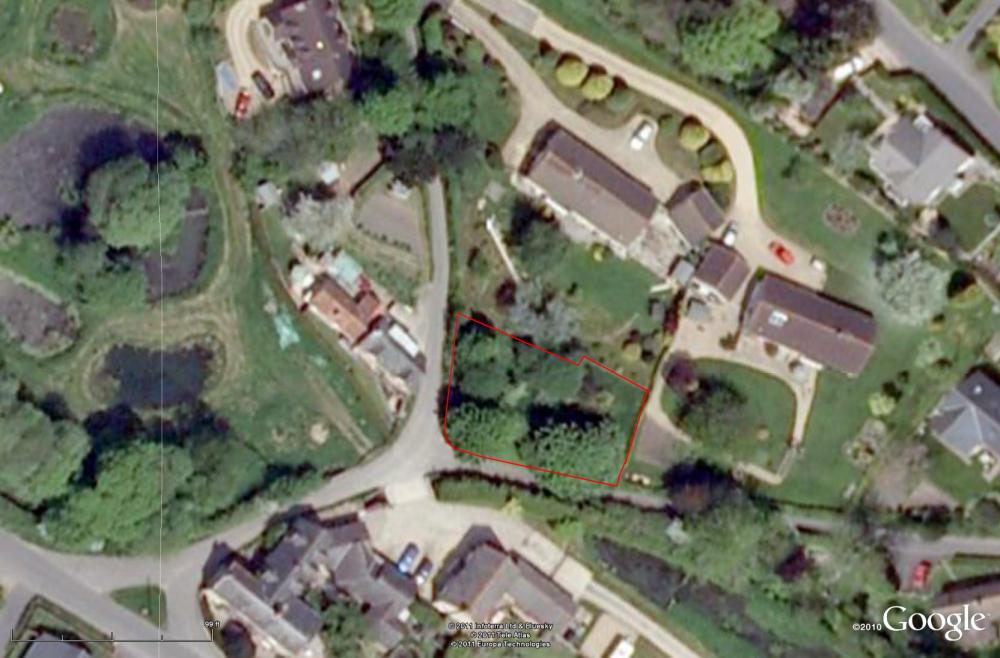
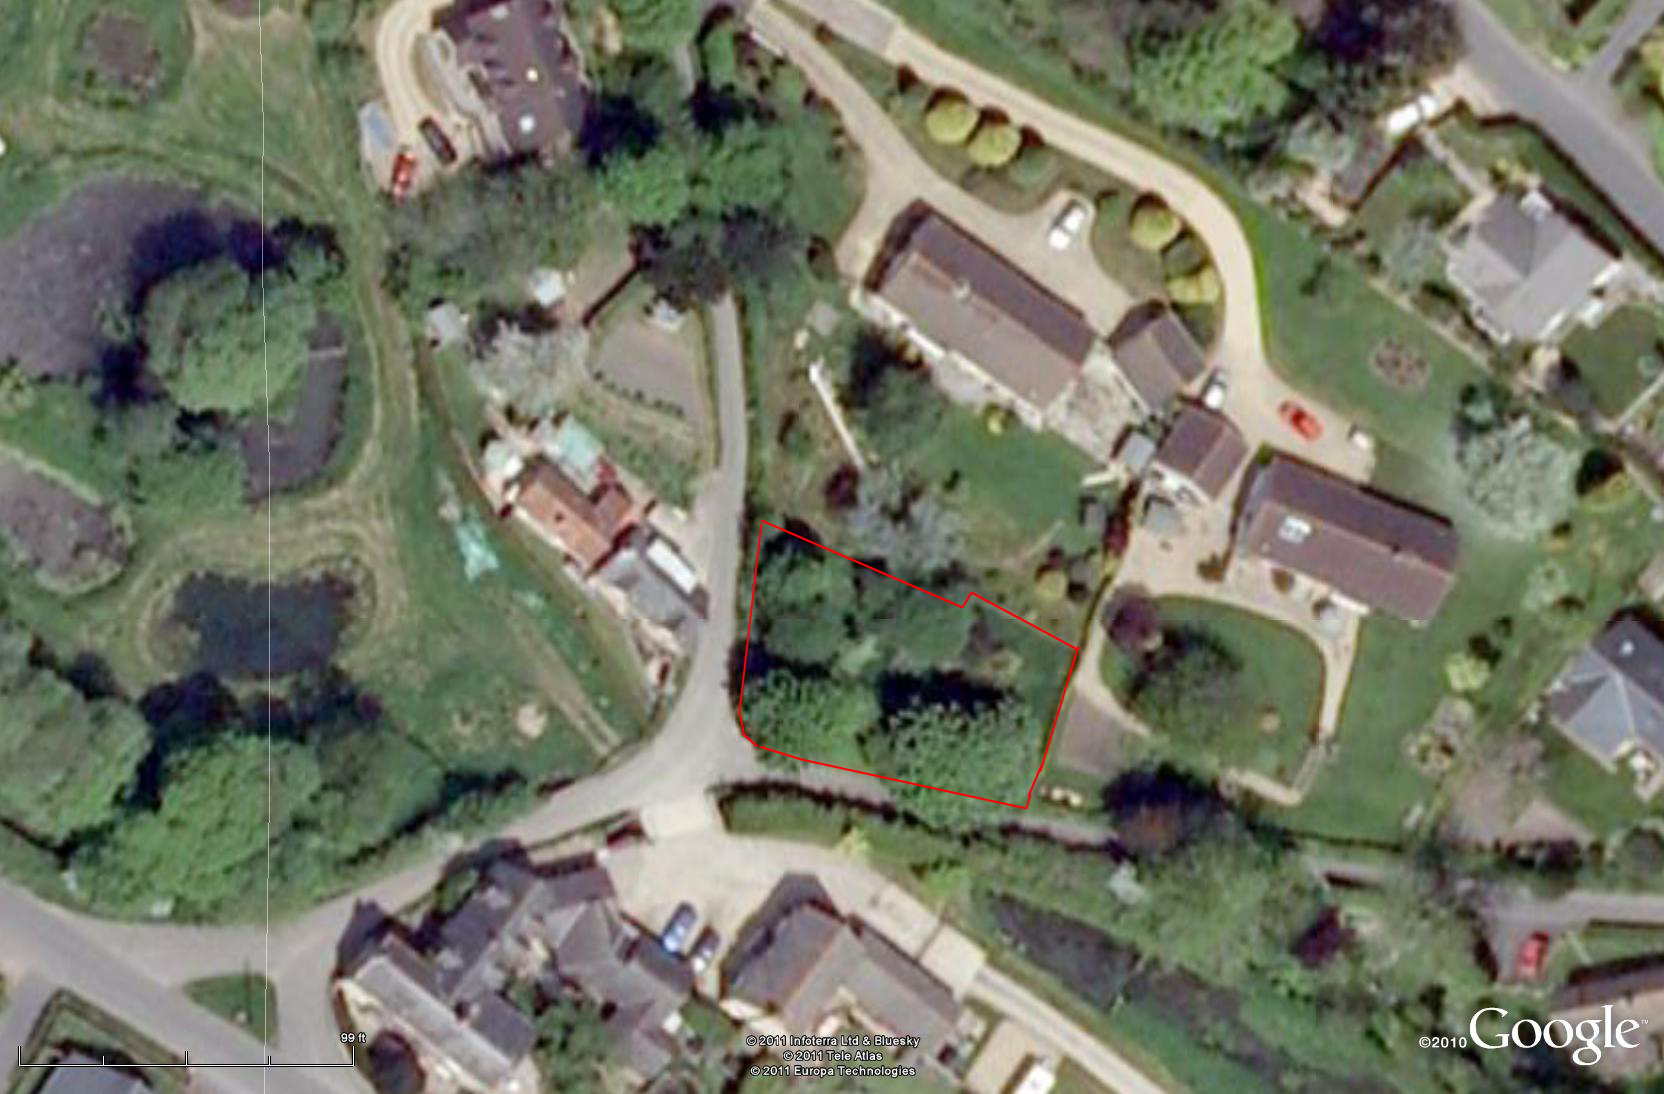
Funny old thing, but here's a Google Earth image of our plot (outlined in red), before we bought it and before we submitted planning. The previous application had noted the large trees and suggested they needed to be retained, but at that time the plot was just outside the Conservation Area (literally, it ran along the boundary!) and none of the trees had TPOs. The day we completed the purchase I had a tree chap in to fell them all, then submitted PP a week or so later.....................