Jeremy Harris
-
Posts
26430 -
Joined
-
Last visited
-
Days Won
360
Everything posted by Jeremy Harris
-
He did a follow-up video after he'd found a few more faults and fixed everything down in that cellar:
-
If you think you've got some dodgy electrical installation work, then take a look at this, probably the worst I've seen, especially the delightful way the company fuse has been replaced with a bit of 2.5mm² wire........
-
I got away with having our treatment plant around 1m from the boundary without any quibble from building control. They agreed with me that as the discharge was going into the adjacent stream, there was no point in trying to locate the unit 7m away, which would have placed it in the centre of our lawn. The general feeling I got was that there was no real concern about treatment plant placement, as they knew that, unlike old cess pits, there's no perceptible odour problem from these things. I'm pretty sure the "7m rule" dates way back to the time before we had treatment plants, so it's well worth having a chat with your BCO, explaining the compromises you need to make and seeing if they are sympathetic to your problems. If you're lucky, as we were, then there won't be a problem.
-

Controlling underfloor heating in passive house
Jeremy Harris replied to dogman's topic in Underfloor Heating
Because I opted to use 12V DC for all the controls (just really a safety preference on my part) I used one of these valves (I bought three, just in case, but they seem really well made): https://www.ebay.co.uk/itm/Motorized-Ball-Valve-Electrical-Valve-DN20-G3-4-12V-2-wire-3-wires/201564641525?hash=item2eee3058f5:m:mpjP6_x5zwaHxqXmPnZZWig -
Controlling underfloor heating in passive house
Jeremy Harris replied to dogman's topic in Underfloor Heating
I used a single motorised ball valve to isolate the buffer tank from the ASHP when it's in cooling mode, just where you have one shown. I chose a motorised ball valve rather than a conventional motorised valve as I wanted to be 100% sure that it would seal when closed. Having looked at the inside of a conventional motorised valve I wasn't 100% convinced that it would be a 100% seal, and as even a small amount of chilled water seeping past into the buffer would cool it down a bit, I opted to use a ball valve that I was confident would be a 100% seal when closed. You could use a manual ball valve, but you'd be operating it a lot in warm weather, when you want to keep the buffer tank warm for preheating hot water but also want to have the floor cooled a bit. -
Acoustic Isolation of MVHR Unit
Jeremy Harris replied to MJNewton's topic in Mechanical Ventilation with Heat Recovery (MVHR)
I fitted ours on a timber base supported on four old-style Mini exhaust mounting bobbins, like this: Seems to work very well, and our MVHR produces a lot more vibration than many, as it has an integral air-to-air heat pump built in, so is pretty heavy (around 70 kg). -
I bought a narrower Geneva door from Wickes, when I decided to build a walk-in wardrobe as an afterthought, and they are nearly the same as the Mexicano. There are small differences, the top and bottom board widths are slightly different, not enough to stand out, but enough to notice if you measure them. Also, the core of the Wickes Geneva is just low density chipboard, that doesn't hold screws as well, and there was less trimming allowance (didn't matter for us, as I bought a door set, with linings). Overall I thought the Mexicano doors we bought were a fair bit better than the Wickes Geneva, but that's based on a sample of one door from our local Wickes branch.
-
What is an acceptable standard of skimming
Jeremy Harris replied to AliG's topic in Plastering & Rendering
I wholeheartedly agree, that workmanship is just crap. I was very, very fussy about our skimming. Our old house was taped and filled and it really, really annoyed me. With the evening or early morning sun shining every joint ripple in the ceilings was irritatingly visible, even through the Artex that had been applied to try and hide it. As a consequence, an early decision was to spend the extra and have the plasterers work another week to skim all the walls and ceilings. When our decorator came to look around and quote he commented that there was virtually no painting prep needed, as the plasterers had done a really good job. The interesting thing is that the really good brickie we used recommended the plasterers to render the big retaining wall, they did such a good job of that, that I didn't even bother tendering for plastering the house, I just gave them the job. In turn they recommended the decorator, who also turned out to be an ace floor tiler. There's absolutely no substitute, IMHO, for getting one very good trades person to recommend another. Good people will be very reluctant to recommend someone with lower standards than their own. The sad fact is that you don't often find this out until too late to change things. We were lucky, we only had one really bad (as in bloody dangerous) trades person on site (for one day only) and one mediocre chap that I'd frankly not ever use again. All those I'd recommend are listed on our blog - I've not linked to anyone that I wasn't 100% happy with, which I'm sure has pissed off a couple of people, but that's just tough. -
Controlling underfloor heating in passive house
Jeremy Harris replied to dogman's topic in Underfloor Heating
Good point, Nick, but I'd do it the other way around - spec a buffer with a solar/heat pump coil and leave the PHE as is. The big advantage is that you don't need to fill the buffer tank with very expensive antifreeze/inhibitor, only the relatively low volume heat pump and coil circuit. The buffer can then be filled with cheap standard inhibitor. -
Good point. About half way through our build I realised that I might not be around to look after all the systems in a few years time (a bit morbid, I know, but frankly I think it's very, very useful to have a healthy dose of realism when it comes to maintenance). This had two main consequences, the first was that I changed a heck of a lot of stuff from custom made to off-the-shelf. The second was that I made a concerted effort to document everything and print off two copies of the main system diagrams and instructions, with one set being laminated and fixed near the relevant system, the other set going into a house documentation pack, that has a lot more detail about how everything was done and includes lots of photos from the build, showing where everything is, including the location of pipes, wiring, ducts etc that are now hidden from view.
-
Controlling underfloor heating in passive house
Jeremy Harris replied to dogman's topic in Underfloor Heating
Looks OK, but there's no need for the magnetic filter, I think. The MIs for our ASHP only specified a much cheaper Y filter, like this: https://www.bes.co.uk/y-in-line-strainer-dzr-22mm-compression-7533 -
The tree stump from Hell
Jeremy Harris replied to ToughButterCup's topic in Landscaping, Decking & Patios
The two are very different when used on plants. Sodium Chlorate was a very persistent herbicide that was also pretty toxic to lots of other stuff too, as well as being pretty good oxidising agent, but it doesn't work as well on stumps, as it doesn't cause accelerated decay when used like this. Potassium Nitrate is a fertiliser, as well as being a pretty good oxidising agent and accelerating the decay rate of the stump, which aids the final burning out process a fair bit. Sodium Chlorate is also a lot more toxic to humans and other mammals if ingested, which is, I think, one reason why its use as a general purpose persistent herbicide was restricted. In some ways the restriction is a nuisance, as it was far and away the best substance for keeping a gravel drive weed-free for several years in my experience. It's dead easy to prepare sodium chlorate using simple bucket chemistry, as all you need to do is heat up a sodium chloride (common salt) solution and then electrolyse the hot solution. The reaction needs to be done in a well-ventilated space as hydrogen is released, but when the reaction is complete you're left with a strong solution of sodium chlorate. -
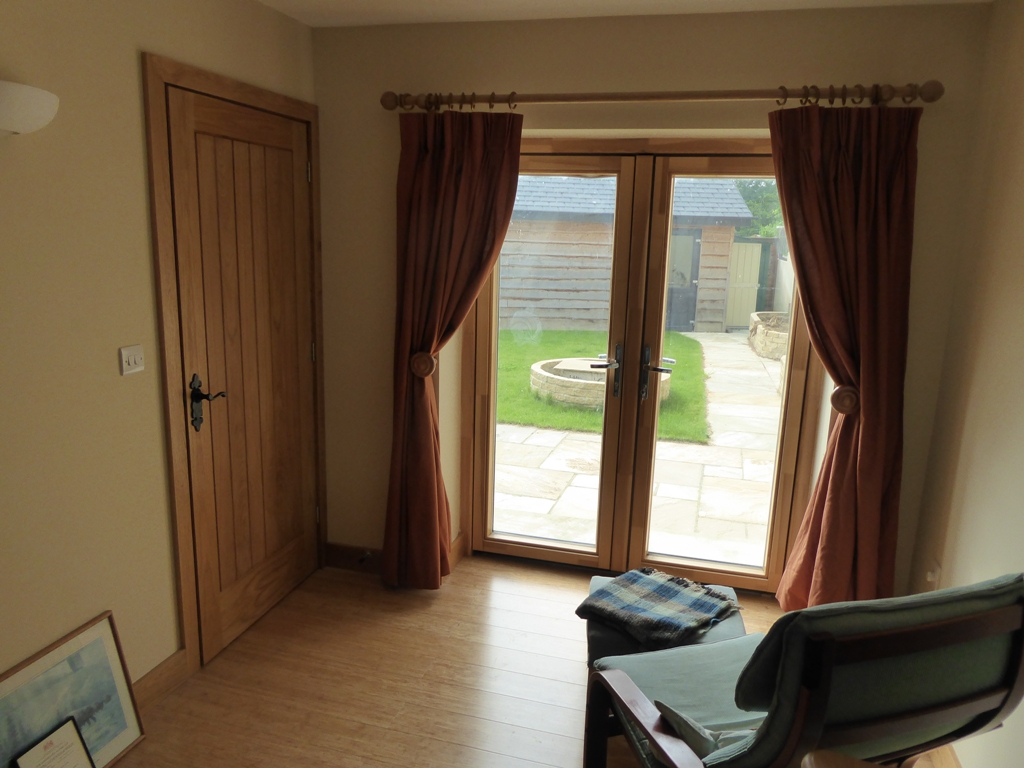
I bought our Mexicano doors unfinished and gave them a couple of coats of Osmo oil. At a guess I'd say it takes around 30 mins to rub the door down with a Scotchbrite pad, wipe the dust off and apply the first coat of Osmo. The Osmo takes a fair time to dry hard enough to de-nib for the second coat, around 24 hours, but giving the doors a quick rub down again with a Scotchbrite pad to knock the nibs off and then apply the second coat of Osmo is a fair bit quicker, maybe 15 minutes or so. Osmo is expensive, but goes a long way, I think we did all 13 doors in our house with about 1 1/2 tins for two coats, so around £3 or so per door for the oil plus around 3/4 hour to 1 hour labour per door. Bear in mind that I'm an amateur, too, so someone who's better at finishing may well cut the time down a bit. This is the best photo I can find of a finished door, done with the satin finish Osmo oil:

-
About 5 years ago I drove my hybrid from home (near Salisbury) up to Inverness, where it was parked up for a week whilst we went on a cruise down the Caledonian canal, then I drove it up to near Ullapool, with a gentle meander back down the West coast, through Skye, a couple of days on Mull, and a few days in the village where we used to live, Portpatrick, before returning back home. At a guess the round trip must have been well over 1000 miles. Before that we'd driven down to the South of France and back in it a few times. I've just checked, and had we done that trip now, with my current PHEV, I could have charged up at every single place we stopped overnight - even right up in the far North West, or on Mull.
-
The tree stump from Hell
Jeremy Harris replied to ToughButterCup's topic in Landscaping, Decking & Patios
The way I've done them in the past (without using explosives - splits them and is fun, but not that effective) is to drill big holes with an auger bit, as deep as you can and pack them with potassium nitrate (salt petre). Cover the stump with plastic sheeting tied down and repeat this process of filling the holes a couple of times over a few weeks, as the potassium nitrate gets absorbed. Then start a small charcoal fire on top, with minimal flames. What you want is barbecue like heat. Over a fairly long period the stump will smoulder away, with most of it's roots, to ash. The process works because the potassium nitrate provides a source of oxygen to sustain the gentle fire inside the stump, with no big blaze, plus the potassium nitrate massively increases the timber decay rate - it will decay timber in weeks, rather than years. If you use potassium nitrate from a farm supplier (it's sold as fertiliser) then grind it down first, as they now sell it in coated granule form to stop people using it as an oxidising agent like this (and for other nefarious purposes). The method is even now mentioned on Wikipedia: https://en.wikipedia.org/wiki/Tree_stump -
On ours, the door switch is the same, just an input to the controller, but when our door switch failed I found it was a common fault and the switch was easy to replace. Worth a look in case the door switch is faulty and is telling the machine the door is closed when it's open - ours failed the other way around, telling the machine the door was open when it was closed. What I did in our utility room was run the travertine under all the units, and where the washing machine fits I bonded in 50mm x 50mm white PVC angle all around the opening for the washing machine, bonded to the walls and the side of the adjacent unit with neutral cure silicone. This created a sealed area where the washing machine is so if it leaks when it leaks the water can't get under the skirting, units etc.
-
Floor screeding, why so late in the build process.
Jeremy Harris replied to epsilonGreedy's topic in Floor Structures
Ours is much the same, the bedrooms are typically a degree or two cooler than the living rooms downstairs, plus the fresh air fed into them all the time tends to make the bedroom air quality a great deal better than homes without MVHR. I did some measurements on our old house tht has no MVHR and found that the CO2 level in the early hours of each morning (with just a fanlight ventilation window open in the bedroom) were regularly reaching around 1600ppm, whereas with MVHR it's rare to see the level get above that outside, around 450ppm is typical. -
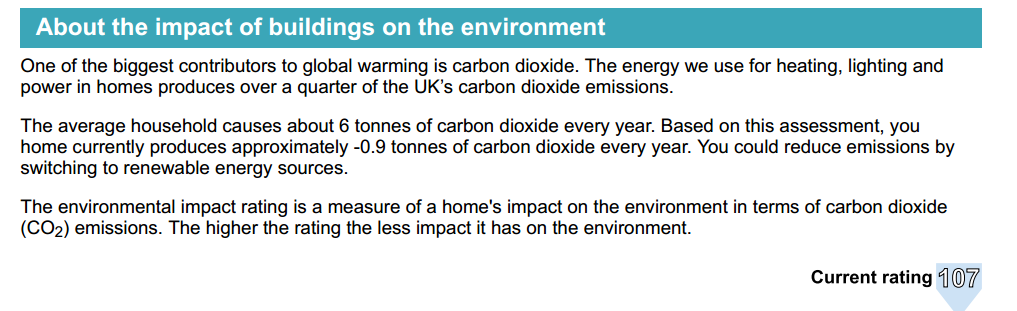
Assessors pretty much never visit the build to see how it was actually constructed and what was used, so rely almost always on the information given to them by the builder. In the case of a self-builder, much of that information comes from you, perhaps aided by technical data from those who've worked on the house construction. In my case I did the design SAP and submitted that to building control, and didn't bother to use an assessor (seemed a waste of money at that stage, as I'd designed the house and had all the data). For the "as built" SAP, just edited my design SAP worksheet to correct for the changes we'd made during the build (different windows and doors, different heat pump, different hot water system and different make and model of MVHR system). Sadly the government have decreed that only a paid consultant can actually submit and lodge an as-built SAP report, so I emailed my FSAP file to an assessor and paidn him £100 +VAT to do nothing more than put his name and assessor number on it and lodge it on the government database. He probably earned well over £200 an hour for his work - more than I charge insurance companies as a expert witness.............. You do need to take a LOT of care to make sure whoever does the as-built SAP has ALL the right information. Key things for us were things like the near-complete absence of any thermal bridges, the absolutely correct as-built U values for the floor, walls and roof (pretty key this - you need to work them out as the air gaps for things like the service void make a difference), the actual heat loss rate for any hot water storage tank, making sure the measured air permeability is used if you've had an air test and got a chit, rather than the default value that SAP uses, checking that the make and model of your MVHR is correct in the worksheet, as that then pulls the right data from Appendix Q, and making sure that the correct Uw values have been entered for all the glazing, not some random assumption (this happens a fair bit - I've seen generic figures for 3G or 2G being used, rather than the true values from your window supplier). If you make sure all this data is available to the assessor, then you should get a reasonable accurate result (not that it means much if you've built to a better standard than building regs, as SAP falls over a bit when you get to very well insulated and air tight houses, I found). Our SAP EPC came out at A107 and the SAP EI came out at A107 too. It was totally bonkers, and not worth the paper it was written on, as this scanned snippet from the bottom of our EPC show: As an example of how bonkers this system is, lets assume that solar water heating cost the mid-point of the above cost, £5,000. It would save £65 a year according to SAP, so the return on investment, excluding regular maintenance and component replacement cost, would be 76.9 years......................... As for the suggestion we fit a wind turbine, when any idiot can tell from our post code on the certificate itself that we are in the bottom of a steep valley, then I'm afraid words fail me. It just illustrates the mentality of the lunatics that came up with this scheme, IMHO. As a final little gem, here's the bit from the EI part of the certificate (note that our CO2 emission figure is actually negative): I just love the line that reads "You could reduce emissions by switching to renewable energy sources", when we're already a negative CO2 "emitter", and have exceeded the "zero carbon home" target which was scrapped, anway (A100 would be zero carbon, anything above 100 is a "negative carbon" home).


-
Floor screeding, why so late in the build process.
Jeremy Harris replied to epsilonGreedy's topic in Floor Structures
No. the finished floor height will be the same, and that is the only concern as far as flood risk is concerned (we're also notionally in a flood risk zone and had to do a flood risk analysis, plus were given a set of recommended flood mitigation measures to consider). A suspended floor carries the additional flood risk problem of how to drain the water out from the ventilated cavity under the house as well. The science does no such thing, I'm afraid. If it is colder under a suspended floor than under a ground bearing floor then more heat will flow out from the house. Air does have a low heat capacity but the airflow under the house in any breeze will be more than enough to ensure the void under the floor stays pretty close to the outside air temperature. The average UK ground temperature is between 6 and 8 deg C, whereas on a cold day the air under the floor could be well below freezing. On a very cold day you could double the heat loss through a suspended floor when compared to a slab. UFH doesn't have to have slow response times, it can respond as fast as having radiators. It's all down to the design. Bearing in mind that even a house built to "just" meet current building regs won't need a massive amount of heating, and one built like ours needs so little that frankly leaving the heating on 24/7 only costs a few pence a week, if that, over having it timed, so the whole working/retired heating pattern just doesn't apply. Why on earth can't a gas boiler run UFH at below 30 deg C? It's easy to get a gas boiler to run UFH at lower temperatures than this, as the boiler temperature is independent of the UFH temperature - it doesn't matter at all what the boiler temperature is, as the thermostatic mixer on the UFH will set the floor flow temperature, not the boiler. Using a gas boiler with UFH is a great idea if you have mains gas - it's clean, efficient and cheap to run. -
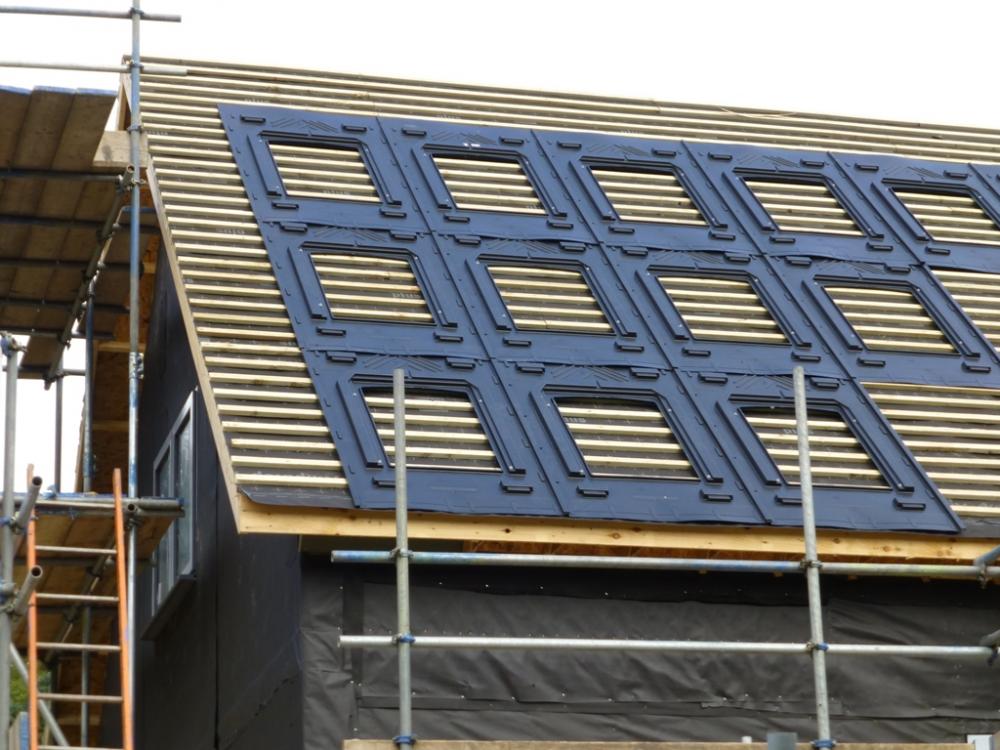
Our roof has 18mm OSB sarking boards, too, and we're only about 30 miles or so from the South Coast. It's always seemed daft not to board a roof to me, for a whole host of reasons. The sarking boards stiffen up the roof a great deal, they stop a roofer putting his/her foot through the membrane, they improve airtightness on the outside, reducing "wind wash" of roof internal insulation, etc, etc.
-
Floor screeding, why so late in the build process.
Jeremy Harris replied to epsilonGreedy's topic in Floor Structures
So why use a suspended floor at all? It needs more insulation (because the air underneath it in winter will often be colder than the ground temperature) and I doubt it's more cost effective than a simple insulated slab floor, where you can just lay EPS (or PIR) then pour a concrete floor slab on top. Power float the slab whilst you still have good access and you can get it flat enough to tile etc with no further work. You can easily and cheaply include UFH pipes in it too. -
Bluetooth Ceiling Speakers
Jeremy Harris replied to Onoff's topic in Networks, AV, Security & Automation
Yes, I bought a set from Ebay, with "water resistant" speakers. They work better than expected, TBH, although they only get used for streaming Radio 4 into the kitchen (which seems to use up what little "broadband" we have). They look very similar to that Ebay link, the amplifier unit looks identical. The speaker grilles on mine are just white mesh, but otherwise look very similar. My only slight complaint with them is that they make a series of beeping noises when they connect and disconnect from a Bluetooth advice, which gets really annoying after a while, but other than that they work fine. It probably helps that the ceiling cavity has 200mm of rockwool sound insulation in it. The only other thing I found was that the speakers were intended to fit to a thin bit of metal or GRP, so I needed to cut some bits of ply and glue them on the upper side of the plasterboard ceiling for fixings, as the fixing holes are too close to the edge to take any normal sort of plasterboard fixing.- 1 reply
-
- 2
-

-

-
The spreadsheet I knocked up was pretty simple and HMRC accepted the printouts from it without question. It's here if anyone wants to use it: http://www.mayfly.eu/wp-content/uploads/2017/01/VAT Claim Form 431 - Blank.xls I made the mistake of just keeping a box full of receipts in the end; we started off well, marking up and entering on the spreadsheet all the receipts for that week on a Friday, but that discipline went out of the window after a few months. I ended up spending three whole days sorting out receipts, checking them, putting them in some sensible sort of order and entering them on the spreadsheet. I had piles of them all over the living room floor................
-
Fixing Solar Panels: is there a standard method?
Jeremy Harris replied to ToughButterCup's topic in Photovoltaics (PV)
FWIW, I think there was around a 10 week gap between our panel frames being fitted and the inverter wiring etc being done. Didn't cause a problem for the installer, they accepted that we were stuck waiting for the roofers to finish and for the cladding on the outside of the house to go on (as the inverter is mounted outside,on the wall under the eaves at the North side, where it stays cool and is out of sight). -
Fixing Solar Panels: is there a standard method?
Jeremy Harris replied to ToughButterCup's topic in Photovoltaics (PV)
Two things are needed behind in-roof panels, and are essential. The first is that there needs to be a membrane that's breathable yet allows any moisture that may get on to it (from driven snow and ice melt, for example to flo down to the gutter and not get through to the underlying structure. The second is equally critical, there MUST be a ventilation path up behind the panels to the ventilated ridge. The panels will get very hot and this ventilation is needed to reduce the temperature and get reasonable performance in hot weather. The ventilation also allows the membrane to both dry off and allow vapour to permeate out through it, as designed, For this reason we counter battened over the sarking, in line with every rafter (on 400mm centres, then draped the breathable membrane over the counter battens, so there was a ventilation space under it, then battened the whole roof at the specified slate nail pitch (with the lower row spaced closer), and then the in-roof plastic mounts were just screwed to the battens. With either the Easy Roof or GSE system there are no fixings other than screw to the existing battens plus some wider boards fitted where required that are the same thickness as the battens. There's no difference between the membrane under the panels and that under the rest of the roof: I think the idea of covering the area where the panels are to go with sheet and then GRP or EPDM would work as a temporary measure, but might cost a fair bit. Is there a way to buy just the panels now, and fit them, then get the inverter and house wiring done later, when funds allow? Probably worth asking around if anyone consider a two-stage process like this, and perhaps be OK with you fitting the mounting frames to the roof, as there is very little skill involved in doing this, the hardest part is making sure that all the mounting frames are fitted dead square and inline.