Nickfromwales
-
Posts
30995 -
Joined
-
Last visited
-
Days Won
329
Everything posted by Nickfromwales
-
It can give you quite a headache, this plumbing lark...... Excellent real life figures there. Theres also still the Heat battery ( like a Sunamp ) to consider. No boiler, no ASHP, and almost zero maintenance / moving parts etc but also with near zero latent losses too. Im currently specifying one with 18kw/hr of Sunamp heat battery, and have steered away from the originally assumed ASHP altogether. PV will feature but with enough capacity to be recharged every evening on E7 /E10, its a VERY slick installation with masses of DHW available that could easily be used without PV. Grid electricity will fortify any short fall / provide boost for higher occupancy ( guests ). I'm awaiting @AndyT to update on things 'up and coming' before going into more depth on that setup.
-
Well, with reduced ventilation and fabric heat loss you may well be able to use the slab as a storage heater, topping up during the night from a buffer heated by pv and fortified by the ASHP. Sizing the system will be down to the amount of heat energy required to offset the losses of the dwelling and start from there. Your not naive as both would work well, and tbh you'll need a buffer tank with either option, regardless of the fact your having PV. If fitting the larger buffer ( as your not fully 'passive' ) id certainly look at DHW preheat from the buffer too, killing two birds with one stone then.
-
Quite often the cost of an installed package which is eligible for RHI is very expensive. There appears to be a high premium applied for the luxury of not fitting this on a DIY basis, but the payments appear to muddle peoples judgement when costing this. For ASHP to be economically viable on PV, you ideally need to be charging a large buffer vessel so when you need to inject some top-up heat into the slab, say around midnight maybe, there is some heat in the buffer ( so the buffer is basically a heat battery ) as at midnight you won't get much sunlight That is a generalised statement though and based on a typical, reasonably well sealed and airtight aka not draughty dwelling. Each instance is nigh-on unique, so no one-stop solution / easy answer I'm afraid. What is the standard of your build ? MVHR?
-
 What uvc do you have ? Make / brand / material ?
 -
Also, and most importantly, there's taking pressure readings and checking the PRedV is operating as it should, and cleaning the stainless gauze filter. Then there's the drain down, isolation of the expansion vessel, and taking / checking the precharge pressure in the vessel. Failure to do this religiously is the number one cause of all terminal ( catastrophic) failures ive attended. Last one was a £1m house with the UVC upstairs. Downstairs got quite wet. ? Shouldn't your qualified G3 installer be doing all of this as part of your annual service and inspection? You won't get a warranty repair without it, and it may also affect your buildings insurance if it's ever leaked catastrophically. Also there's another PRV on the multi block, for 5-6bar cold mains relief in case the PRedV ever fails and allows full mains potential through. A bit more than checking for drips there I'm afraid.
-
Crossed with @ragg987 and agree. Id still stick with gas and a non MCS pv install though.
-
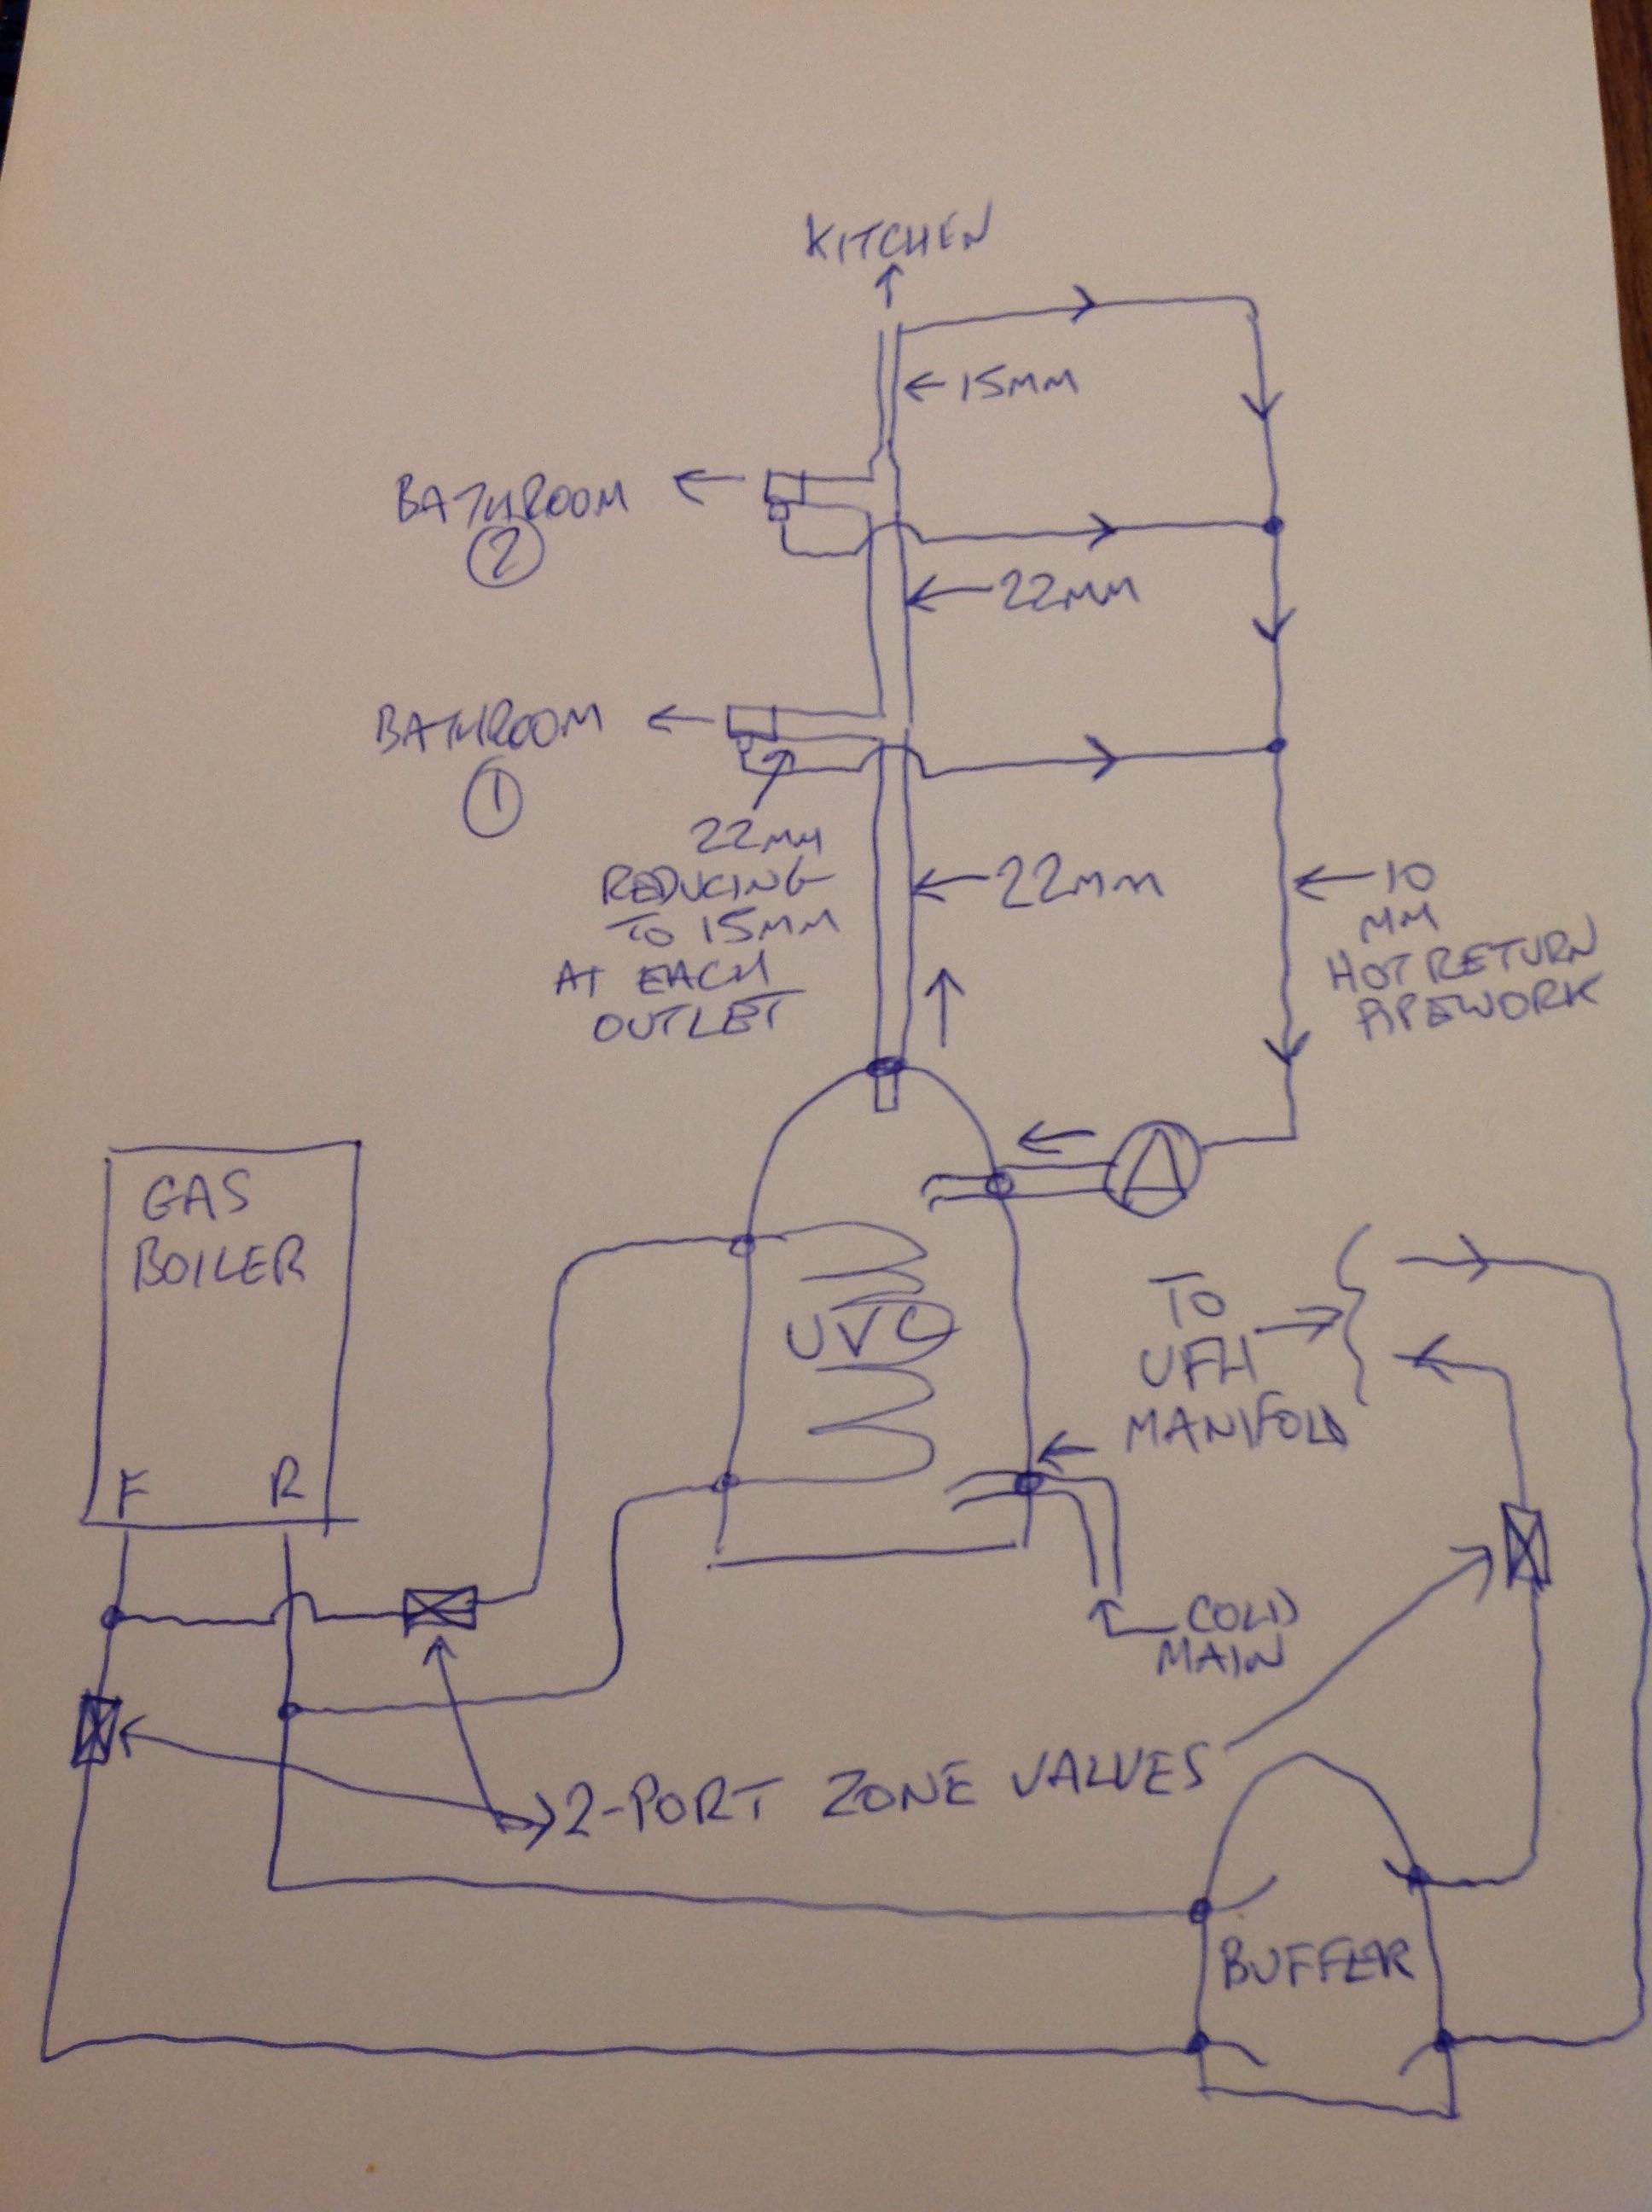
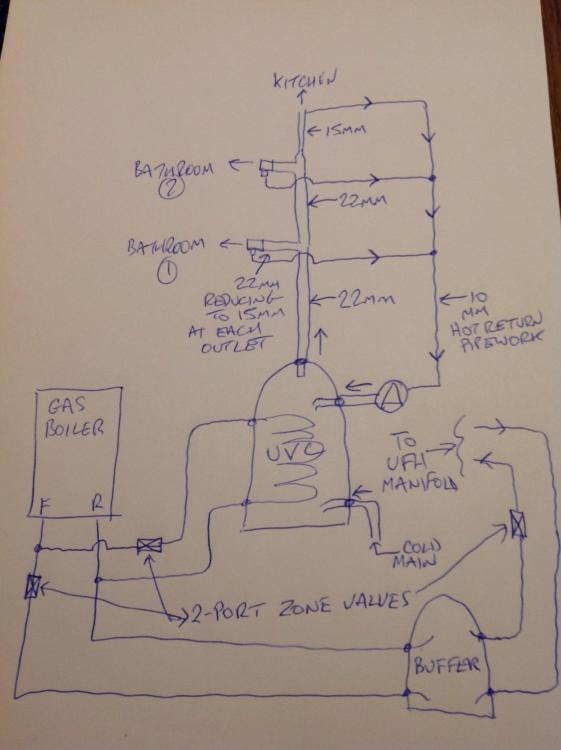
@Visti Just as a reality check, that having a flue penetration in the wall of the house is of very little consequence. You can still make it airtight and you can fill the sleeve ( duct ) with intumescent expanding foam for a bit of insulation. Yes it'll be a slight cold bridge, but the latent loss off the boiler will offset that by a huge factor. ASHP or gas boiler ? GAS BOILER! Smaller tanks, less installation complexity, no antifreeze, common and simpler controls ( so setting up and operating it is childs play ) and still a reasonable unit running cost per kWh. What boiler do you have now? Do you need to replace / upsize ? The 'beauty' of the manifold setup only comes into play if it's centrally mounted and sees short-ish runs from the manifold to the hot outlets. ( the cold is not an issue ). If the plant room is off side and leaves you long runs to two or more outlets then it may be a candidate for a standard series plumbed configuration, and the introduction of a hot return circuit and pump. I agree, if you have mixer taps then the secondary TMV is a luxury item that can be dropped from the design, but as they're so bloody cheap I choose to install where possible as a comfort measure as much as for safety. If there are a house full of little ones who will grow up there, it's a no brainer. Fwiw, the image where you see two TMVs is one where a TS has been fitted, so comes factory supplied with a TMV to cap the output temp ( usually 50-55oC ) as a measure for anti scald and to mitigate any excess energy wastage. A TS will typically store water ( primary heating grade water ) at a much higher temperature conmpared to an UVC so these are two different beasts with two entirely different uses and installation requirements. An UVC is full of drinking quality potable water, stored ready to be drawn off at the tap, and a TS is full of non potable ( primary heating grade ) water which has an instantaneous DHW coil sat in the water which instantly converts incoming cold water to hot DHW, so basically a giant combi that uses heated water instead of gas as the energy medium. An UVC does not require the primary TMV, in fact it requires no TMV at all. If you decide on the hot return and series plumbing you definitely want the UVC, sized between 250L - 300L ( 300L better if you ever decide on solar pv ( NOT solar thermal )) and to order the UVC with a hot return tapping to accept the pumped DHW return. As I know you'll be wondering what the hot return is all about : Lol. Another way of doing things
-
Aka liners / inserts Example
-
24V gate - what size cables for 25m in duct run?
Nickfromwales replied to readiescards's topic in Electrics - Other
Why do you need to dig it up ? Isn't it cheaper and easier to pull a HO5 or HO7 cable through and leave it submerged? Just a 2.5mm2 3.core flex then with an cat6 for comms / accessory switching. -
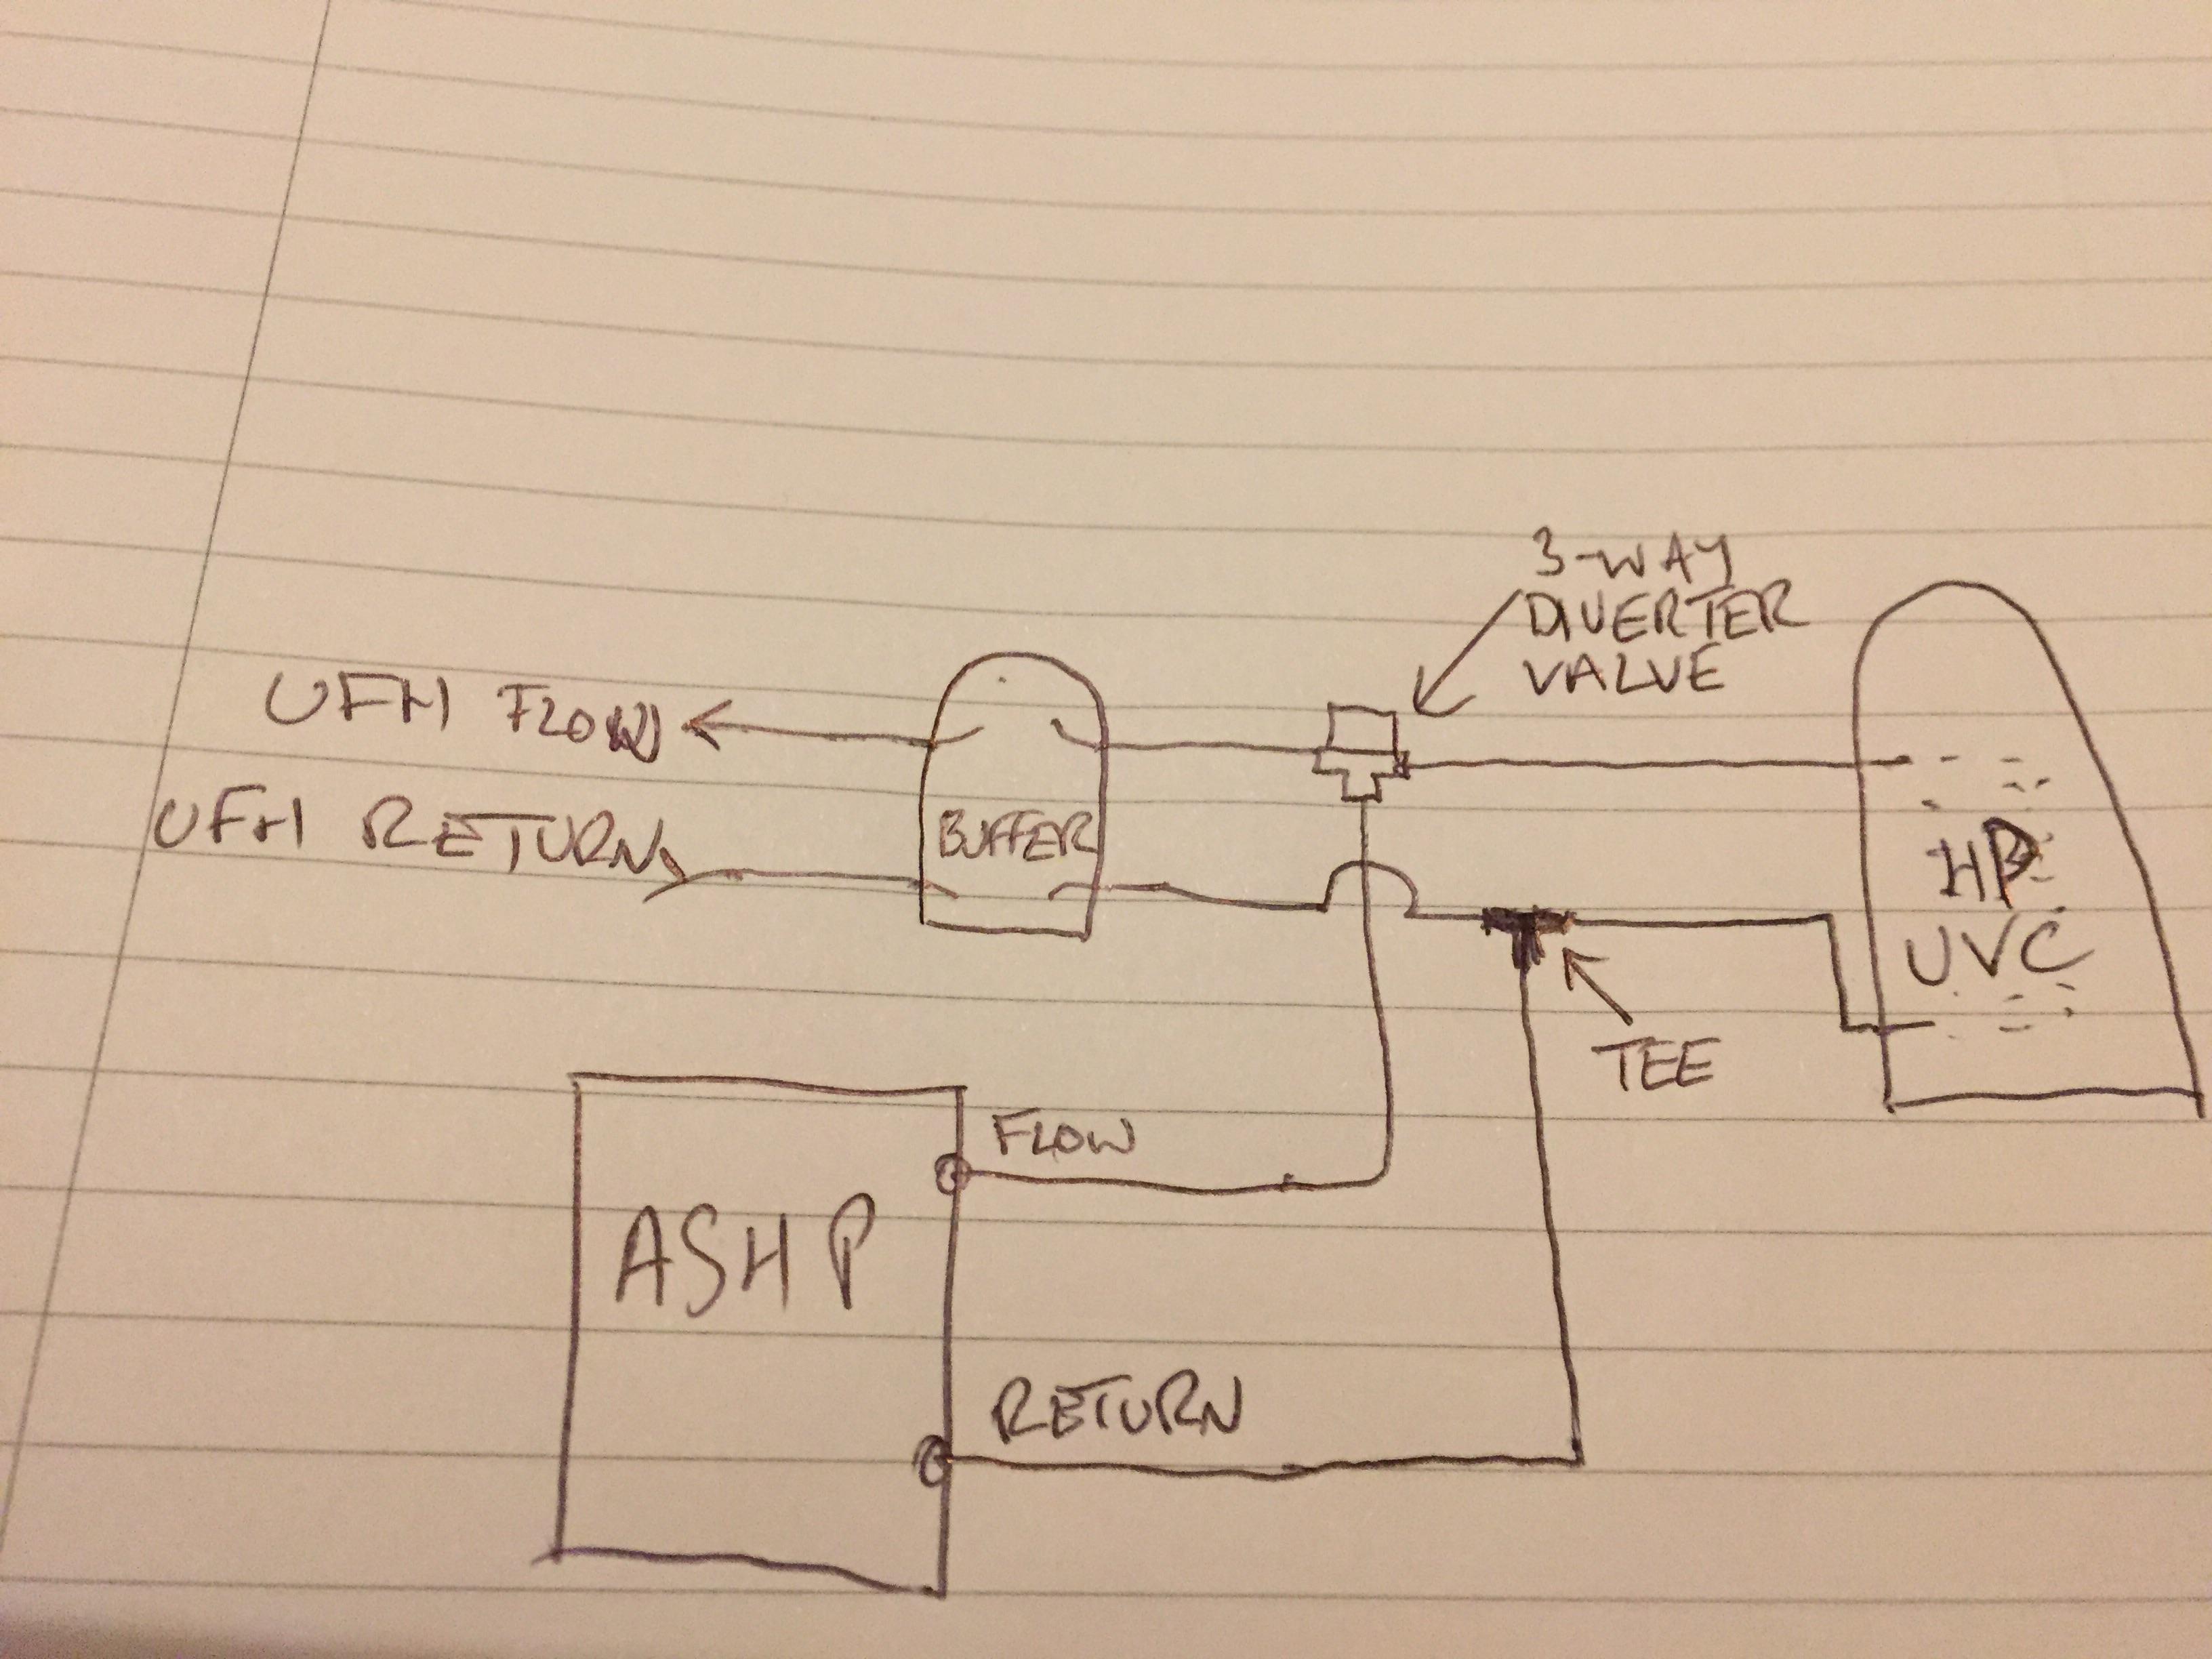
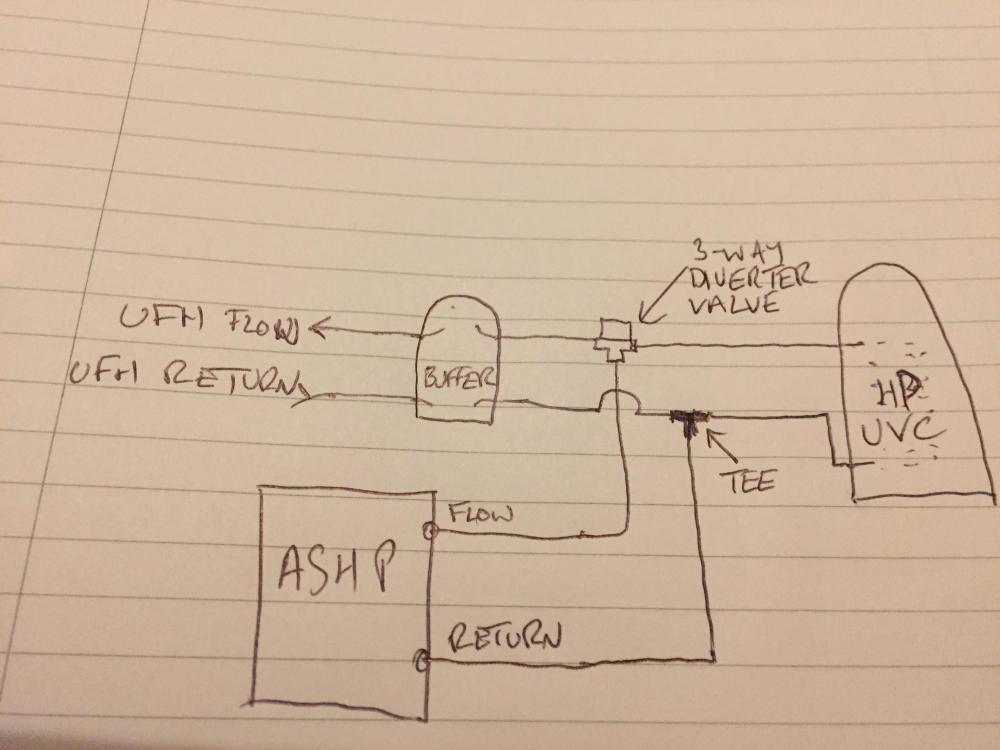
@Visti Rough as toast sketch. You can omit the buffer but its its better to have it in to help regulate the delivery from the HP and mitigate against short cycling when the house is up to temp.
-
The body drier will be a bigger fire bridge.
-
Bingo. But available from the CT1 family too. http://www.wilsonspaints.co.uk/product/c-tec-ct1-fsb-fire-seal-n-bond/
-
CT1 would bridge and maintain the vcl.
-
Should I make building control and for what application?
Nickfromwales replied to legepe's topic in Building Regulations
Not a good idea to have pipes ( central heating ) and cables in the same void unless the pipes are well insulated. The heat transferred to any cables would reduce their current carrying capacity and the circuit would need derating accordingly. Running the pipes around to minimise wall clutter / chasing is a good idea, but the cables I'd keep up the walls if it were me. -
Passivhaus training course
Nickfromwales replied to graeme m's topic in General Self Build & DIY Discussion
Here's one or it's a trip to Germany ?? -
Passivhaus training course
Nickfromwales replied to graeme m's topic in General Self Build & DIY Discussion
Are there any examples of available courses ? -
Hi and welcome. Theres plenty of merit for getting your ducks in a row . Better to ask now than when things are being held up by it.
-
i have a feeling you may be right Just thought with an all ipad / all iphone house it would be easier to chop stuff between devices when on the go with the ipad and at home with the mac. Should it really be this difficult? Thats a neat solution, but the closest i can see with a quick search is Lucidchart.com. Any others with a similar library? Decision time......
-
Lets see if its available for Mac
-
This is something I'm currently on a vertical learning curve with. I don't know how people can work with computers all day Is Powerpoint one of the favourites? Just looking at Edraw at the mo. I'm not making this any more complicated than it needs to be
-
That makes sense now, thanks. If one gauge is fitted at the lower station, and another at the upper station, then the system was commissioned at say 2 bar, it would then clearly show the differential in pressure between the two heights. Handy for then setting the pre charge values accordingly.
-
None at all, and tbh it'll have lower resistance than 25mm so you would ( marginally ) benefit from going bigger. Marginally. .
-
Pressure gauge not pressure switch ? Also, if there's a EV at the lower location and the local pressure is circa 1bar higher than at the house, remember to set the back ( pre ) charge pressure in the upper vessels accordingly. More pre-change pressure for the lower and slightly less pre charge pressure for the upper EV's. Jeremy, I remember the Zimlet 300l horizontal I fitted a while back had a 1/2" tapping at each end, which I simply blanked off. Iirc those trappings were somehow connected to the stored water, rather than the pre charge chamber. Is that how you found yours to be?
-
Design of drainage in to be built over mains manhole
Nickfromwales replied to Jml's topic in Waste & Sewerage
Bingo. -
@Tin Soldier Sizes and dimensions Prices