


Temp
-
Posts
10690 -
Joined
-
Last visited
-
Days Won
43
Everything posted by Temp
-
If its your hedge you can be required to cut it down if its causing a nuisance. They are a lot easier to maintain if only 6ft anyway.
-
There are no hard rules on who owns what fence or hedge. Sometimes it's mentioned in the title deeds. I believe it is one of the questions solicitors ask sellers these days.. who maintains or own which fence.. but many reply they don't know who owns which fence. Check with your solicitor. As others have said, it's probably too late to cut it this year. I normaly cut our hedge in early January when the leaves have gone so there is less to clear up and no animals hiding.
-
Why are the bricks white on some parts?
Temp replied to Lal's topic in Bricklaying, Blockwork & Mortar
Some bricks are remarkably porus. I once filled a round bucket with some of our bricks. I then filled up all the spaces with water from a hose. They fizzed and popped and soaked up all the water leaving just an inch or so in the bottom. -
Why are the bricks white on some parts?
Temp replied to Lal's topic in Bricklaying, Blockwork & Mortar
Yes, below DPC they soak up water from the ground. Not all bricks suffer from it. Its actually possible to buy bricks with a low rating for Efflorescence. Just like you can get them with different levels of frost resistance. Just for info, this is our worst patch. Its where water runs down some steps. Me not clearing leaf debris probably doesn't help.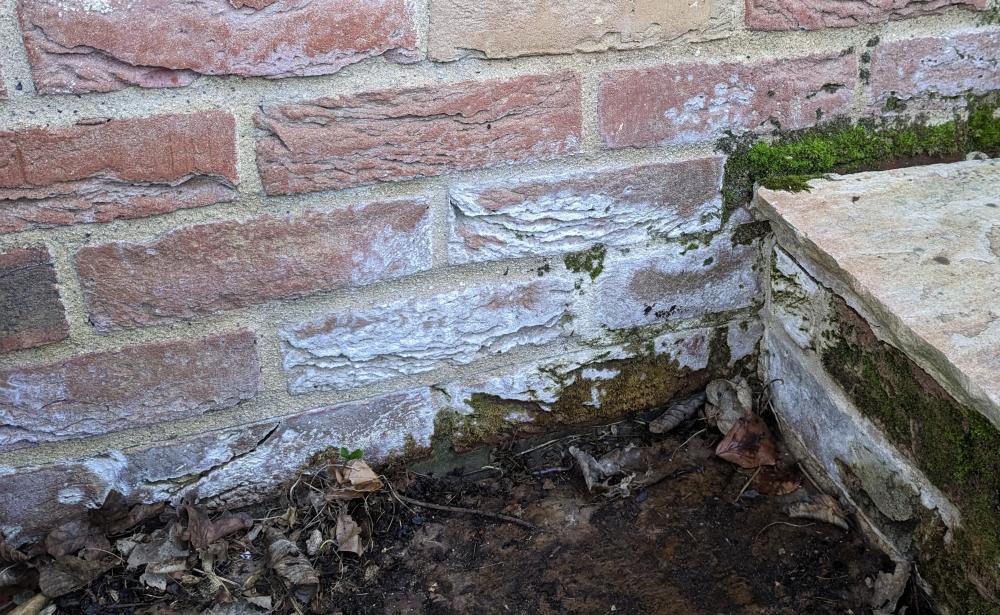
-
They usually want the meter box where it can be accesed without the owner present. Sometimes they will allow it around the side if there is no side gate to block access.
-
I think only the DPC in the inner leaf needs to tie into the DPM. Sometimes it's sufficient to just lap the DPM up the wall above the DPC on the inner leaf. You may need to insert weep holes in the outer leaf as well.
-
Welcome to the forum. Inserting a physical DPC.. If you hire someone to do the job I believe they should only charge you 5% VAT which you reclaim on VAT431C at the end. Make sure they know the VAT rate should get 5% before you accept their quote. Best get the quote to say Inc VAT at 5%. If they question this refer them to VAT708. Come back for more advice.
-
They work by passing both live and neutrals through a transformer of sorts. They way its wound means the field created by each winding should cancel out the other when they are the same. When they are different they don't cancel and the field produced trips the breaker. I think sending the current the wrong way on one would make it trip all the time because the field would add rather than subtract from each other.
-
Got a picture?
-
Why are the bricks white on some parts?
Temp replied to Lal's topic in Bricklaying, Blockwork & Mortar
Efflorescence. Usually harmless. Salt coming out of the bricks or mortal. Can sometimes indicate that area is wetter than others for some reason - eg the gutter overflow others mentioned. Might just be recent heavy wind blowing rain into that corner. We have it on our house in a few areas below the damp proof course. Generally it's best left alone. It should eventually stop but can take many years to dissapear. Some people advise to use or not use a pressure washer - they can push more water into the brick and make it reappear worse. Others suggest various products to put on it. A stiff brush can be used but beware of marking up the bricks. A broom might be OK but not a really aggressive wire brush. I would leave it alone unless it really bothers you. -
https://www.telegraph.co.uk/news/2023/03/31/homes-poor-energy-ratings-faulty-modelling-ucl/
-
When I was looking at tile levelling systems a few months ago I found this vid on exactly this problem with bowed tiles. He shows how the levelling system bends them flat.
-
When you sit on it the forces push the bottom of the frame down and backwards. The top of the frame gets pulled away from the wall. So i braced the bottom 2x4 against the wall with some timber running front to back. Just screwed the frame down into the 2x4 with coach screws I think. We had a bit more space in the cavity than you. At the top we have timber fixed to the block wall with quite a few fasteners. Then "bolts" made from studding act as stand offs for the frame. These bolts were put through recessed holes in the timber before it was fixed to the wall. Then we used nuts to set the distance from the wall to back of frame and more to secure the frame. So 4 nuts on each "bolt" if that makes sense. Either side of the frame we have vertical 2x4 With screws through the frame into that. This 2x4 had to be notched to clear our 110 pipe which runs left right.
-
Not bad results with either the special stuff or regular plaster..
-
- 1
-

-
Has he specified a material? Or diameter? If they need to be stainless steel perhaps.. https://www.screwfix.com/p/ultra-screw-pz-double-countersunk-multipurpose-screws-5-x-100mm-100-pack/26281 But you might need to pilot drill holes as stainless steel is easy to shear the heads off.
-
You thought yours was bad.. https://www.solarpowerportal.co.uk/news/amp/connection_dates_branded_unacceptable_as_octopus_offered_2036_date_for_sola
-
Difficult planning application for loft conversion
Temp replied to Ernie's topic in Planning Permission
Welcome to the forum. Have you got a drawing of what it will look like when all done. Would the dormer needing PP overlook neighbours? Has anyone done similar in your area? Many of us have our own horror stories regarding planning permission. I'm tempted to say keep calm and carry on. Wait until you get a decision. If its declined then perhaps have a rethink. -
I think OB1 Adhesive is probably OK. It claims to be solvent free. There are several versions of 785. I think 785+ is an acetoxy type, 785n is Neutral. Pretty sure lots of people have used both on trays.. For some reason I can't post a link but there are people on the diynot.com form that say... Some people say the neutral n version sticks better.
-
Congratulations! A year to find a plot and another to get planning permission for what you want. He might be walking before you can start building 🙂
-
Leave the gaps. I think any filler will look bad and probably crack out due to flexing.
-
Can the BCO require a job to be done by a given date?
Temp replied to ToughButterCup's topic in Building Regulations
Just fix something inside across the door to prevent someone opening it and falling out. Bit of 4x2 wrapped in warning tape? Tell him the balcony is on back order. -
Either.. Dig out and paint the inside with a liquid tanking medium as used for basements right to the bottom. Then eventually the wall should dry out enough to allow paint to survive. Or.. Build another wall around it with a cavity between. Bottom course in engineering bricks with empty perps for drainage and a DPC on top. Put paving slabs or similar on top of the wall to cover the cavity?
-
Perhaps try a good old fashioned plunger first. Run the shower to get the pipe full then plunge away. Use the plunger to push down and suck back the water. Surprising how much gunk can be sucked back into the tray with a plunger. The tricky bit us getting a good seal between plunger and tray. Sometimes a ring of dishcloth can help.
-
Leaking boiler left to deal with it myself
Temp replied to Niall Patrick's topic in Boilers & Hot Water Tanks
Some of these agents really suck. We rented a house while building our own. When we moved in the agent told us the shower was going to be re-tiled. The man they sent made a total mess of it. I called the agent when he was half way through and told them if it was my house I'd throw him out the work was so bad. They told me to just let him carry on. The tiler didn't even know how to plan a tile layout. He ended up needing to cut a tapered 10mm wide strips of tiles the full height of the room. Near impossible to cut such narrow strips so he gave up and filled the missing strip with adhesive ! Felt sorry for the owner who was in the armed force. -
First floor UFH on Beam and Block - Insulation issue.
Temp replied to MMcGill's topic in Underfloor Heating
We have a beam and block first floor with UFH. In some rooms we went for 200mm wide 21mm thick Engineered Oak flooring with no screed. The UFH system we choose for this uses a foiled insulation with grooves for pipes. This was laid on a layer of PIR. Both the UFH and PIR was laid between "battens" that are the same depth to support the Engineered Oak floor. It works but our flow temperatures are probably higher than you are aiming for.


