
Leaderboard


Popular Content
Showing content with the highest reputation on 08/21/23 in all areas
-
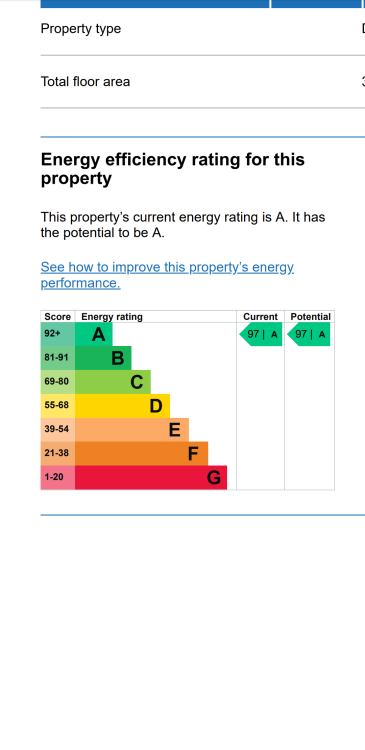
Even though I'm disappointed in the airtest result of 1.8 (the thermohouse roof panel system is NOT airtight, despite what they say!), I'm happy enough. First time seeing an EPC with no potential improvements! We hit the passive House heat requirement target but not the airtightness so certification not an option.
 3 points
 -
This comes up time and again and can be a bit of a disaster as moving rooflights after they are installed isn’t easy. It’s a bit like the other thread with the non-compliant fire door problem in an open plan space. The regs are very clear and this ought to have been picked up by someone at the design stage and certainly at the build stage but it often gets missed. Your solution to this needs to be the least intrusive and least costly fix to get you through sign off so figure out what that is and do it. This might come back to haunt you later when you come to sell of course. In all likelihood it won’t but an attentive structural survey person could check this (as it’s very commonly wrong) and raise it so keep that in mind with whatever solution you employ.2 points
-
I would advise caution doing the actual build. Your house is built on sloping ground but nobody knows yet how the foundations were built and how deep. To do your new lower ground floor extension, you need to dig down right adjacent to the back wall of the house about 10 feet. That slab of concrete needs to come up and someone needs to carefully did and see what foundations the house is on at the moment. This must be a real candidate for not knowing the costs of the ground works before you start. If the house is not on very deep foundations then you are into deepening the foundations and it is really like adding a basement to the existing house. Accepting the technical and possibly cost challenges, it sounds an interesting project.2 points
-
Well a couple of fruitful days and mostly finished, pottering to do with facia,s and eves etc and roof shingles, could not have done it without my Team, my mate and his wife who both worked very hard. Just need to talk to garage door people about what to buy but I think an ordinary up and over will be fine for what I want.
 2 points
 -
The DNO does make sure the grid is safe by insisting only ENA compliant kit is connected. Home owner is responsible for personal safety including that of the linesmen working on the grid where any hazard comes from the home owners premises, on their side of the service fuse/meter. See National Terms of Connection.1 point
-
Siemens, Bosch, Neff and Gaggenau are all part of BSH (Bosch and Siemens house appliances) Miele has a single brand I think. Zanussi is part of the Swedish brand Electrolux which also owns AEG. Our ovens are AEG, the hob is Neff and everything else Siemens. Modern appliances tend to be reliable no matter the brand.1 point
-
I work in the construction industry, on the design side, between all the disciplines that work together to put a building together, things are forgotten or overlooked, I really don't think this is an issue, it is a variation for you, OK maybe there should have been something included originally, but 2 people missed it, the AT and the BCO, I know BC will accept no liability as they are not "checking" drawings, but they still didn't flag the requirement at the time. So, as for a claim, it is a no from me.1 point
-
My understanding is that they are fine so long as not exposed to daylight and UV, hence the boxing as you imply.1 point
-
Dont over think...... Accept that as a DIYer with basic tools it'll not be perfect. Measure, measure and measure again. Be patient! Don't use Farrow an Ball Eggshell paint!! Seal the MDF....I forgot to. Don't use 6mm stripwood, too unstable, it warps and cups. Use 9mm mdf for the panel and 6mm for the rails ect to make 22mm'ish thick doors. Ideally have the rails ect machined if you don't have the capacity. Get an accurate level!1 point
-
Not a bother with it. Cant hear a thing during heavy rain.1 point
-
From the point of view of getting a design, i sent a floor plan and SAP report. Then listed the pipe centres, flow temp etc that i thought i want.1 point
-
That is the key point. Maybe MCS needs to offer this a service, after assessing their own installation practices thoroughly.1 point
-
The garden drop is a real advantage for you to create a whole new lower ground space. 10ft drop means you can get drainage in without sump pumps etc.1 point
-
Our rebuild has very similar issues. However we specifically wanted to keep the bungalow as single storey living. So we are extending out at ground floor level and rather than in- filling we are constructing a store/plant room below, accessible only from outside (to avoid losing floor space to stairs).1 point
-
Morning squire, the tanking stuff leaves a good tacky surface, very like PVA bonding. Tile adhesive grabs hold well so no reason plaster won’t.1 point
-
`Could you use the lower level and the existing ground floor level to do a Two story extension? Lower level could provide the granny annex, with the upper level providing an extension to your existing ground floor.1 point
-
You've various options. Split level, building up. digging down to match the lower level and getting another story in. For accessibility you'd probably want to match the floor levels, so building up. You'd be best getting an architect/designer round for a professional opinion. They can also advise on best options for planning. Any photos?1 point
-
Most door liners are at least 22mm thick. For example Wickes are 27.5mm. I think you need to find 22mm liners then allow at least 5mm for packing to make the opening square and 2mm clearance around the door. So at least (22+5+2)*2= 58mm for the lining and clearances. So the door would need to be cut to 882-58=824mm wide. Your doors are 838mm wide so you would need to be able to trim about 838-824=14mm total or 7mm off both edges of the door. The amount you are allowed to cut off varies from make to mak and depends on the construction of the door. Some say only 5mm, others 12mm or more. I think I would check how much you are allowed to cut off the door each side. If it's enough make up a temporary liner from some 22mm timber and brace it up well so it's definitly square. Then try fitting it in all the openings. See how hard or easy it is before buying all the liners. It's 3:30 am so check my figures!1 point
-
I tried 2, they were not expensive. The first is not really satisfactory. Wrong placement of the manifold and weird gaps in the pipe layouts. Other details in the design have led me to abandon it. The second is still in revision. initial attempt was good but i missed giving some detail. I only tried using Fiverr becuase i cannot figure out creating a virtual machine on my PC to have a second trial period of Loopcad myself.1 point
-
The house had an old (bc approved) loft conversion that was rebuilt to better standards. Sprinklers are a consideration but also expensive and distruptive I paid for a full plans application, Building Control made a mistake when approving it. I was not aware of those fire regs myself unfortunately and we proceeded to build to the approved drawings There was no conditional approval it was full approval and BC admitted they made a mistake. But they generally don't have much liability for their oversights. A door can be fitted but it would be a bit of a hodge podge and be too close to our kitchen island, the house was renovated for someone with special needs so open plan was needed. So my evaluation of the situation is that plan drawer made a mistake with drawings that didn't meet regulations, then BC made a mistake by approving this drawing. Can't blame anyone on the construction end of things because we just built to the approved drawings.1 point
-
So to recap: we bought an old house with a bit of land at the back. We tried to get permission to knock it down and do a new build passiv house in the backland. The council said no no no, we lost an appeal, then put in ridiculous plans for a massive extension with basement on the existing old house, plus a large stable block on the back land where we wanted the new build. Council said yes yes yes, thats fine, please go ahead.... Having never built anything major before, we hired a 9 ton digger and a small tipper truck and set about digging a hole. The basement would start over 4m back from the existing rear wall of the old house and as long as we graded the excavation where possible and used plenty of sheet pilings, it would work out fine. To get rid of the clay soil, we just spread it out on the land at the back saving quite a bit on grab lorries. We originally planned for a four week hire of the plant, but we ended up taking about six weeks. Prior to digging I made a few test trenches to check the soil and water level. We also found an in depth soil survey from a major development next door. Once we had the hole dug in the right place, and sorted some temporary drainage, we set about levelling and pouring the basement slab. This was designed to be 300mm concrete on top of a tanking membrane, with tons of rebar. We just followed the drawings and building control came a few times to check it all. The waterproofing was overseen at each stage so we could get the warranty as well. We poured the slab in winter of 2022 and had a few cancellations due to frost. In the end we made an insulated temporary roof over the basement and used gas heaters the night before the pour just to be safe. The concrete went in very well, i think it was two loads of waterproof concrete, then we could start on the nudura walls. The hardest part of this section was wiring all the rebar together and getting the 20mm OD L bars in place which connected the slab to the nudura walls. These were doubled up all around the perimeter every 8" and a pig to get in amongst all the rebar mesh. Assembling the nudura walls was very straight forward, once i got my head around the idea of a common seam - where due to the plan measurements, the nudura blocks needed cutting and joining together. We had done the nudura course and the rep was very helpful with all my questions. Once built up, building control came out again and we ordered another three loads of water proof concrete for the walls. Where the walls joined the slab, we used an expanding waterbar and kept it dry until we poured the walls. We hired a concrete pump for the pour and because it was a basement we just used the nudura walkways and scaffolding to allow the pump hose to get round the whole perimeter. I was concerned about blow outs- especially on the first load dropping down into the bottom of the wall so I over did the shuttering on the outside of the nudura - including 220mm x 50mm floor joists screwed all around the perimeter outer edge, plus lots of OSB shuttering at all the weak points. It all worked well and it was a major relief to get the walls filled up.1 point
-
I bolted my manifold to a length of 4x2, screwed either end to a stud. Simply unscrewed it when it came to boarding time. It just hung forward and board went in behind. The screwed manifold directly to the wall.1 point
-
@iMCaan you are welcome - i'm just pleased my blog entries are stil proving to be useful. 👍1 point
-
Make your back board (MDF, Ply, OSB etc) a little larger so in the example above it goes all the way left to the corner of the room, a bit further right behind the feed pipes and all the way down to the floor. then it is simple to plasterboard and skim around it. Set the back board flush to the wall so you are plastering up to it, NOT behind it.1 point
-
For distribution ?1 point
-
Hi @jsjsjs Welcome to the forum. If it turns out to out helpful perhaps consider donating, we have some key fobs to give away to donors at the moment. https://forum.buildhub.org.uk/topic/33304-free-build-hub-key-fob-for-donors/#comment-490153 In our experience dealing with people from the planners to trades is the hard part. We originally planned to have our Architect manage our project but our builder was pretty good and the Architect hardly ever came to the site so I felt we wasted some money on him. Some people use an Architect to manage their builder, some manage the builder themselves and others hire trades themselves. The former is the most expensive but least risk, the latter can be the cheapest but higher risk and a lot of work. There are good, bad and positively ugly builders out there. There are other ways to go.. An option is to hire a Project Manager who might be a retired builder or other profession. With a project manager you pay them a fixed fee and they should be helping you minimise overall costs. They would probably be on site much more than an Architect. Hiring individual trades with help from a project manager might be an option. Another option is to use a builder but hire a Quantity Surveyor to control payments to the Builder. The QS would visit and assess how much work has been done to date and give you the OK to pay the builder that stage payment. If you decide to make changes the QS can help assess if the builder is charging the right amount - especially if its the builder proposing the changes. Have you tried to find a builder yourself? While looking for plots we did a lot of driving around and any time I saw a nice house being built I asked if the boss was on site. I explained I might be looking for a builder and asked to look around. You can get a good idea what sort of quality they are capable of. Look for odd gaps, neat or untidy plumbing etc. Ask questions and see how they answer you. If they answered with "Oh don't worry about that" I didn't bother to keep their business cards. If they carefully explained their approach to that issue I was more likely to keep it. We found our builder that way. He was working on a fabulous barn conversion. We gave his details to the Architect and he was included in the bidding process and he turned in the lowest offer of three we had. Two other bidders took me to see houses they had built for other people, sure they were nice but I couldn't be sure they wernt taking me to see one they built for their mother 🙂 Are you living in the house? If the house has been unoccupied for more than two years and is still unoccupied you should be able to get renovation work at the reduced VAT rate of 5% instead of 20%. The rules allow you to move in after work starts but not before.1 point
-
You really wouldn’t like to see the one I was working on today. Biggest pile of shite I have ever seen. 2 identical frames each with a ‘leg’ 75 mm higher than the other leg on the same opening. Both angles are different and the roof timbers no where near the same angle as the apex frame. I’m only doing the brickwork and it’s for a friend of a friend but I really had to point it out to the client. If it was mine I’d have it all taken down in a flash. Oh I almost forgot the line of the vertical section is inside the brickwork opening so I had to cut every brick up to the steel to keep the brickwork opening plumb.
 0 points
 -
Build the step. Remove it once BC have signed off, if it annoys you. A colleague of mine had to do that on all his first floor windows as there were all slightly too high. The contradiction of the planning condition will only matter of it is raised to planning. If you think the affected neighbour would notice and care, then take that in to consideration.0 points
-
We also managed an A, but was suggested I install a wind turbine at an estimate cost of £15 to 25k to give an A104. No! Loads more solar would be better.0 points
-
Congrats, I briefly contemplated getting my SAP A EPC printed out mega big and stuck to the side of the house like a new fridge.0 points


This leaderboard is set to London/GMT+01:00