Leaderboard
Popular Content
Showing content with the highest reputation on 11/02/24 in all areas
-
Get some wooden pegs. peg out house location, peg out patios and driveway. peg out heights of all these finished areas, dig out the top soil and use all that concrete as a sub base below the drive way. the topsoil you skim off where the drive is going you can put where the concrete came from to turn back into garden. it’s all about planning. tree waste just burn it. or you will need a roll off skip, nobody will chip it if you moved it with a digger as it will now be dirty, if you stacked it neat and tidy then hire a chipper and chuck it through, only good for clean branches though not grass or shrub mess. my sites 20 times bigger than yours and I haven’t had to remove anything from site apart from two loads of muck that came out when we did the treatment plant as it was horrid clay stuff, and a load of concrete that was over 450mm thick that just didn’t fit in any holes.2 points
-
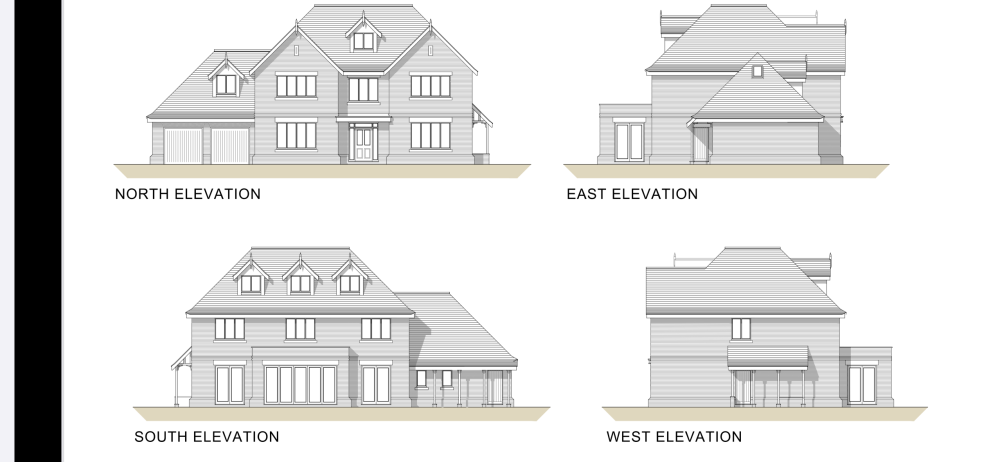
Hi All, just came across this very helpful forum and wanted to stop by and say hi. A little about my journey so far: I purchased a bungalow in Berkshire with a reasonable plot in 2022, got planning a year later for a replacement dwelling - 4000sq ft over 3 floors, started the building works only a couple months ago. So far the bungalow has been demolished, trenches dug and filled and all the utilities have been run to desired locations. Currently we are completing the install of beam and block which is nearing completion. I’ve got a main contractor who is building the shell but I’ll be looking to pull in on your expertise on this platform to source everything else I need, from roofing, solar panels to bathrooms and decorators etc etc. And of course share my journey and document all the highs and lows that I’ll most likely experience. Elevations attached for your enjoyment 😀 Thanks, Gurpaul.2 points
-
On Monday the second gable is poured and most of the internal bracing, corner bracing and window shuttering is removed. Tuesday rains all day so no work on site. The internal floor is under 1 inch of water with no way to escape, without us brushing it towards soil pipe. Good to know we are airtight at the floor/wall joint. The steels are installed, we were supposed to have wooden roof beams but somehow this was not calculated by the architect who insisted the roof truss company would do the calculations later. The roof truss companys only want to do the calculations when they know you are ready to order and they said the beam spans could not be done. So on the last minute we had to go back to the SE who worked out our steel beams and the total cost of roof went up £8k. I wish the architect had suggested the SE looks at the roof calculations earlier but unfortunately we just have to move on from this, and up to this point we have had no other extra costs. Since we are no longer working with the architect I have had to find a new SAP assessor who I can engage with as the build progresses. We have been discussing how changing the steel beam might change things as the vaulted ceiling can now be higher if we want. This gives us more space to heat up. I also wanted to know the effect of not putting as much solar on the roof or not having the wood burner changes the SAP results. Since having a smart meter fitted at home we have reviewed our current electric usage and decided that less solar (7.5 kwp instead of 11 kwp) but with the ability to add a battery. Also I think aesthetically one row of 15 panels will look better. Total Man days of labour week 7 is 16 days. Total to date b/f £44925 New Design Stage SAP Calculations (previously done by architect) with ongoing advice about changes that will affect the SAP and to include the As Built SAP documents and EPC at completion £720. It does seem a lot compared to online prices but for peace of mind knowing that we can if we choose to only put 6kwp of PV on the roof instead of 11kwp, is an overall saving. Total to date £456451 point
-
Because im an idiot, i miscaluclated where the door would land, mainly because i changed my door solution post slab laying, but if we ignore that aspect, i put 2 inch EPS on the upstand where the door was, then cut it back at an angle so the block paving could run up to the concrete. So yes, something of a thermal bridge there. Could have put a thin sheet of something in the gap to actually break the bridge though.. Like a thinner GRP box section. Perfect, no, but light years ahead of any other garage i have had.1 point
-
Have a look at Drax for the trees...neighbour nearby chipped a load and made a few grand selling it to Drax through an intermediary. I had no idea they did that but it makes sense when they're spending a fortune shipping wood pellets in to burn as 'green' energy!1 point
-
Definitely use the concrete at the front of the property, you will be amazed how quickly it will turn into a mud pit once you get started, you will need a lot of materials to be delivered and will need an area for lorry's to access the site without the risk of getting stuck . As you have plenty I would create a roadway for them back down with a large hard standing area to unload onto close ot the house .1 point
-
1 point
-
Contact a grab loader company that also supplies crushed concrete and get them to collect it providing it is not contaminated with soil or wood you'll get it moved for a cheap price. They took mine away for £120 a load and will supply me with clean crushed at £160 a load. So you can't warrant hiring a crusher that you need to feed. Wood / timber put it on Facebook foc, and someone will collect the wood providing its suitable to be processed into logs. Whatever is left put a match too it when the wind is in the right direction.1 point
-
If you're planning a shower, then just choose 50mm diameter pipe. And make sure that the maximum flow capacity of the shower trap is more than the flow from the shower head(s).1 point
-
If your not looking to replace the roof It’s normally quite easy and cheap to do a fibreglass repair around the skylight May not look pretty but will cure most leaks The trick is to make sure the area is dry Not easy at the moment May have to temporary sheet over for a couple of weeks1 point
-
If it will absolutely be only hardcore friendly materials then shop round for those who acknowledge it, and price accordingly.1 point
-
It seemed to be the easiest way to achieve want I wanted achieve, no thermal bridge between the slab and the outside world. I had thought about that, that’s how the house was built, but I couldn’t work out how to do that without the thermal bridge?1 point
-
This seems fair. We're extending and fully refurbishing our 200m2 detached house and hoping to get it done for ~£300-320k1 point
-
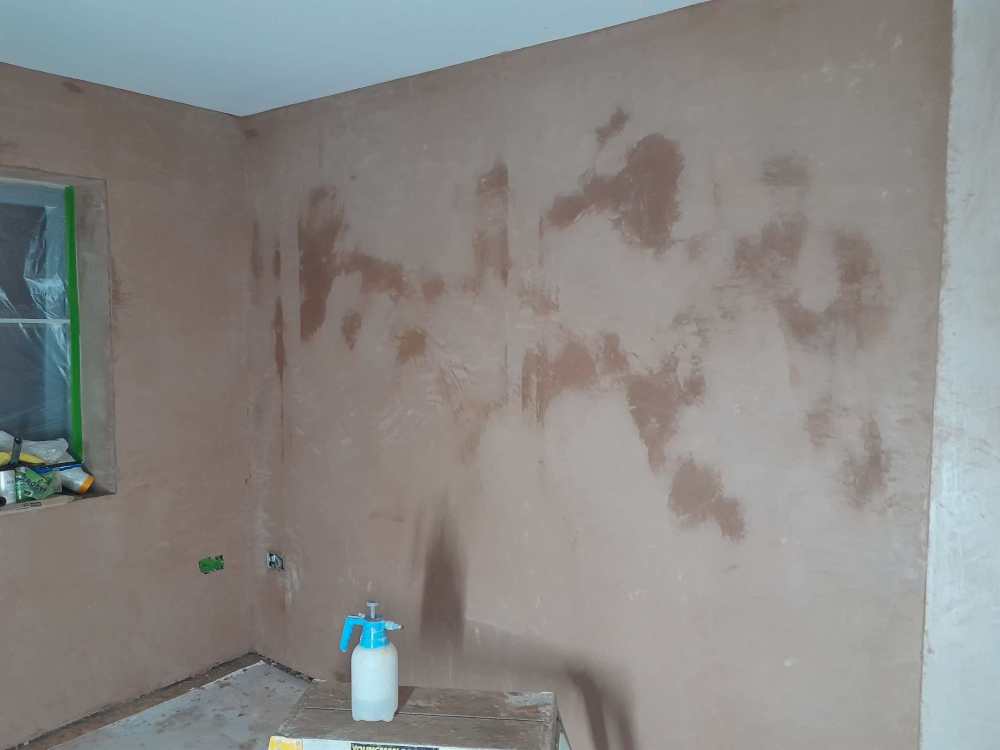
So yesterday I had a busy day dot and dabbing and thanks to the guy on On the Trowel Youtube channe, I skimmed my first ever walls as I need to get this room finished in the next week or so to give my younger son a bedroom - it was supposed to be in September. The wall was straight, plumb and the plastering was not a halloween horror show - just a few minor imperfections. I'm most pleased about the clean top corner to the primed ceiling:1 point
-
Hello everyone, I stumbled across this amazing resource via google. I'm a now skint renovator of our family home. A lot of experiences with trades people have forced me to turn my hand to bit and pieces and I'm getting drawn into to doing more and more work around the house. This is not to bash trades people, they are (in the main) professionals and can understand what needs to be done and execute it much quicker than me*. However, we don't have the money and as a plodder, we reckon we can get there later (we've already been in the house 8 years - what's another couple of months make to anything?) Looking forward to meeting you all on the forums. Thanks, Anthony *I'd never touch electrical system though.1 point
-
Absolutely. A cardboard model. The a ply model. Then a bird house. Then a dog house. Then a pump house. Then a garage. Then the house.1 point
-
The nicest, possibly cheapest, crack monitor I have seen is on a wall near me. 2 6" plastic rulers glued one each side of the crack, one just above the other, allowing mm-perfect measurement.1 point
-
We have bought 2 Bette trays. Very good quality thick gauge steel. Not installed them yet but working on one atm.1 point
-
You can tape some foil to the wall (well sealed around the edge) and see which side the moisture appears. If it is the exposed room-facing side it is likely condensation, if it is on the wall-facing side it's coming from/through there.1 point
-
https://youtu.be/9zugv1NdMj4?si=aGuohpMXU_3a48j_0 points


