Leaderboard
Popular Content
Showing content with the highest reputation on 06/21/24 in all areas
-
I'll inform him he's the new owner of two shovels and I'll be taking the cost off his fee.3 points
-
Seems to me your installer has been negligent in not advising you of the correct process. They've also broken the national rules by connecting to the grid without consent. I'd be looking for them to fit a G98 inverter for you FOC. If they are members of any trade bodies you probably want to make a complaint. Once you've got a G98 inverter fitted, if the DNO decide to do reinforcement works to handle your 3.6kw export, then once those works are done you can reapply for G99 with a 3.6kw G100 export limit. Shouldn't be any reinforcement cost for you3 points
-
Given the constraints of your circumstance you must decide where to compromise. In opting for a rigid U value target for a given width you may have missed the wood for the trees a bit. Say you get your approx 150m2 of wall to a theoretical 0.12 instead of a realistic 0.18. that's a difference of 0.06w/m2K 150m2 x dt20⁰ x 0.06w/m2K. That's about 180w in the peak heating load over say a floor area of 120m² it's 1.5w/m². At another guesstimate that's about 200kWh/annum or £32 per year. Now account for the poorer airtighess performance, material wastage during building, additional cooling load due higher decrement delay. Poorer noise and fire performance. Be very careful about putting PIR In a stud wall.2 points
-
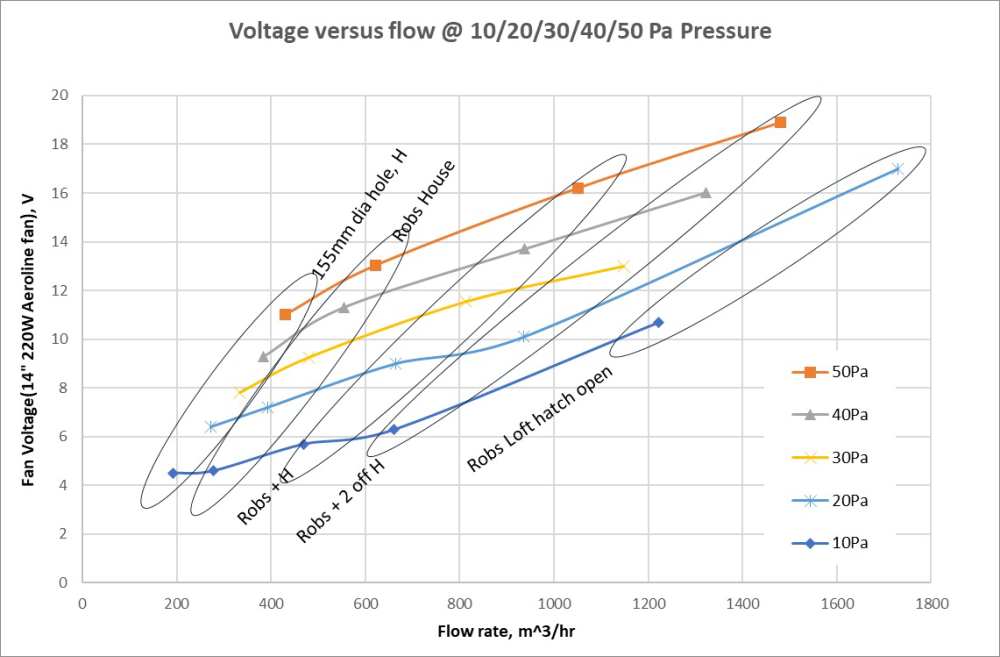
I’ve done this before, and have a set of recommended parts - links below to a suitable fan, power supply, and differential pressure sensor, total under £200. You can halve that cost by using a car battery charger and no measurement. https://www.ebay.co.uk/itm/171452099291?itmmeta=01HPJ04NFJ122390GS5BHYCSTA&hash=item27eb576adb:g:AlsAAOSwFLBabz6P&itmprp=enc%3AAQAIAAAA0MHDPIuVE6xMauIT%2B2m3GgQGT8tYsJluxspKLHSwqw2b%2F%2BOcaIly6fBGJylxh3zb5Jt%2BiqjJU5XVvqa3u%2FGMfqCwPjrLEMb5lBzMdLjDfJaGcBD9prP5gR7rYGam3WEHjv5VII7atBOJ1Unhve0fvtuur%2Bo265pYJwGbp2rnHX06VlE%2FewjhoSs4bRG1t%2BVUnBzbF13HZ%2FF3YP7vcD3wY6utJXhe6t2NLy10Vn%2Fn1EUdVjVhKb41RcAUTjvMW8GNMdSgeSgJzKTo1gIgBqDsLTo%3D|tkp%3ABk9SR-jXksC0Yw https://www.aliexpress.com/item/1005003681719599.html?gatewayAdapt=glo2esp select 15V 20A variant https://www.aliexpress.com/item/1005005320909441.html?spm=a2g0o.order_list.order_list_main.15.44d11802qTJLEi Using those parts, I got the flow versus voltage and pressure relationship below. Of course, it won’t be super accurate - but what do you expect for £200 of bits?2 points
-
I would be tempted to dig 4 holes (space width square and deep) get some threaded bar, chemical anchor, and postcrete. Fill holes with postcrete and level. Drill holes for flanges. Chemical anchor threaded bar in place. Tighten nuts - it's going nowhere in a hurry.2 points
-
There've been discussions on here doing this with a scrap electric radiator fan. Mount it to a frame, add a flexible surround (that you can tape to a window or a door), 12 V power supply (ideally variable), and a pressure guage, and you're set.2 points
-
Our Lindab metal guttering was dearer than the zinc quote. Neither was that dear. This was driven by energy prices apparently as zinc takes less energy to make. What the supplier told me anyway.2 points
-
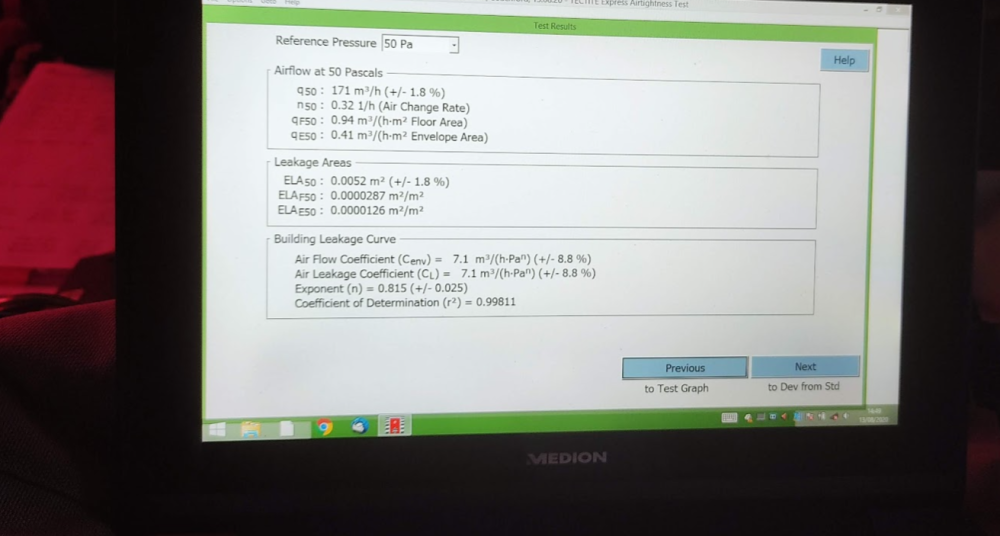
Just had a prelim air test completed, as I’m just finishing up, or so I thought first fix ready for plasterboard. Std brick and block build. And the result wasn’t great tbh so I wont publish it. Filled the house full of smoke, reversed the fan to try and ID the areas for attention… Windows, all taped up on perimeters, but the units themselves leak air in the corners, most if not all suffer from this, and my big gable window which comprises of 8 window units leaking along frame joints where attached to next frame - not happy at all with this. Restraint straps, air making its way down back of restraint strap between blocks and strap. Handful of small holes, and the odd crack in mortar that I’d missed. Big fist sized hole into the cavity I’d missed behind a steel into the cavity - Doh, poor attention to detail! And the mvhr unit, I taped off before the manifolds, maybe I needed to tape off at the building inlet and exhaust, as smoke billowed out the vents, are the units sealed up by design or are they quite leaky? To be fair the company I used (found them on the internet) were spot on, walked me around and helped identify the areas for attention. My local chap wasn’t interested in doing a test at this stage… £250 quid well spent, even if result was poor. Now I’ve seen it done, I need to build a rig to replicate. Now I’m going to have a cup of tea, and think about the challenges that lay ahead.1 point
-
1 point
-
It’s easy enough to diy a guide out of an offcut of thin timber. Drill a 22mm hole in it and hold it (or get someone else to hold it) firmly in place whilst you get started with the diamond bit.1 point
-
Guide link: https://www.screwfix.com/p/erbauer-diamond-tile-drill-guide/845241 point
-
1 point
-
I used diamond dust core bits. Start at an angle. You won’t break the tiles unless they are thin and cheap.1 point
-
Crack porcelain tiles? I don’t know if that’s possible. It’s hard enough drilling through with diamond bits! that bit you linked will do the job nicely. I used the Erbauer diamond bits (8, 10 and 12mm) and not a crack in sight1 point
-
If you look at the image (previous posted) there is a raised platform at the back of the house. The wall in front of it is a structural wall. There were wall plates added to that and the rear wall to form a loft (plant room). We used something like 10 or 12 X2 timber, to form the floor and glued down tongue and groove 22mm waterproof floor panels as that is the only upstairs bit in the house.1 point
-
Thank you all. Had the blower door test yesterday, 2 fans, both on 90% couldn’t hold 50pa. The tester was walking around saying there is a door open somewhere. Smoke in, fans in reverse, smoke piling out from the cellar. The old carpets are in, nice thick wool with underlay. Really quite remarkable how much ventilation the house has.1 point
-
It's like being reluctant to have a roof. Gutters and downpipes are the only right answer. Lindab is elegant and precise. I've got about 12m of it with special bends. 15 years on still looking good. Just think carefully on the position for the downpipe, and choose a colour to blend or contrast.1 point
-
I just taped the inside terminals during our final air test. And I think the mvhr units leak like sieves. I have two of them. Get a tub of airtight paint on stuff and airtight foam, that will fix mist things except the mvhr units.1 point
-
Apart from the windows the rest of it is easily fixable so you know you can significantly improve it. My first test result was pretty reasonable and was able to significantly improve upon that for the final test. (0.98 to 0.4) so was money well spent. Doing the air tightness was the bit of my build I enjoyed the most.1 point
-
thank you. my first time fitting guttering. I was very happy with the outcome. 🙂1 point
-
Without wanting to get all mushy over some guttering, that looks delightful.1 point
-
zinc guttering isn't necessarily stupidly expensive! I fitted zinc gutters to our place and, yes they're a lot more than plastic, but totally worth it and not amazingly more than aluminium guttering. some pictures and details of where we got ours from in1 point
-
like what Conor says, i left the fence and built it with a 250mm gap to my brickwork. Worked out well as i able to run a waste down there as well. Have these plans been passed? it looks like its massively different to the neighboring houses and a bit of a monstrosity to be perfectly honest. I wouldnt be happy if i was either neighbor.1 point
-
You need something that works and is worry free and gutters seems the easiest solution. On the ‘what gets installed first’. I had exactly the same debate. The consensus between the metal roofers, the membrane installers and some other advice was the membrane gets fitted first. The problem this creates is maintenance down the years as you can’t get to it.1 point
-
If a wall has been tape and filled it is good to give it a once over with a soft brush to remove the dust.1 point
-
Another vote for the gutter. I have used Guttercrest for aluminium gutters and I am very happy with them. If the roof is going to be zinc, you could stick to zinc. Expensive though. I have seen the top hung posis in the manual. The only issue may be that the strut should overhang the bearing by 15mm, but if the supplier did the design and calcs to prove it works, then all is good.1 point
-
1 point
-
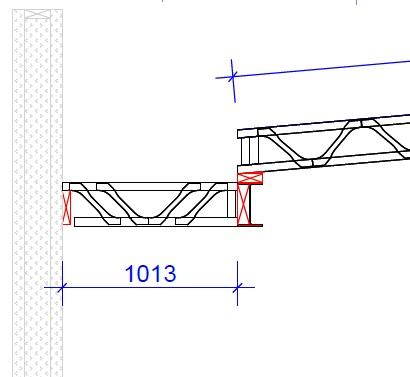
I greatly appreciate all replies on here, well except for @Dave Jones. Firstly, I am the 'builder'. Nothing has been butchered, I take great offence at that. I have also not improvised. The whole scheme is installed to the absolute letter of the structural design and this mindset is what has led to this post. I am concerned about deviating 'off plan', but I don't think the Architects plan has been thought through. The Ledgers are mounted to the ICF with pairs of M16 bolts at 800 centres and with concrete pads directly through to the back of the timber as seen here. This was agreed with my engineer. The Posi scheme was designed by Pasquill and meets <10mm deflection limits. I have a designer there who has been exceptional and we have carefully examined every detail as I wanted to understand it all. I'd be keen to hear what you think has been butchered as I take great pride in my work and strive for perfection. I know you're a great contributor here and take all (most) advice on board with great appreciation, but I'd love to see/hear some substance to your suggestions as you've added another layer of worry at a time when I could do without it (unless its justified of course). @ETC and I are chatting in DM's. I am beyond grateful for his input and he knows that.1 point
-
1 point
-
I got timed out. don't panic about the joists as by the looks of things it can be easily fixed if need be. But you need to get it checked.1 point
-
Sorry to say but I think you need to get your metal web joists supports checked not least. I had a quick scant at the photo at the start of your post and it is flagging stuff up at my end as an SE. The ledger piece that has the bolts into .. ICF, I have concerns about that. The method of supporting the metal web joists.. I suspect someone has had a "butcher" at them. I don't say this lightly so please take my observations on board and do something about it. I think you need to get an SE in here as I suspect that your builder may have been "improvising". Next @ETC has been chipping in.. his knowledge of construction details and even more importantly his knowledge of practical construction details seems to me to be exemplary.. my opinion is.. ignore his advice at you peril and have a look at his sugestions seriously. Also appreciate (I do) what ETC is sketching out. It a great demonstration of skill and practical experience, takes many years to perfect and demonstrates how you communicate an idea quickly and effectively.1 point
-
Exactly. In fact the compromises have forced us to make decisions that have resulted in a better outcome. Necessity being the mother of invention.1 point
-
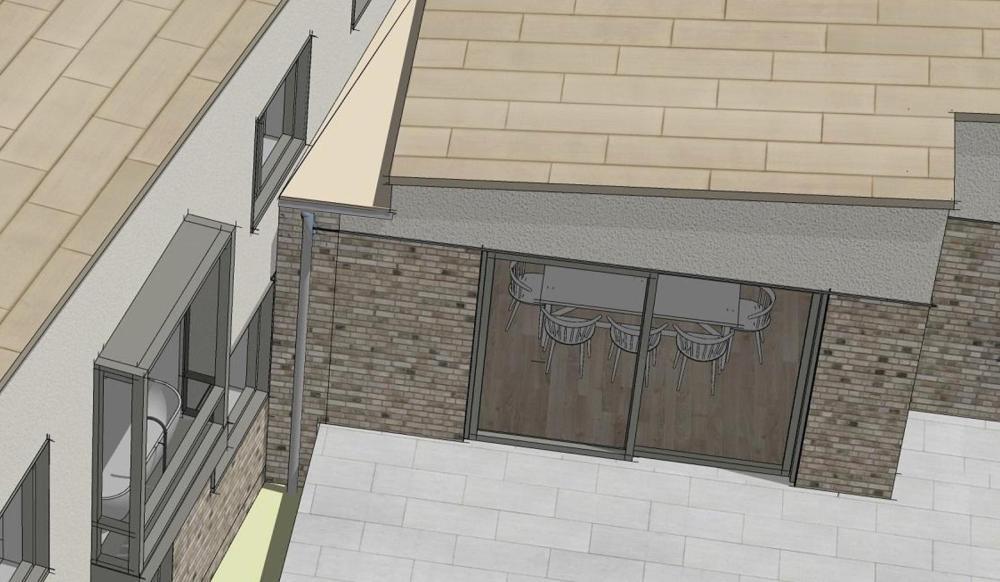
Not an architect and slightly facetious, but: Your main entrance is on the other side of the house This runoff is in a corner next to a patio A climber or large potted plant will hide a short gutter from the patio As a bonus, without a parapet your grandchild gets a better view from the window It's not what you planned for, but it sounds like the easiest compromise at this stage. Plus it's easy to maintain.1 point
-
Just remember @Mike M that as I noted previously, you should only be paying for extension assets and not reinforcement assets. A new transformer would be a reinforcement asset so it shouldn't matter to you that they want to replace the existing one with a 50KVA one as that will be at their cost. You should only pay for the extension asset which is the cabling from the transformer to your property. When they come to site, if they mention costs, ask them whether those costs relate to extension assets or reinforcement assets1 point
-
It bugged me that despite the handy rubbish bags I had tied up in useful places, including on the skip, they still chucked crisp packets and all sorts of recyclable rubbish directly into the skip, ready to blow away…1 point
-
I can't give any specific recommendations for what to do here, but I'd be incredibly p*ssed with your installer. I've spoken to three different providers/installers for our build, and each one has stated they'd like to get a request in first before they go any further. Maybe there's something they can do for you on the final invoice.1 point
-
argh. no. I would suggest this one. because it stays permanently plastic under the skin. ie when the building moves or distorts, this will move with it. 2 longitudinal beads then place to material on it. then fix. I think there are others similar, Most mastics set hard and lose this ability to stick while deflecting.1 point
-
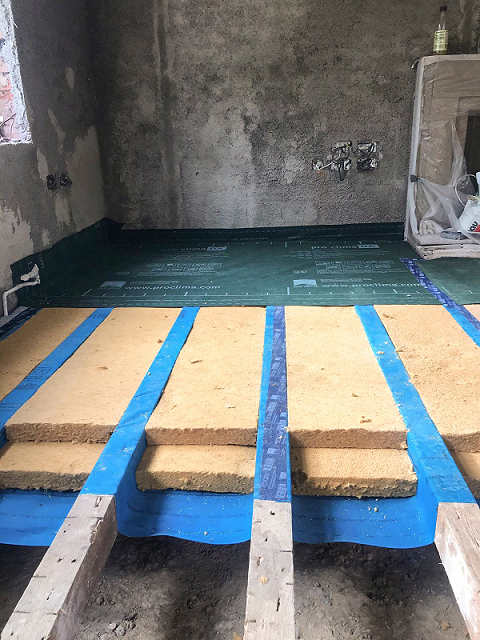
Look at the above picture from the ecological building systems website. It's a good system in my opinion. The thermal resistance of a material is mute until you make sure you can install it properly. The above system makes sure no wind can blow through or around the insulation. PIR will perform worse than the cheapest mineral wool if it's not installed well and the mineral wool is. I would put. Breather membrane draped between joists. Stapled square to the bottom of the joists with all joints taped and returned to the external walls and sealed here too. Good performance mineral wool fitted between the joists. T*G chipboard glued and screwed over the top. If you have space put a layer of PIR over the top of the joists under the chipboard. This will need to be between battens and all joints foamed and taped.1 point
-
@ mods not sure if this is the most appropriate section. We don't have a dedicated Airtightness one. Time: 1hr. Cost €60 Materials: 1 X Sheet of OSB or PlY 1 x Used car radiator fan including housing ( I used a lexus IS200) 1 X Roll of Airtightness tape. 1 X length of automotive wire. 2 x Crocodile clips. 2 x wire connectors. Some short wood screws Tools. measuring tape. Jigsaw/circular saw. Pocket Knife. Large 12v powersource. ( I just used my cars battery in situ) Screwdriver Direction. 1. Measure an opening window sash/door of your house. 2. Carefully cut the OSB so that it fits snuggly into the opening and presses evenly against the seals of the window. 3. lay the radiator fan including housing on the sheet of OSB and trace the outline. 4. Carefully cut a hole out of the OSB just slightly smaller than the radiator housing. 5. Screw the housing into the hole such that the edges of the housing are all supported by the OSB. 6. Using Airtight tape seal the edges of the fan. 7. Connect the wires to the crocodile clips leaving enough length to reach your power source. 8. Insert the rig into the window and secure in place. It should fit reasonable snuggly, if it is an outward opening sash the vacuum generated will pull it tight to the seals. Consider using tape or a wedge to hold it in place. DON'T use airtightness tape. It'll stick to the window forever. 9. Connect crocodile clips to the power source. You can simply reverse polarity of the clips to swap between depressurisation and pressurisation. Testing procedure. 1. Close all doors and windows in the house. 2. Temporarily seal up/close all vents. 3. Ensure all combustion appliances are off and isolated such that there is no risk of fumes being drawn into the house. 4. Set the fan to depressurise the house. 5. Methodically go room by room using the back of your hand to detect and seal any leaks. Most are found at junctions between floors, walls and ceilings, sockets, windows and doors and wall chases. 6. Use a lighting candle to visually see any pinhole leaks (the flame will flicker). It's much more successful than smoke. Jamming the candle in a length of rigid electrical saves doing too much climbing and descending of steps. Be careful not to burn the house down!!!!! Outside View Using a candle to check leaks. Official test Final Result1 point
-
If it helps I've compiled a list of ways you can connect blinds/curtains to Loxone.... Option 1: Hardwired Power with Loxone Wireless Control Example motors: Geiger Solidline Air - this is the motor Loxone promote Loxone Parts Needed: Loxone Air Receiver Pros: Loxone wireless protocol built into motor makes integration easy and no additional hardware needed at the window location (such as a wireless transmitter) Hardwired power means no batteries need re-charging No need for wiring back to a relay or main panel or plant room Only need 240v power at each window which could be taken off a socket or lighting circuit Cons: This is a 45mm motor which means it will only go in a 65mm+ tube meaning the minimum rollup size is going to be around 70mm which is quite large High torque motors (great for RLs but overkill for standard blinds) Wireless control limits distance from transmitter to receiver Wireless control is not 100% reliable although it is good and always getting better As more devices become wireless there is more radio traffic and more risk of interference 'Dumb' motors with no 2-way communication or feedback to the system Option 2: Hardwired Control Switched through Power Example motors: Somfy WT, Nice Action, Vestamatic MM or ME Loxone Parts Needed: Loxone 240v relay appropriate to the number of blinds you have. Pros: Total reliability of control Hardwired power means no batteries need re-charging Easy to trouble shoot Wide range of motors Cons: Home-run wiring needed from the relay to every window Intermediate stops need to be done via a timer rather than using logic in the motors 'Dumb' motors with no 2-way communication or feedback to the system Option 3: Hardwired Power with Wireless Control Example motors: Somfy WT, Nice Action, Vestamatic MM or ME Loxone Parts Needed: Shading Actuator Air Pros: Hardwired power means no batteries need re-charging No need for wiring back to a relay or main panel or plant room Only need 240v power at each window which could be taken off a socket or lighting circuit Wide range of motors Cons: Wireless control limits distance from transmitter to receiver Wireless control is not 100% reliable although it is good and always getting better As more devices become wireless there is more radio traffic and more risk of interference Intermediate stops need to be done via a timer rather than using logic in the motors 'Dumb' motors with no 2-way communication or feedback to the system (Loxone say it is a pain to setup) Option 4: Hardwired Power with Dry Contact Control, 0v Control, DCT Example Motors: Nice Edge AC or DC, Gaposa Sileo XS50 AC or DC, Somfy Sonesse 30 DCT, Glydea DCT, Movelite DCT Loxone Parts Needed: Loxone 0v Relay with number of channels appropriate to the number of blinds Pros: Total reliability of control Hardwired power means no batteries need re-charging Easy to trouble shoot Cons: Good range of motors but mostly in a higher price bracket than the switching through power option Home-run wiring needed from the relay to every window Intermediate stops need to be done via a timer rather than using logic in the motors 'Dumb' motors with no 2-way communication or feedback to the system Option 5: Hardwired Power with Digital Control Example Motors: Sonesse 30 RS485, Sonesse 50 RS485, Vestamatic SMI, Nice Smart, Glydea RS485 Loxone Parts Needed: Loxone RS485 extension Pros: Total reliability of control Hardwired power means no batteries need re-charging, power can be local to the blind Easy to trouble shoot Easy to set multiple intermediate limits and get hembar alignment at the stop positions Data can be daisy chained making communications wiring easier 'Smart' motors with 2-way communication, system can see blind status (open, closed, etc.) Cons: Slightly limited motor range although some good options available Potentially more complex commissioning needed, especially when intermediate stops required Power and communication wiring should usually be separate, therefore two cables to run (although power could come off a socket or lighting circuit) Option 6: Wireless power with Wireless Digital Control Example Motors: Sonesse 30 WF RTS Loxone parts needed: Loxone RS485 extension Other parts needed: Somfy RS485 RTS transmitter; Pros: Easy installation as no cabling required Long battery life (8-12 months depending on frequency of use) Cons: Maintenance required, battery charging once a year Wireless control limits distance from transmitter to receiver Wireless control is not 100% reliable although it is good and always getting better Slightly complex commissioning for AV integrator and blind installer Option 7: Wireless power with Wireless Dry Contact Control Example Motors: Sonesse 30 WF RTS, Nice Edge Battery motor Loxone parts needed: Loxone Dry Contact Relay Other parts needed: Somfy DCT RTS transmitter or Nice 0v radio transmitter Pros: Easy installation as no cabling required Long battery life (8-12 months depending on frequency of use) Cons: Maintenance required, battery charging once a year Wireless control limits distance from transmitter to receiver Wireless control is not 100% reliable although it is good and always getting better1 point
-
Thanks all. I like the look of the erbauer guide but think I'll try the ply offcut method - not that I've got massive balls though, more that I'm massively tight0 points
-
Soooo, I think I’m at a point where I do need to wait for my architect input. I have various wall build ups of various thicknesses, none of which I can yet be confident about moisture control. I don’t know that there’s a problem with them, but I need to know there won’t be. I have a wall build up made of lots of PIR which fits my desired thickness and has a good u value, but opinions have been shared about the acoustic properties of that design (and how nice a house built such will be to live in). Alternative insulation yields designs which are either a bit thicker, have a lower u value of both. I like the 140mm rockwool batts idea in terms of acoustic attenuation but I don’t yet know if we can trade off the insulation level with other elements. The idea of some PIR part filling the frame, then rockwool filling the rest of the frame, then another layer of PIR sounds like a good compromise but it makes a PIR/rockwool/PIR sandwich and that sounds like a recipe for trapped moisture, unless PIR will allow moisture through - maybe the non foiled stuff will. For me, having built a blockwork house, concerns about wall solidity play straight to my anxieties, so if anyone has a timber clad, PIR insulated house I’d be very grateful for you sharing your thoughts on my concerns and whether they are reasonable. On the brightside, yesterday I bought a shiny new tailored boiler suit. Tailored meaning I cut 8’ off of the legs (I’m short and round) using pinking shears (it is pride week). So I may not have a wall design yet but I do now look like a navy blue Tinky Winky.0 points
-
Yes I know. We might end up with one on a little garden building just as a feature to keep 'er indoors happy.0 points


.jpg.c21f3ac78c9b7efd90cbdcb312744dc5.thumb.jpg.7adcad4c0e384f5ecd7d56b0618df6e5.jpg)


