
Leaderboard


Popular Content
Showing content with the highest reputation on 11/17/19 in all areas
-
Your attitude is disgusting.6 points
-
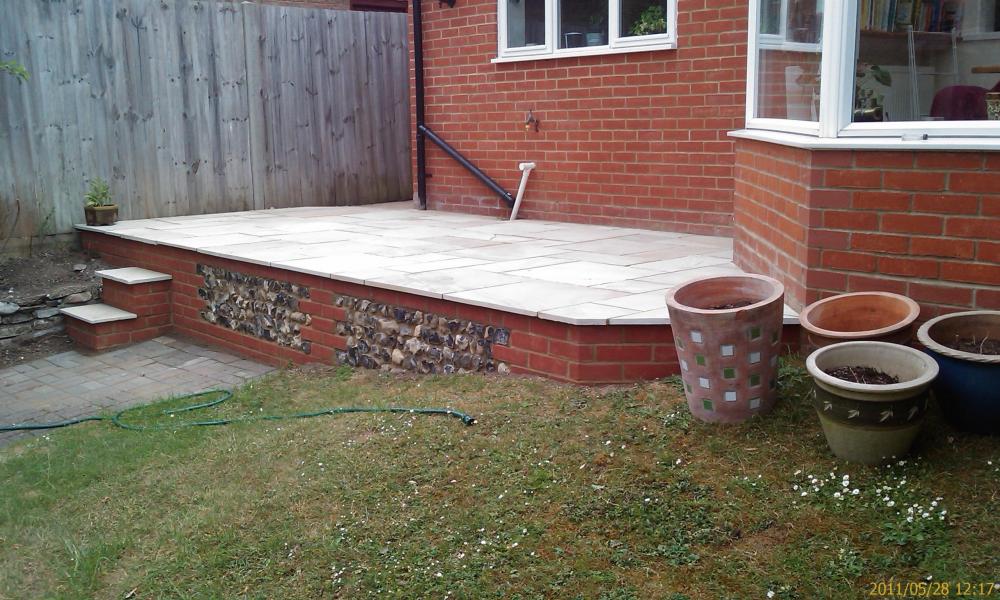
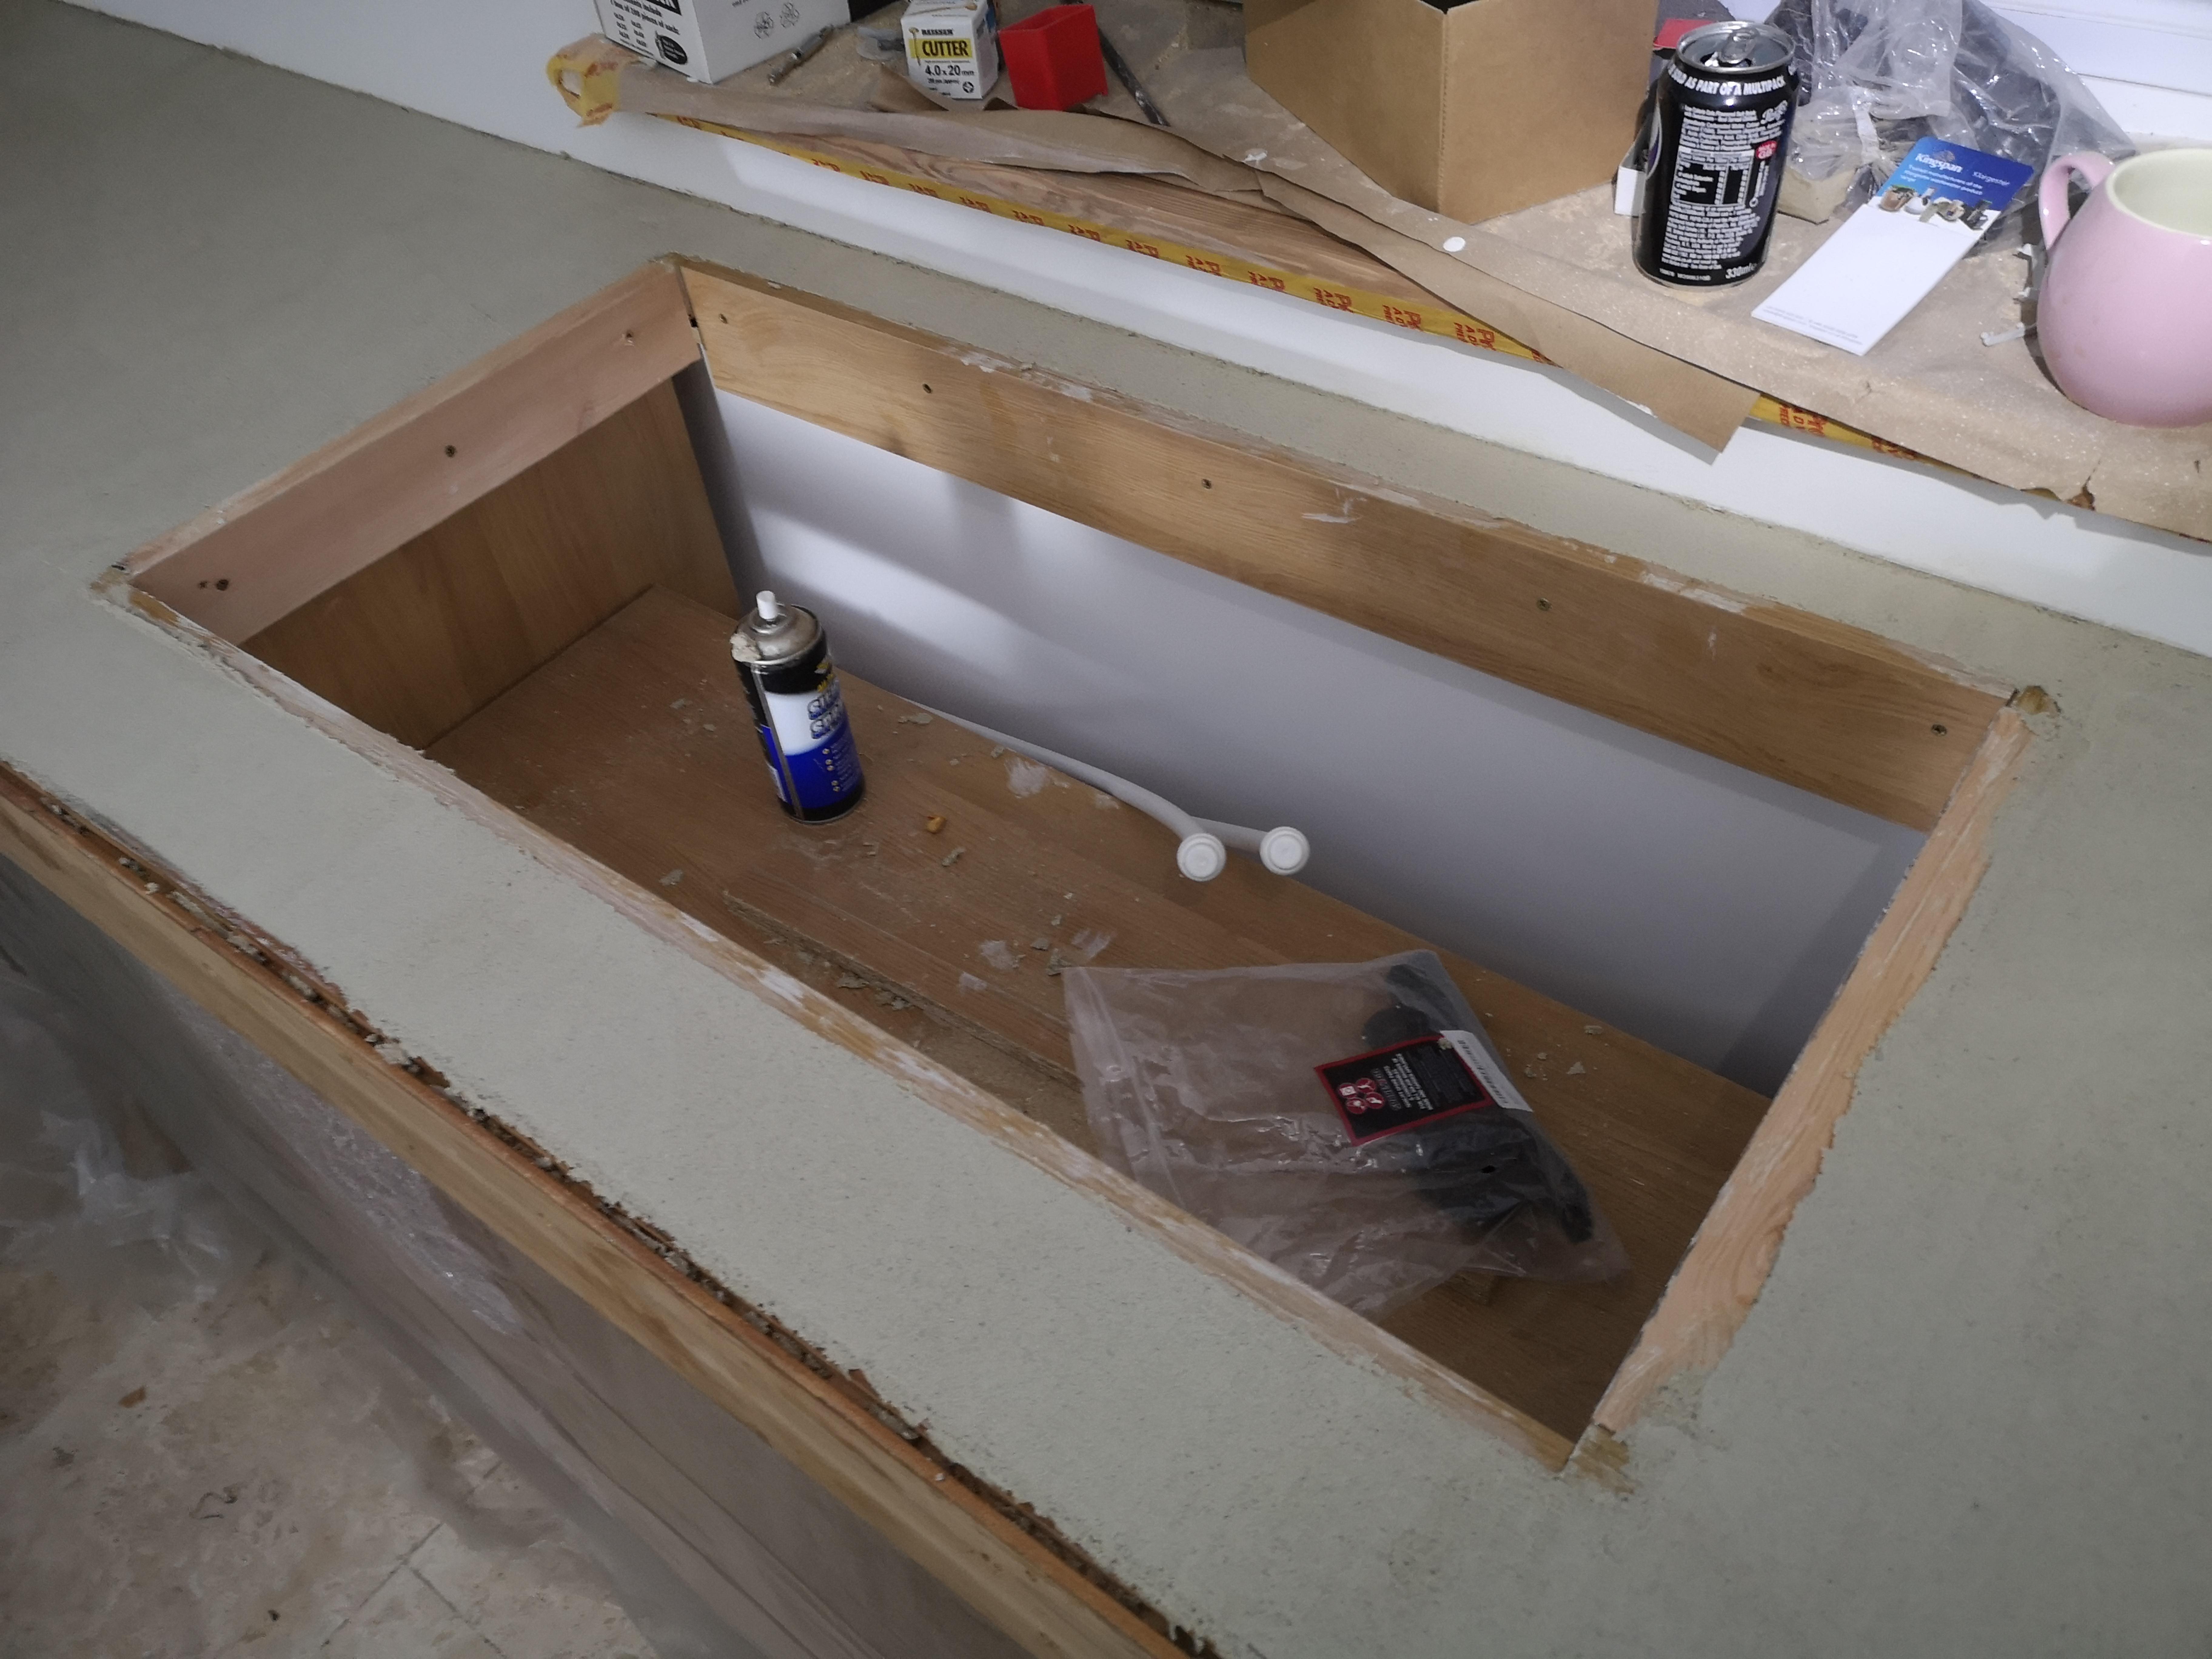
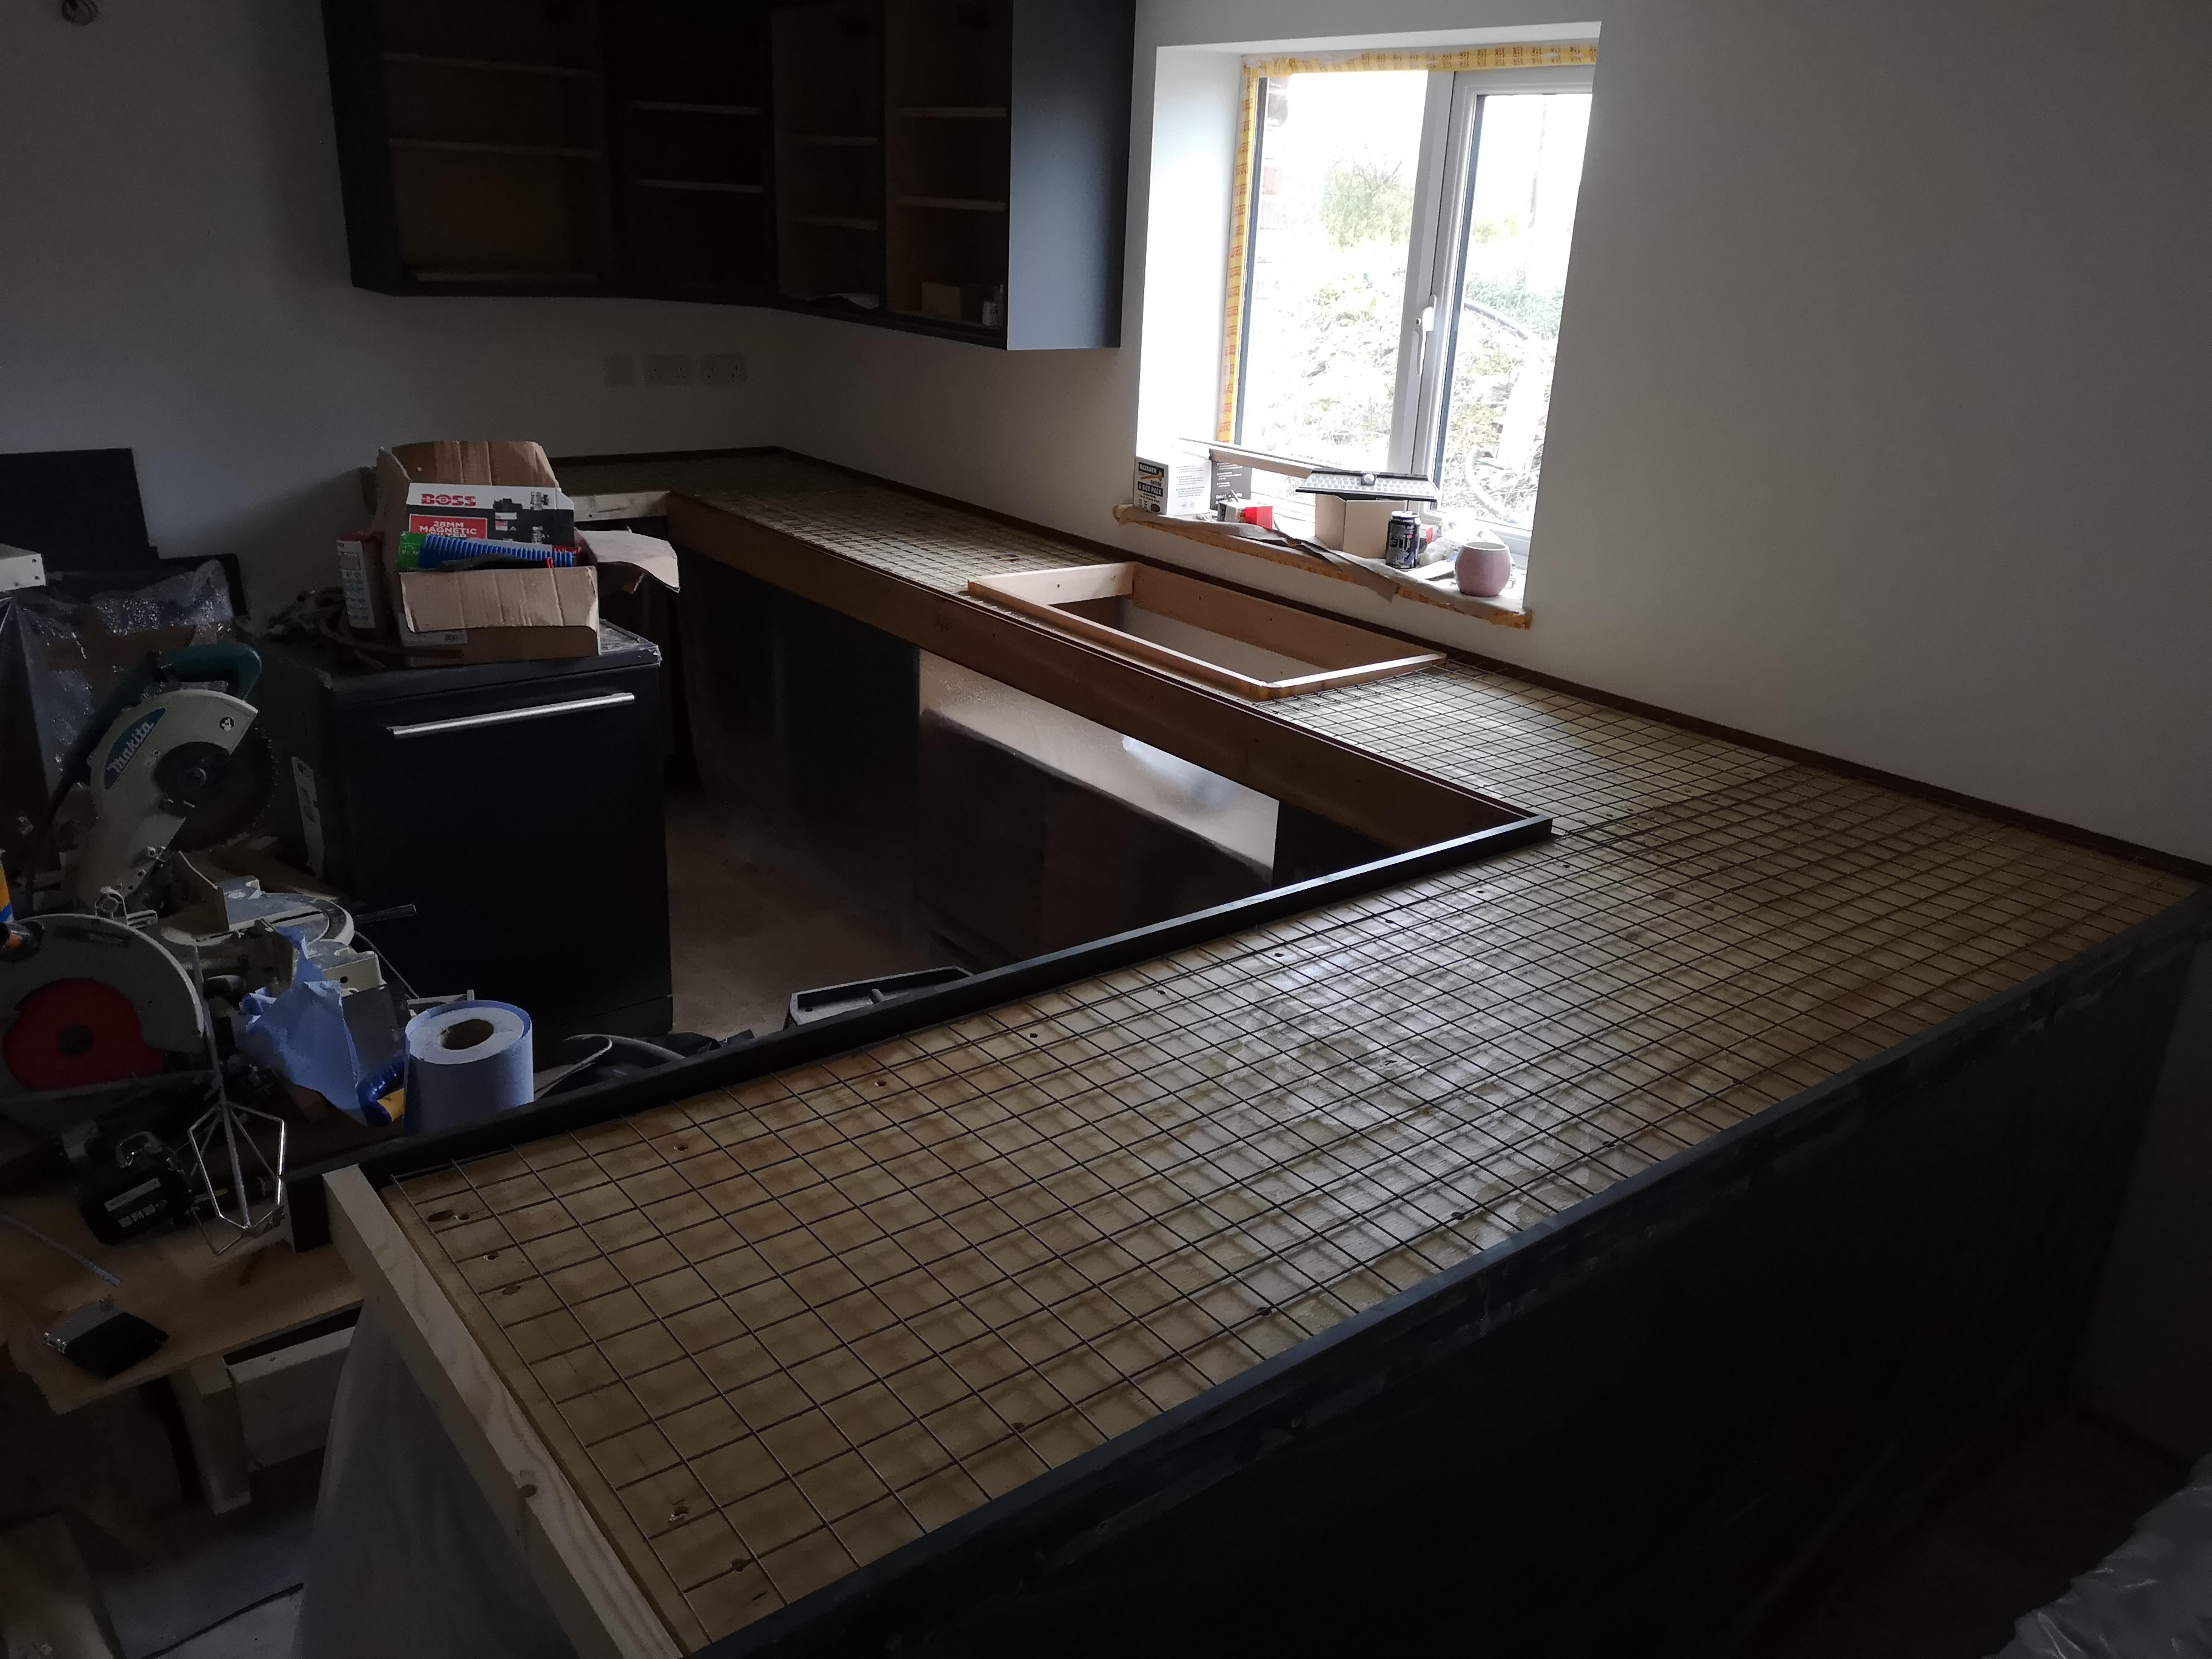
Starting to put in the exciting stuff. The stairs measurements were taken back in August and we then had to have a good think about what type of timber and finish we wanted. The vaulted ceiling had a bit more structural work and being the most interesting feature in the house and we decided that this would be good place to invest in a high finish and we decided go with a solid oak stairs and balustrade with toughened glass panels. Like many self builders we have adopted a fabric first approach and although not part of the building a good stairs to us is worth investing in. Before we could install the stair we had to get rid of the internal scaffolding and before we could do this we needed to finish any awkward decorating. In the summer I tackled the external painting and my wife is going to be doing the internal decorating. These bits were probably the most awkward in the house and with the caulking and painting done, the scaffolding could now be carefully taken down. I was working on the day of the stair installation, but had a quick glimpse early in the morning when helping to lift it into the house. The installation of the stair and balustrade was done in a single day by two joiners from Inverness and the following morning I was excited to see what had been done. When I went into the house my eye was more drawn to the velux windows which were all covered in the most amazing frost. Here is the best photo I could take on my phone. The three velux windows were like etched glass, hopefully this will happen again. And here are some of the stairs and balustrade taken today. We are very happy with the installation. The stairs feel solid on your feet, easy on the eye and pleasant on the hand. Finally, just to provide an update on my last entry regarding the stove. I did the first burn and was pleased with the results. The render/blockwork surround heated up well and retained a good temperature for a while afterwards. The air feed for the stove also worked well. Our house has a suspended timber floor, but hearth/stove are supported on a small slab which had a pipe buried into the concrete to allow a direct air feed to be drawn from below the floor. A bit different but work well for us. What’s next. At the point of posting this entry, as you might see in the photos, the kitchen and ground floor flooring are being installed and this will be covered in the next entry when this work is finished. Thanks for reading.5 points
-
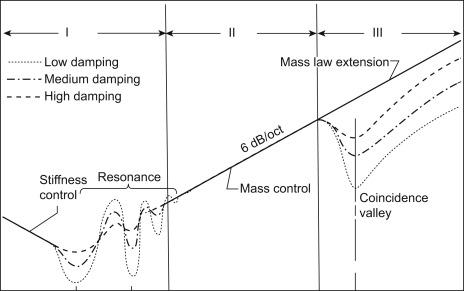
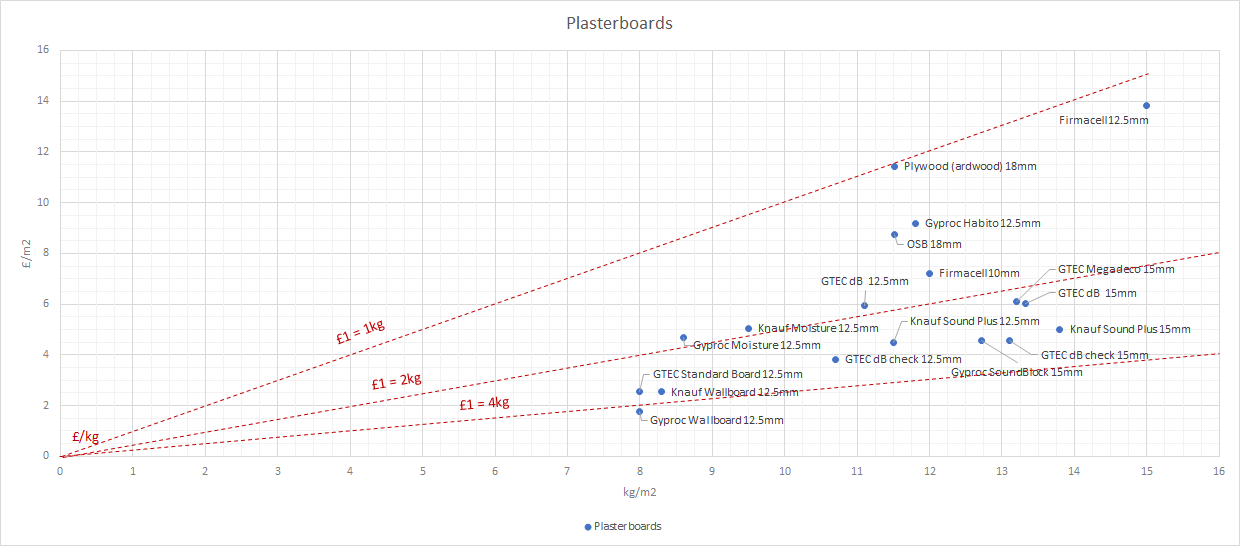
Interesting graphs, and I agree that the 'acoustic' in a name does give a up lift in cost when it's the density you are really getting. High density boards are needed as they offer the higher acoustic ratings needed in some situations (e.g. trying to meet ADE conversation requirements on a timber floor with limited floor to ceiling space). Also as you say labour, people will start looking at you funny if you start asking for triple boarding, when you could do it in a double layer of SoundBloc. @Dreadnaught in simple terms a single skin partition with double the density will increase the sound insulation by 6 dB In the mass control region, but maybe more like 4-5 dB when considered throughout the whole frequency range. See below
 2 points
 -
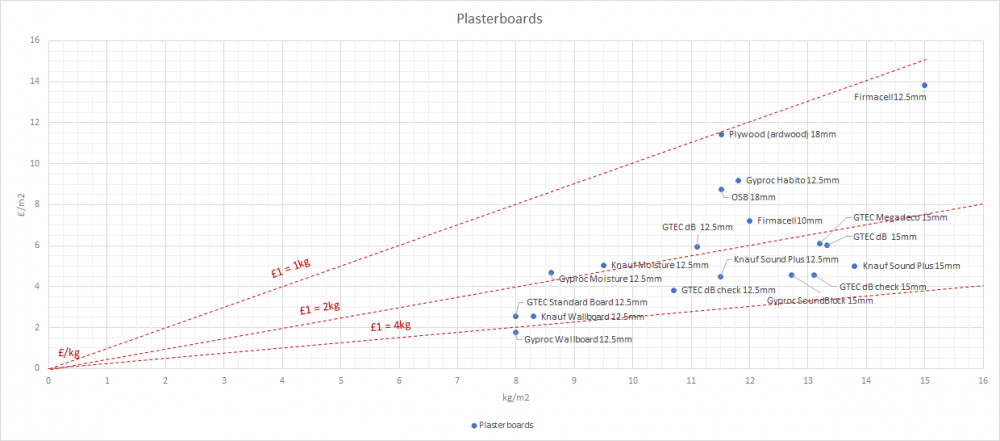
@Moonshine - doing a review on the £/kg and it looks like the no brainer if going for acoustic performance is bog standard wallboard at 4.52 kg per £ I may as well double up on standard board which will give me a surface density of 16 kg/m2 at £3.53 per m2. That is a full pound pound cheaper per m2 than the most economical soundboard GTEC dB check, and gives an extra 3kg/m2 to boot. Why have soundboard at all? Is it a question of labour? @Nickfromwales - 100% correct on ply... a very expensive approach. I'll be doing it strategically as recommended
 2 points
 -
Well tip of the day is to buy more cement than you think you need. ? Only just had enough for the big section so the little one will be done another day

 2 points
 -
This was my first ever private job ?
 1 point
 -
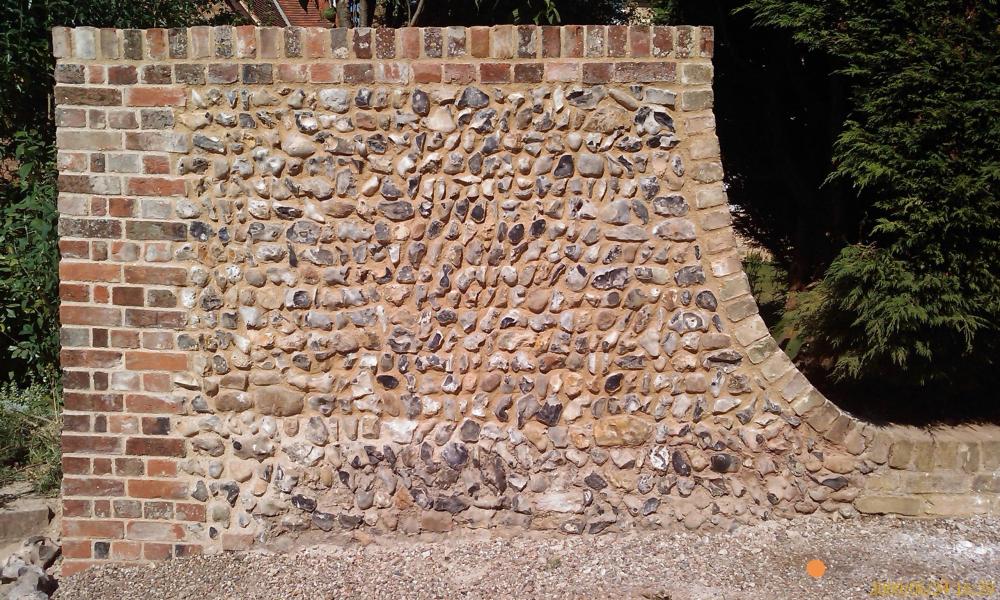
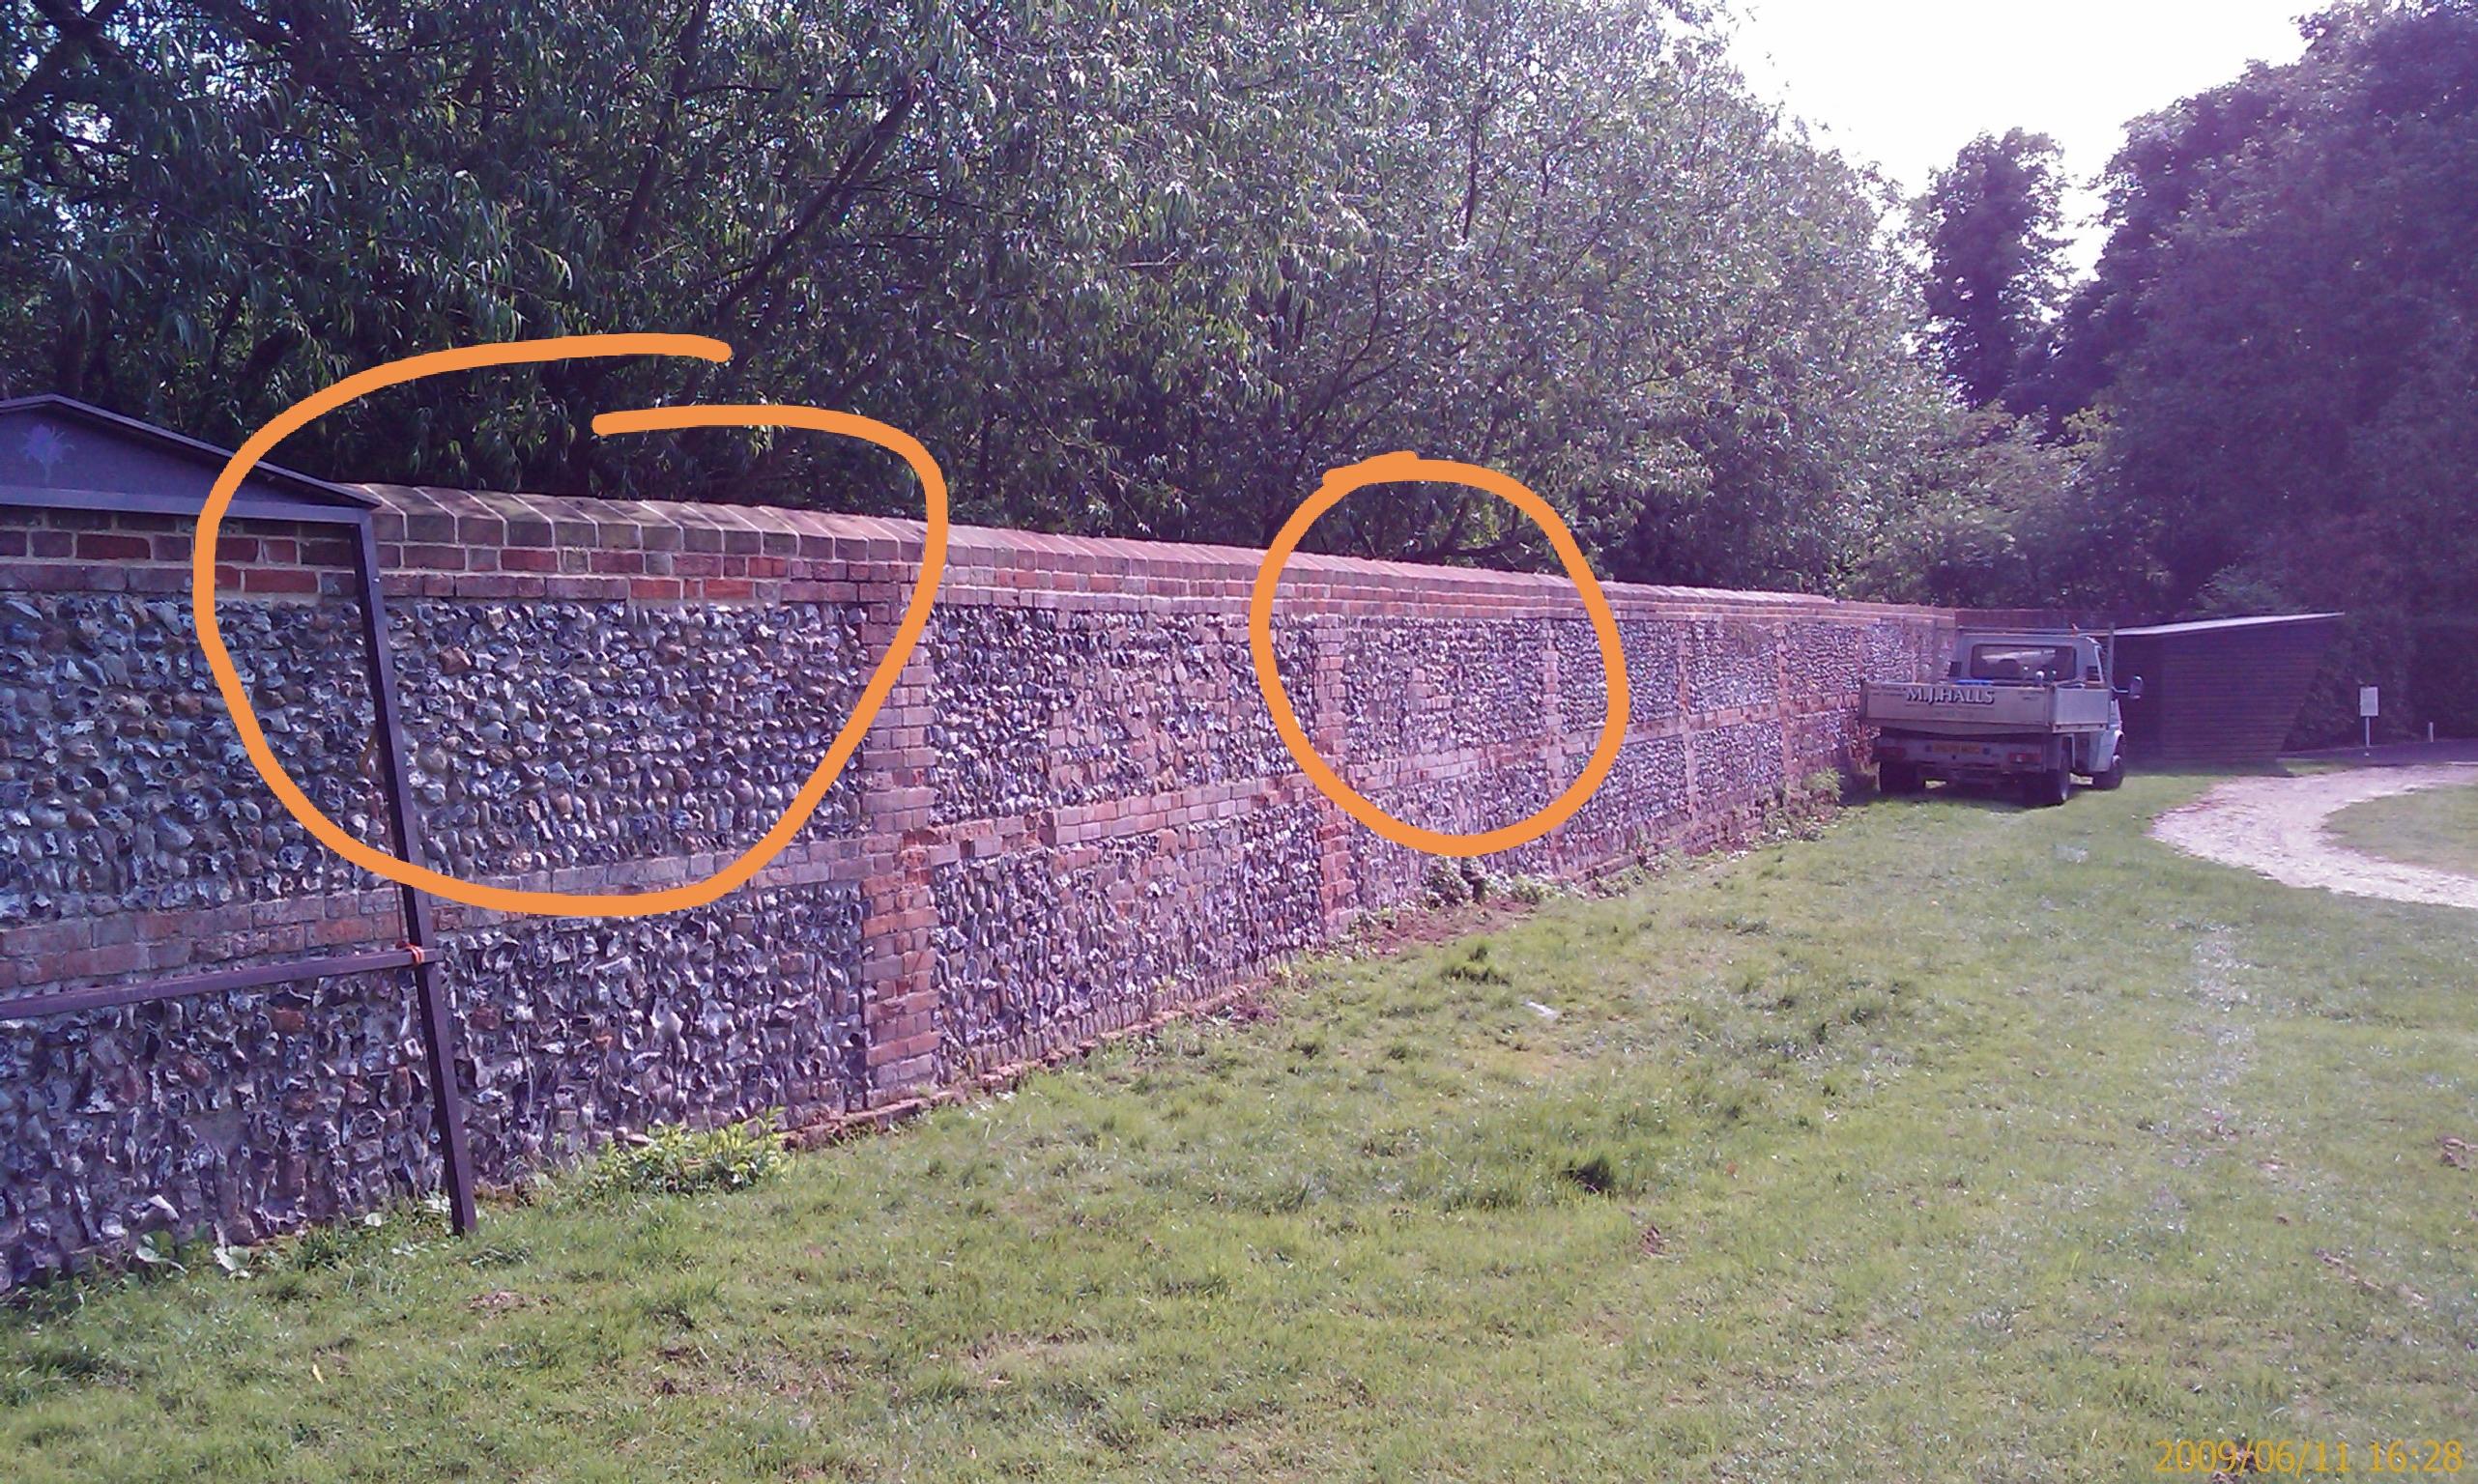
Roughly 80mm high and 100mm deep by whatever length helps keep it to brick courses. As for selecting flints you can't be too picky but it is worth spending time to make sure each one nestles well with its surrounding stones. It's a natural product so it's a fine line between having character or imperfections. Probably best to avoid cracks though. We used to "nap" them to an extent. Eg if it was too big it got hit with a hammer to take the bits off I didn't want.1 point
-
Metal roofing sheets. 6 inch feather edge boards, lots of creosote.1 point
-
Flint laying varies across the country but these are some of our local walls around Audley end house. Notice the courses.
 1 point
 -
If you lay them behind a board I will never speak to you again. If you are planning to make the panel removable just lay them Like cobbles on the flat in which case you can just make it look pretty and not worry too much about the way the flints are laid. If you're planning to do it properly then they should be laid to a line in courses. The line is just a guide to keep the courses roughly level and the face flat. Try not to leave a forward slope on the top of each course otherwise the next layer will potentially slide out. If you are not planning to put any cement in the mix you will only be able to do a Handful of courses each day. Then go back to rake out (stick) the joints the next day before you continue with the next courses. Also flint laying muck is a lot stiffer than bricklaying gear. Let it turn for ages and try to avoid adding too much water. THE MUCK IS JUST THERE TO HOLD THE FLINTS IN PLACE. NOT TO STICK THEM TOGETHER. hth1 point
-
The perfect sized flint is about the size of your fist. On such small panels you really can pick and choose your flints. Interweave them between courses as much as you can without it looking silly. The less muck showing the better ??1 point
-
I think that the smaller ones look better, but it is only my personal opinion. I don't like to see quite as much motor between them so would put them a bit tighter.1 point
-
Double boarding will cost you double in labour.1 point
-
It's about the only thing I am quick at!1 point
-
I too removed one chimney in my first house. Used a Minimax tower from work and my ladders and hooks. I wasn't going to but went up via just ladders onto the roof to look at a chimney pot that was leant over. Pretty hairy when it came off in my hands. I wedged it behind the stack. Next plan was to take a few courses off and cap it off. Every course might as well have been held together with sand so I just kept on going. I slid the bricks down the roof on a couple of tethered sheets of ply to my FiL on the scaffold and he dropped them into the front garden. I had to put in a new bit of roof joist then felt and tile.1 point
-
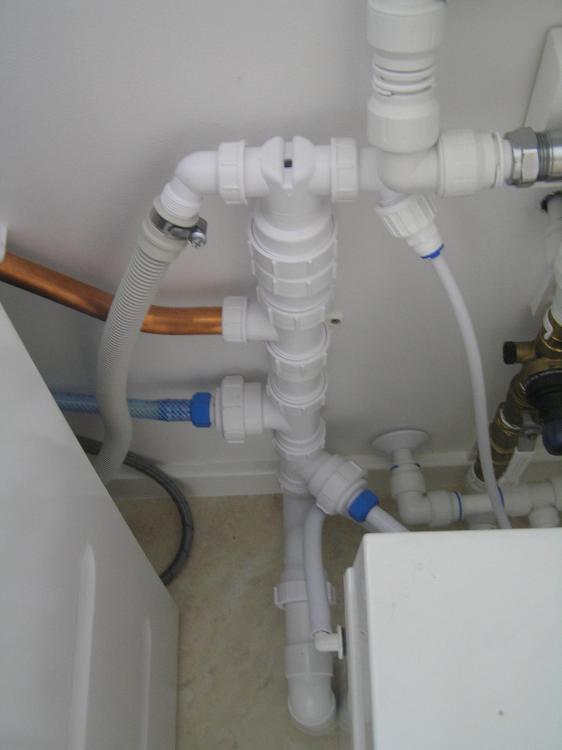
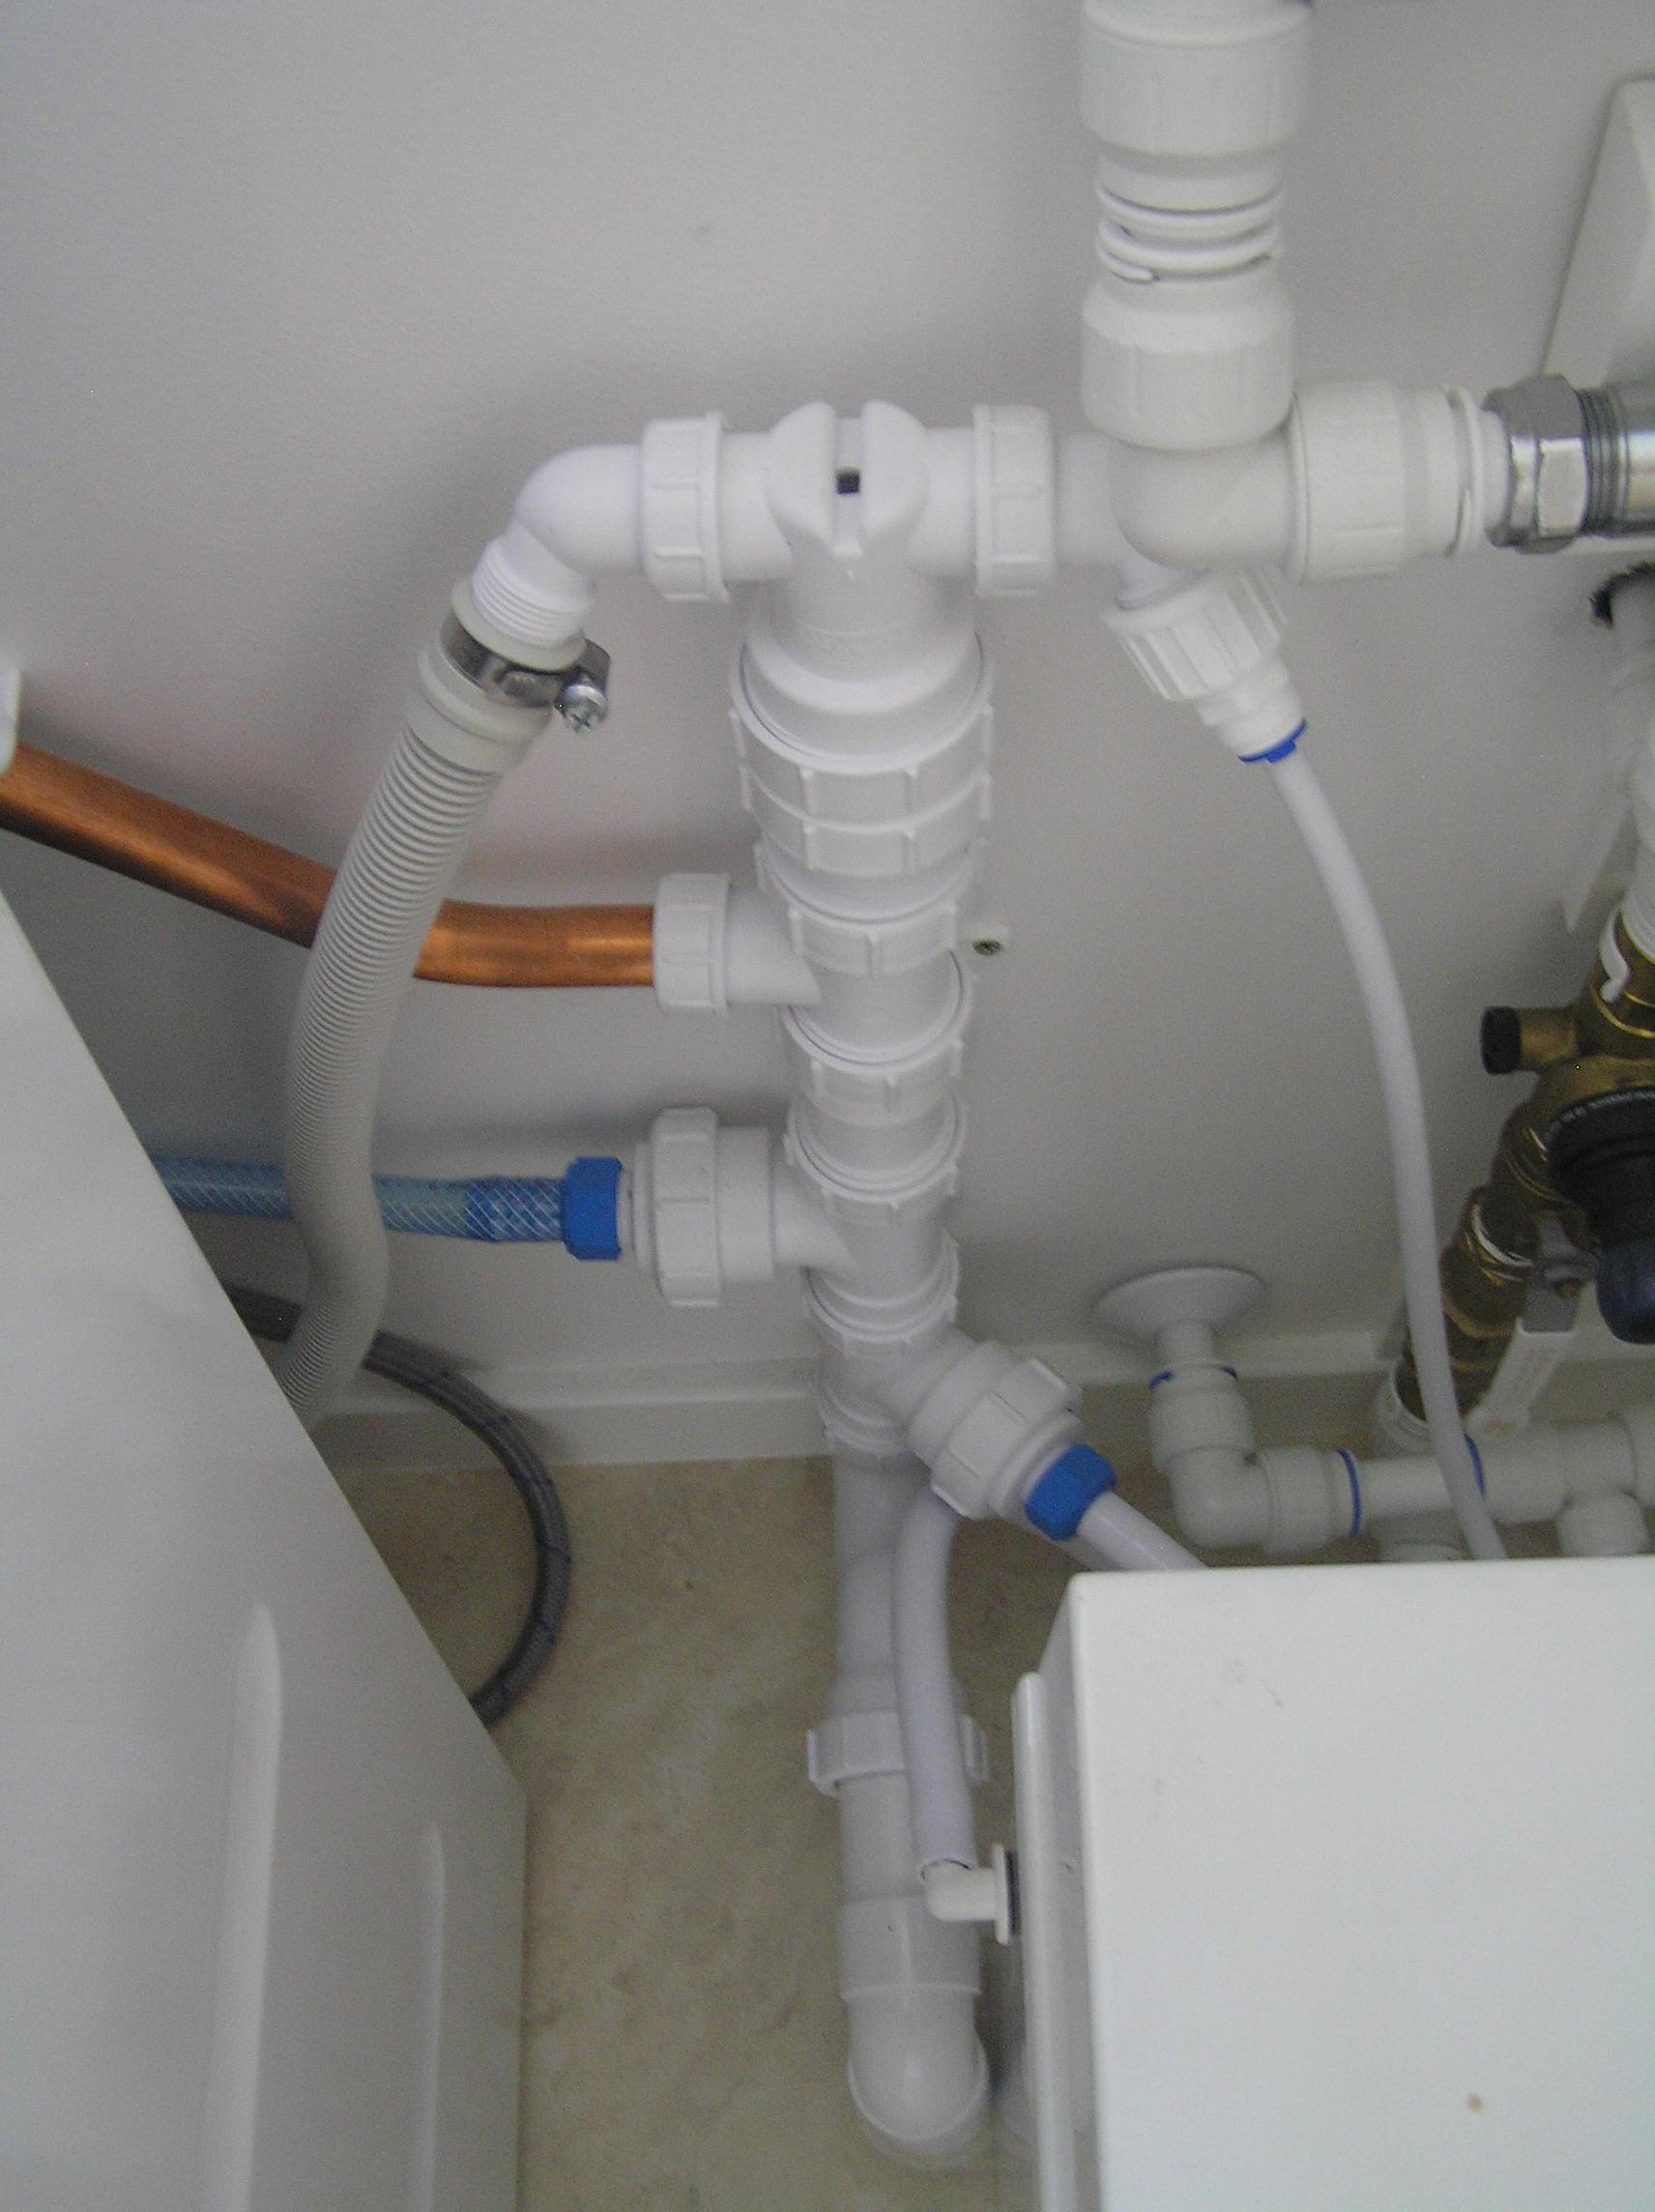
I knew there was someone here had the same fitting. I think I will put a vertical section before the trap and see how it goes.1 point
-
I have that fitting on top of my waste stand pipe and it doesn't cause any problems. I can only think that the resistance of the S bend allows the fitting to fill up and vent water through the air vent.
 1 point
 -
Are they even legal to use nowadays under health and safety ? unless you have a team of dedicated brickies I think you will struggle to get anybody to want to work with them, I certainly wouldn’t lay them.1 point
-
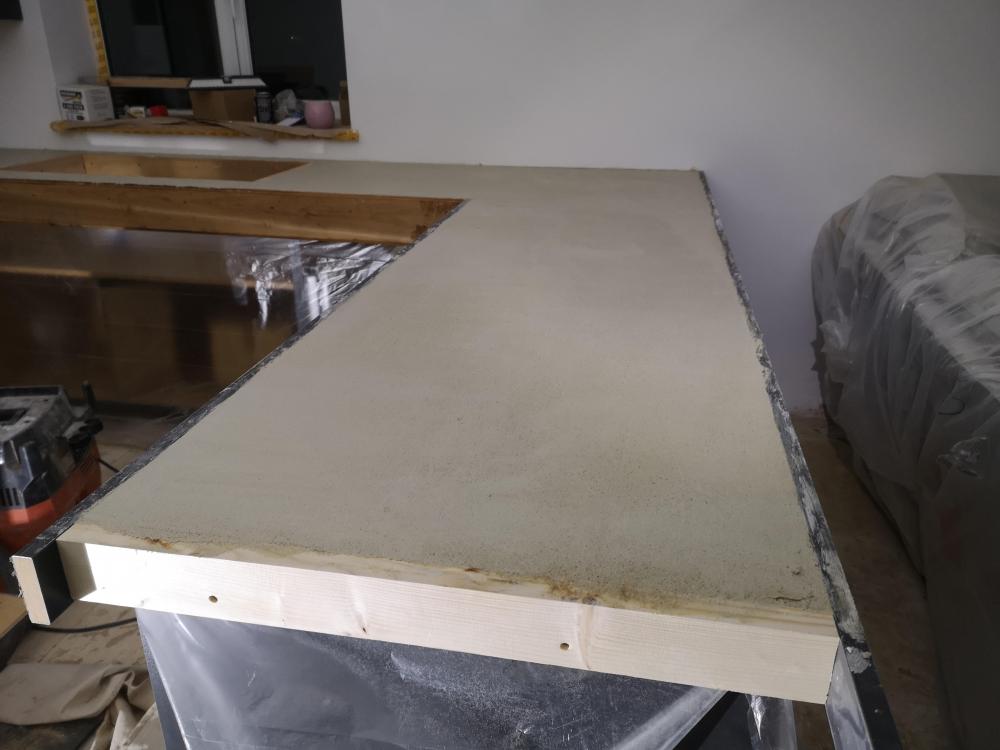
This may be of interest: concrete-countertop-sealers.pdf1 point
-
Looks lovely, and is very much what we aspire to, some time next year hopefully.1 point
-
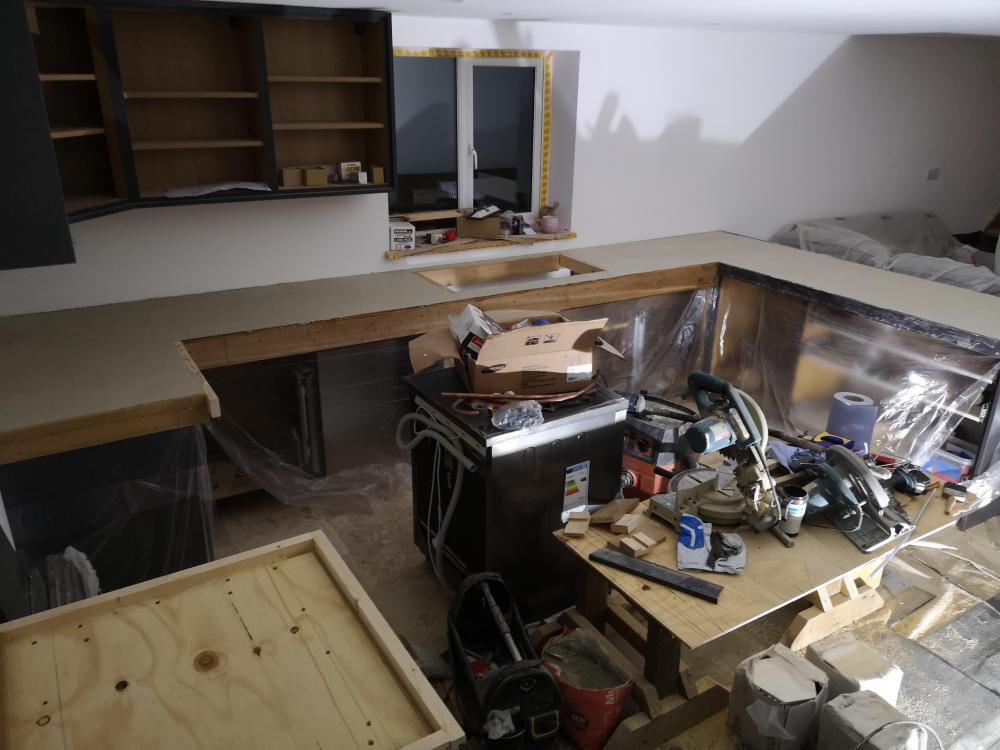
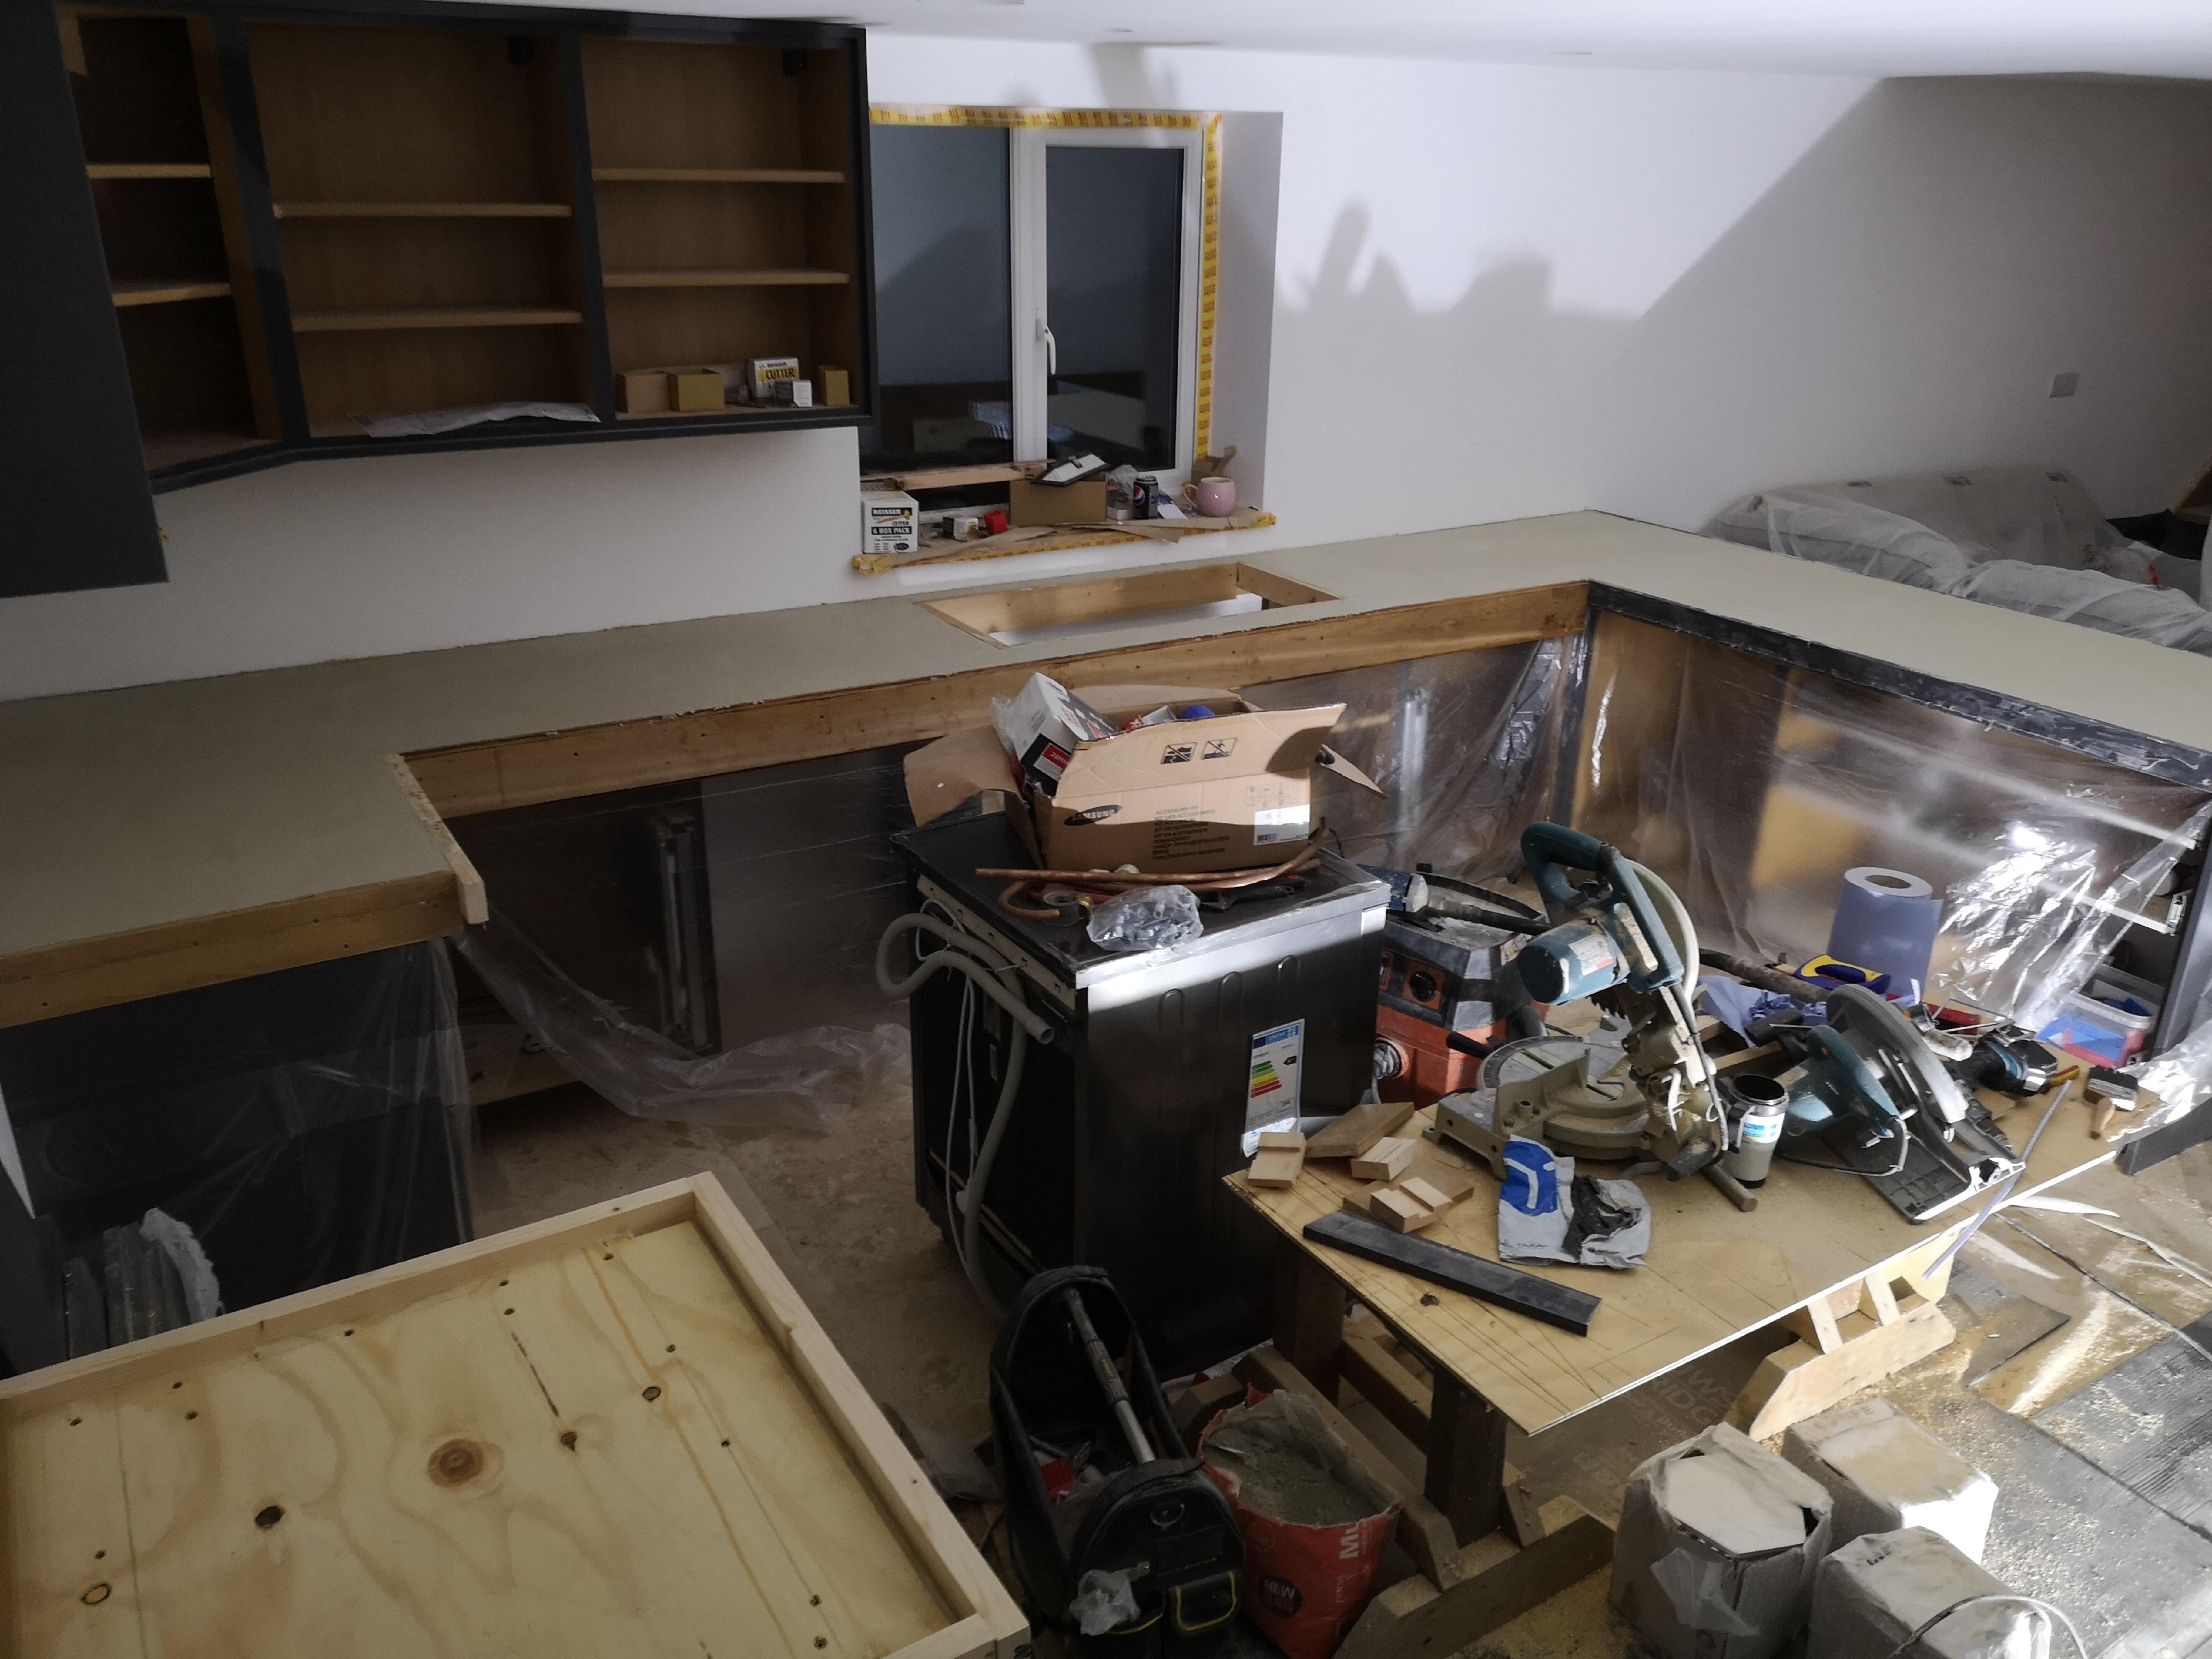
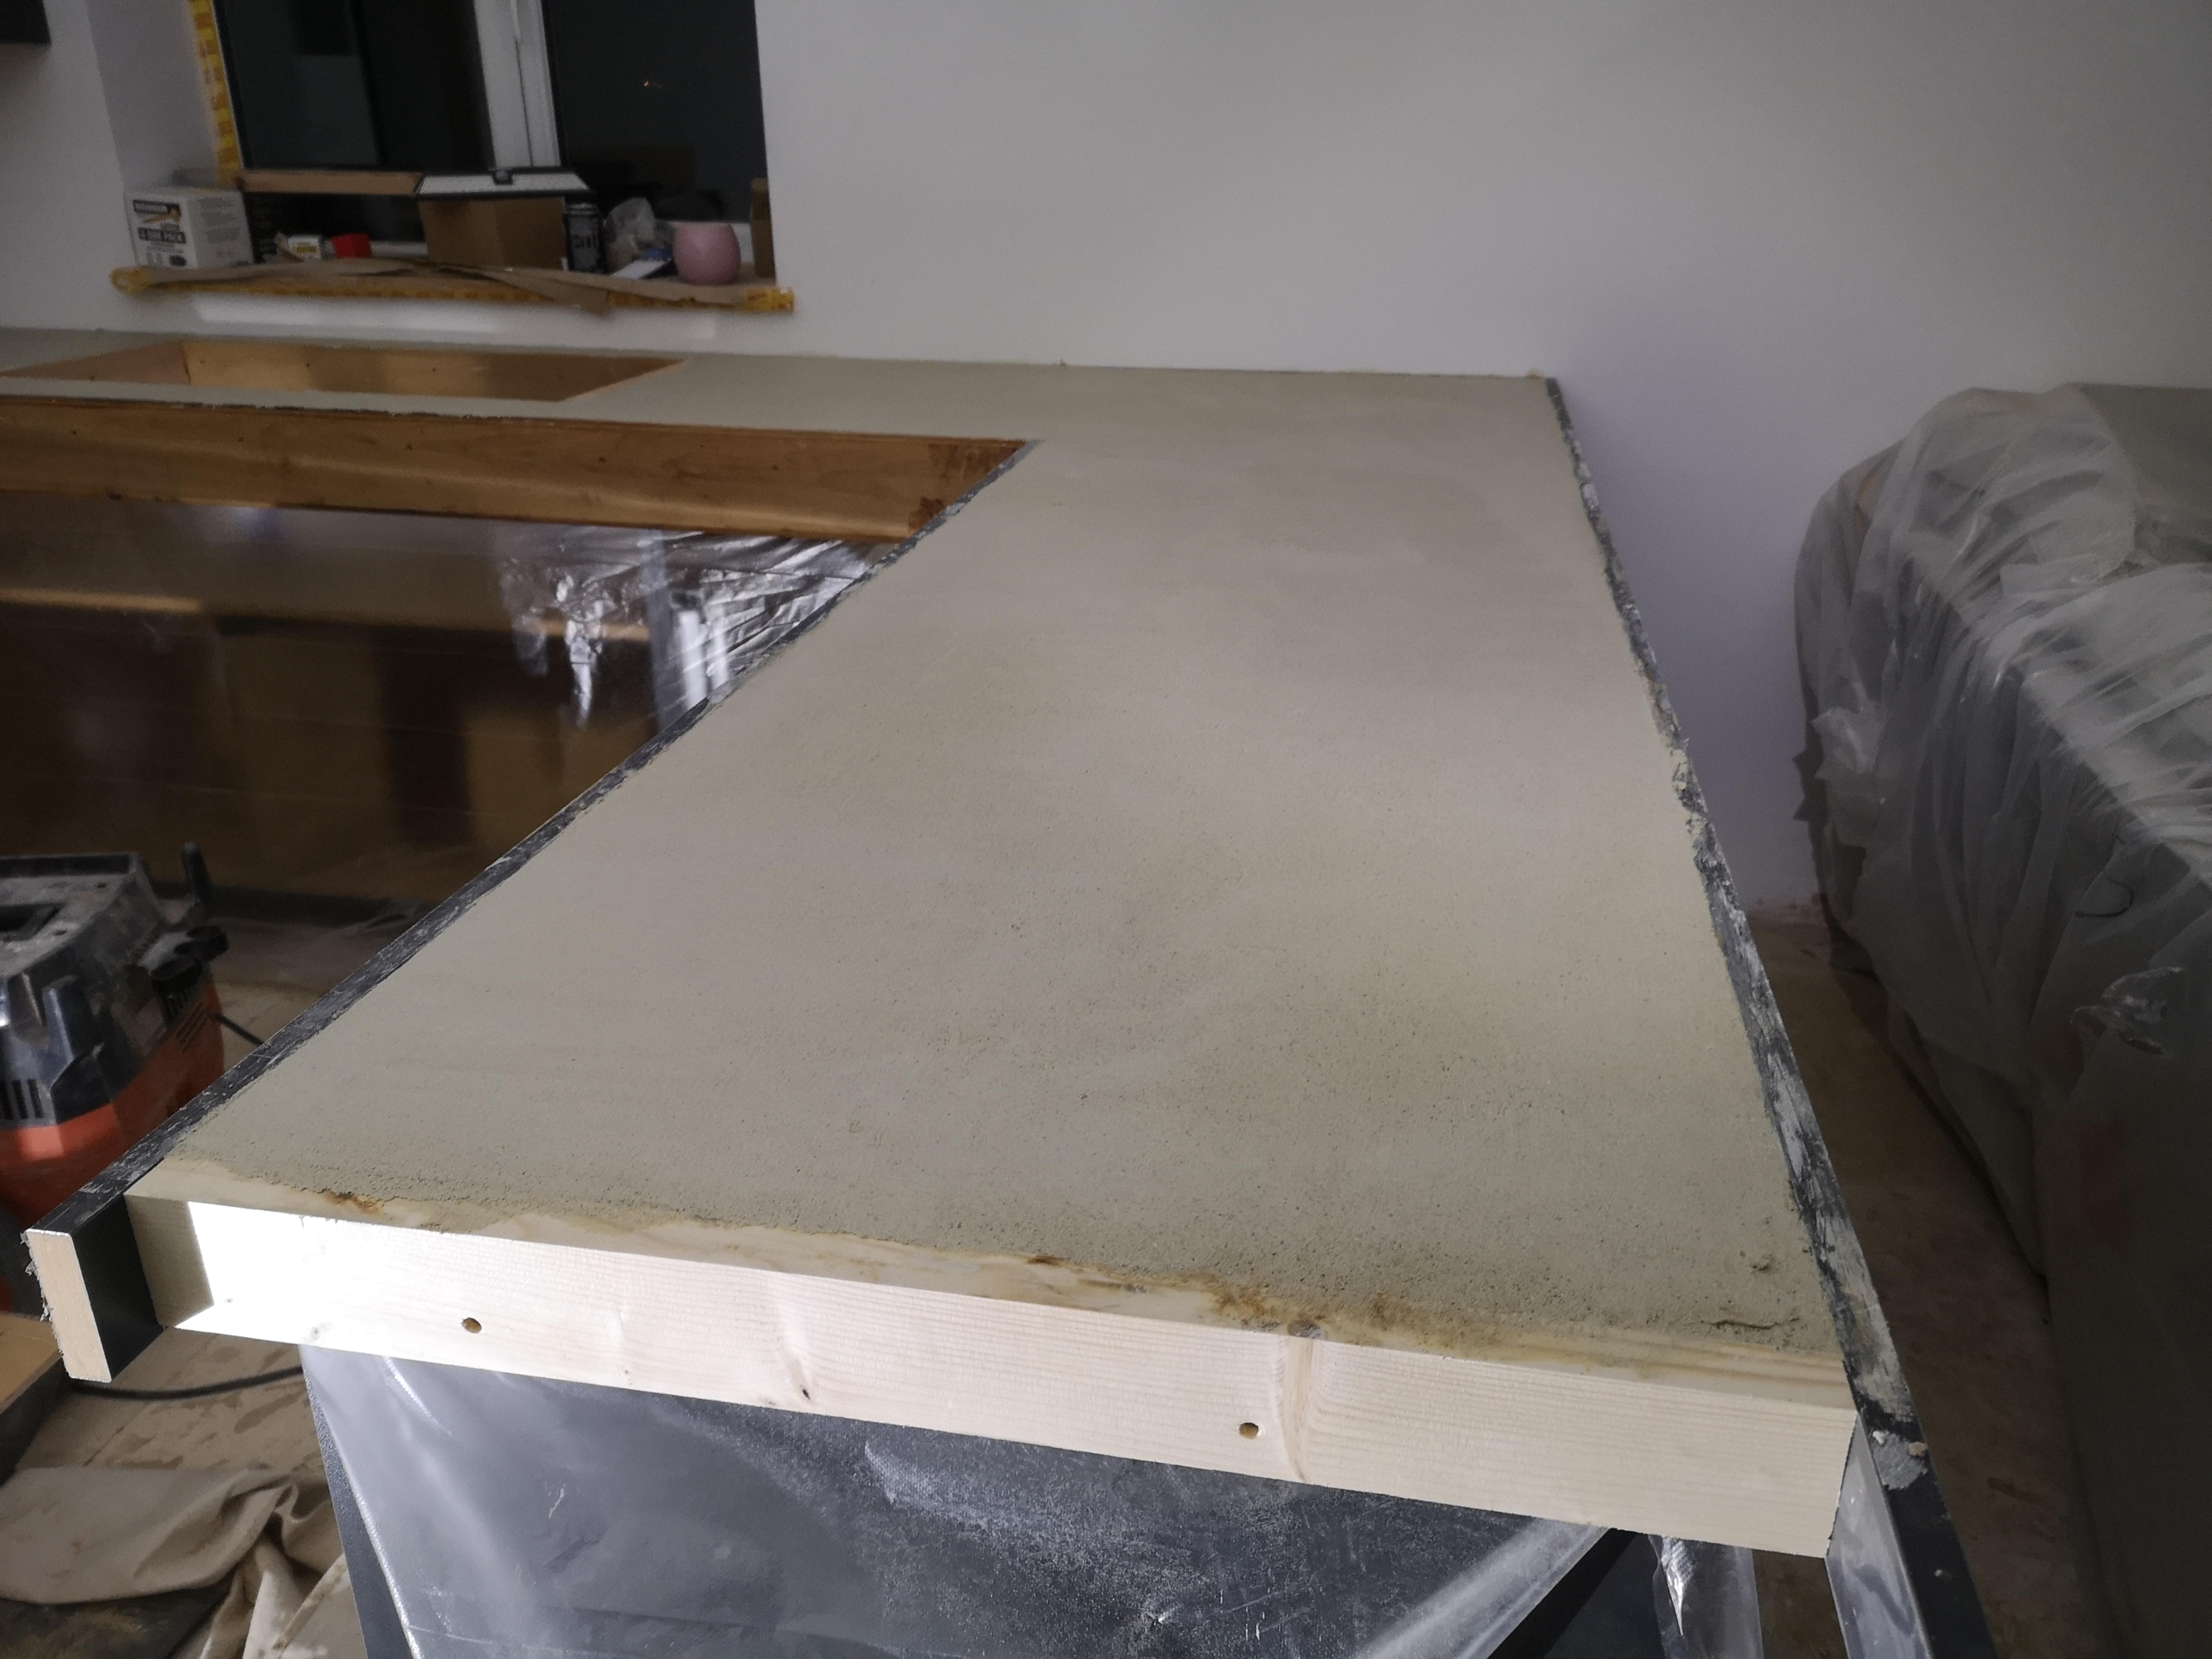
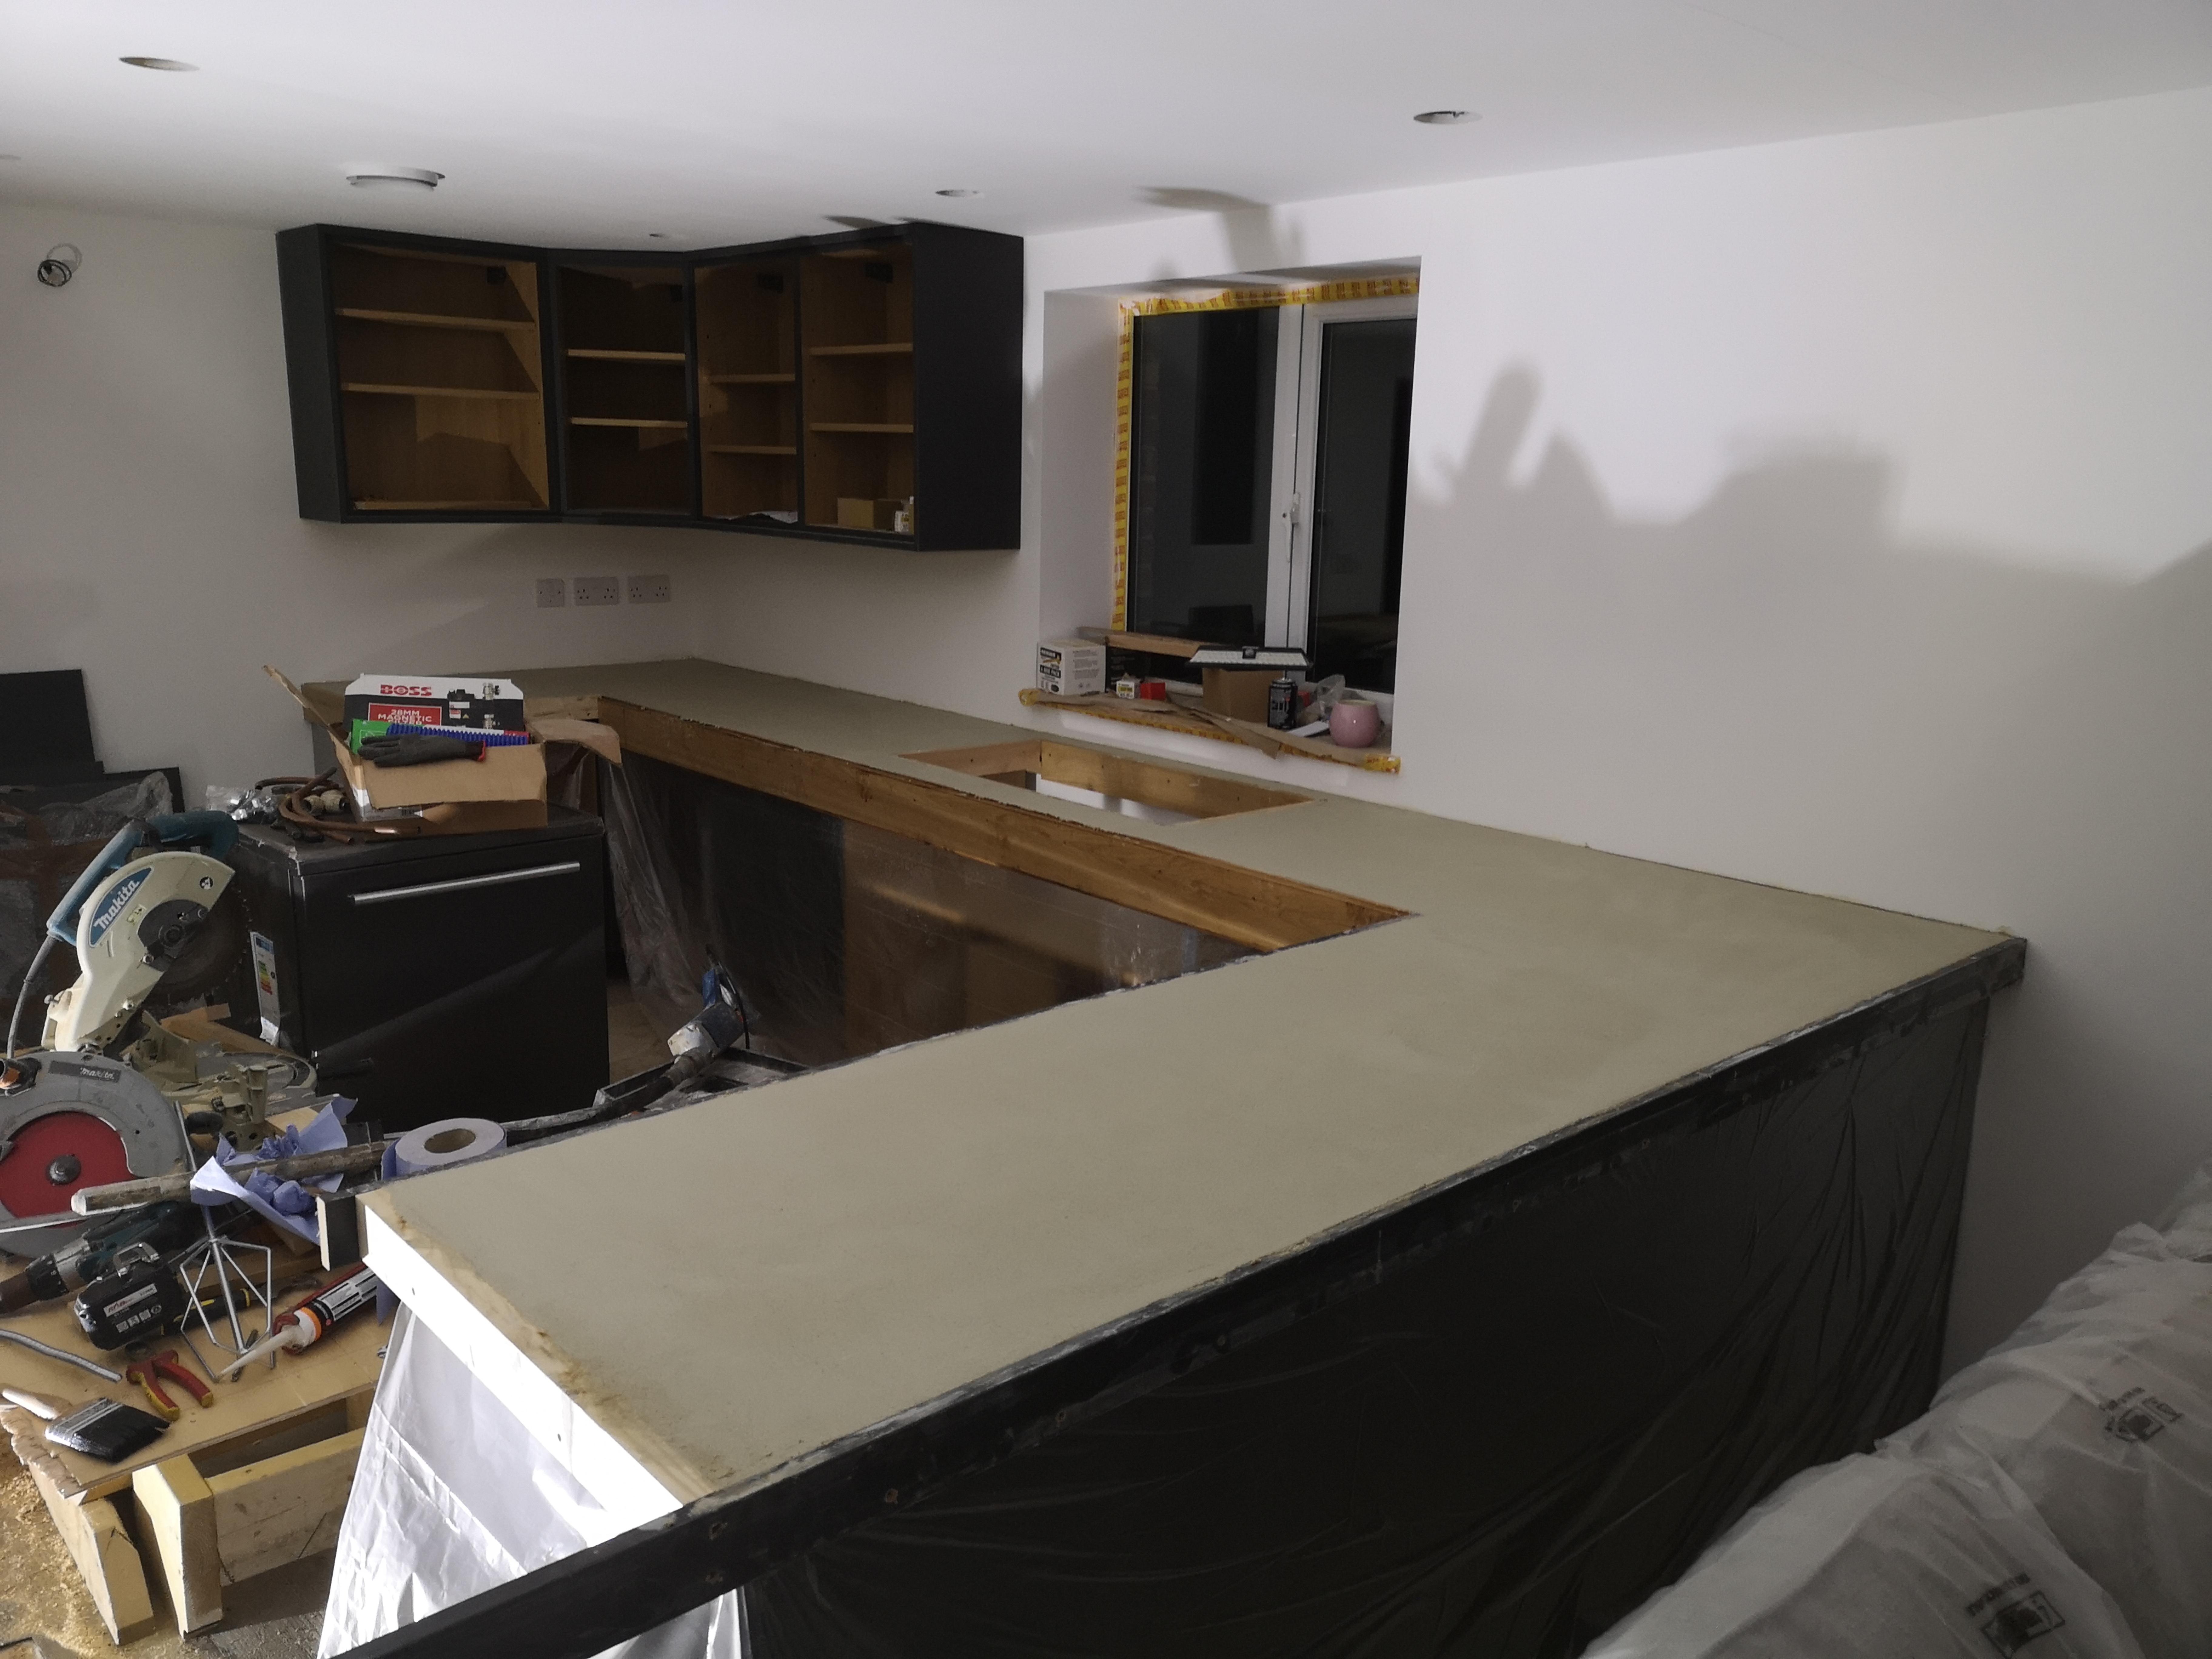
Just waiting for the silicone to go off..... The big pour will commence shortly. The base ply has been sbr'd as I want it to stick to the mortar. The outside formwork had been silicone release sprayed because I want it to release..... Wish me luck ??


 1 point
 -
I have paid the deposit on 2 structural kits from Alexander Timber Design in Troon. Hoping to take delivery 1st week in December. They were the most competitive and have been good to deal with so far. Can't comment much further until I get the kits on site and see how they fit but I would certainly recommend the structural option. That way you do not have as big an outlay at the start. You will need to supply your own doors/windows, plasterboard, flooring etc. Using this option gives you good flexibility as you buy materials when they are needed (and can usually pick up a few bargains from sales/builders merchants/gumtree/ebay etc I bought a kit from Scotframe before and through no fault of theirs the project ran on a bit but they deliver to a set date for each phase and although there was some flexibility it was not really enough for what I needed so if you go down the full kit option make sure you keep to schedule as material will be turning up to pre determined dates. With the structural kit you can include all the internal partitions and this gives you pretty much a clean slate to work from once erected and as mentioned before gives you greater flexibility regarding the flow of materials. Hope that helps.1 point
-
I use this one on external intakes and on kitchen extract https://uk.rs-online.com/web/p/filter-media/1221772/ this size will last along time and free delivery.1 point
-
Faye would look good in resin hot pants methinks. She's make you proud(er) ?0 points
-
Nope them (you) Germans were and still are good with concrete just now it is used for different purposes.0 points


This leaderboard is set to London/GMT+01:00