Leaderboard


Popular Content
Showing content with the highest reputation on 10/11/16 in all areas
-
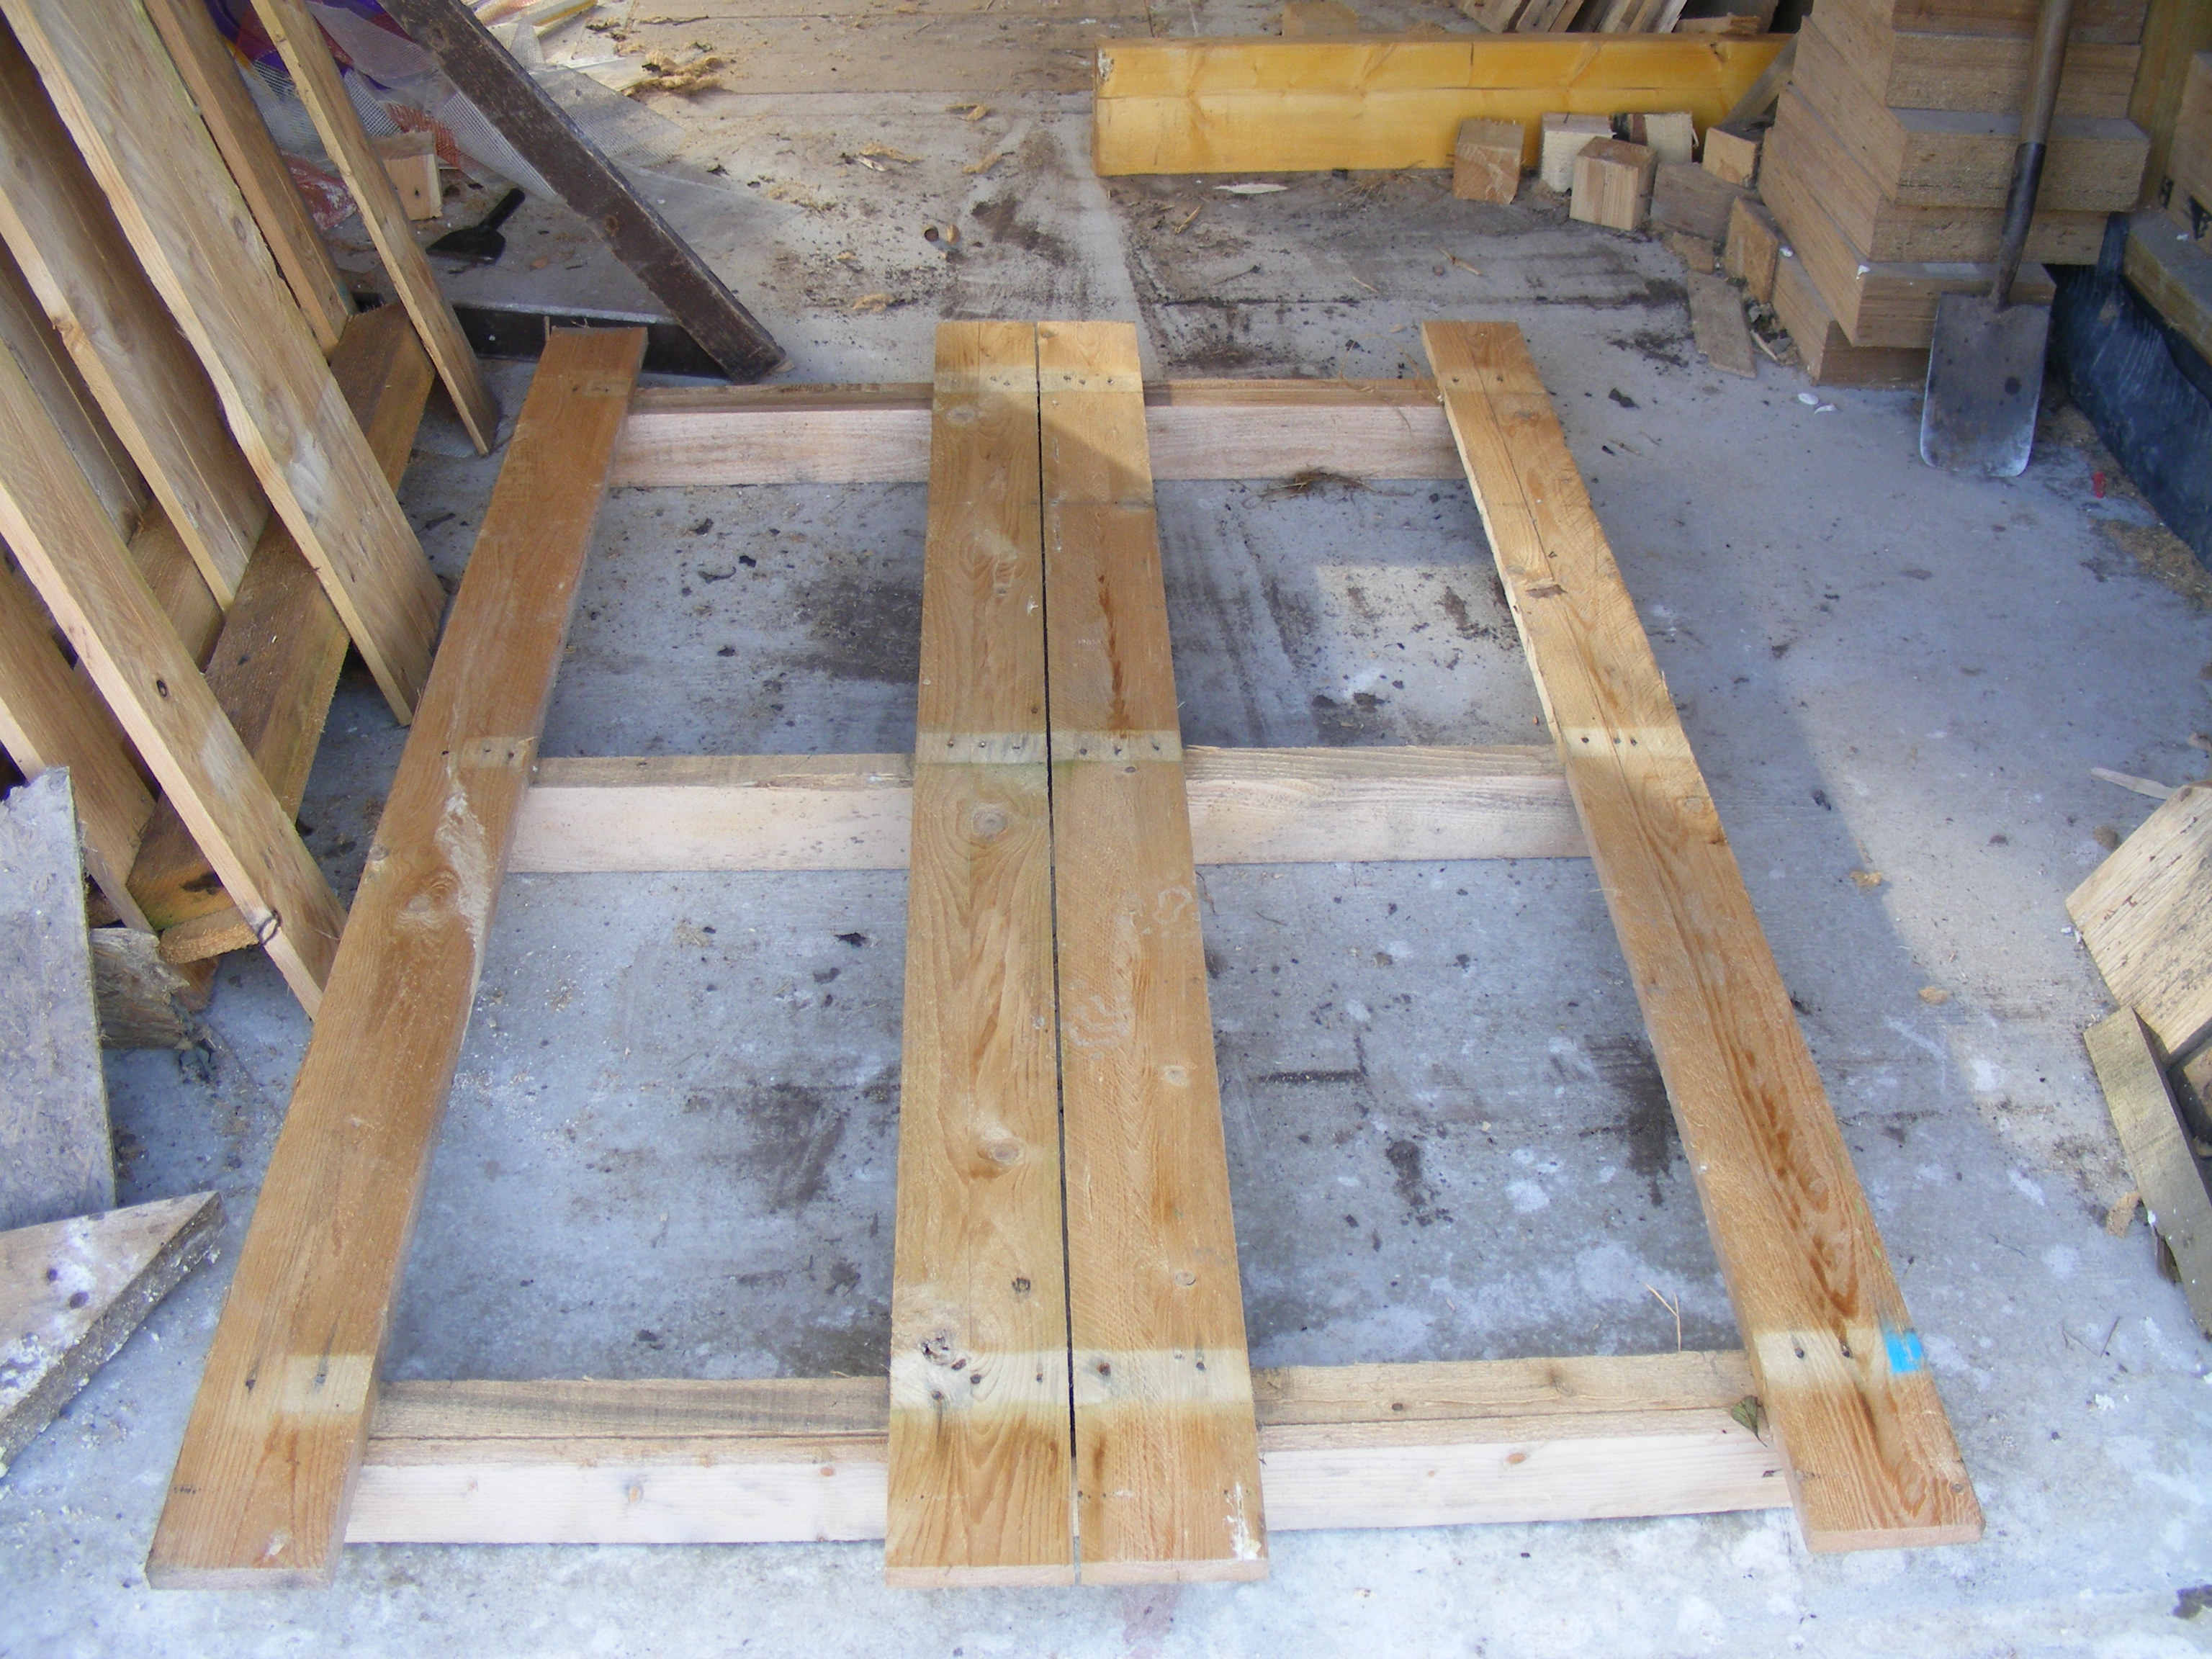
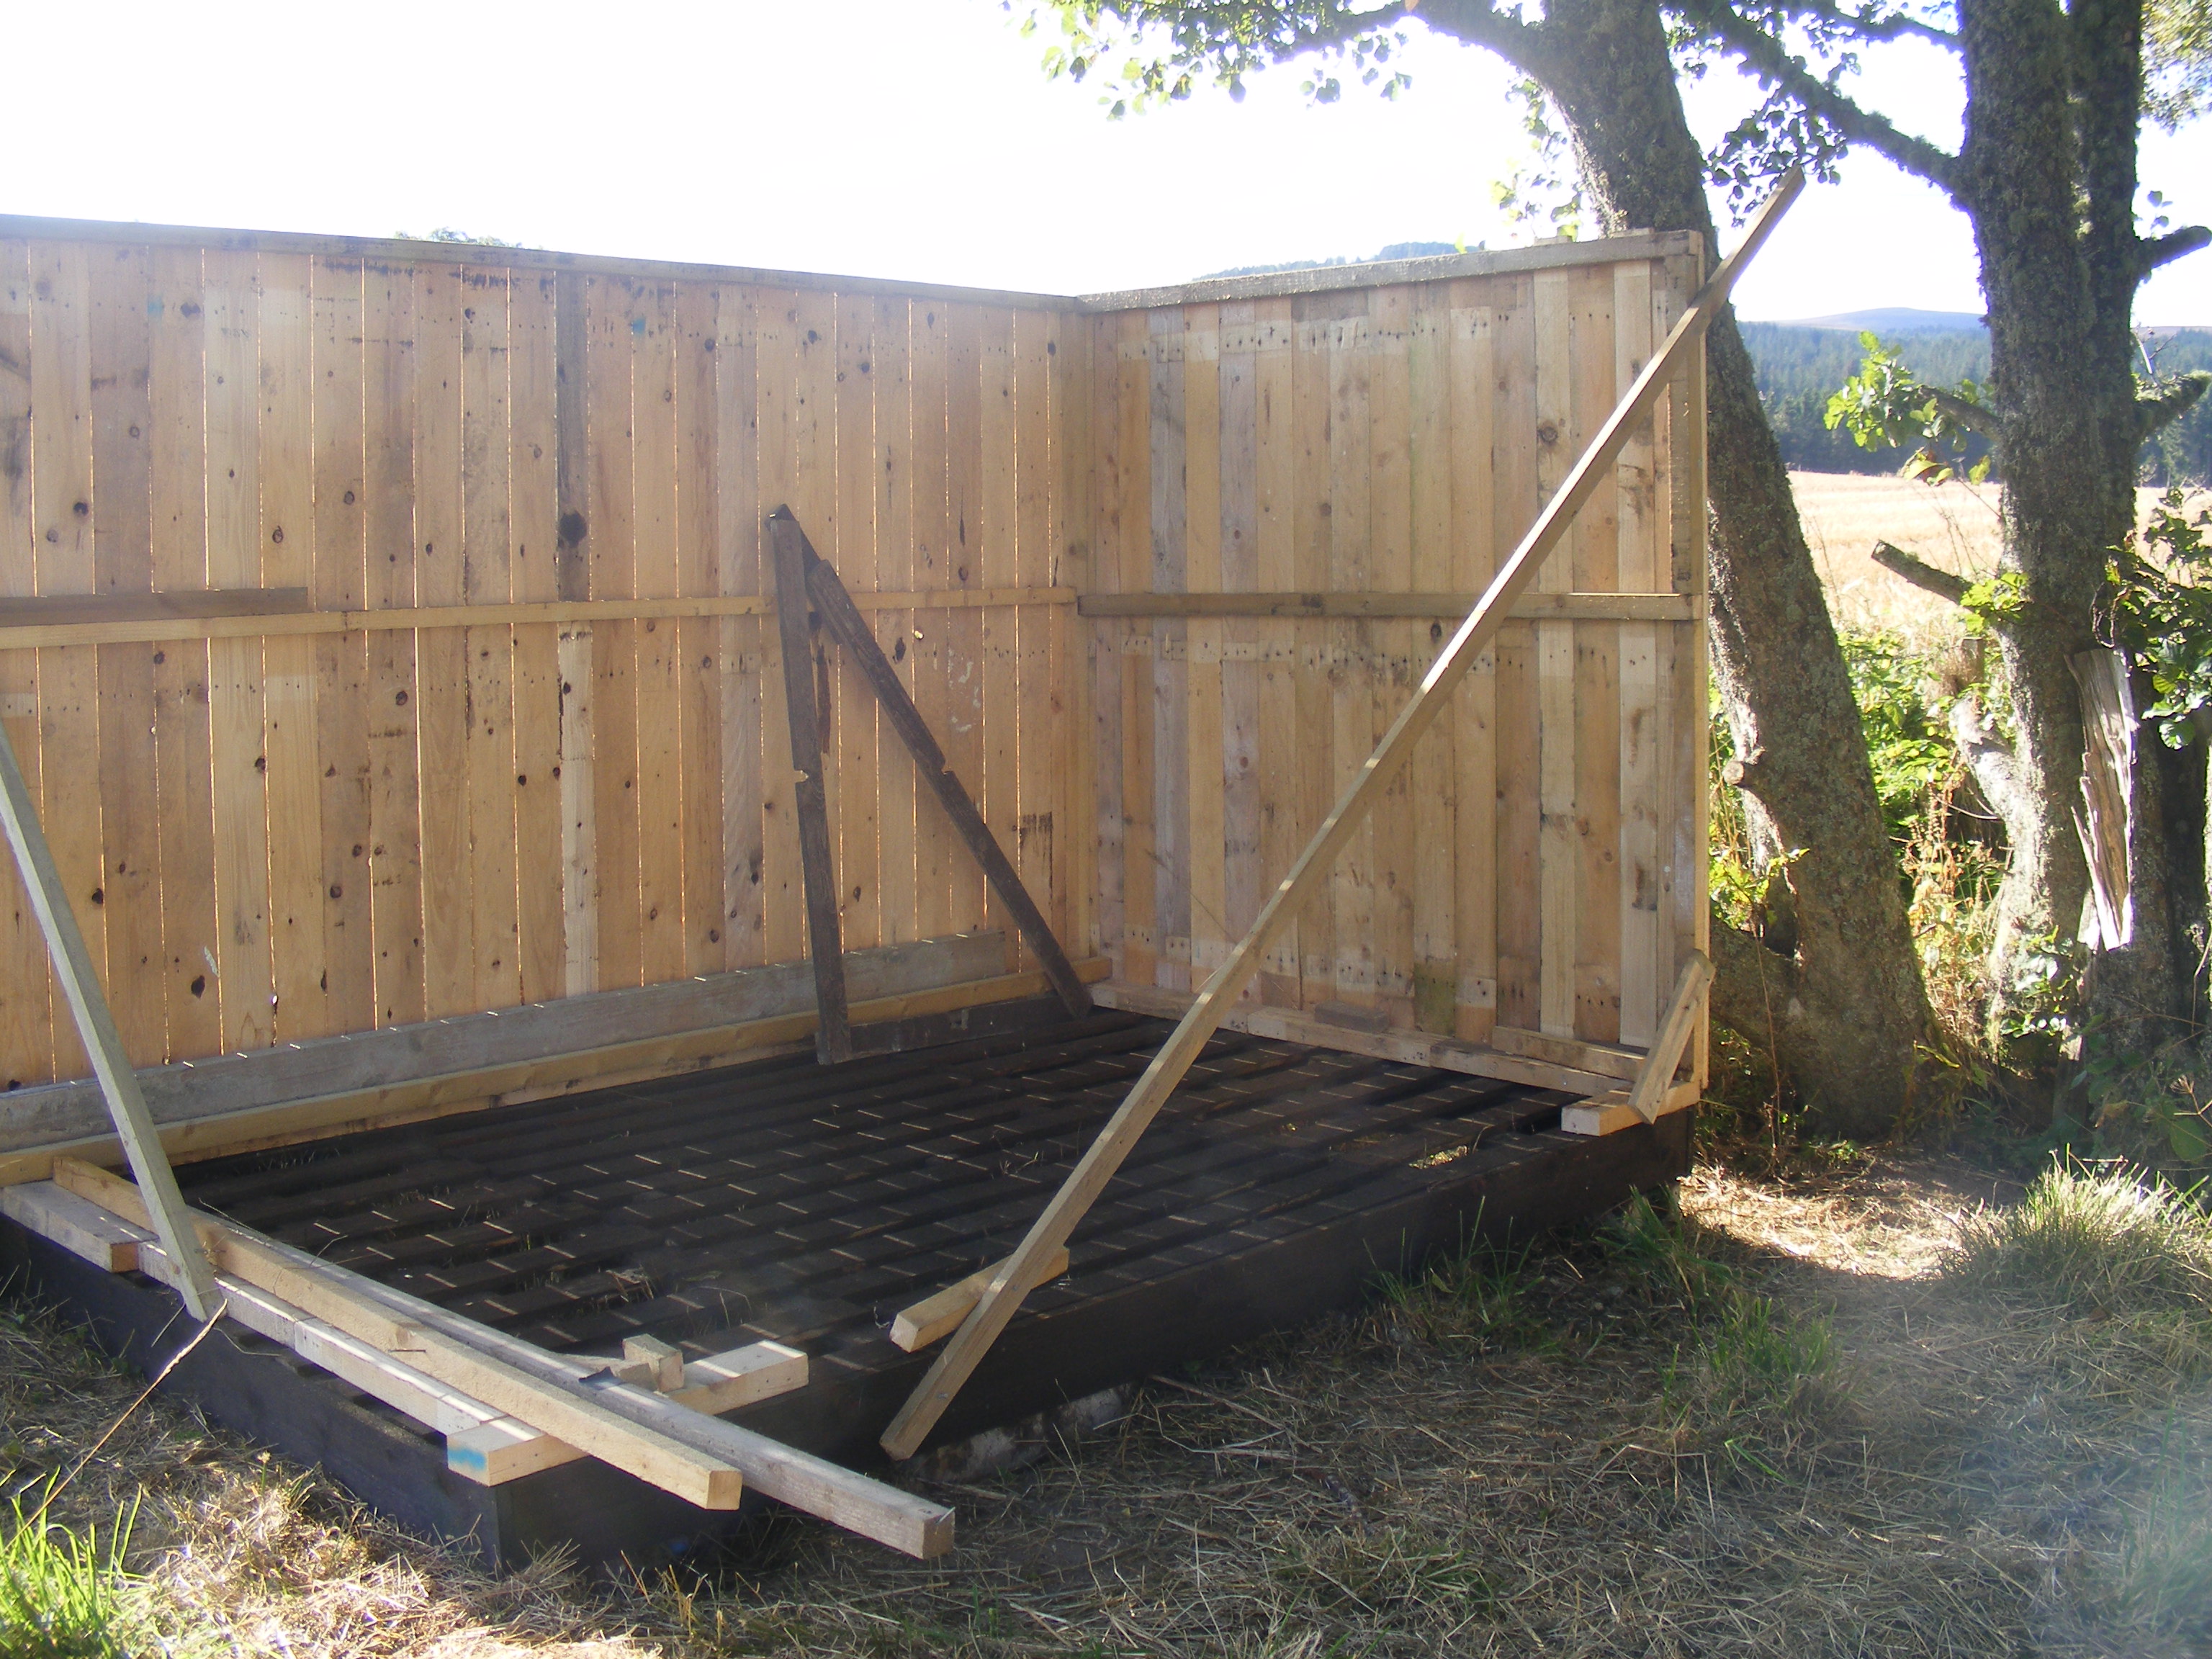
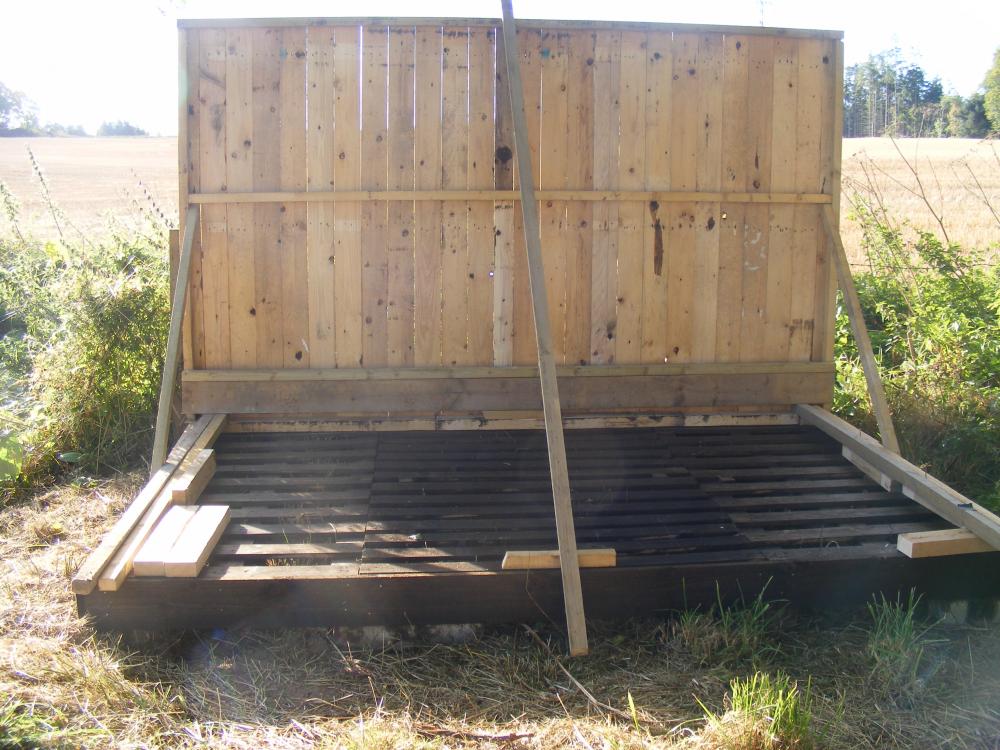
One of the things you accumulate during a self build is pallets. Everything comes on a pallet. Some good, some bad, some ugly, some not even worthy of firewood. One of the things our plot needs is a shed. Somewhere to put the lawnmower, strimmer, garden tools etc should we ever find a buyer and move into the static caravan. I don't have any spare money to buy a ready made shed, not that I think much of the way most sheds are made anyway. So a while back I said to SWMBO "I am going to make a shed out of those pallets" The reply was not exactly "oh that's a good idea dear" Some (most?) pallets are not fit for making stuff. But I have rather a lot of these that all my wood fibre board came on. When dismantled they each yield four 6ft long 5" wide planks and they dismantle relatively easily. So these planks will clad 3 of the walls of the shed. So lets start. First you need a base for it to sit on. Well I have the three large pallets that my windows arrived on. Quite substantial and put together will make a base 9ft by 7ft, so big enough just for a garden tool shed. Lay them on the ground with the corners and ends of the members of the pallets supported on concrete blocks. To support the mid span, drive some stakes in as far as I can then fic these to the middle of the pallets. Not only does that give extra support, but it anchors it all down for when the wind blows. Of course I forgot to take a picture of just the base, so here is the base and the back wall. The observant will notice the base is slatted with big gaps. The gaps are not even enough to fill in to make it a solid floor. So the floor will be over sheeted with OSB using the pallets as the "frame" and the OSB as the finished floor surface. Today I built and added the first end wall. So one other end wall will be made from the final pallets (still to be dismantled) The front will then be clad with some different wood, a load of 6" X 1" planks that have been used as temporary bracing during the build. the front will incorporate two windows and a door. The roof (probably the only bit I will have to buy) will be corrugated bituminous roofing that I used previously for my wood shed. This is a fill in job, low priority, but fun (more fiun than sanding and re varnishing the windows of the old house)

 2 points
 -
Very interesting. My perception has always been the reverse, generally influenced as it has been by the experiences of friends who have bought or lived in large developer built houses, but that is perhaps more to do with the issues highlighted by Steamy. When you say house types are a lot more thoroughly designed and developed, in what context do you mean? I'm guessing from your previous comments about developer build costs that the focus of all that technical design work is to be able to build these standard units at the lowest possible cost (far lower than a self builder could achieve).1 point
-
I've likewise got a stack of pallets sitting on site. I'll be getting rid of them all except for the three that my windows and doors came on (Rationel do seem to supply very good pallets). At my last house, I built a series of large storage boxes for all of the various garden clutter I didn't want in the shed. I used the wooden crates the roof slates had come in, one turned upside down on top of the other, strengthened them using offcuts of 2"x2", then clad them with sarking board offcuts. I covered the roof with DPM which was going spare. The only cost was buying some nails. It really was very satisfying making something useful from stuff that would otherwise have been disposed of.1 point
-
Hello All, Just want to get some opinions on what is best out of the above three building types? Some specific questions arise while researching the internet: Benefits/drawbacks Concrete blocks with EWI Fully fill cavity walls Poured concrete walls with EWI Which is more cost effective etc Thanks, Shah.1 point
-
Go onto Pears Stairs and you can price it up yourself using their online stair builder. You can choose infinite variations of oak, glass etc ..!1 point
-
I use instant gasket stuff for that. Great on chocolate box connecters on cars/boats too. My doorbell terminals have it on.1 point
-
My roof is (starting from the outside) Tiles, battens, counter battens, breathable membrane, 100mm wood fibre board (used as sarking) 195mm rafters filled with two layers of Frametherm 35, 9mm OSB, 25mm battened service void, plasterboard. Originally I was going to use blown in insulation to fill the void, until I found the price. Frametherm 35 gives the same U value as the blown in insulation would have, at a much lower cost, plus it's a bit more of the job I can DIY. The frametherm is nice(er) stuff to work with and is stiff enough to stay put when you press it in between the rafers before boarding (I have a test piece that has been in place for 6 months now, not boarded, and it hasn't fallen out or slumped) In my case the wood fibre on the outside is mitigating any cold bridging and adding to the insulation, rather than having extra on the inside. I think the overall U value is about 1.31 point
-
I have a room in the roof build and I went the knauf route. Much easier to cut and while it mightn't be as good on paper u value wise by the time you cut the pir up and go round foaming and tapping they will be not far apart. I have 140mm high density between my rafters then 50mm pir underneath. Pir has all the joints taped up then I have an airtightness membrane and then the plasterboard. Didn't need a service cavity as I made sure all the plugs etc where on the inside block walls.1 point
-
I grew up in a house that used a wood/coal burner with back boiler. My parents were more than happy to see the back of it when gas CH was installed. It's not the feeding with wood that gets to you its the emptying ash, cleaning of the glass, relighting etc. On balance I would install a stove (I like a real fire in winter) but I would ditch the idea of using the stove to heat the TS and install ASHP from the outset. The cost saving on the stove and the associated back boiler, plumbing and installation would help pay for the ASHP. There are other reasons for ditching the back boiler.. A new house will be well insulated that it will only be possible to run a small low output stove anyway. Are there many stoves that output little to the room and a lot to the back boiler? I've heard not. I would also want my stove room sealed so it burns outside air not room air. Again that reduces the number of options. Is there a low output stove that can hold enough wood to still be burning next day? How big will the PV system be? Is it worth using it to heat the house or would most of the benefit come from using excess to heat the DHW only? The heating won't be on in summer and excess PV output will be down in winter (more used for lighting). I think I'd be happy with just using the excess for DHW. Taken together (no back boiler and PV for DHW only) the result would be a much simpler system to install and operate......... . ASHP -> small buffer tank -> UFH ASHP -> Mains pressure DHW tank -> mixer -> DHW PV -> Element in Mains pressure DHW tank An off the shelf mains pressure DHW tank is also likely to be cheaper than a custom TS even though there isn't a huge difference in the parts count.1 point
-
Standard build up of 190mm joist full fill with a rock wool product plus 40mm of PIR under the rafters gets you there and it also means you have a VCL with the foil. I plan to do 2 layers of 25mm insulation with a cross batten and counter batten which leaves a cold bridge of around 0.064% which I think I can cope with ...1 point
-
My build is working out at just under £1000/m2 if I include everything except land costs and final decorating/furnishing. If I take out the drainage system, services, and access, the actual building itself is about £500/m2. But, and it is a big but, this is because I have literally done everything myself except for driving the digger. So what you are seeing is materials costs only (plus plant hire). The spec is reasonably high (3G alu clad windows, high levels of insulation, decent woodburner). It will have taken a year of my life full time, and a year or more part time prior to that. All for a 43m2 bungalow! The small size is what makes it feasible to go completely DIY, but it also pushes the price per m2 up a hell of a lot. If I build another one, it will be bigger, and I will get a labourer...1 point
-
The only holes there should be in any walls are for doors and windows. Get the bolster out and start hammering.1 point
-
Excellent question. That would have been the sensible thing (as long as you like render finishes as I do). However when I applied for Planning Permssion for a 3 storey replacement house in the countryside, I decided I had t make it look like a nearby Water Mill, so the application was for a building clad in white weatherboard. I was very glad to be granted permission with few conditions (and I didn't want to risk reapplying).So then we had to work out how to hold the cladding up - and the outcome of that was 'build a second skin in 100mm. Pain in the neck and with a big price tag. Re suppliers of prefab houses: I will have to dig out the details - but please note I cannot recommend any of them1 point
-
The roof was one one of the things that made my ICF quote really expensive. I just got it out again. The quote was £150k for just EPS panels, no steel, battens etc. It is more than 50% more than the roof I am building which has a better U-Value. Actually looking back at the ICF quote, the roof, foundations and walls all cost around 50% more than what I am doing now. They also had very poor U-Values. The EPS used inICF systems has a lot worse R-Value than PIR insulation and the walls have to be very thick to get a 0.15 U-Value, probably similar to my 420mm thick walls.1 point
-
I was quoted £32k EX Vat for SIP panel roof that was 175mm panels so a uValue of 0.15...! Not surprisingly I didn't bother following it up !1 point
-
The concrete upper floors haven't come in with final quotes yet but are looking around £50 a square metre, hopefully less once the quotes are in. But then you have the extra costs as the ceiling below has to be put on straps, the extra height meant I had more spoil removal from the site etc. I didn't ever price up a posi-joist floor but it is possibly around half the price. Also I wanted under floor heating up the stairs, I am told this is still possible posi-joists, but it is a lot simpler on the concrete floor. I believe that SIP roofs are expensive. My roof is made of small trusses and some straight rafters. The big cost is the PIR insulation. The original quote was astronomical using Kingspan. I changed to Celotex as they make 200mm insulation in one piece which can be cut between rafters. However, I am hoping to use 220mm Knauf Omnifit Stud plus insulated plasterboard underneath. It does not give quite as good a U-Value as Celotex, but is easier to fit and better from a noise and air tightness point of view, plus around a third cheaper again. I can't guarantee I am using it as so far it has proven almost impossible to buy in the UK despite being heavily advertised by Knauf.1 point
-
Heat store 938 and a small buffer for Ufh would do you proud . Fill yer boots1 point
-
Well, it won't surprise many of you to hear that some of this thread has whistled well over my head, but I've read it all and I'm actually quite encouraged by that which I have understood. It seems likely to me, as so often is the case when opposing opinions are articulated, that the truth (in this case best practice) lies somewhere between the two, and that (hopefully) is just about where my build should end up. The ambition for me was to create a house that delivers the best possible environment for my wife, rather than the most energy efficient possible. Her health problems include chronic asthma, eczema, severe allergies and bronchiectasis (a degenerative lung condition). Due to a very rare 'syndrome' she has no sweat glands, so rapid temperature/humidity swings play havoc (and not just with her asthma), and just to add insult to injury she is T2 Diabetic (despite weighing little over 6 stone) and has high blood pressure, reflux and osteoarthritis. As I set about researching the home I should build, air quality was, unsurprisingly, my main concern. Ebuild certainly informed my opinion, but I decided quite early that PH levels of air-tightness, insulation and energy efficiency were not for us. Yes we'll have a well insulated home; yes we'll have MVHR with F9 filtering (oversized so hopefully capable of more ACH than may be prescribed as we REALLY don't want to be opening windows); and yes we'll have it reasonably airtight (I'm aiming for around 2 and if we achieve better I may well engineer some 'leaks'). I don't expect the house will demand too much heat input from the UFH (driven by ASHP) but I'm quite happy to force a need for more by bypassing the MVHR unit's heat exchanger in winter (using the summer bypass, not by opening windows!) if that proves to help air circulation (due to the additional convection) and management of humidity levels. As for solar gain, I wait to see whether the SageGlass (electrochromic) glazing on the southern elevation proves to be as good as the manufacturer claims at regulating unwanted SG at warmer times of the year, whilst allowing us to benefit from it on sunny winter days. Finally, as we're building a chalet bungalow, it was a no-brainer to go with a warm roof throughout, even in the non-habitable spaces. Time will tell whether the 'gut feeling' that has largely steered my decisions will provide the home that can give my wife the best environment for her wellbeing, but this thread has at least convinced me that I have a fighting chance.1 point
-
No usually you have to do it or hire someone to do it. The BRE have a guide that explains how to design a soakaway and that includes some info on how to do the test.. http://forterra.co.uk/plugins/downloads/files/BRE365.pdf If you hire someone you get a report you can wave at the planners (to get a planning condition removed) and Building Control to keep them happy. You need a digger to make a few holes and it's common to get both a percolation test and a soil condition report done at the same time to save money. The latter may be needed for the foundation design as it includes info on load bearing capabilities, clay shrinkage etc. However if the soil in the are is well know/understood then you might get away without. May also need a water bowser to fill the hole for the percolation/infiltration test.1 point
-
Ha-ha - I wish I knew what you were talking about - sounds fascinating! good luck1 point