


Carrerahill
-
Posts
2132 -
Joined
-
Last visited
-
Days Won
10
Everything posted by Carrerahill
-
Concrete slab on top of dwarf wall or adjacent to...
Carrerahill replied to Carrerahill's topic in General Structural Issues
Hi Dave, thanks for your input. The sketch is inaccurate, it's being dug down into undisturbed boulder-clay. But had it in real life been as drawn, I'd agree! Yes, the site is being excavated down to the hard clay, the soil being used to lift the lawn. I like your idea of the stepped site, then level each site onto level ground - the sketch was not ideal, it didn't show it all properly it was just to show the wall issue. Yes the third sketch is the wall with a engineering block buttress then filled with concrete. I am just in this minute from the builders yard with engineering brick so that's the weekend sorted! -
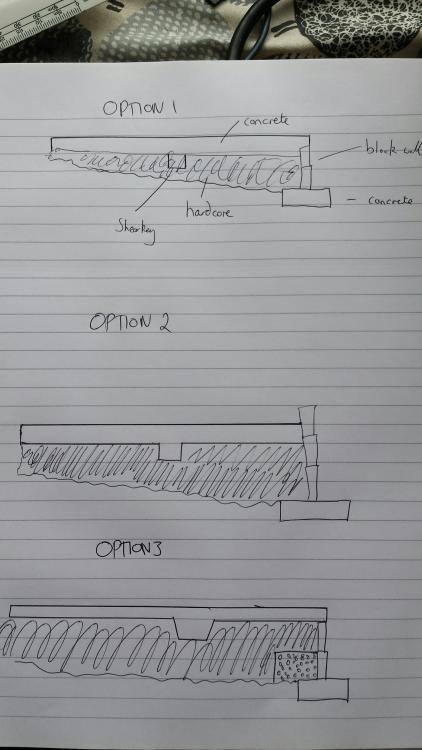
Hi guys, I have a question regarding my garage slab, I'd just like to see what you guys think and also what you may have experience with. I have attached some sketches to help explain this. My garage site is on a slope, it slopes to the back. I dug out and poured at the rear elevation a C35/40 foundation 400-450mm wide and min 200mm deep. I then built a 2 block high wall, I may add a single row of engineering brick along the top to get the level spot on, so this is going to become the rear wall. It was done like this because of the slope, the amount of shuttering and the strength of said shuttering would have been fairly heavy duty and because of the proximity to the neighbours it would mean needing to remove mature hedges to build the shuttering structure - their only stipulation when I said I wanted to build this garage was to leave the hedges, although they are my hedges I have respectfully done this. The rear found and wall also forms a back shear key of sorts to help support the slab and stop it slipping (there will be another mid-point shear key cast as part of the slab). It's all quite well thought out and a civil engineer gave me the design spec but I have got some questions now. I was thinking about the slab and how it will work in relation to this little wall, the next stage would be to attach 6x2/8x2 to the wall running up to the front to form the shuttering. The concrete will then fill the shuttering up to the rear wall, but my concern is that the slab could push upon this wall and potentially push it out in the future if there was any slippage or settlement. So I have decided that I think the slab should sit on top of the small block wall, this would then mean that the rear wall would restart on the slab, and if slippage settlement occurs it would be less likely just to push out the rear wall - instead the wall would move with it. So I would build the shuttering to the back of the wall and let the concrete sit on top of the wall. I would need to insure that the infill was very well whacked to ensure the slab didn't settle on the inside of the wall and crack as it cannot move because of the wall. I was tempted to make up a no-fines concrete and back fill on the inside of the wall so that it was a bigger concrete base. I have sketched out some thoughts and options. I am an engineer so I tend to look at things in every fine detail, but not being a structural/civil engineer I can only start letting my mind run away with ideas and thoughts that I don't have training in.
-
I usually buy my batteries from RS Components then solder up replacements, make sure to match the chemistry, for a charger you can look at various options including another manufacturers 12V battery charger (more like 13-14V output) but again try and match the type of chargers because it will almost certainly be NiMH or NiCAD and the different types charge differently. NiCAD charger's will usually undercharge NiMH for example.
-
This is great info and the 345 rule was going to be my go to for the garage slab shuttering but I have another question which I will tag onto this to keep it to one informative wall starting post; I know the OP has a spinny laser thingy to get his heights, but what did they do before this magic? The reason I ask is I built a small wall a few weeks ago, I was fairly sure of the found being fairly level as I did my best to get it right. So I worked out the proposed location of the wall with pegs and strings and stuff and checked and checked again to make sure I was about to start my wall in the correct location then I placed a bed of mortar on my found, set the first block and then wrapped a string around it and ran it out to the opposite end of the wall (5000mm away), I then took another block and just placed it at the centre point on the found and sat a straight piece of CLS between the first block and the middle block and using packers set it till the CLS was dead level and sat square on both blocks, I then used that block to run the CLS to the opposite corner of my 5000mm long wall. I lined up the opposite corner block, set a bed of mortar and lightly sat the block on it, then using my CLS and level I was able to check that the block was dead level to the middle block. I checked all the levels again and was happy, I set the line to the very top edge of the two blocks now set in mortar and I now had my line to work to... or so I thought. I started running block into the centre from both ends at the same time and when I got to the middle block the LHS wall was 10mm taller than the RHS. Now over 5000mm this is a heck of a lot in my eyes. To resolve it I just ran a slightly bigger bed on the low side and a smaller bed on the high side. I know it would not pass BC and is not good but as it is just 2 blocks high to hold some back-fill up and will end up covered in concrete I was not too upset; well actually I was because I spent a lot of time trying to get it right. But what would have been the way to do this and get it right? I guess my CLS was not that straight, never is I guess - should have used a piece of aluminium box section or gone in smaller increments and used a 1800mm level.
-
I now have a small wall along the back found which the slab will be poured up to. I still have no planning permission for any of my projects annoyingly, that is 8 weeks almost to the day so I am hoping for something soon as I want to get watertight structures up before mid autumn! I will post some update photos soon.
-
Well, nothing has happened this weekend, it rained too much, I was at the building show in Glasgow on Sunday though so picked up some good ideas and saw some good materials and systems. The rear found for the garage is 100% complete as of middle of last week, so I can start the block-work - I need 36 blocks to start it, I don't want a delivery of materials yet as they will get in the way so I went to TradePoint - 1 in stock! I enquired as to what was going on apparently the supplier as a shortage. I'll need to get along to the merchants this week and get them.
-
Not really done a lot of thinking yet to be honest, just at an early planning stage and consideration of some sort of insulation.
-
I figured it was a concrete saving initiative but I figured I would ask in case there was some special reason - access to your fallout shelter or something.
-
How to build a rainwater tank system from IBCs?
Carrerahill replied to Bitpipe's topic in Rainwater, Guttering & SuDS
OK a bit far away - I could set you up with once used (for whisky) IBC's but transport would make them cost prohibitive at £50 a pop on a pallet line.- 50 replies
-
- 1
-

-
- rainwater
- harvesting
- (and 1 more)
-
Well done. What are the excavated but not filled (boxed out with ply) parts of the trench about? I poured 2 mixed loads of concrete yesterday...
-
Planning permission and boundaries & ground level
Carrerahill replied to Carrerahill's topic in Planning Permission
Well done! This reminds me of the time a friend had an issue with the DNO. When he moved into his smallholding there was a 250litre immersion heater in the loft, this had 12Kw of plate heaters in it connected to a Horstmann radio teleswitch meter. He informed the utility provider of the readings on move in date and all was well. Soon after moving in he ripped it all out and fitted tanks and pipework for a solid fuel appliance in the kitchen, he had the DNO fit a new meter getting rid of the Horstmann, he told his supplier and that was that... or so he thought. Bills kept on coming in for estimated readings for the Horstmann, which was quite a lot, which he refused to pay and even invited them to come and look at his shiny new board with a single meter. This didn't happen and eventually they said they were going to come and fit a prepay if he didn't pay his bill (he was still sending money for his normal meter amount). As you can no doubt imagine this went on and on, however they were messing with the wrong man here - they were dealing with a seriously expert amateur lawyer with the legal back up of a friend of ours a judge! The DNO were now threatening to get a court order to break in and do these changes, so he went to the sheriff court and took out an interdict against anyone who wanted to get a court order to enter his premises, not only did the sheriff agree, but insisted this was done due to the nature of my friends business. The DNO now could not get in and could not disconnect his power because he and 1 other property were fed off a single pole transformer and to split them would mean digging up his road - they were stuffed. Eventually the fools at the utility worked it all out and it went away but it is scary how inept the council or local utility etc. is. -
Planning permission and boundaries & ground level
Carrerahill replied to Carrerahill's topic in Planning Permission
Seriously? Some little twerp from the council BROKE into your new build to prove council tax could be levied? That is unreal! I'd have had him in court for that! Anyway, I digress. -
Planning permission and boundaries & ground level
Carrerahill replied to Carrerahill's topic in Planning Permission
The path has public access, there was talk of closing it off before I bought the property and taking the land but as it's been a right of way for x number of years it must now be left. I think you have all confirmed what I was thinking, this is not an exact science, as long as the building I build is more or less what I said it would be and where I said it would be we are all going to be happy. Unless I go and build a 2 storey garage or something, planning are never going to care really. It makes me wonder how many structures exist out there with planning consent that were not actually built 100% as planned and no one will ever notice. I have no intention whatsoever to try and flout the rules here but I was concerned as a first time builder that I would build my garage, kit it all out for some jobsworth to come and tell me it was 300mm to tall at the back and 43mm too far to the left or something outrageous. -
Planning permission and boundaries & ground level
Carrerahill replied to Carrerahill's topic in Planning Permission
I spoke to planning last year and explained where I wanted to build the garage and asked did I need permission, he came back and said yes because the path constitutes a road - I was going to argue this it's not a road, it's a 1500mm wide path and I own half of it but I didn't want to get my relationship with them off to a bad start. Also the garage sits beyond the front elevation of my house albeit about 10m away to the left where you can't actually see it from the road, it was only a small corner of it that came forward of the house but I would have ended up wasting a 1900mm strip down the side of my garage so I was not keen to lose that. I had to put in planning for the extension anyway so I drew up the plans, gave them to the architect who re-jigged them a little and submitted them as part of the application thus costing me no more anyway. Another argument I made was that if you look at the house and draw a line along the front of it to where it ends fronting a road, then drew a line perpendicular to first line down to the road, that according to PD is a permitted build area as it doesn't front a road. But he said no because the path was a road, so the line had to extend right along the front of the house. Anyway, application is in now anyway, so fingers crossed. I think what is being said above is the case, be careful, lay it all out and just build it without being stupid on any of the dims to prove I have done my best to adhere to the plans. -
Planning permission and boundaries & ground level
Carrerahill replied to Carrerahill's topic in Planning Permission
On the side elevation boundary it is a path (which I actually own into the middle of) and to the back it is my neighbours garden, the neighbours know about the garage and have seen plans and only stipulated that they wanted the hedgerow left alone, which is fine I don't need to touch it and want it to remain anyway. -
Planning permission and boundaries & ground level
Carrerahill replied to Carrerahill's topic in Planning Permission
The location plan simply shows the garage sitting on the site on the scaled block plan. On the proposed elevations plan it just shows the 4 elevations with a dimension showing the length, width, ground to soffit (or is that slab to soffit?) and ground/slab to apex - picture of the actual planning application elevations drawing attached.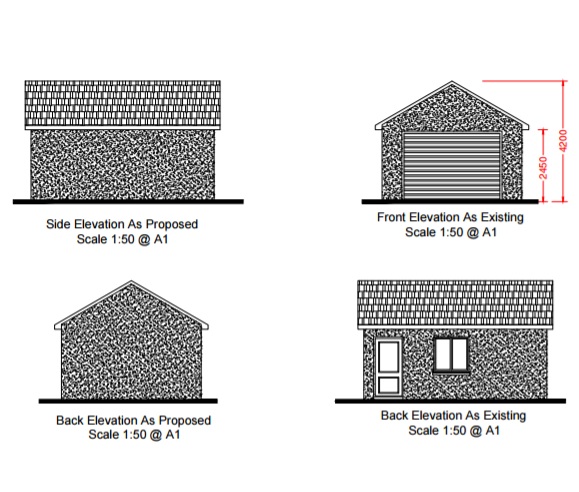
-
Hi All, Simple question; but a bit drawn out, regarding my planning permission and the setting out and heights of said proposal onto my site. As an engineer I work with CAD on a daily basis, everything is mm perfect, everything very precise - now come to my site and the location for my new garage - this seems to be a little bit, rough shall we say. I know from my drawings that the garage sits 800mm in and parallel from one boundary and 400mm going up to 1200mm on the rear elevation (site is not square and it made sense to align the garage with the side elevation boundary). So I go out and start to work out the physical location and bang in pegs and what not so I can see where I need to dig out and dig services trenches. Now the boundaries of my site are set out in traditional estate wrought iron fence which have been there forever, so I am going to use these, as my physical marker of boundaries. Now the question is this, if I measure 800mm out from the side fence, check it is square to said fence then measure 400mm in from the back fence and bang a peg in I now have the completed outside corner of the garage location, I can then measure 5000mm across and at that point 1200mm out from the back fence, by ensuring the 5000mm line is square to the side fence I now have the opposite corner of the back wall - the rest is the case of staying square to the side fence and marking out the site. That all sounds fairly easy and with some careful measuring and squaring off it will be fine - however, old fences are not perfectly straight and things do undulate a little, with care and attention I can allow for this and I will be fine. But really what I want to know is how much out could something be and planning would not care, and secondly, planning don't actually come and look do they? How would they ever know if I, through genuine error, ended up 40 or 50mm off course? The next part of this question is regarding ground level, from the front of the garage to the rear of my garage the ground slopes down to the rear about 450mm. My plans show the soffit at 2.4m, if the site was flat then all elevations could easily enough be built to have a ground to soffit height at 2.4m however I cannot do this, I am going to have to have the back end of the garage about 2.8m from ground level to soffit, I may be able to re-grade the access to the front of the garage a bit to lower it, maybe go down 100mm and put the slab in level at the front bringing it down a bit at the back but what is deemed as "ground level". I don't want to build this thing as I said above, only to find that planning say I am too high at the back. Thanks
-
Bloody brilliant! What a complete fool and time waster who phoned that one in! I hope planning start filing these complaints directly into a bin!
-
No not a Canadian thing but a North American thing. They have been into fitted bathrooms long before we, i.e. UK, started to include them mainstream.
-
I am now a big fan of bathroom units for the sink etc. We currently have a traditional suite with no storage in the bathroom, as a result there is no where to keep any bathroom essentials out of sight, so there is bleach hidden down the back of the toilet, cleaning stuff hidden behind the sink pedestal, whoever installed it also liked boxing lots of things in at lots of different depths and heights which was then tiled over creating some sort of highly slippery climbing wall! I know why he has done various things but to be honest had he just battened out the wall, hid all the services and installed to that he would have only lost 50mm on that wall and then had a much easier life. Anyway, 2 years ago my fiancee and I stayed with family in Vancouver who had just moved into a new house, our en-suite was a decent size but what made it so smart and tidy was the sink unit, it gave lots of decent space for toothpaste and shaving stuff, it was about 600mm deep and 1200mm wide, basically a 1200mm kitchen carcass in terms of size and build, with a big stone top on it. There was loads of space for bathroom stuff and the place looked neat and clean. I think every bathroom in the house, including the powder room had this sort of setup for the basins. The only place I have seen them in real life for sale so far is B&Q and some of them look like an MFI storage unit with a basin bolted to the top, but I know I will find the right one when I come to do our bathroom (after the garage and extension). I am a bit of a stickler for neat work, so I would make the plumbing neat anyway, but the idea that I can have it all sitting there exposed but hidden in the unit with isolation valves etc. seems like a great idea to me. I think North America has a lot to offer in terms of how they build houses, they have been doing bathrooms like this for decades and we only seem to be catching on now, also there laundry rooms, great idea, they think it is plain insane to have a washer or dryer in a kitchen, and thinking about it, it is a bit!
-
Hi guys, I am looking for a bit of advice on a external wall insulation system and where I can buy it. I am thinking of insulating part of my house and a recent extension (within past 10 years I think) which seems to have shocking insulation, part of the house I would just want to render over and possibly the extension would end up with Marley weatherboard or something on the external. I have seen this stuff going on, it looks very easy to install yet everywhere I look they want to sell and install the product. So, can anyone advise on a system and where I can get hold of it. Thanks
-
I think it would be easier jut to to get a note of comfort from the engineer and shove it in the inspectors face, some careful polite discussion with him should suffice though, which to be honest is all a nonsense given that the re-bar going in is heavier and will offer more support, not like they used A192 or something! It is just a bit over the top - like using a 6x2 instead of spec'ed 4x2! I do really wonder about the inspectors sometimes.
-
Right, I have just wasted too long reading borehole reports!! Very interesting stuff. I guess the confidential ones hit gold and diamonds!
-
Just had a look at the BGS site for borehole scans and nothing showed up, however one down the road shoes the makeup of the ground and it's similar to my findings at the depths I am at. Boulder Clay seems to be prevalent. That would help explain some of the rather nice big boulders I have pulled out the the ground, I am hoping to find enough to build a little wall or rockery section next to the new garage.
-
If it dries up I will have a dig about tonight and let you know. I would hate to concrete over a fallout shelter or something, if it is, perfect location as my garage can become the new secret entrance! Am I being to hopeful?
