


Gus Potter
-
Posts
2339 -
Joined
-
Last visited
-
Days Won
29
Everything posted by Gus Potter
-
Good point, design is an iterative process.
-
Floating floors: compression vs vibration
Gus Potter replied to Workerbee's topic in Floor Structures
Agree with @Nickfromwales Is the floor separating two different dwellings? If you are adding load to the floor have you checked that is ok? A drawing would help a lot. You need to start with the basics and develop from there. You can maybe see it but for us it's difficult to comprehend as a complete floor design. If we can't understand it then little chance your builder will and the prices you get will reflect that. -
Hello webby. Thanks for a good post and the work you have put in. I've attached a document from the RICS which is to do with spray foam insulation. This might seem a bit odd as at first glance it has got nothing to do with your post. But read the last paragraph of page 4. Then look at the diagram on page 5, then read around. For all on BH, it's also a good guide to help you understand some of the basics about roof insulation. @webbythewebster. Here is a bit of a lay persons guide to insulating an old loft. Let's say your Dad's ceiling is just plasterboard, painted but with no vapour barrier and it's got say 100mm of glass wool at the moment. I'm going to call simplistically water vapour a gas. When the gas gets cold enough the water gas turns into water drops and at that point the problem starts. Gas molecules are farther apart and move more freely than liquid molecules so they can get out the roof more easily. The paint (may have some gloss paint) acts as a bit of a vapour barrier. The loft space may have some ventilation but not that much. When the weather is cold some moist air will penetrate the ceiling and now and again, depending on the temperature in the void above you will hit what is called the dew point. This is where the water vapour turns from a gas into a liquid. Now when the insulation is only 100mm thick this won't happen very often. The water gas will keep migrating into the roof void and escape more easily. The insulation will get a bit wet from time to time but it often dries out in an old roof. The techy bit is called the dew point. This is where the water gas turns to a liquid. Like when the gas in the clouds turns to water and it rains. In the thinner insulation the dew point will occur less frequently and the gas will just exit the roof more often without causing any harm. But to bring a roof up to modern standards we are looking at (350 - 400 mm in Scotland) and a say 300mm in England, this insulation comes in standard thickness. Here you can see that the loft will be much colder as you have added insulation. As the insulation is thicker the dew point will occur more often within the depth of the insulation and the insulation will become wet more often. Wet insulation against a timber roof don't make good bed fellows. To solve this we need to make the roof void much more drafty.. by installing more roof vents so it dries out the thicker insulation and reduces the time that the roof timbers are exposed to moisture. The big problem with this is that the foil is impermeable. We know that at some point we will get the water gas turning to water drops. The foil stops this water from venting out into the loft and then out the roof so it is trapped and will rot the timbers. @webbythewebster To upgrade the loft insulation, it sounds counter intuitive, you need about 300 to 400 mm of glass wool and then increase the ventilation to the void. The loft will become much colder, but the house will be warmer. Here is a link to a free calculator that you can play with. It also chucks out a basic condensation analysis. https://tools.knaufinsulation.com/en-GB/tools/u-value-insulation-calculator But why is this product to be treated with extreme caution! Basically, because if it is laid on top of insulation is stops the water that has condensed within the insulation and then turned back to a gas when the weather warms up (evapourated say) from getting into the loft void and out the roof. For all, and the teckies. At some point many buildings will, depending on the weather get condensation happening in the depth of the structure. If we try and avoid all cases we end up over designing and that costs you money. For the really tecky we have what I would call a reverse condensation effect.. few if any condensation models take this into account. Your house outer pane of glazing is cool, a warm weather front moves in from the west, it's misty, you can see the mist with the eye. This mist / humid air penetrates the wall and condenses from the outside in! @webbythewebster To save money the easiest target is the loft. But you need to ventilate more. Have you explored whether your Dad can get a grant for this work? RICS Spray foam insulation downloaded 31-10-2025.pdf
-
Good point John. If you have a deep (thick roof) then the reveals can form quite a large area. The closer you get to the top surface of the roof the less effective thickness of insulation.
-
I bet it did! Took me ages to find this data also.
-
Welcome to Build Hub. This is a massive step forward. You'll get lots of help here as and when you need it. These type of projects are fascinating, even just from an engineering aspect and how you evaluate the existing building in terms of what you can retain structurally. Photographs and a couple of concept drawing will encourage targeted advice from members. Main thing is to enjoy the design process.
-
Nobody wants to touch my roof for solar and alternative location
Gus Potter replied to SimonD's topic in Photovoltaics (PV)
I think you have done well exploring this. Yes you can design this SE wise, maybe achieve a weather tight arrangement. But now I've read others opinions I'm inclined to say, I've learnt a bit more and now also concur that you should look at alternatives. Keep us posted though! -
Downdraft Extractor Ducting Route
Gus Potter replied to carson321's topic in Kitchen & Household Appliances
Avoid, it's a gimmic! -
Nobody wants to touch my roof for solar and alternative location
Gus Potter replied to SimonD's topic in Photovoltaics (PV)
But I posted a long rant on how you do it as an SE, it's not that difficult! If another SE reads my posts all they have to do is look up the references I give, make their own judgement on the geometry of the roof and off you go! It's 3 hours work checking / learning that I'm not talking shite (call that research that will add add to your portfolio) and looking at your drawings. Then you go back to the PV designer to check their brackets are ok, do the rest of the checks for due dilligence. The key is to identify the pressure coefficients. For the house design the SE has probably worked out all the wind loadings already! This sums it up plus, as I said previously, the PV needs to look good Architecturally, you can't have a big unsightly gap at the ends for example. The detailing and weather proofing needs to be spot on. Keep asking your welcome questions so you can make an informed judgement. -
Thank you for posting and asking questions. It keeps BH alive! In no particular order. True enough. We are both experienced in design, have much common ground. @saveasteading has more than a decade of design experience than I. But it's ok to sometimes disagree. You present / argue your case. You bring to bear specialist knowledge and sometimes that sways the case. Good designers learn every day, age is not a barrier, new materials are on the market so the choice of material is more varied. It's a great time to be a designer! But if we never disagreed that would be unheathy. Check the privacy regulations for your neighbours windows. Often you need to add 2.0m plan distance for every 1.0 m change in level. Just check even if to rule out as a consideration. I've attached a handy guide that is easy reading with lots of visuals that explain daylight and sunlight. Don't discard this on the basis that it is from a Scottish council.. the principles apply UK wide. Daylight and Sunlight guidance 17-06-21.pdf
-
This is a good point, I also think the house is a little unbalanced on elevation, too late to turn back now though. But for all and maybe @ETC can explain in more detail what "massing" means. To me the basic explanation is about the proportions of the building and over use of some material that lok "too massive.. i.e big!). The front elevation looks "top heavy" The roof and wall cladding dominates the lower ground floor. Architects and nearly all SE Engineers are not at communicating in lay persons terms! Take the rear south east elevation.. much more pleasing to the eye. Here the two floors of glazing demonstrate the upper and lower floors, the roof looks more balanced, doesn't dominate. Now I know @Gballam you may not see it the way I and @ETC see it. But think this through, you can do your own research on massing and proportion. The tough love is... we can see this as designers and are saying.. the front elevation could be better, imagine when you come to sell at some point and how that may impact on the offers you get. How could you fix it? Well look to see what you can change easily. The massing on the front elevation comes (partly) from the continuity of the first floor wall cladding vertical line with the roof cladding profile. That makes it "top heavy" Try and change that so it looks more like the rear elevation. Just experiment to see if I and @ETC have a valid point.
-
Your house and interior design looks stunning. I admire the skill and hard work you have put into this.
-
Nobody wants to touch my roof for solar and alternative location
Gus Potter replied to SimonD's topic in Photovoltaics (PV)
That radius of roof looks quite large. Draw a line of your predicted panel lengths, the gap between on the roof side you want. Do you think you can achieve a minimum gap of 100mm and a maximum gap of 300mm between the roof surface and the underside of the panels? This would make calculation easier and pretty much in line with the digest BRE 489 with some consideration to the blocking factor due to the diminishing gap and cross section area of the fixings. The quasi parapet at the top is an advantage. I would do a quick check on any snow drift but the parapet is not high so don't think it would prove significant. In any event snow drift is what we call an accidental load so the saftey factors are less onerous. I think the main challenge is to make sure the panels look ok Architecturally and that you get the flashing details robust.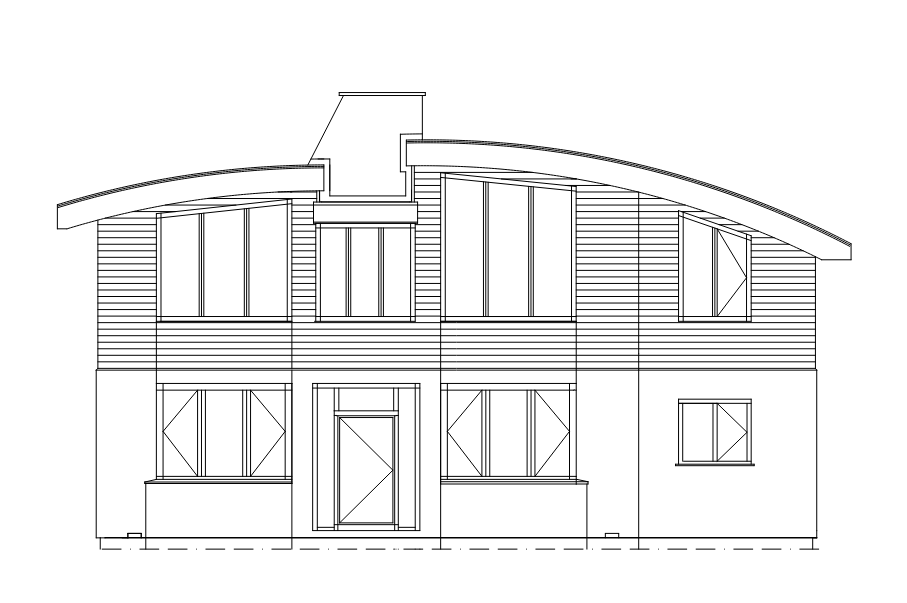
-
Nobody wants to touch my roof for solar and alternative location
Gus Potter replied to SimonD's topic in Photovoltaics (PV)
As a bit of encouragement. Hopefully you followed my last post. The wind loads I started with were based on the design life of the house, in design terms for wind this is 50 years. But PV panels only last say 25 years so there is an argument to be made, why don't we design and check the house structure against the 50 year wind loading (that is safe) but design the pv panels for their life expectancy of 25 years. The fixings would get designed on 50 years as we don't want the panels flying off the roof and hitting someone. Simple solution is often just to add more fixings in the vulnerable areas. This is all about the probability of us getting the highest wind load. As SE's we design based on the probability of wind occurring and balance that against the risk. For wind calculations we call this the probability of occurrence. Simplistically, if we look at a 25 year wind return period the basic wind load gets reduced and that can make the panel design fly. Don't through in the towel just yet due to your curved / barrel roof! -
Good for you getting to this stage, exciting. SE wise it does not look too complicated and costly. You'll need a stiff floor over the open plan area at the rear. Architecturally inside, this is a nuance. I can see what you are trying to achieve with the void over the front door which also lights the upper hall. I can also see how you are intending to be able to look all the way through the house from the moment you come in the front door. The potential pitfall here is that you have a small area of narrow corridor off the TV/ snug.. cloaks. Sometimes I design stuff like this to create a perspective view as you come in the front door. Here what you do is to widen the corridor as it progresses into the building. For this I would start with a sightline of about 5 -7 degrees, for large hallways with depth and volume the starting point is about 12 degrees. The intention is to trick the eye into thinking the corridor is shorter and to invite you further into the building. A tunnel effect is not inviting. Try experimenting with this at home just now. Mark out your corridor length and width and have a pretend walk through it. I would try first widening the hall at the TV / cloacks area by stepping the doors back, see how that feels. Ask your Architect about this trick. Later on if you start asking about SE design then it would help lots if you could put some gridlines on the drawings as it's much easier to refer to and line up the different floors for easy visualisation of the load paths. To this day I still can't fathom why Architects don't do this!
-
Cut a piece of ply / OSB3 to you ceiling shape, fix that using a combination of pink grip and screws to the existing walls and underside of the stair. That is your stiff diaphragm that holds everything at the wall head in place. Build the walls, could be MF or timber. Sheet with ply/ OSB 3.. that give you mutiple fixing points for hooks, TV etc.
-
For me the starting point is to look at the underlying structure. While I'm an SE and will design beams and slappings all day long, if you pay me it's not that great as it's your money. I think. What kind of opening are we making into the existing house. More load from the flat roof can = more money on structure you don't get any benefit from. Once you nut that out you can then look at the insulation levels you need. Roughly your glass area does not look too large once you take into account the area of existing openings you are building over, relates to the U value calculations. I would aim for the simple stupid. Modern PVC type roofings are much more forgiving than traditional felt roofs, there are a few pitfalls, but lets run with it for now. Given the shape of your extension the main run of joists and fall is likely boundary wall to glazing line. So concealed gutter above the glazing. Run that back as you have shown to the internal corner. I like green roofs, but they need looking after. Also, on warm roofs they are great for sound proofing. To resolve the issue of excess water collecting against the house introduce a water gate, so if the puddle gets more than 25mm deep the water will pour over the side of the building, you'll see that and know that there is a blockage. This is standard fare on industrial buildings with valley gutters. Your model is a good start. Add to it and put a 1.0 degree fall on the roof and see what it looks like. It does work but if the builder makes one mistake then you have a problem. Timber firrings are much more forgivable and can accomodate,up to a point late, design changes, could be a roof lantern in your case.
-
Nobody wants to touch my roof for solar and alternative location
Gus Potter replied to SimonD's topic in Photovoltaics (PV)
Good post. The following is a bit lengthy but hopefully it will give you some pointers and other BH members an insight into the structural design when fixing the panels to the roof. I've broken down the design into different elements and then recouple (kind of) at the end. Element 1: The PV panel itself. The general standard is that the panel should be able to with stand a static load of 2400 Pa for one hour. This is roughly 240 kg / square metre, then we apply a safety factor of 1.25 (called a material factor in eurocode design) so 2400 / 1.25 = 1920 Pa ~ 194 kg per square metre of panel. Glass has one at least funny feature in that (general) it is able to withstand a higher short duration load say one or a few seconds. The reason for this is partly due to crack propagation. Thus if your PV panel can withstand the one hour test it has a good chance of resisting a higher short duration load that you might associate with a 1 or 3 second gust of wind. In the UK there is the potential for the wind loading to exceed the panel strength. This is influenced by for example the wind direction, altitude, topography, shape of the roof, height of the roof, location of dormers and chimneys and importantly if the panels are close to the eaves, verges or ridge. Often neglected is snow drift loading or dumping of snow from a higher roof onto PV panels. Here the snow drift can often exceed the panel strength locally. Element 2: The fixings of the panel to the roof. Here we are interested in two things. As the fixings are perpendicular to the roof we can split the axial load in the leg of the fixings into two force components. One is perpendicular to the rafter, the other is parallel to the rafter. The latter force is the force that wants to cause the panel to slip down the roof. The former is required as it lets us check the underlying structure. Element 3: Calculation of the wind loading on PV panels so we can check items 1 and 2 above. Element 4: Check the main roof structure. Here we are looking at two things in the main. Are we adding load to the roof, probably not if the main roof is tiled, but check anyway. PV panels are increasingly light weight cf tiles so we need to check the structure for uplift and check to see for example that any masonry below still works for a reduced dead weight. Brickwork / blockwork often benefits from a bit of dead weight so we need to be careful when we don't have it. If you have say a cantilevered floor that may be relying on dead weight from above, remove that and you can find yourself in trouble. Motto is, think of the consequences of making a building lighter! Simon, I've assumed you have a barrel shaped roof. The SE starting point here is to calculate the dynamic wind pressure for your roof. This is standard stuff so won't go into this. You might find in the original calcs for your house a value for this that relates to your roof. The interesting bit is how you calculate the wind loading on each of the panels on a barrel shaped roof as the panels are flat and the roof is curved, thus the gap between the panels and roof will vary. Reference wise the SE may look to BRE digest 489, Wind loads on roof-based photovoltaic systems. Eurocode 4, BS EN 1991-1-4:2005+A1:2010 and the older Bristish Standard BS 6399 part 2 for initial guidance. But then you find that there is no specific guidance on fitting PV to a barrel / curved roof. Which goes a long way towards explaining why no one wants to run with it. But the guidance gives you a handle on things that you can then do some bespoke design on. Ok so we have calculated the basic wind speed. What we need to do next is to arrive at the local pressure coefficient for each panel and this is the bit where folk back off. The maths is roughly qs (basic wind speed units are Pascals which we convert to kN/m^2) * local nett pressure coefficient ( non dimensional unit). Example here for PV sitting 100 to 300 mm off the roof. Take a middle England wind load of 800 Pa / 1000 = 0.8 kN/ sq metre ( about 80 kg / m sq). Now a typical nett pressure coefficient in the middle of the roof might be around -0.6 to -1.3, take the worst... 0.8 * 1.3 = 1.04 kN/m^2, a lot less than the PV rating so looks ok. But move to Wales, parts of Scotland, maybe the Downs, close to the sea, add a bit of altitude, where the qs is 1.1 kN/m^2 plus and you have a PV panel close to the edge of the roof (nett coefficient of potentially 2.2, here the sum is 1.1 * 2.2 = 2.42 ( 2420 Pa) so we check the panel rating. This is something your normal PV installer should be familiar with and that provides values for the fixing design and underlying roof checks. The high loaded wind zones are away from the roof perimeter so you can see why PV installers want to keep clear of these areas. But PV on a curved roof will have a varying gap under. They way to approach this is to understand what the guidance means in the above references, distill that down so a lay person can understand. Here goes. I would treat this as a hybrid PV roof for wind design. Start with an even gap under the PV and couple that with the guidance for canopy roofs. Think of a hay shed. In the autumn is gets filled with hay, the farmer takes the hay from the front, the back is blocked, called the blockage factor. The varying gap under the PV panels on a barrel roof is like a blockage factor, add to that the cross section area of the PV panel fixing legs (more blokage) and you can arrive at a reasoned Engineering justification for your selection of the pressure coeffient. One you have that number everything else is pretty much standard design. There are a few extra checks as above and it may be that if you have your PV close to the roof edge or high wind local zones you need some extra fixings. Nah, give your SE a call, you might find they say, oh we do a lot of this so no problem! Point of note. Once the gap gets over ~ 300mm then the approach might need to change / nuanced. Here we would look to the guidance part in BRE 489 that talks about mounting PV on stands, more like a solar field. Thanks again for posting. -
Dormer Flat Cold Roof Ventilation
Gus Potter replied to shbrooks's topic in Lofts, Dormers & Loft Conversions
Good post and a good question. To clarify. I think your contractor is talking about a ventilator at the soffit, (the bit under the gutter) the dormer cheeks (the sides) will also have a vent at the bottom to ventilate the vertical cladding of the dormer. Designs like this are generally taken with a big pinch of salt these days. The main reason is that folk started to do big flat roofs using the same principle and these lead to big rot and condensation problems. Basically folk started taking the pish. But on a small dormer the old rules are still applicable. I've counted your tiles and at worst you have 9 x 330mm = ~3m roof that needs ventilated. The dormer "sticks"out the roof so it is going to "catch the wind" and that will promote cross ventilation provided you have good soffit vents. So your builder is not talking out their hat, but check that BC will run with this. Now the above will fly provided you are not installing an ensuite shower room in the dormer. -
This is good comment. Quite often I'll design using the British Standards and some of these are quite old. A good example here is when designing a steel portal frame to BS 5950. To comply with BC regs etc you can use older standards but must be aware where the Eurocodes are more strict and take this into account. To simplify, you can use old design codes provided you know where the modern codes have shown the deficiency in places. In this case @Alan Ambrose we are at the leading edge of design, so we must look to the latest guidance, take that into account and form a view. The DIN codes also apply to bolts / fixings and other things, often seen in the statutory CE compliance regs. To my mind the internal vapour barrier (plastic) is essential to stop moisture entering the roof structure in the first place Then, if we get condensation within the roof structure we want to vent that upwards and outwards. The question is, is the layer of ply on the top of the posi joists able to let seasonable condensation out. @Nickfromwales might be able to help here. My own view is to say, lets look at where we may get a high moisture content.. bathrooms / kitchens and do our MHVR to make sure we don't get elevated moisture where we may have vaulted roofs and the damp air stagnates. This is pragmatic design. In other words you remove the potential problem at source. @Alan Ambrose asks a good question. OSB and ply are not permeable when compared with traditional timber sarking with gaps between the boards. Good question. Am I missing something as well as Alan? Help!
-
Architects have messed up. Next steps?
Gus Potter replied to flanagaj's topic in General Self Build & DIY Discussion
Hiya. First thing is that we feel for you, it's a scunner and very stressful. We can see you are commited and enthusiastic, previous posts about your stair case etc. Key thing is not to allow this to grow arms and legs. What we are looking for is the Occam's razor solution. The simple solution. Most importantly, you need to identify all the issues before alerting the planners and your neighbours that you have "a potential issue". Keep this under your hat for now! I'll drop you an email. -
That's great news Jack. Your heating system is something that we should aim to achieve. But.. you are a switched on fellow with loads of life experience. My guess is that you controlled your design, built well and are thus reaping the rewards. Unfortunately the build market is full of chancers, designers included! I rest my case. Again I rest. John, I love your technical input, learn lots from you so thanks for that. It's ok to disagree. My main arguement is not about UFH in principle, or about your well presented and knowlegeable approach. My main point is to design in redundancy where pipes are buried in screed / concrete and recognise that your house, to maintain it's value, has to perform and not be a burden to maintain when you sell it on. For all BH folk. This is something you really need to face up to as surveyors can right down the value of your property. The more main stream UFH becomes.. and the more that the big developers cock it up, which they will, the more the light is going to shine on the self build UFH market. Now UFH, controls, home automation are a lively topic on BH. I like to see it as folk are innovating which is great, call it a bit of a hobby. But don't expect me as a designer who is responsible for my Client's money and have a Civic responsibility to the next person that will buy your house to not ask some nasty questions!
-
Environment Agency Discharge License
Gus Potter replied to Robert K's topic in General Self Build & DIY Discussion
They are actually doing you a favour. If you don't have a license to discharge then your house and plot could be worthless unless you have another alternative. -
This is not practicable achievable in my 30 years experience. The UK weather is very unpredictable. At times UFH just won't comply, so you open a window or a door! What we should be doing here is saying.. hey, UFH is not perfect, we will never make it perfect but here is how you can get the best out of it for minimal maintanace and running cost. I'll say this again and again, you can design on paper, balance your system and it will work for a few months and the game changes! It's fine if you have all the time in the world to play with your UFH system but lots of folk have families, kids and a day job! Ok interested, where do you live, what are you pipe centres, how much have your maintanence costs been over the last ten years
-
So I just picked this bit out of you post. If it's hard now imagine how folk are going to maintain this in 5 years time?

