


Dave Jones
-
Posts
3606 -
Joined
-
Last visited
-
Days Won
11
Everything posted by Dave Jones
-
you have two options. board the walls to bring it out far enough or cut back the insulation.
-
shouldnt be the profile sits tight to the floor over the top of it. This is where you find out how good the screeder was.
-
shadowline looks good, you need a trim or stopbead for the plaster to finish on. https://www.barbourproductsearch.info/renderplas-makes-shadow-gaps-simpler-with-new-news016813.html
-
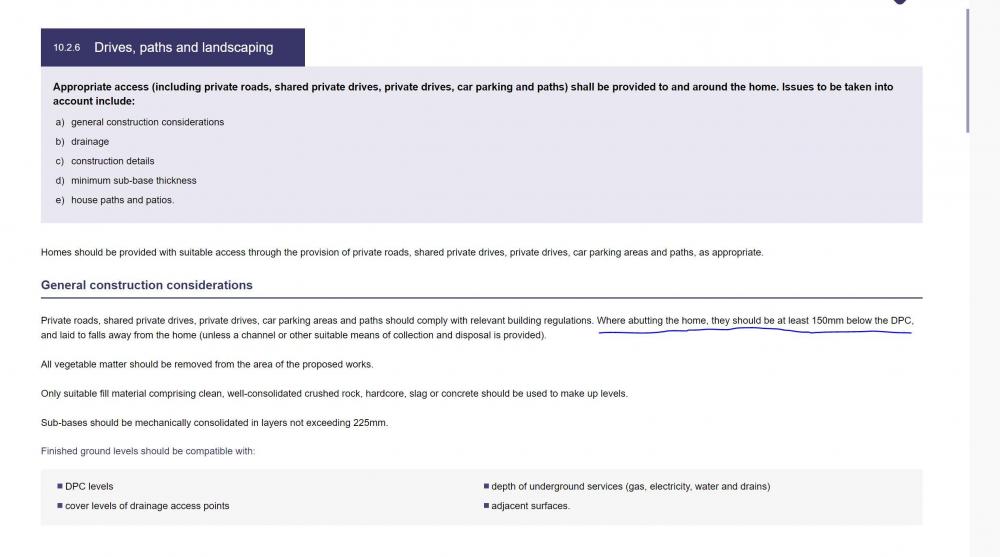
150mm below dpc (2 bricks). Maybe easier to make a feature step for the doors ? a linear drain wont stop rain splashing above the DPC, you may be ok and it not get too much weather on it to worry about then again you may not.
-
dont submit the minor amendment, you are enacting your planning permission. If you change how you do that the council could enforce against you. Sounds like a job for your local councillor to sort out.
-
how far away is your nearest connection point to the storm system ? A pumped chamber (if no fall) fed by an attenuation tank (cheap crates) would be pretty cheap.
-
a vertical cavity tray effectively moves the level of DPC higher. Very handy if your on sloping ground for example and you want to bank up against the building.
-
Notification of Statutory Undertakers?
Dave Jones replied to Tracey Gardner's topic in Party Wall & Property Legal Issues
the person with most to lose in this situation is the owner, even if the extension is built under the radar when it comes to sell up a search reveals the gas main he wont be able to sell it, or rather if the purchases requires a mortgage they wont get one. May get lucky with an indemnity policy but thats a roll of the dice. -
doors are generally ok to flush upto as there is no cavity above dpc to let the wet in, as its a door! Although you do need to pay attention to the door/wall junction. Some use a gravel channel next to the house, as its splashing water your trying to avoid soaking the brickwork above DPC and therefore letting damp into the cavity. You can get some paint on waterproofer as well. We allways have a tray 600mm above dpc on our last two homes that way you can safely lay patio flush to finished floor level inside and have no worries about damp getting in.
-
the only true cost is every penny, from legals, stamp duty and every £1 spent no matter on what it all counts. then you can see if you have made or lost money when you get it valued. The only real cost reducer for a diy/self builder is free labour. Trading dragging out the build time over paying for professionals/trades.
-
you really need 150mm below DPC unless you have a tray.
-
save the cost and hassle, brick and block over timber with the maintaince issues etc Save the 10k on a heat pump and go for a combi if you can get mains gas, 10 year warranty on worcester bosche.
-
warm roof as you say much easier but on a pitched roof can not look good due to the build height. How did you seal it to stop air/moisture from entering externally as tiles wouldnt be sufficient ?
-
Wrapping a SIPs Garden Room 1.2w roll or 2.7w ?
Dave Jones replied to Tooled up's topic in Structural Insulated Panels (SIPs)
really doesn't matter overlap by 150 (its marked on the rolls) and its fine. -
slightly incorrect you show a gap to the underlay, as you can see from the photo there is none. the counter batten is on the other side of it.
-
Alternative sliding doors to be used with ikea wardrobes
Dave Jones replied to Adsibob's topic in General Joinery
https://www.cutwrights.com/new/home https://www.online-bedrooms.co.uk/ -
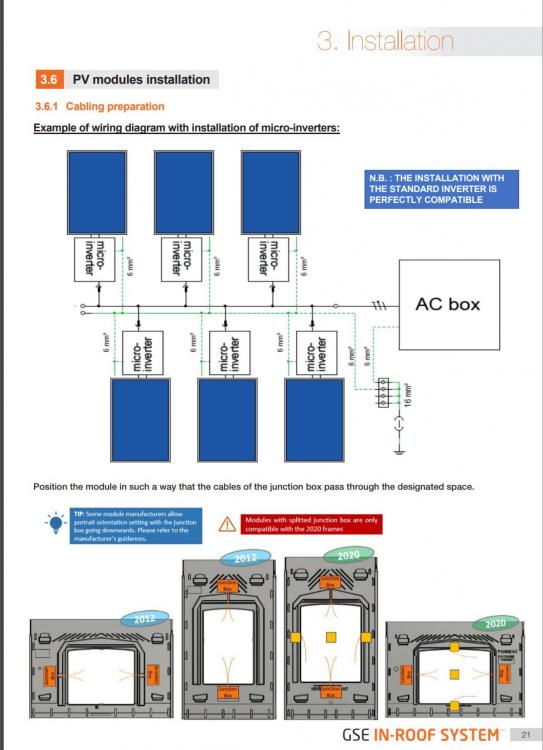
i really dont know, i used those small micro inverters and the sparky said it needed earth but your could be different. fingers crossed.
-
you will have more air flow if anything as the GSE trays have a massive open area in the middle!
-
https://www.carvers.co.uk/building-materials/chemicals-sealants-adhesives/liquid-damp-proof-membrane-25l-everproof-blackjack-543032
-
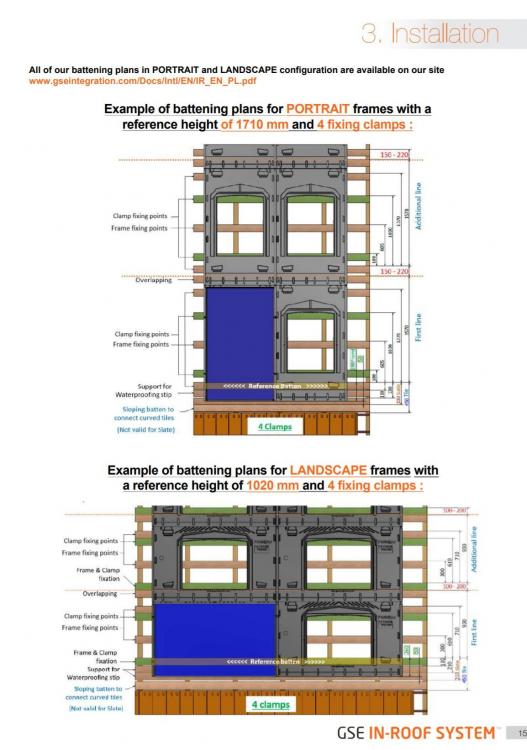
the batten support spacing is in the manual, basically run your normal battens then add more to match the GSE fixing locations.
-
page 21, check with whoever will be signing off the electrics..
-
you don't have to remove the trays, just take off the locking clips on the bottom row panels so you can prop up the end of the panels, you can leave the existing flashing if you like just pull out the tiles from underneath it and relocate them below the panels and redo the flashing. Its a couple hours work to get it right and avoid bodging with packers etc. If its any consolation when I did ours the panels had to come off completely as the sparky didnt tell me about the earth wire that has to be clamped to every panel so i feel your frustration!
-
not all the trays just the bottom ones are wrong. You have almost a whole slate under the bottom this has to go and be replaced with the flashing/lead so it sits down. The sides are fine as you cut them into the metal flashing try same as the top. Just take out that whole bottom row sitting underneath the panels and replace with a flashing kit per the manual and it will be fine. Lead looks so much better than the crinkled stuff that comes in the kit.
-
Neighbour 'pressuring' me to not object to application
Dave Jones replied to JKami84's topic in Planning Permission
your objections unless on planning grounds would't matter a jot anyway. -
i would think they have 100% as it wouldnt be watertight otherwise. just need to get the row of tiles at the bottom cut shorter so the panels doesn't sit on them. Strange the trays are so short it looks a good 150mm as if the panels were not the right size for the trays. Oh and every panel should be earthed as well as cant see any earth wires in the pics.



