PeterW
-
Posts
18480 -
Joined
-
Days Won
207
Everything posted by PeterW
-

Trusses going on to fresh mortar
PeterW replied to MortarThePoint's topic in Bricklaying, Blockwork & Mortar
So the garage is on a different stage ..?? But you need both up to wall plate at the same time for the roof..? Are you planning on roofing them both at the same time as assuming gable walls will need to be done, then that steel needs at least a week to set before you contemplate building anything off it. Garage lintels are notorious for twisting as they are unevenly loaded due to the shape of the gable. -
Trusses going on to fresh mortar
PeterW replied to MortarThePoint's topic in Bricklaying, Blockwork & Mortar
Is the builder not just doing your job ..? And “cash flow” issues flag some huge alarm bells to me. What else has he got to do for you..?? -
Heat pump installation certificate & DIY install
PeterW replied to JIH's topic in Building Regulations
Never heard of it - ask them what they want as there is no installation standard for a heat pump. Cylinder (if it’s a UVC) will need the Benchmark / Warranty completed. -
Trusses going on to fresh mortar
PeterW replied to MortarThePoint's topic in Bricklaying, Blockwork & Mortar
I would delay a week and get it all up properly. I would be more concerned about putting the steel beam in place than the trusses - that needs to be done carefully and I wouldn’t want it onto green mortar especially 2.2m columns. They can’t be built in a day either as they will just rock over - are they a single block wide at the back ..?? -
Nope so you will have 2 zones, and 2 zone valves. One for rads upstairs and one for the UFH manifold supply. Decided on that thermal store yet ...?? You know you want to .....
-
Probably because it is wired as 2 zones, upstairs and downstairs. A lot of systems are done like this so they can use the zone valve micro switch as a call for heat to the boiler. For yours I would go straight in with the Salus self balancing actuators as they will control the return temps better as you have a more “leaky” house. Are you keeping Rads upstairs ..??
-
I tried using a demo saw and it was quick but a bit dusty - best way was outside on a breezy day ..!!
-
What windows do you want ..? Timber ..? uPVC..? Aluclad ..?? Unobtanium coated ..?? My current supplier for white uPVC is on 5-8 weeks depending on the glazing, coloured uPVC at 9-12 weeks due to issues with supply of the profiles. Local timber window place is talking 8 weeks currently, so you can see the pattern and trend. Your other option is do it how it was “traditionally” done and make forms for the window openings to exact sizes and build them in. You then know the frames will fit and you can order windows ahead of time allowing for the 10mm fitting allowances.
-
@Elle he also has some really nice walk on glazing for sale, along with probably the UKs only top glazed shower ... As many have said, you need to take a look at the budget and the location, and also work out where your compromises may have to be made and what is more important to you.
-
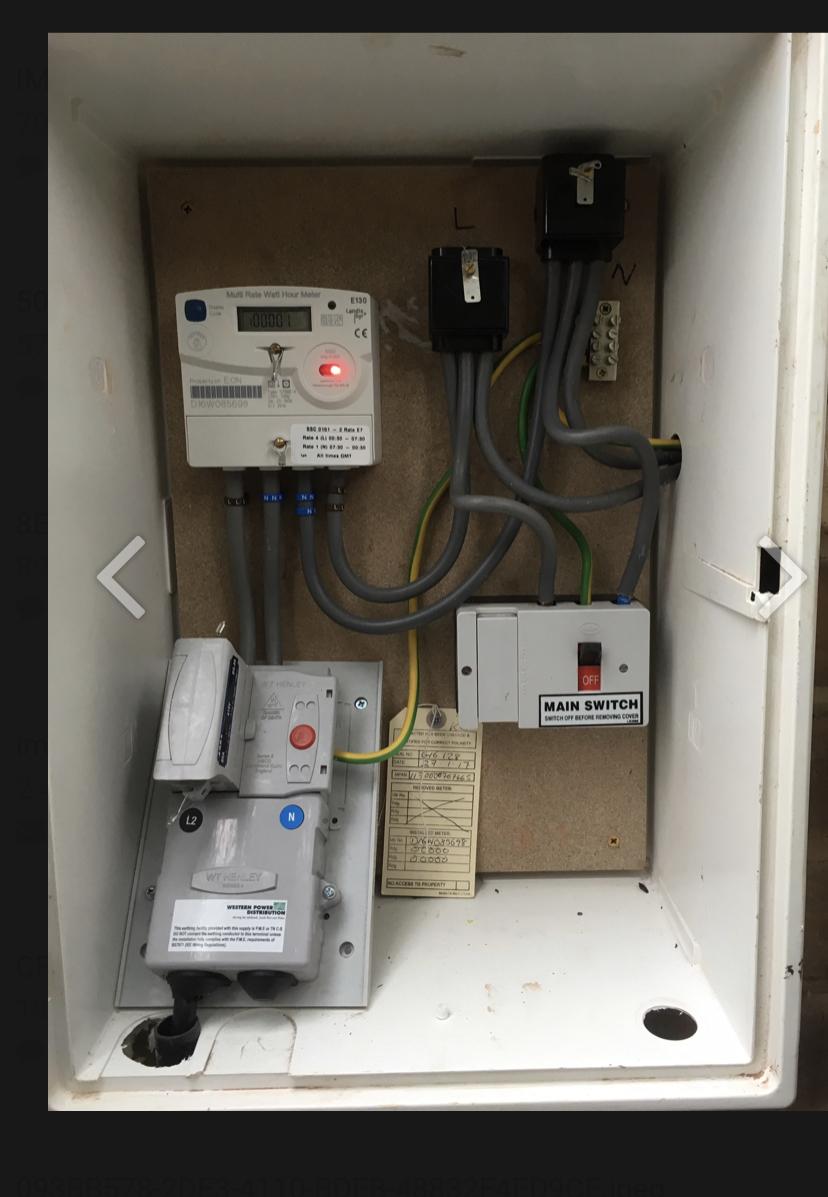
Connecting-up my empty meter box…
PeterW replied to Dreadnaught's topic in Consumer Units, RCDs, MCBOs
..?? Looks like a standard in wall meter box to me. One to the right has a small CU and automation for gates / lights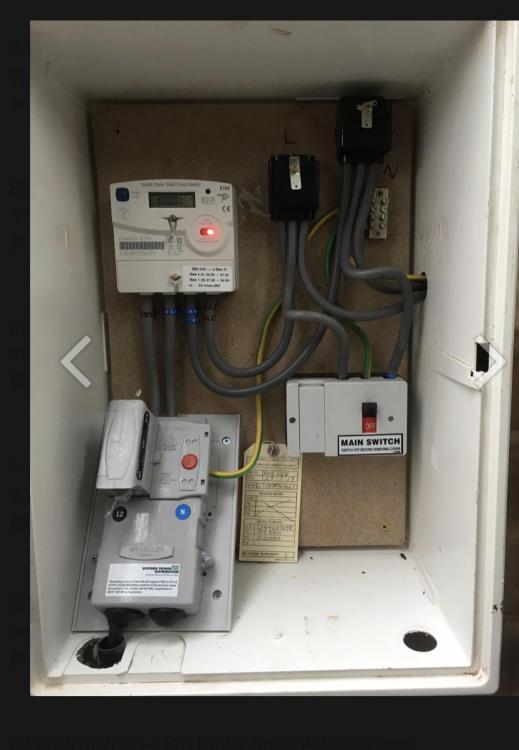

-
Connecting-up my empty meter box…
PeterW replied to Dreadnaught's topic in Consumer Units, RCDs, MCBOs
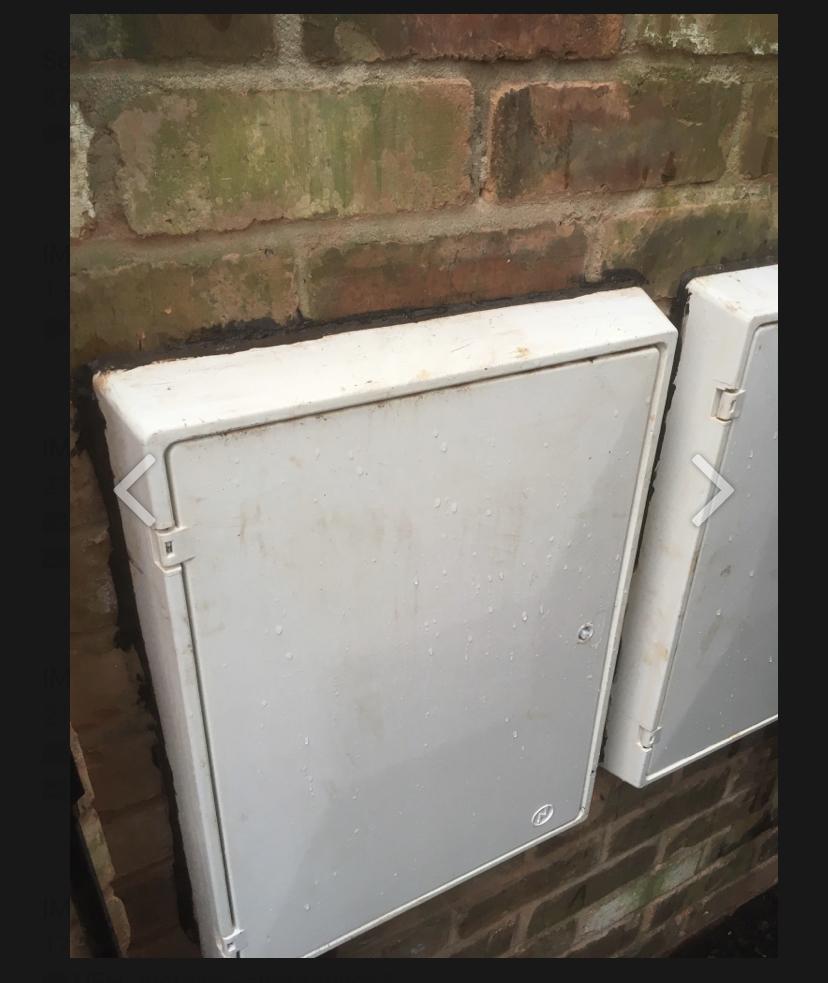
Not at all - there are plenty of ways of doing it. These were installed in the back of a boundary wall - all permanent and signed off by WP and electrician. -
Connecting-up my empty meter box…
PeterW replied to Dreadnaught's topic in Consumer Units, RCDs, MCBOs
You don’t ..? You use a surface box or a recessed box in a boundary wall or a GRP enclosure and then you run your house supply from the isolator in the meter box. -
Connecting-up my empty meter box…
PeterW replied to Dreadnaught's topic in Consumer Units, RCDs, MCBOs
This isn’t a temporary supply. It’s what a lot of people have done, put the permanent meter in a meter box at the boundary and then use that to supply the build site and you don’t need to move the meter when the house is built. It then doesn’t need an earth spike as it uses the supply head earth, although if it is used to supply to a static caravan then you may need a second earth but @ProDave can advise on that one ! -
Connecting-up my empty meter box…
PeterW replied to Dreadnaught's topic in Consumer Units, RCDs, MCBOs
20-22m at 100A needs a 25mm Armoured cable buried in the ground. -
You can build over this but it needs some thought and also will need permission from your sewage provider. Assuming this is a terrace, how many houses upstream of you location ..? if the pipe is 240mm below FFL then it will just be below your insulation level assuming a standard build up of 100mm MOT, 100mm PIR and 100mm of concrete as slab. Couple of ways to approach this, neither are “fun” but can be done in a couple of hours if you have a couple of good friends ..! Assuming the manhole is downstream of your extension (given the depths) you need to make friends with your upstream neighbours. First job - expose the whole of the top of the pipe (assuming this is clay) and measure the distance from side to side of your extension and add 300mm each side. That’s your replacement length. You need enough UPVC pipe to do the length you’ve identified. Mark the points you’ve measured, and ensure you have 150mm either side of the mark to put a connector. You’ll be using clay connectors so plenty of lube on the pipe and they will go in easy. Dig carefully around the pipe where your marks are - you want 4-6” below the pipe clear. It is nicer doing this now rather than later. Now get the jet wash out, and get it in the pipe from the manhole and jet the whole length as it makes the next job much nicer ..! This is where you need friends ...Ask the neighbours nicely and basically you need to block the drain for an hour. In the upstream manhole, on the upstream side of the manhole, insert a bung in the pipe, lock it up tight and put a couple of bits of timber in the channel to wedge the bung and stop it sliding.Tie a loop of rope onto the handle on the bung - this stops it getting lost if you do get a release. Tie it to a bit of timber and leave that outside the manhole. Chuck the hose into the manhole and wash down the pipe to make sure there is nothing nasty lurking in the pipe. Now on the marks you’ve made take a Stihl saw and cut through the top mark. It needs to be a clean straight cut so take your time. From this point, Mate #1 can start digging out the old pipe, just pull it out and clean the trench as you go. Keep going and make the second cut on your second lower mark, try not to disturb the connection into the manhole. Dig out the remains of the pipe, get the trench as flat and clean as you can but don’t panic too much. You need to get 2-3” of fine gravel under the pipe but don’t worry too much at this point. Mate #2 now needs to do a semi dry mix of 3:1 ballast and cement. You need 2 or 3 buckets full. Drop a shovel full every 3 ft along the bottom of the trench, this is for bedding the pipe onto. Now put the clay connectors onto each end of the uPVC and drop your uPVC pipe into the trench, and slide the connectors over the clay stubs. Do up the bands and using a string line check the new pipe is flat if it has a join in it, and use a level to make sure you have a fall from one end to the other. if you need to move the pipe about, just bed it further into the concrete or add a bit under the pipe. Once you have your levels, hose back in the upper manhole and check for leaks. Drop the rest of each bucket of concrete over where you’ve bedded it, and then it’s the fun job ... Take your prop timbers out, and then slacken the bung. Chances are it will wash out so be ready, and just pull it out with the rope. You’ll get a surge down the pipe but nothing that should cause issues. Time for a cuppa and a chocolate hobnob.. Double check your joints are still dry, and now back fill below the joint and the pipe with 10mm pea gravel. You only want to go 1/3rd of the way up the pipe as you’re going to be encasing the rest in concrete as this will give more protection to the pipe, the joints want to be only in pea gravel as it can allow a little movement then. For the concrete around the pipe a 4:1 mix will do, just pack it round the pipe then over the top, just don’t go mad and make sure it’s below 220mm of the FFL. when you come to do the rest of the founds you can dig round this and cast under with the concrete, just put a lintel over the top where brickwork goes over it. When you’re laying the MOT, don’t run the whacker over the pipe but just cover that area with sharp sand. Photos would be helpful btw..!
-
Connecting-up my empty meter box…
PeterW replied to Dreadnaught's topic in Consumer Units, RCDs, MCBOs
How far is it from box to the house ..? You will have the meter in the box along with one of these, and then another isolator at the house end. -
Inside then use emulsion - weather shield both sides will cause issues trapping water. Nice thing about that lime mortar is when you’ve used what you need, splash a bit of water onto the surface and close the lid tight and it will still be good in 6-9 months. Cement will just go off.
-
Redo it - sounds like a lost connection during the upload. only other way is to resize the video and tbh that is near impossible without a PC and uploading it to a different online conversion service.
-
Yes you will have a second tank nearer the house that has one or two pumps in it that basically takes all the effluent from the house, minces it and pumps it up to the sewage treatment unit. It should be big enough to cope with 3 full days of usage of the pumps fail, so that’s 6 showers plus 36 loo flushes, which is around 650 litres. Do not let them tell you a 250 litre unit will do, you need capacity in this unit and the size isn’t that expensive. This is the sort of thing - this only has a single pump. https://www.sumpsandpumpsdirect.co.uk/acatalog/800S-Sewage-Pumping-Station--800ltr--58.html#SID=20 If you go with a single pump then insist on having a pump failure alarm and a high level alarm fitted.
-
If you have a CCF Agri near you they sell Snowcem Plus which is a powder breathable paint that you mix yourself. It is designed for houses like yours as it lets moisture out of the walls.
-
@zoothorn is this patch inside or outside the porch..?? If inside then just use ordinary emulsion as it doesn’t need to be waterproof.
-
Thought this was inside the house / porch not outside..? Decent breathable emulsion would do.
-
Looks to be some decent enclosures and furniture along with a lot of wall hung stuff. https://auctions.eddisons.com/auctions/7639/eddiso10906
-
Think you can buy breathable masonry paint now ..??
-
How much oil do those XL doors take ..? I may have about 10 to do ... did you buy the Osmo brushes..? Looks really good.