


Onoff
-
Posts
21127 -
Joined
-
Last visited
-
Days Won
206
Everything posted by Onoff
-
Here, his light bulb moment...
-
Sorry yes, forgotten that. It's a while since I've "tanked". Since then it's just been tiling primer. Tbh looks and smells like the same stuff!
-
On the 2G windows and sill sections I fitted recently there were "ribs" all round about 6mm high inbthe window and a channel under the sill. I just fitted Compriband inbetween the ribs/channel before it "grew" on one window and slid it into the hole. You have to have the window in to make sure it fits then out again to put the Compriband on. Then need to be pdq getting it back in. Lovely cold bridge where the window meets the sill here as an aside!
-
Are you saying prime the ply before I tank it? I was intending to tank the ply, then prime. Cheers.
-
Once I've done the basin area, I'll hopefully soon to be tiling around the bath, so I'll be asking lots of questions I'm sure! I've tanking taped what I see as key junctions from vertical to horizontal and between moisture resistant plaster board and marine ply. If I tank the whole lot i.e. the moisture resistant plaster board and marine ply can I use tile adhesive to affix the tiles to the ply? This rather than use "ordinary silicon" or "grab adhesive" to stick tiles to bare ply. I've even been priming the tanked areas pre tiling btw. Cheers
-
CPC do 'em cheap as though only IP20: https://cpc.farnell.com/olan/ol40005/enclosure-ip20-2-module/dp/EN84797? TLC & CPC both offer the Wylex one at just over £3. ESE2 is the Wylex reference. https://www.tlc-direct.co.uk/Products/WYESE2.html? https://cpc.farnell.com/wylex/sfese2/general-purpose-enclosure-ip40/dp/PL11751?
-

Help with kitchen renovation/ 1st house.
Onoff replied to zoothorn's topic in Bathrooms, Ensuites & Wetrooms
Try a SMALL test area first & follow the instructions to the letter. Protect whatever it might drop on as well. I wonder if a few seconds blast from a hot air gun would do it as in lift and curl the remaining paint? -
Testing is usually carried out with a "spray bar". A horizontal pipe with holes in with water at a certain pressure for a certain duration.
-
My copycat TileTracker didn't work so well as in the tile sat on a "knife edge" of the angle and had a tendency to slip off when setting up. The main issue was the amount of excess tile adhesive that would drop down behind the angle and need chipping off before the bottom tiles went on. For the next section I've made a slight mod and added a bit of plastic angle with some double sided tape. A small steel angle would have been better but I haven't got any. Not so sure I shouldn't have hooked the plastic over the big angle rather than sticking it on the back...I still might! Also improved the coverage of the antinox floor protection so hopefully less cleaning up required!
-
Help with kitchen renovation/ 1st house.
Onoff replied to zoothorn's topic in Bathrooms, Ensuites & Wetrooms
Cheap enough to try this maybe? https://www.screwfix.com/p/no-nonsense-paint-varnish-stripper-500ml/17091 -
Help with kitchen renovation/ 1st house.
Onoff replied to zoothorn's topic in Bathrooms, Ensuites & Wetrooms
Scraper blade on a multi tool maybe? -
Help with kitchen renovation/ 1st house.
Onoff replied to zoothorn's topic in Bathrooms, Ensuites & Wetrooms
Have you tried soaking the paint that won't come off? A steam wallpaper stripper might be worth ago if you're fed up sanding... -
Help with kitchen renovation/ 1st house.
Onoff replied to zoothorn's topic in Bathrooms, Ensuites & Wetrooms
Looks pretty good from where I'm sitting. The lighter the paint colour the more imperfections you'll get away with of course. Fill and sand the paint as above. A good base coat will hide a lot. That Leyland Super Leytex paint is good for that. If it's getting you down have a look at a photo from the start of the thread to see just how far you've come. So, kitchen nearly done, what are we doing next? -
I was half thinking similar myself. Elderly patents, both coming up 90. Chalet bungalow with a plasterboard tent dormer. Put bluntly Mum is doubly incontinent (also diabetic, mixed dementia etc). Dad is insistent he cleans, but doesn't really to the extent Mum used to. Consequently the place is pretty grim. Heat turned up, windows kept closed. There's black mould in the corners up by the ceiling etc. I was thinking how much healthier the environment would be for them and other old people in general if there was a subtle, whole house ventilation system. Another case for building housing stock to passive standards I reckon.
-
No problems with that cistern I bet. You should have left it in!
-
Must we resort to toilet humour?
-
Penetrating stain? https://www.adsealcolours.co.uk/Smart-Colour-Stain.html?
-
Just a few fiddly ones done: Some bottoms: Some rips along the top: And all 3 pocket shelves cut to give a nom. 1mm gap front and back: Top Tip: A strip of plastic really helps for taking them in/out when fettling to fit:
-
Help with kitchen renovation/ 1st house.
Onoff replied to zoothorn's topic in Bathrooms, Ensuites & Wetrooms
VERY carefully! The less you put on now, near level as you can, the less sanding / mess. Aim for as smooth a level as you can with the wide filling knife for as little sanding as possible. -
Help with kitchen renovation/ 1st house.
Onoff replied to zoothorn's topic in Bathrooms, Ensuites & Wetrooms
Wally! It's meant to prevent cracking (says the man who forgot to put fibres in his bathroom floor concrete). The theory is you have a number of different substrates; the "brick" wall, the timber studs, the pb. They all expand & contract minutely to different degrees. The tape holds the pb together to stop that join where they meet opening up as the timber etc moves underneath. The tape should be stuck to the paper face of the pb. I'd be inclined to not tape now and just be prepared to using a flexible decorating filler later if it cracks later and repaint locally. Others may have a different view! -
WC Concealed Cistern Access in a Fitted Unit?
Onoff replied to MAB's topic in Bathrooms, Ensuites & Wetrooms
His SWMBO is set on wall mounted! -
WC Concealed Cistern Access in a Fitted Unit?
Onoff replied to MAB's topic in Bathrooms, Ensuites & Wetrooms
Its something I need to think about at some stage as I'll need to do a 3rd wall mount wc sometime (& maybe another two here also) and I'm buggered if I'm paying full price for a Geberit frame! Maybe I'll just buy the Geberit cistern and make the frame. Anyway, I'm literally off to mix up right now and do some more tiling in mine. Pics to follow! -
WC Concealed Cistern Access in a Fitted Unit?
Onoff replied to MAB's topic in Bathrooms, Ensuites & Wetrooms
Permission? Likely not! He's just managed to puncture the incoming mains water when trying to fix a squeaky upstairs floor board. Did the same about 10 years back! Lucky he's the ground floor & basement tenant and the neighbours are upstairs. Reckons the landlord would redo the bathroom just to a very basic level with "6"x6" plain white tiles" in his words. He's just redone the ground floor laminate wood floor himself. Back to the budget wc frame and drawing on what others here have done: Simply thinking a 4"x2" half height (or less) frame screwed to the floor boards and existing wall. Removeable top shelf to access the cistern. Hell, at <£20 buy two cisterns. So the cistern just bolts to the wall. What drew me to the ones above was that you can buy it branded as Hudson Reed and as a few of us in here know it's generally good stuff, certainly on the shower mixer etc front. He's spotted a new, unused, wall hung pan and seat for £35. Back to the frame then I've got my spare UP200 frame here to copy from. I reckon with a bit of forethought I could even do away with the adjustable height legs if I knew the new pan dimensions and existing poo pipe heights. Or just allow for 5mm of steel packs. Tbh he'll have gone out and bought a cheapo set by the time I get around to this but it keeps the grey matter ticking over!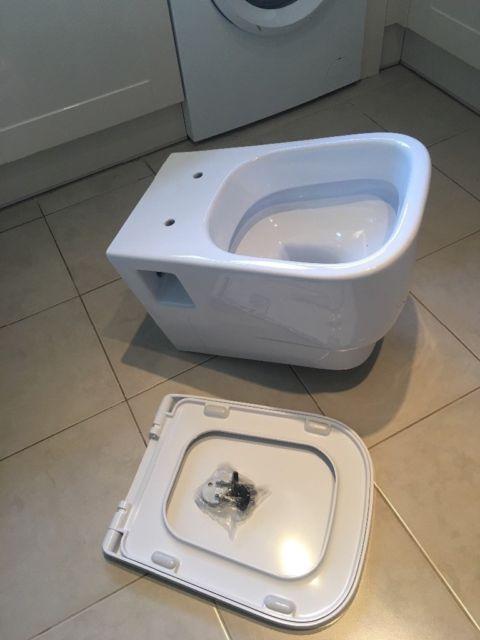
-
WC Concealed Cistern Access in a Fitted Unit?
Onoff replied to MAB's topic in Bathrooms, Ensuites & Wetrooms
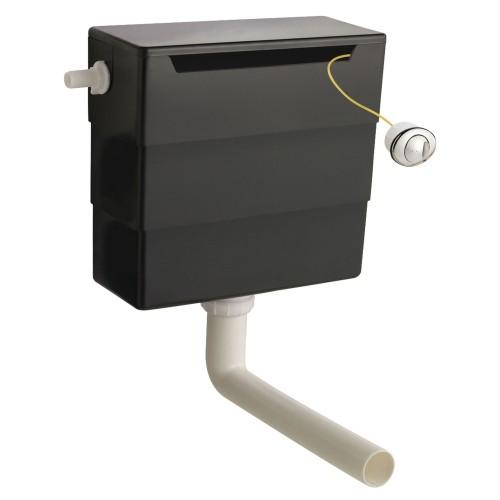
Tight arse mate in a rented place wants a wall mount, concealed cistern wc like mine but wants to pay peanuts! I tell him Geberit and he tells me he's found a no name frame and pan for around £120! Exit pipe is horizontally straight through the wall. Just thinking out loud here... Concealed cistern, 5 year guarantee for <£20: https://www.qssupplies.co.uk/bathroom-furniture-shower-taps/77484.htm? At first glance, no name etc so what's the point? Then there's this Hudson Reed cistern, again <£20 with a 5 year g'tee. Surely the same model? I reckon then I can copy a Geberit frame with the 2" box I've lying around: A goer?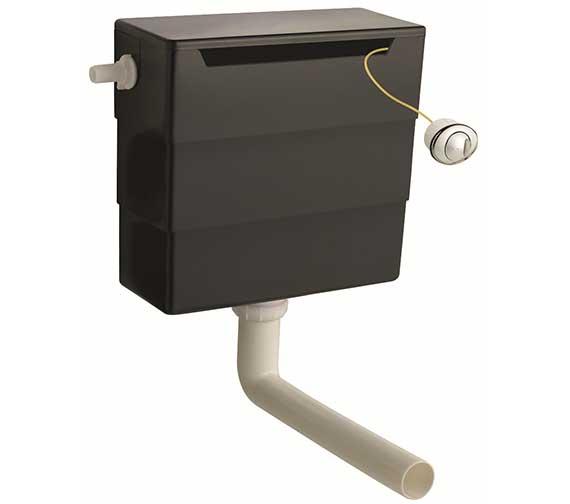
-
Paint it with some yoghurt? A neighbour years back had an extension built and the new roof tiles really stood out against the old. He spread manure over both sets of tiles!

