Declan52
-
Posts
4449 -
Joined
-
Last visited
-
Days Won
10
Everything posted by Declan52
-
I used bits of carpet underlay and carpet taped to the floor and windows.
-
Get yourself 2 of these. https://www.screwfix.com/p/irwin-quick-grip-12-mini-one-handed-bar-clamp/98247 You can hold the post and then clamp the beam to it. Check your plumb and level and then fix in place. If you need to move the beam up or down it's dead easy to release a bit of pressure from the clamp and adjust to suit. You will need the diagonal bracing on the upright posts to stop it swaying. Definitely put noggins in, it will make a massive difference to the strength of the floor. Use the correct your of nails for the hangers. https://www.screwfix.com/p/easyfix-square-twist-nails-sheradised-3-75-x-30mm-1kg-pack/12788?_requestid=133521 Once it is all fixed in place your relying on its weight keeping it from moving. The diagonal bracing will stop the sway and the fixings into you pads will stop it moving so don't skimp on these.
-

What is the negative effect of too much mortar plasticiser??
Declan52 replied to epsilonGreedy's topic in Brick & Block
It will depend on the size of the mixer for a start. A small belle mixer that just about fills a barrow will be 5 mins of mixing once it's filled. Then you have a proper site mixer that will fill maybe 5 barrows at least then your up to maybe 10-15 mins. It will all depend on things like how wet the sand is and how quick you are at getting the sand and cement into the mixer. Then it will all come to experience. -
What is the negative effect of too much mortar plasticiser??
Declan52 replied to epsilonGreedy's topic in Brick & Block
It will take as long as it will take. Just get all the sand cement and water in quick then walk away and let it mix. Go and stack blocks or clean up just Don't stand and stare into the mixer like your watching TV. It will never mix with you watching it. -
But it will take a massive change in attitudes from the mortgage companies as paddy Bradley explained on the show. They won't touch that type of build.
-
Cordless angle grinder is the tool you want.
-
Lay the 25kg cement bag flat and using a trowel cut across the bag in half. Grap it at the cut and lift it up and you will have 2 half bags that weigh 12.5kg. Cut the rest of the way through and then they are easily lifted.
-
Turn the mixer of before you pour it out. This will let you control how much comes out the front. Once you get the hang of it then you can try it while it's spinning. You need a proper barrow not something meant to carry leaves. If you put it side on and get it wrong the motar will hit the side first and tip the barrow. Do as Peter says and put it straight on if the lip will sit under the mixer. Just keep Infront of the mixer clean so if you do spill a bit then you can put it back in the barrow and use it.
-
What is the negative effect of too much mortar plasticiser??
Declan52 replied to epsilonGreedy's topic in Brick & Block
It puts to much air into the mix which makes it go like fluff. Once it's hard you end up with voids in the motar so it's not as strong as it should be. With voids then frost can get into it and it will crumble. I always used this type where you have the small bit at the top to measure it out. Squeeze the main bottle to fill the small bit and drop it into a bucket of water then into the mixer. https://www.amazon.co.uk/Multicrete-One-Shot-Plasticiser-Concentrated/dp/B07BBJRT2C/ref=mp_s_a_1_1?_encoding=UTF8&qid=1567361968&s=gateway&sr=8-1&srs=5309686031 To get a good motar the secret is just to let it mix and mix and mix. If you just lash water in till it looks right but not properly mixed then it dries out to quick. -
Mixed ballast is a mixture of usually sharp sand and gravel from 10mm to 20mm depending on what you need it for. You really didn't notice the sand in it when you where shoveling it into the mixer??? I should have said buy another few bags of ballast like these. https://www.diy.com/departments/diall-all-in-ballast-large-bag/35702_BQ.prd
-
Just keep mixing till they are full. If you need to buy another few bags of sand and cement then buy them, finish this part and move onto the next task.
-
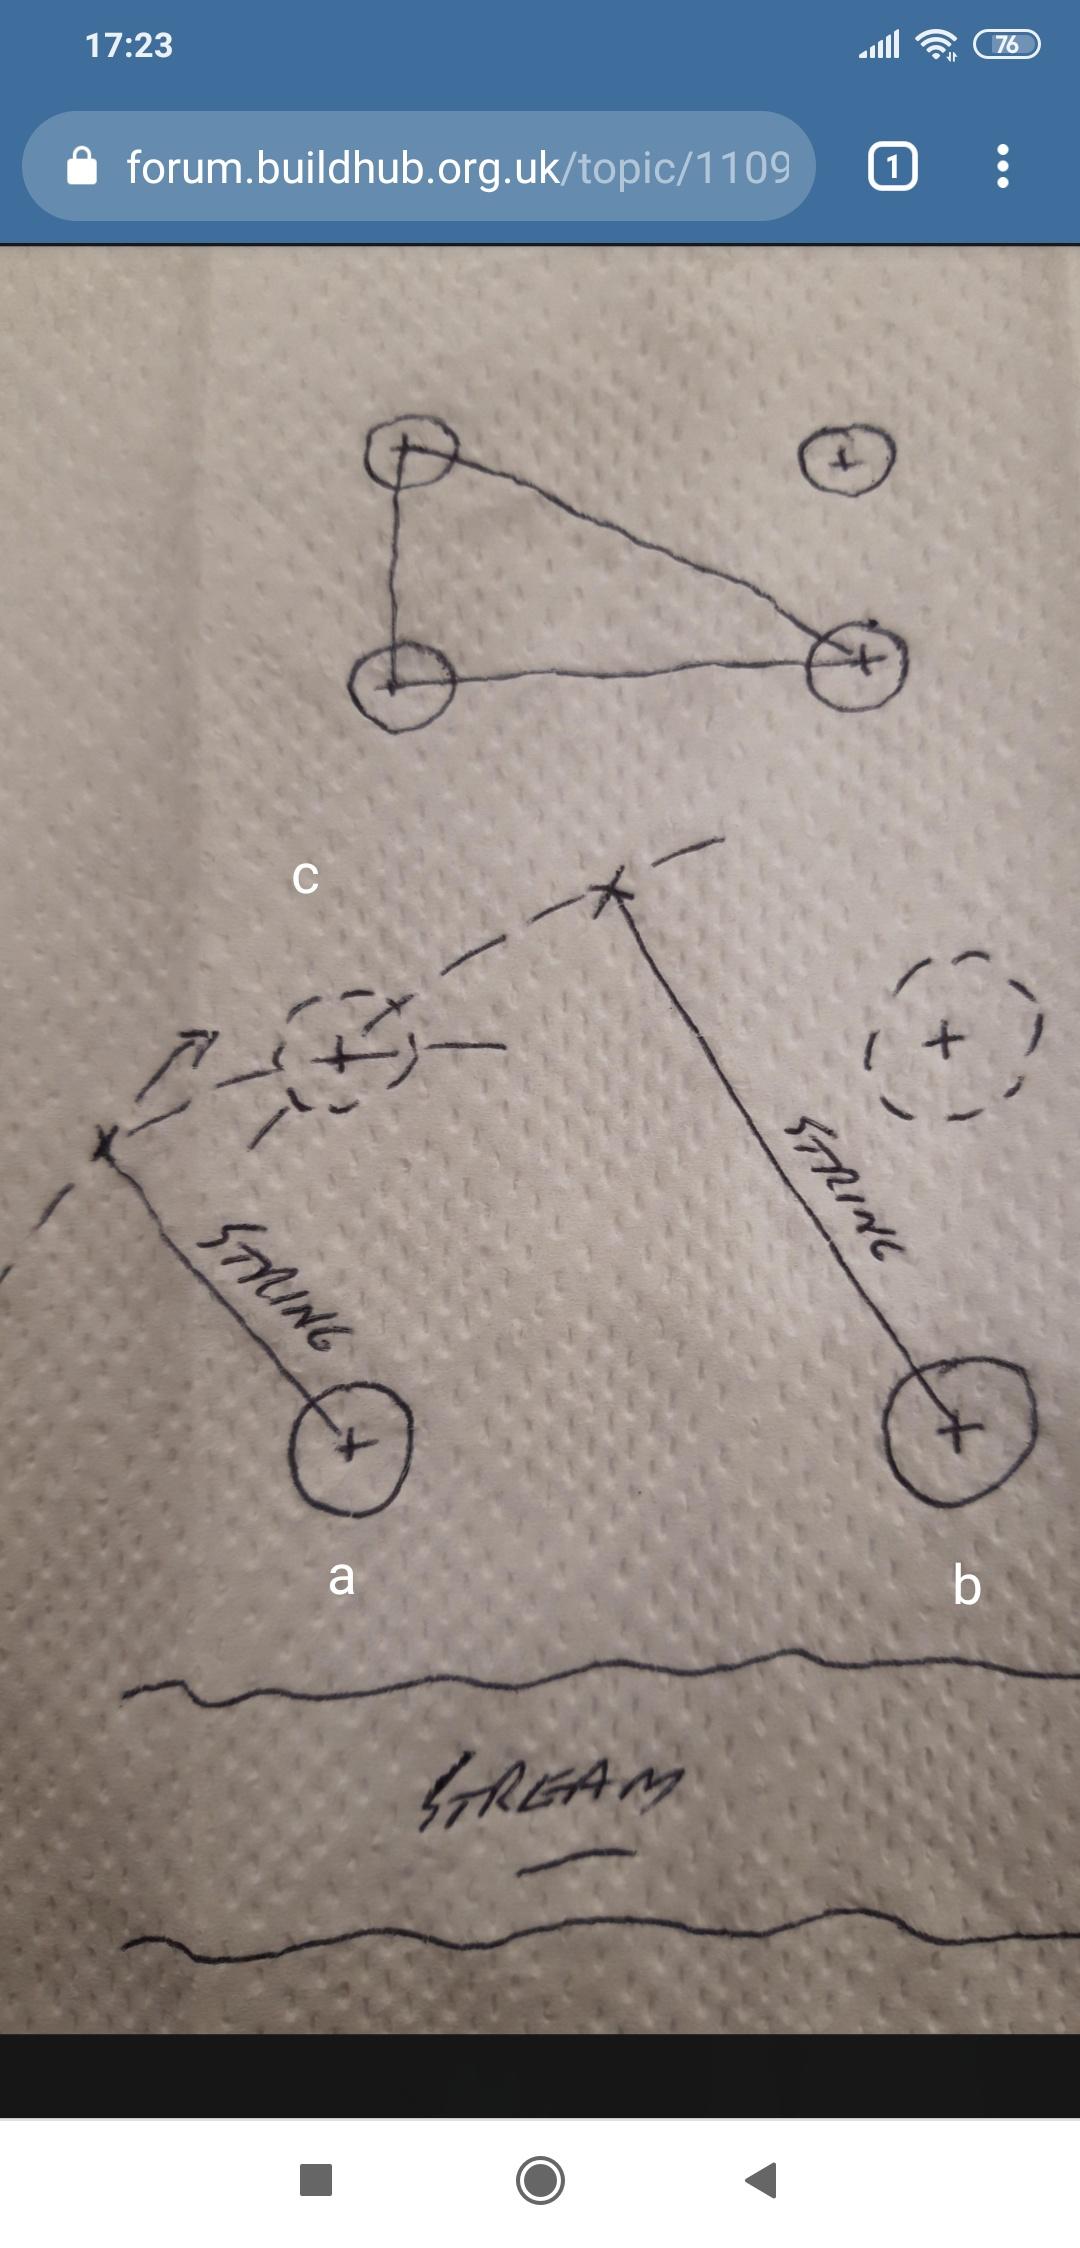
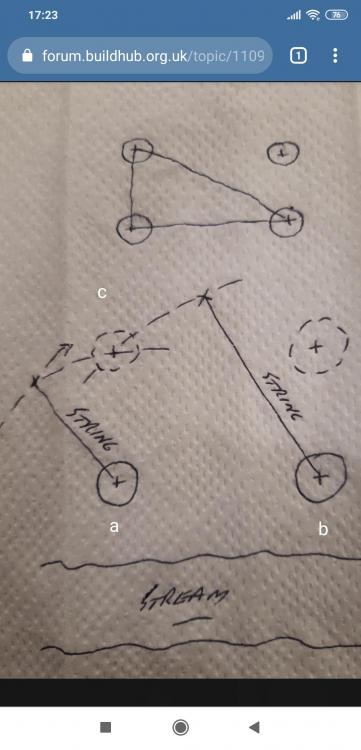
If you call the other point d, you know b to d(2.3m),c to d (2.3m) and even a to d( 3.252m) so it's just using a tape and a level and mark on the ground roughly where these points all meet. It will be much easier if you have 2 tapes going at the same time. In the grand scheme of things due to the size of the pads even if your 50mm out it there won't be an issue. Once you put the frame on it it will be much easier to move it slightly to get it spot on. Once you have it square then you can fix it to the pads and it will never move.
-
Ok you have a basic sq that each corner is 2.3m from the other points. You know the distance from points a to b and a to c is both 2.3m. then you use Pythagoras to work out the other distance c to b. A²& B² = C² 2.3² & 2.3²= 10.58 √10.58 = 3.252m
-
MVHR DiY install?
Declan52 replied to gc100's topic in Mechanical Ventilation with Heat Recovery (MVHR)
It's not a hard job to do. Much easier to wrestle with all the pipe work of you can get an extra set of hands. Plenty here have done it and saved a few grand which is always needed come the end. -
A pellet gun and a sharp eye.
-
They are hard to wear when it's very warm. After a few days it takes a big squirt of febreeze to kill the smell of sweat. The radio is very good though. Much better than having earphones inside the unit.
-
They might as for a costings for your build so you can prove that you can build and finish your house for the amount of money you are looking to borrow.
-
I don't think you should include the cost of the land due to the vast difference in how much a site costs between different regions. You could buy a site here in NI for less than £40k. In the South East your into hundreds of thousands. So I could buy my plot and build a very good sized house for way less than someone could buy their site near London. You could say that my house cost £X per sqm and then include the cost of the site separately for a more balanced view. Everything else then should be included, tools, hire costs, if you bought and sold things like scaffolding, utility costs etc. I think it would be unrealistic to include your own labour costs. How much spare time do each of us put in in terms of the total hours. You would be into thousands of man hrs. Everything from actually doing some work on the build to sitting at home doing research into different aspects of your build to being on this forum asking questions could all be classed as work. I don't think my calculator had enough screen room to add my man hrs up.
-
Who told you 100mm is sufficient??? Price up the 100mm cavity boards and then don't forget the brickies will want some of you £s per sheet as to put them in right is slow.
-
Why are you set on a 100mm cavity??? If you go down the route of cavity boards then you really are at the mercy of the guy putting them in. Any snots that fall onto the tongue or motar pushed out when he is lifting a block on will have a major impact on how your house performs. A 100mm cavity with boards in a lab will give great results. On a building site its a toss of a coin. Are you able to stop by the site each day to look down the cavity to see if any boards aren't right. And if you do notice some with gaps are you prepared to pull the brickies up on it. I used them in mine but I built it myself so spent time cutting boards with a hand saw for each corner and door and window junction. The boards have small fins on them so there is about 10mm of a cavity. But I made mine an extra 10mm wider as if you get a thicker batch of blocks then you ain't got no room to manoeuvre and the wall will be out of plumb. My build was block and block so I was able to use additives in my render to help keep the wet stuff out. Very few facing bricks will stop rain penetrating into the cavity. If you can increase the width to at least 150mm you can use graphite EPs beads blown into the cavity so no gaps anywhere. It will be one less thing to worry about on the long list of things to stress out over.
-
Standard plasterboard on the ceiling then Rockwool at the depth of the joists, 80/90/100mm. Then roll out a min of 300mm across the joists. Keep your insulated boards for the walls. Pay attention to holes in the ceiling for lights as these will need sealed up. As Dave points out the gap in between floors will need sorted. As it's an old house the joists will be through the wall do over time gaps will have appeared. Lift the floorboards so you can go round the permiter and seal the wall with a combination of tape/membrane/motar especially if the gaps are large.
-
If your banking on some survey results to make them fix anything then your in deep deep shat.
-
You have 2 options. 1st option is to bring it to their attention and get it fixed. Not a massive job. Scaffold up first 6/7 rows stripped back and the battens put on correctly. A half days work. 2nd option is to say nothing and let it annoy you every time you look up. No chance would I be buying a house without seeing the inside until completion day. The builder will know all the wheels are in motion and you will just want in by that day so all it does is buy him more time to complete the snag list. Which once he has your money in his bank he won't exactly be dancing to your tune when you call.
-
Self build costs - those who used their own labour
Declan52 replied to rh2205's topic in General Self Build & DIY Discussion
A good plasterer can cover all manor of sins. For everything else there is caulk. -
Artificial Grass Play Area ... advice needed
Declan52 replied to Ferdinand's topic in Landscaping, Decking & Patios
Most rolls come in 4m widths so you will have plenty of waste of you only go 3m wide.