

Crofter
-
Posts
3484 -
Joined
-
Last visited
-
Days Won
11
Everything posted by Crofter
-
Interesting... but I presume any facilities blocks would still need PP and a building warrant? And normal requirements apply for road access? So only really of use to someone who has an existing road access into a field, and is looking to attract people who are happy to be, erm, self contained when it comes to their ablutions.
-

Gabions as garden fence anchors?
Crofter replied to Hillydevon's topic in Landscaping, Decking & Patios
That's a heck of a price for a fencepost though. To be honest a decent wooden post can last 20 years or more, although it all depends on the quality of the wood, the treatment, and how wet the ground is. Is there any room to brace the fence? That would help it stand up to the winds. -
Gabions as garden fence anchors?
Crofter replied to Hillydevon's topic in Landscaping, Decking & Patios
Is there something stopping him from being able to dig a hole? Concrete is not scary, you can use postcrete if you really want. -
Single Room MVHR
Crofter replied to Crofter's topic in Mechanical Ventilation with Heat Recovery (MVHR)
Can't say definitively, but all the ones I've looked at show through-wall mounting, with a straight duct run. There may be condensate drain issues if you were to mount the unit in the ceiling with a bend in the duct. -
Erm, no, sarking is pressure treated softwood. Well I suppose you might have found it made of larch but that would be rather unusual! Tbh it might outlast the locally grown larch that I've used...
-
Just make sure the duct size is compatible with the sort of unit you are likely to install... shouldn't be a big problem though. Bigger ducts tend to be quieter, by the way.
-
Cedar? Very posh... I thought you were using sarking boards?
-
I'll shortly be buying some cement board to use in place of plasterboard behind the woodburner, but it's got me thinking, what's the consensus on using this stuff for its intended purpose? In every house I've lived in tiling has always been done directly onto normal PB, even around baths etc. Not great when the time came to change the tiles, but other than that no problems at all. But I guess the stuff exists for a reason...?
-
The supply to my house (built in the 70s) is not ducted, but then again it doesn't have warning tape either, and is six inches under the lawn
-
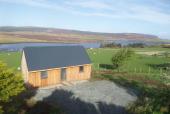
If you like it then you should have put a roof on it
Crofter commented on Crofter's blog entry in Wee Hoose on the Croft
Very trusing of you to pre drill all the holes! I figured that I wouldn't want to drill without using a punch first, and if I was doing that I might as well bash it a few more times and make the hole that way. I could tell it was time to call it a day when it took 20 blows to knock the punch through though... it had taken five to start with... The ridge is certainly going to be interesting... -
It's something diligent lawyers ask for when a house which has had major work done to it changes hands... in theory It may also be something that diligent insurance companies ask for when DIY wiring burns your house down
-
If you like it then you should have put a roof on it
Crofter posted a blog entry in Wee Hoose on the Croft
I had the offer of some help from a neighbour so decided to crack on with the roof sheets. These are corrugated sheets 4x1m and in the thicker 0.7mm spec, so fairly heavy and awkward things to handle. I did get the first sheet up and fixed by myself but am not daft enough to turn down an offer of help when it appears! When I bought the roofing, I had recently read @ProDave's less than glowing review of Jewsons' plastic headed roofing screws, so made a point of asking what would be supplied. The guy at the BM was adamant that everybody these days prefers the plastic headed stuff, quicker to install, no caps to come loose, just a question of getting the right bit to drive them in with. He even did a straw poll of the people in the shop at the time... Anyway, how do the screws work in real life? They certainly do not self drive, not by a long shot. And so far I have stripped the heads off two of them, although in both cases I was able to back the screw off and remove it using pliers. So it seems you need a decent hole punched in the sheet, which slows down installation somewhat. Getting the sheets up on the roof wasn't too hard once I figured out a method- I built a 'stretcher' to hold each sheet, and this is then run up a pair of wooden guide rails onto the roof. Doing the last sheet will be a bit tricky as we will have to pull the 'stretcher' out from under it, instead of moving the sheet to the side as we have been doing so far. In other news, the hole for the flue is now made- a bit daunting cutting a whopping great hole in the roof! I'll write another blog post about that as part of the stove installation, -
I'm not an expert but I don't think you would need PP. However you will probably need a building warrant if you are moving the kitchen to another room.
-
Good timing bringing this thread back up. I am now potentially going to have electric UFH, in place of the panel heaters that I originally specified. My thinking is that if I am going to go direct-electric heating, might as well make it reasonably elegant. I am hoping that with the levels of insulation I have got, and the small size of the build, the running costs should not amount to too much. I noticed upthread that Jeremy pointed out that his low temp UFH would not subject the flooring to anything that it wouldn't get from the sun on a hot day... but I presume that electric UFH is a different kettle of fish? More of a high temperature point heat source, and therefore more liable to cause problems?
-
Sounds like it. You want to keep the wind from getting into your insulated shell and carrying away heat. The gap between a couple of sheets of OSB might not look like much but a strong wind will fairly whistle through that- I know because I have this issue at the moment myself on a few places.
-
It's just business. If your competitor's price goes up, you can put yours up too.
-
Crowbar, car jack, blocks of wood... but yeah maybe a helper is a better idea!
-
I'm about ready to start battening out the inside of my build, and I guess now is a good time to do a rough plan of wheret he wiring runs need to be- so that the the battens don't end up in the wrong places. I can draw everything out on top of the (paper faced) Kingspan at this stage which will be a nice easy way of doing it. Just wanted to double check something- I understand I can have cables in a safe zone up to 125mm wide, at the ceiling, and thereafter running horizontally or vertically to each outlet- nothing going diagonal without being ducted in metal. My floor is effectively solid- ok so it's actually chipboard but as an airtight face of the building, I do not want to disrupt it to run wires. Now, can I create a 'safe zone' of 125mm along the floor? This would make for shorter cable runs to each socket which is presumably safer than having floor to ceiling runs each time. And of course at the end of the day my build is not subject to BC so I can do what I want, but I don't want to deviate from good practise, especially with things like wiring.
-
Cheap, Thermally Efficient Non-Structural Wall Detail
Crofter replied to Nick's topic in General Construction Issues
That would be the wrong side of the wall... did you mean tape the ply? -
Hutting revival (Guardian article)
Crofter replied to Crofter's topic in General Self Build & DIY Discussion
I'm sure there would be demand if you are close enough to the WHW. Will the lack of main electricity not put off the neds? I am also a little worried about people using the woodburner... putting rubbish into it or running it with the door open... plentiful free firewood and a spring on the door maybe? -
I don't make a point of watching GD anymore... seems like people with more money than sense. Hard to empathise when they run into problems. I've got absolutely nothing against innovation and quirky design- just would like to see people working with more modest budgets as well.
-
Because self building isn't stressful enough... can't imagine wanting a bunch of cameras all over the place :0 The other thing is that there is no way of knowing how the judges will weight the various factors. Will the winning house have to be quirky, off the wall, and stuffed full of features that look great on TV but would actually drive you mad trying to live with them? I would hate to compromise my build by making it über trendy just to impress some people off the telly...
-
Hutting revival (Guardian article)
Crofter replied to Crofter's topic in General Self Build & DIY Discussion
If it was on Skye it would be rented out on AirBnB and making a killing. It's crazy up here. I'm thinking I might rent out my wheelie bin as a minimalist glamping experience. -
Dual Hobs in Worktop, design vs structural engineering
Crofter replied to TerryE's topic in Kitchen Units & Worktops
We've also gone with a Wickes kitchen, it was really between them and B&Q and the latter were really not impressive at all. Would have been nice to have had more options, but we didn't like anything at Howdens and weren't prepared to drive hundreds of miles to the nearest IKEA... -
Nice to see this getting some more coverage: https://www.theguardian.com/uk-news/2017/jan/15/how-scotland-back-in-love-with-hutting @Tennentslager Is the expert on this, but for those who don't know, a hut is a <30m2 building not intended for permanent occupation, and made from low impact materials with minimal permanent effect upon its site. Generally off grid, they are exempt from building and planning requirements.

