

Crofter
-
Posts
3484 -
Joined
-
Last visited
-
Days Won
11
Everything posted by Crofter
-

A new room above the garage, wood or brick?
Crofter replied to 8ball's topic in Garage & Cellar Conversions
Just trade it in for one with a sunroof, much easier! -
Dual Hobs in Worktop, design vs structural engineering
Crofter replied to TerryE's topic in Kitchen Units & Worktops
Hmm, interesting one. Is there any way that the support along the front could be a longer piece, built into the units either side? That would gain the advantage of becoming a built-in rather than a simply-supported beam. Secondly, why CT1? I'd be more inclined to just bolt it together, or maybe epoxy. -
Build to let mortgage - self build then rent out
Crofter replied to Lingwood's topic in Self Build Mortgages
My drainage issue was for the sewerage, as there is no mains connection around here. So my services came in at about £11k, of which about 6 was a fairly fancy septic tank and treatment system. The access was about another 5 and I think still needs another thousand to bring into truly usable condition. So between them, all those will be not far off half my total budget -
Thanks all. To be honest I'm wondering if I should bother. The drafts were pretty obvious the last breezy day we had. I think that as I block up more of them, the airflow through the remaining ones becomes stronger- does that sound right? It's a lot easier to wait for a breezy day than it is to rig up a DIY test kit. Also, whilst numbers would be nice to have, I don't think they would change anything. So whether I am getting 5ach or 2 (or however it is measured) I will still be installing a MVHR.
-
Build to let mortgage - self build then rent out
Crofter replied to Lingwood's topic in Self Build Mortgages
Hi and welcome to Buildhub Your plan is not dissimilar to mine- I'm building a 5x10m one bedroom house on land I already own, with the intention being to let it out. I've been fortunate enough to be able to do this in cash rather than needing to go to the bank. FYI my total project cost is going to be about £40k, hopefully just under that, which includes some very expensive work on drainage and access issues that hopefully you won't have. However I am doing absolutely everything myself so the cost is materials only. If you build to let, I don't think you will get your VAT back. I think you have to actually live in the property to do the VAT reclaim. So it might be best to go down that route, and not bother telling your bank that you plan to rent it out at a later date. -
I've come across some discussion of this on other forums (fora?) and am at a stage with my built where it would be possible to do this test now. I have installed all my internal PUR insulation and foamed up any gaps as best I can, so a test now will reveal any major leaks in advance of installing the vapour/airtightness layer. I would then run the test a second time to check that the barrier was doing its job. It seems that the general idea is to use a large car fan running off a 12v battery, to suck air out of the house. A tube set up with one end in the house, and one outside, can function as a manometer to check the pressure differential. So far, so good. But on a practical note, how would I actually go about finding the leaks? Just work my way along every joint and edge feeling for a draft- or something a bit more scientific? I was in the house foaming up gaps the other day when the wind was gusting to 60mph outside... is a DIY fan test going to achieve anything that I haven't already done with the help of mother nature?
-
Hi and welcome. No such things as stupid questions, except the ones you don't ask Why are you concerned about the MVHR running whilst the house is unoccupied? It should only be costing about £50 a year in electricity and for that you get peace of mind that the house is going to be free of mould and damp. I suppose you could achieve the same thing by having dedicated passive ventilation that you are happy to leave open whilst the house is empty and unheated, but imho achieving that securely is more of a headache than simply using the MVHR itself. My understanding of how MVHR interacts with extractor fans or woodburners is that it's not a big deal. Extractors are not going to be running for very long periods anyway. I have heard of integrating cooker hoods with MVHR but I think that is a recipe for blocked filters. For the woodburner, it's best to get a room sealed one if possible, for all sorts of reasons, so the MVHR won't even know it's there except for the brief moments when the door is open for refuelling.
-
I think a decent filter would be a necessity. My DIY one was going to be longer and use copper. But I wouldn't be able to have the corrugated pipe surfaces. Edit to add: surely copper is adequately long lived, unless you're planning on showering in salt water or battery acid??
-
That's pretty much exactly what I was thinking of building. Thanks for the headsup on the website by the way- they have some interesting products. I've just emailed them about their single room heat recovery unit, which could be just the ticket for my wee house.
-
Don't forget to tile your bathroom with PV panels while you're at it...
-
When I looked into this there seemed to be two approaches- a vertical pipe where the outgoing water swirls down the walls, and a spiral tube underneath the shower tray. Which sounds like a good way of getting cold feet, IMHO. I have contemplated building something akin to a conventional heat exchanger- basically copying what a marine diesel engine has- using microbore copper piping. There would need to be a good filter and a high level overflow, and cleaning hair out of the filter would probably be a daily task.
-
Never knew that, but it does make sense, thanks. I would be ventilating a single 600mm wide strip of the void, from floor to ceiling, immediately behind the stove and flue. Ventilation would be to the room only. Not sure what the neatest way of achieving that would be, though.
-
I'm planning on using 12mm cement board instead of plasterboard, and behind that will be the service void, 25mm deep. However this will be faced with the plastic vapour barrier, so I'm a bit worried that a slight crease or fold in this would allow it to contact the rear of the cement board. Would it be prudent to use some 6mm cement board over the top of the vapour barrier? And should I be thinking about ventilating the service void in this area to help prevent heat buildup?
-
Yes I'm not looking to have the wall look any different to everywhere else. I think having a big feature would look too cluttered in such a small space. I'm not going to have a whole heap of choice available between my two local BMs. Probably need to go on and see exactly what they've got, and then look it up.
-
Twin wall is insulated so depending on the exact brand you can have it within 50-60mm of combustibles. Just check what the manufacturer says. Single wall is a different beast, you need 3x the diameter as clearance. A non combustible material can be only half that distance, provided it has an air gap behind it. My first stove was only 4" flue, and it was rated at 5kw. But then again it was a multifuel and much lower efficiency, so the flue temp would have been higher, which will help the draw. My impression of the Burley is that it is designed by people who know what they are doing, and I wouldn't want to mess with their instructions. The downside of the high efficiency is a colder flue, so that's probably why it needs the extra cross section.
-
Thanks! The flue components arrived today, a combination of single and twin wall. There is a school of thought it's best to carry the twin wall all the way down to the appliance, but with such a tiny stove that would have looked a bit odd. As soon as I've got the stove up and running, I'll be able to use the space for band practises
-
I've done a bit of reading on this, with the notion that I would like to build a DIY version using copper tubing. To do it according to regs you need to have so much separation between the ingoing/outgoing flows that heat exchanger efficiency suffers. The reasoning for this is to prevent the dirty outgoing water from contaminating the clean supply. You're correct in identifying that a different approach works for showers vs baths. For my own use, I would be looking to give an instant boost to the incoming supply to a shower, which necessitates a heat exchanger rather than a tank.
-
After some online research I've decided to use a cement based backer board instead of plasterboard for the wall behind my woodburner, for increased fire protection. I had assumed that hardiebacker was the only game in town but the different BMs I've phoned have offered me 'multi pro' or 'aquapanel' instead. Is there any difference in the fire rating of these boards? And is there any other material that might be better for the job? Thanks
-
Guilty m'lud... although the systems are sized for 150m2 as a minimum, so there should be economies of scale to be had.
-
My MVHR quotes have been well under £1k, so it will cost less than my woodburning stove. Worth it for good air quality, IMHO.
-
A new room above the garage, wood or brick?
Crofter replied to 8ball's topic in Garage & Cellar Conversions
What are the building regs for putting a habitable room above a garage? -
My little house is too small to need a proper heating system, so in addition to the woodburner the plan is simply to have a couple of wall mounted panel heaters for easy, convenient, and responsive heating. As a holiday let, it might lie empty for periods of time so a fast response is going to be handy for those last minute bookings. I'm just wondering how much more it might cost to use underfloor electric heating mats instead? It would certainly be a neater look. From the little bit of reading I've done, it seems that you need special insulating boards underneath the mats, which will add to the cost. I've got 300mm of rockwool under the floor, and 22mm chipboard flooring on top of that. I'm planning on laying bamboo as the final floor covering.
-
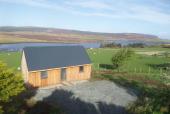
I was about to write 'time flies by with too little progress to show for it' and then realised that was exactly what I said last time! Anyway, since the last update, I have battened out the walls and fitted the first layer of larch cladding on the gables. There was a fair bit of head scratching and working out how the detailing around the windows etc was going to work out before I could get on with the battens. The larch also had to be treated with preservative oil- this will be an ongoing task but it should help keep the wood from looking faded and neglected (even though I gather that look is fashionable for some reason). Another overly time consuming task has been the detailing around the fascia and soffit boards. These things are very easy to draw up on Sketchup but in real life it is much harder to ensure that things are square and level. What I have ended up doing is making up the four barge boards and fitting these, then running string lines between them. I have no idea if this is normal practice but it at least ensures that these highly visible parts of the roof line are symmetrical and match up with each other. On the roof, the battens are ready for the arrival of the corrugated steel sheeting- unfortunately I wasted time chasing some tantalising prices from suppliers further south, which fell down due to delivery costs, and when I eventually ordered from my local BM I was into the Christmas shut down period. Inside the house, I am absolutely delighted to be able to say that ALL of the insulation is complete now. I have 150mm rockwool between rafters and studs, and 50mm of Kingspan over the studs, with 100mm over the rafters. Today's job is to take advantage of the howling gale outside to identify any leakage paths and finish the foaming up between the boards. A tedious task but one that should help me achieve a high airtightness level. The vapour barrier will then go on top to provide the final airtight layer. I have also taken delivery of my stove- a Burley Springdale 3kw model. This is the third woodburner that I have bought (I installed one ine ach of my previous two houses) and it is a real step up in terms of design and built quality. The stove is 100% room sealed, with a single intake that draws from an external duct. The firebox is fully lined in vermiculite blocks, even on the top and bottom, to ensure the hottest and therefore most efficient burn possible. Finally, a stainless steel mesh at the top of the stove acts as a soot catcher to burn off any particulates. It's an impressive piece of kit and I can't wait to get it fired up.
-
I'm not sure but I think BCF is a mild abrasive/polish. Oxalic acid powder can be bought cheaply on eBay. Try something gentler first though...
-
If it's mud/dirt, make sure they're nice and dry and try just scraping it off. If you go with wire wool, best to use stainless in case any fragments get left behind. Any actual stains may be treated carefully with oxalic acid, which bleaches out dark spots, but it's a bit of a nuclear option, as of course is sanding.
