Jeremy Harris
-
Posts
26430 -
Joined
-
Last visited
-
Days Won
360
Everything posted by Jeremy Harris
-
Welcome, sounds like an interesting build. The prevention of interstitial condensation can be a bit of a challenge, as the standard models tend to only cope well with steady-state, or at best slowly varying, conditions, and not with the sort of rapid variation in external temperature and humidity that we can get quite often. I looked long and hard at this, as our frame uses modified Larsen truss construction, but with cellulose insulation. The two key things seem to be to ensure that the vapour permeability outwards through the construction layers is always good (i.e. most vapour permeable layer on the outside, least on the inside) and that the most likely locus for condensation, the sole plate, is insulated well from the ground beneath and has a low heat capacity, so less energy is needed to warm it up and drive vapour back out. Not having an outer skin with a high heat capacity helps, too, as the worst case seems to be a cold, damp, night, followed by a warm sunny morning where the relatively high external skin temperature can create high local humidity next to the structure and this will then tend to move towards any cold areas and might condense out. Once liquid water is present, it takes quite a bit of energy (heat) to drive it back out again. It seems to have taken some of the suppliers of things like SIPs panels a while to spot this, as they were still giving out an approved detail for the sole plate to foundation junction, that made interstitial condensation under rapidly changing conditions a near-certainty, until relatively recently.
-
 They are. If you were granted PP before CIL was adopted then you can't retrospectively be charged, and the same goes for S.106, as an S.106 is a planning condition. It doesn't matter how long you take to finish the build, the main thing is to start work to the point where the build is officially agreed as having started, and get the pre-commencement planning conditions signed off before your current planning permission runs out. You can then spend as much time as you like on the build itself and remain free from any CIL liability.
 -
We had to do a lot of hand lifting of stuff, as a fair bit came on pallets, via a standard truck with a tail lift and that couldn't get up our drive, so had to drop the pallets at the bottom. It keeps you fit shifting things like pallet loads of travertine flooring, or sandstone slabs, up our drive! All told I think I shifted around 8 to 10 tonnes of stuff by hand from the bottom of the drive. The worst was having 6 pallet loads of sandstone delivered, as it all arrived at around 4pm and I couldn't get my car out to drive home until after I'd unwrapped each pallet and lifted all the stone to the top of the drive and stacked it. The 900 x 600 slabs (of which there were three pallet loads) were particularly memorable..................
-
The slab does, very, very slowly, end up the same temperature all over, yes, but it heats up first, and a bit more, where the pipes are. with low temperature UFH, like ours, I doubt is makes much difference if the pipes did run under the units, TBH, as we only run at a flow temperature of around 24 deg C, so there's not a lot of heat to worry about. It's not worth the faff of adding insulation on top, as all it would do would delay the heat getting through, as the space under units hasn't usually got a free flow of air through it.
-
It's fair to say we were pretty staggered, too! The original quote from the water company was around £26k, IIRC, we got it down to £23.5k by getting separate quotes from other approved contractors to dig the trenches and do the surface reparation work. As I mentioned above, all the utilities should break their quotes down into two parts, the contestable element (trenches, surface reparation, pipe, duct or cable laying) that any approved contractor can do (often cheaper than the utility companies) and the non-contestable element (making the actual connection to their network, testing, doing any work required to their network to accommodate the increased demand, etc).
-
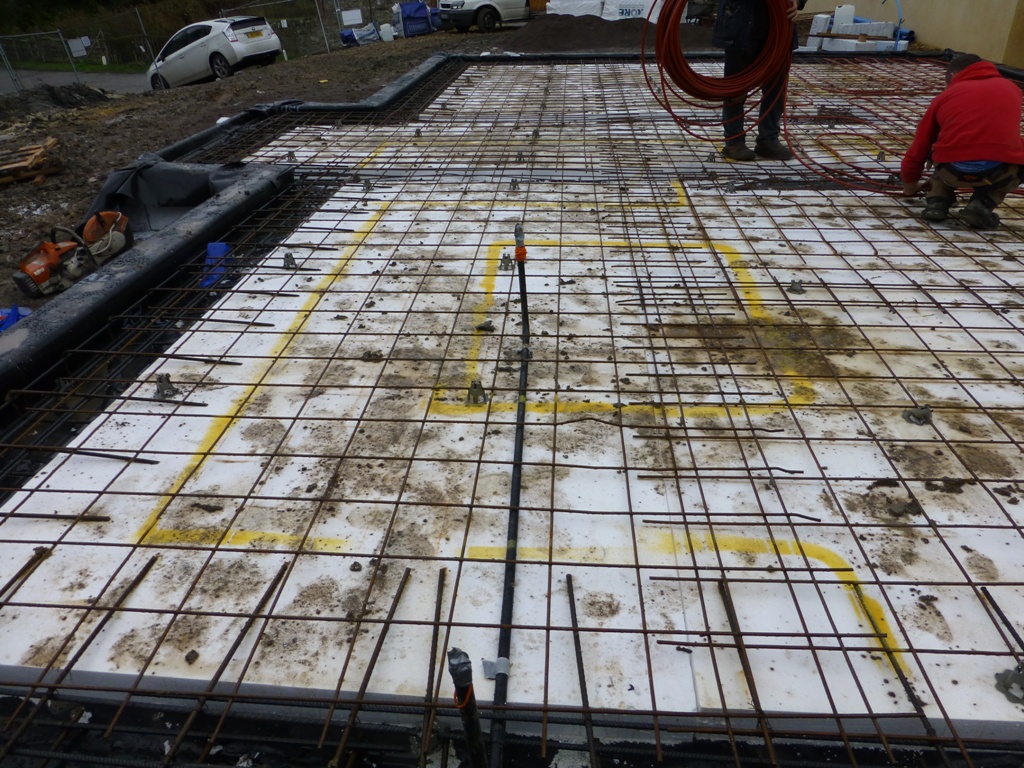
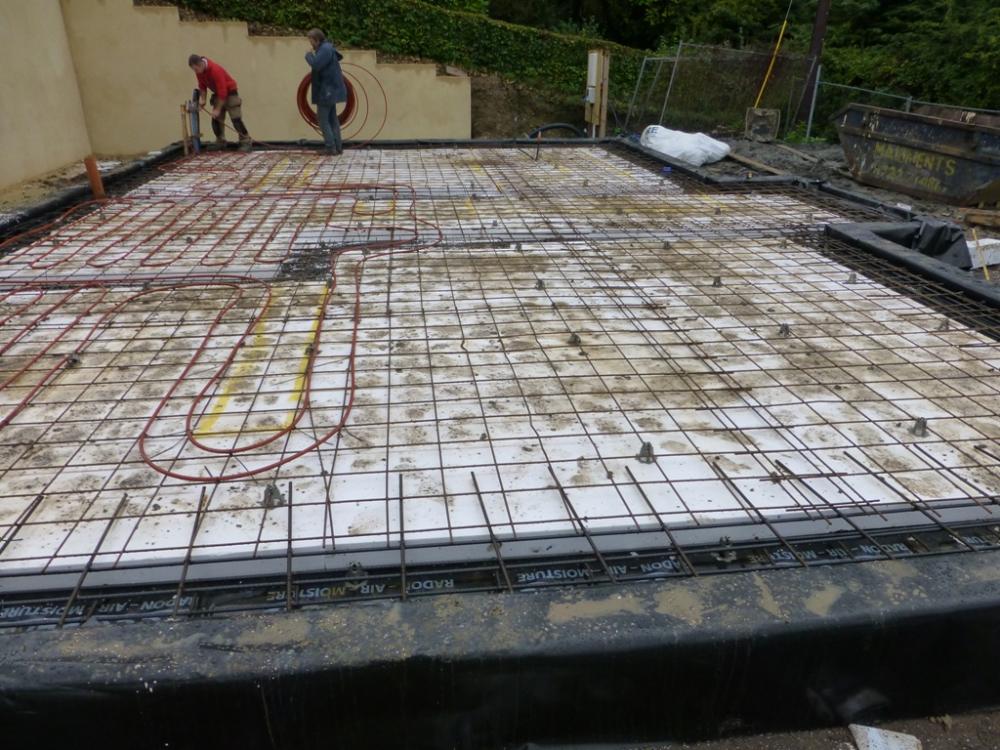
Here's a photo showing the yellow lines marked out before the slab was poured, showing where all the walls, kitchen units etc were going to go. This is from the Kitchen end, and the square is the kitchen island: And this is from the other end, showing where a a stud wall is going to go, with the pipes laid either side of it:

-
Our UFH avoids all these zones: - Under all built in furniture (kitchen and utility room units, plus the kitchen island) - Downstairs WC units and the WC itself - Under the space where the staircase runs (which is partially boxed in as a cupboard) - under all internal stud walls. It also shouldn't run under shower trays or baths.
-
Electric UFH recommendations ( under tile UTH )
Jeremy Harris replied to a topic in Underfloor Heating
I reckon they have misunderstood the question, as I'm not at all sure that stuff would bond bamboo, as the underside of bamboo flooring is pretty shiny; ours was varnished/lacquered all over, both top and bottom. -
No mention of either in my planning permission, but the senior building inspector who did the completion inspection was very hot on Part M compliance. I also had to justify not having Part G3 sign off for the low volume, low temperature, low pressure, sealed system. The jobsworth was just a person it wasn't worth arguing with, as if you "won" on one point he'd only have picked you up on something else!
-
I was think of something like a medical emergency. Say (God forbid) that there are two of you in the house and one has a heart attack, the other gives CPR and calls the ambulance that can't then gain good access because of the post. Same goes for a fire, when you want to get out as fast as possible. For use when away on holiday then I think it's a great idea, and could be done quite simply, with no need for anything that folds or retracts. Set a really solid stainless plate into a big concrete foundation (something like a stainless post with holes in with a thick stainless plate welded on top and set into concrete so it's level with the top of the drive. Threaded holes in the plate, greased and normally covered by rubber plugs, could be used to bolt down a hefty steel post using tamper-proof bolts, or locking bolts with a rotating head that need a key to undo, like locking wheel nuts.
-
Expanding window tape - how long does it last
Jeremy Harris replied to readiescards's topic in Windows & Glazing
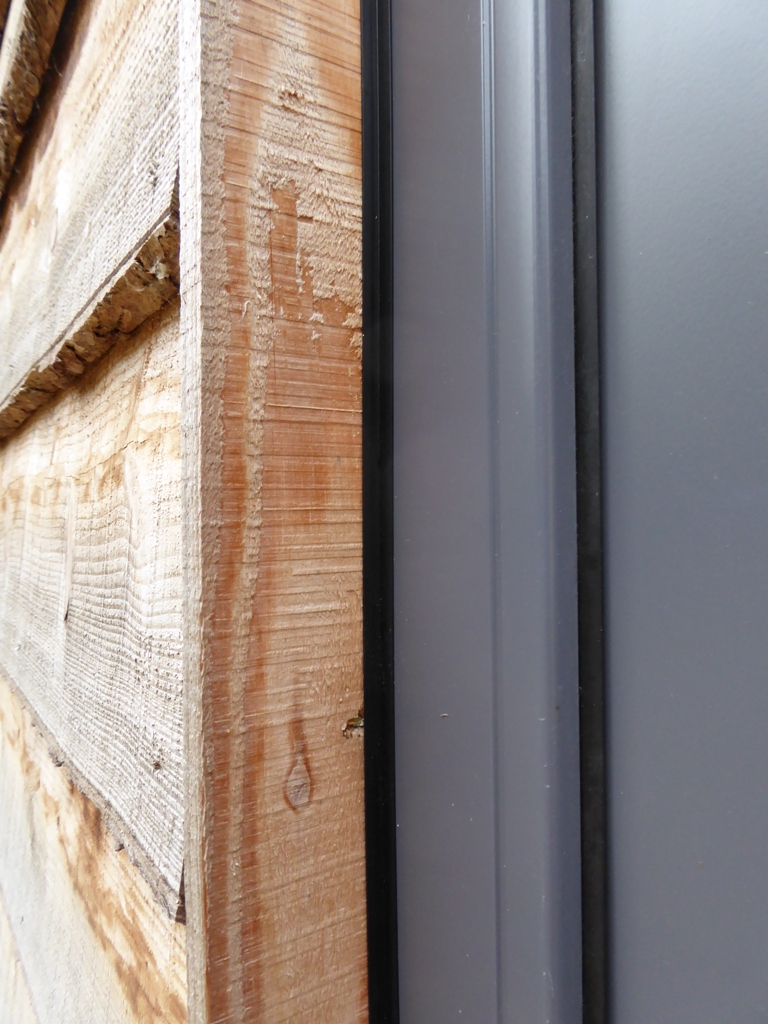
Depends very much on the way the frame is made, though. There's no exposed wood at the outside edges of our aluclad frames, the alloy extrusions are around 20mm deep, IIRC, and then there's a foam-cored PVC frame about 30mm thick, with the timber frame inside that. -
If you can fit a strong-looking retractable/folding post in the drive entrance then that should be a deterrent, as I doubt they'd want to spend time trying to remove it. There are other considerations though. How much of a nuisance is a drive-mounted retractable post going to be? What about an emergency, when you want to get out quickly? I like the idea in principle, but I think I'd want something that was pretty foolproof and very quick and easy to retract/fold.
-
TBH, we used to have a row of key hooks just inside the back door, where we both used hang door and car key fobs (and the spare key fobs.........). We stopped using that, not because of the break in risk, but because the key fob batteries kept going flat - apparently the fobs were close enough to one or other of the cars (both Toyota Hybrids) that one or other of the cars were interrogating the keyless entry on the fobs. It was only around 6 months ago that I read about the "amplifier trick". A quick search on the web revealed that these things were on sale, and made nicking a keyless entry car easy. It works like this. The scrotes turn up with one of these amplifier boxes late at night, and stand between your car and the house. The box amplifies the weak signal that the car sends out all the time, the one that activates the key fob and primes the keyless entry, and relays the keyfob signal back to the car. The car then thinks there's a key fob nearby, so allows the doors to unlock when touched and the car alarm is automatically turned off, as the car thinks there's a fob there. The scrotes then get in and just push the car away, without starting it, so there's no noise. They can't easily start the car any way, but they can tow it away on a trailer easily enough. So, now we have a hidden metal key safe in the house, that's screened enough to prevent the amplifier trick from working, and hidden well enough that it would take a long time to find it, and scrotes generally don't like to spend a lot of time nicking things. As for alarms, I'm not convinced they work. Where we currently live, a neighbours house alarm goes off at least once a month, and everyone just ignores it, or gets annoyed enough after half an hour or so to call the alarm company. I think obvious physical security is probably the best thing to have, followed by CCTV that's good enough quality to ID the perpetrators after the event. We've gone for microwave doppler activated motion detectors, that silently trigger two separated solid state video recorders, with two cameras, one that covers the front door and the whole entrance drive, the other mounted so it looks straight at the first camera, and covers the garage entrance to the front of the house. The idea was to have cameras that would catch both a front and rear view of anyone approaching the house. I suspect that having very obvious CCTV cameras (and ours stand out, even at night, as the IR illuminators give a slight visible red glow) probably deters the casual scrotes, plus we live in a low crime area anyway. The house is pretty secure - secure-by-design locks all around, and triple glazing that's glazed from inside and not easy to break. However, I think the rather sad bottom line is that if a determined enough scrote wants to break in they will, no matter what you do, short of fitting steel barriers all over the place. They always seems to be one step ahead of any new security measure.
-
Thanks Dave, I only have a copy of Amend. 2 here, so wasn't sure. In my case the installation certificate was all signed off in 2014, well before there was a hint of the "fire resistant box" requirements. The funny thing is that CUs were very commonly made of metal years ago, in fact the one in our old house is, so we're just reverting back, really. I can fully understand why the fire resistant materials reg has been made, too. With CUs now full of RCDs, MCBs and/or RCBOs, plus the higher peak electrical demands imposed by a lot of modern kit, there has to be a greater potential for over-heating than there was. I poked my thermal camera at our all RCBO CU and it's definitely warmer than the surroundings by a couple of degrees. Not enough to be noticeable, but enough to show on a thermal image. There were no faults anywhere, I checked out of concern when I found out it was slightly warmer than the wall behind it, it's just the very even heat build up from all the RCBOs, as they do seem to consume a tiny bit of power all the time. I did the same exercise on our old metal wired fuse CU and it's at ambient temperature, not even half a deg warmer than its surroundings.
-
Yes. I had an interim building inspector (not the very nice bloke I'd had for the whole build) who was a right jobsworth. Not only was I asked for the certificate, but I was asked to prove that the restrictors had been fitted. In the end we settled on my taking a photo to show each being fitted..................
-
Just to add, the spreadsheet I used was nicked from somewhere else and modified slightly, but is compliant with the water usage calculation guidance from the Department for Communities and Local Government. I've attached it to this post, but you need to change the suffix to .xls from .txt. Water Usage Calculator - Master.txt
-
There's a water usage calculator for checking compliance with Part G of the building regs. Basically it's a spreadsheet where you enter all the appliances and their known water flow rates or usage for some, like cisterns, and it spits out whether you pass or fail. In our case we failed badly the first time around, so I fitted those cheap flow limiter washers, measured the flow rates again (bucket and stop watch method) and passed, and then put those numbers in the certificate to show compliance with Part G.
-
It's worth a call or email to your local water company new connections team. Mine came out within a day to do a site survey and price up the connections, long before we made an offer for the plot, and then emailed me plans showing the location of both water and sewage mains, together with the connection costs and confirmation that their network had the capacity. The costs were very high, around £14k for sewage and £23.5k for water, after I'd deducted the part of the quote that was for work that could be done by others and got separate quotes for it. Worth asking for a breakdown of any quote from a utility co, as they are obliged to split it into two parts, the general trenching and surface reparation work that can be done by any approved/competent company and the connection which can only be done by them. Often there are ways to get the trenching, pipe/cable laying and surface reparation done for less cost than the utilities quote, especially if you already have a ground works company lined up for other work on site who have the appropriate approvals to do such work.
-
Terry, if you want an idea of the massive range of flow restrictors like this, then this page (where I nicked the image above from) give a fair idea: https://www.qssupplies.co.uk/Taps/Taps/EcoHomeRestricters/Product/463.htm There are literally dozens of suppliers of these things, as the water regs require that taps, showers etc be limited in flow rate for a lot of new builds. Often fittings are supplied with the flow limiters already fitted, we found; our downstairs WC tap had one on already, for example.
-
I'm afraid you can't assume anything! The tap is an indication that there is, or has been, a water supply in the past, but you don't know if it's capable of supplying a house, or that it's connected to a main. Your not allowed, by law, to connect to a communication pipe, so if the pipe feeding that tap is fed from another property, via a communication pipe, then you almost certainly can't use it. You'd need to trace back to where it originates to be sure. If it comes from a stop cock near the road that has a cover marked with a water company logo, or just marked "water", then the chances are it's a mains connection. In that case you just need to enquire from the water company as to whether there is capacity available for you. If their answer is no, then they are obliged to put that extra capacity in, but may well send you the bill for it. It's a thing that should be resolved pre-purchase, as it can be very costly (our water supply costs were going to be £23,500, even though the house over the lane has a pipe that runs 2m from our plot). Mains drainage plans are available from your water company, and show the position and invert depth of the nearest manholes. They will usually let you have a copy of these free on request. You can see if it's feasible to connect to a main drain from those, remembering that you can run sewerage uphill using a pump if need be. Whether you can fit a treatment plant depends on the soil conditions and the amount of space you have for a leach field. Some soils just won't drain well enough for a treatment plant to be fitted. The planners will happily grant planning permission that says the house can be built with a treatment plant when one cannot be installed in practice, we found!
-
Expanding window tape - how long does it last
Jeremy Harris replied to readiescards's topic in Windows & Glazing
I did the same, then covered the small (5mm max) gap with clear neutral silicone and a length of 6mm x 6mm x 1mm PVC angle as a trim, so you can't see the sealant. It worked well and left a neat-looking finish externally:
-
Just an off-the-wall idea, but if you can get a decent hose to the standpipe, how about installing an accumulator to store water in the hut, under pressure? It takes up space, but could be put outside in an insulated box. If filled via a NRV on the accumulator, via a removable pressure hose that fits the standpipe, you could have water at the same pressure as at the tap, with no pump. Fit a pressure gauge and you have early warning that the tank is getting low and needs topping up. You could then have ordinary plumbing in the hut if you wanted to.
-
I've never understood why some people are happy to use physics to understand something, yet at the same time believe that well-proven laws of physics can be arbitrarily broken just because they like the idea and want it to succeed. Often it's not about making money, either. Those we refer to haven't, as far as I know, personally profited at all. I mean, few could argue with Newton's laws of motion, we feel them around us all the time. So what's different about the first law of thermodynamics that makes people think it can be broken at will?
-
Yes, but only because it suited our kitchen layout, plus, in part, it was a realisation late on (change of appliances, as a consequence of the ones we wanted having been superseded by new models) that our original wiring plan wouldn't work. It was the electrician who spotted the snag (we'd ordered two ovens that ran from a 13A outlets, but were delivered one that needed a 16A feed and one that had a 13A plug) and together we came up with the idea to fit the small bank of MCBs in the cupboard. The original plan (in fact they are still there) was to run the ovens from 13A outlets at normal level on the wall adjacent to the tall double oven unit, as the two original ovens that I'd ordered both had 13A plugs fitted.
-
We had to fit (and test) flow limiters on all outlets. I just fitted flow rate limiting washers, cheap, easy to fit (and remove after inspection................) and do the job over a wide pressure range. For a shower you can just replace the existing washer in the fitting with a flow limiting one, for a bit of pipe you need to fit the flow limiting washer in an adapter. You can pay through the nose for adapters with ball valves on, but if you hunt around there are cheaper straight ones available. The washers I used are like these, colour coded for flow rate in litres/min, over their working pressure range: These work by the elastomer bit in the middle deflecting under changes in water pressure to open or close the peripheral water flow space, hence regulating the flow rate more or less independent of pressure.