Jeremy Harris
-
Posts
26430 -
Joined
-
Last visited
-
Days Won
360
Everything posted by Jeremy Harris
-
Pity you didn't ask here, as someone else had confirmation a year or so ago that MBC don't do extensions, and never have, as far as I know. The reason is mainly that their system just doesn't lend itself to to fitting together with an existing building, plus they have a pretty full order book for new builds, I believe.
-
Right, I've dug back through the emails and found the order. The hoses came from BES: https://www.bes.co.uk/braided-stainless-steel-flexible-hose-3-4-x-1500mm-8131 I used ones with bends on the end as they better fitted the tees on the bottom of the pressure vessels. I also used shorter ones with bends on (900mm IIRC) on the back of the ASHP, as it made the pipes run in a loop (to kill the transmitted vibration problem) neatly.
- 18 replies
-
- 2
-

-
- ashp
- connections
- (and 2 more)
-

Kingspan heating (or lack of) issue
Jeremy Harris replied to Lynford's topic in Air Source Heat Pumps (ASHP)
OK, all's normal with the heat pump, that indicates no faults and the unit should be operating normally, so the problem has to be elsewhere. I suspect that the wiring in the wiring centre may well be wrong, and the heat pump isn't getting the call for heat signal. From your photo it looks a bit of a mess in there. I'll have a long look at it later and see if I can spot what the problem is. -
I have two spares here, if you're desperate, I'll try and find where I bought them from.
-
It's a lot easier to use the pre-insulated pipe that's made for the purpose, like this: https://cpv.co.uk/product-range/pre-insulated-pipe/hiline-flex-pe-xa (I'm not recommending this one, it was just the first website with a photo I could quickly find). You won't get 22mm pipe to bend around a standard bend, so I suggest you have a think about the possible solution I suggested above. You can get 1.5m long large bore flexis, I have them connecting our pressure vessels. I'm certain that two of those, wrapped with Armaflex, would get around that bend OK.
- 18 replies
-
- 1
-
-
- ashp
- connections
- (and 2 more)
-
I'm assuming that it's the 90 deg bend that's the potential issue. Is the bend a standard one or a swept one? If the former then you may really struggle to get insulated 22mm plastic pipe round it, if the latter then it may just get around OK. One solution may be to terminate some insulated 22mm pipe with a long full bore flexi, test the joints for leaks, insulate the flexis with Armaflex, tape the open end of the flexis to stop muck getting in, then feed the pipes in from outside. With luck the flexis will just go around the bend in the 110mm pipe easily and just pop up inside, where you can make the internal connections.
-
Only a small thermal bridge though, and the effect of that thermal bridge will be reduced by the surrounding insulation, probably to the point where the thin, offset, webs connecting the inside and outside faces can be considered to be long 2D heat loss paths. The increased length of those heat loss paths, created by the offsets, means that the thermal resistance may well be quite high. Even though brick as a material may not be a great insulator, make the thermal path long enough and it could well be.
-
Kingspan heating (or lack of) issue
Jeremy Harris replied to Lynford's topic in Air Source Heat Pumps (ASHP)
OK, you have the external diagnostic indicator box fitted, and that mimics one of the LEDs that is fitted on the circuit board in the heat pump. That is green, which means there are no errors being reported by the heat pump itself. You can get a lot more detail by removing the cover of the heat pump and looking at the full diagnostic indicators. First off, in case you don't have it, here's the manual for that unit: Kingspan_Aeromax_plus_Installation.pdf The diagnostic codes are detailed on page 23. If you choose to do this, use caution, as there are live connections that are exposed when the outer cover is removed, and I can tell you from personal experience on our smaller model of the same heat pump that in removing the outer cover with the power on you can get it to touch a live terminal as you take it off(gave me a heck of a belt!). Best to turn the power off, then remove the cover, then turn the power back on. Also included in that manual is the wiring for the wiring centre that you have taken the cover off, and that for the programmer and thermostat, so it would be a good idea to check that it's wired as it should be. Post back here with what you've found and we'll try and help further. -
I can advise that taking the water metering head off is not advisable! Getting the gears all back in place after they've all come off their spindles as you lift the cover is very far from easy.............. The perils of being intrinsically curious by nature; I just had to take the thing apart to see how it worked.
-
Not yet, I've been busy digging and getting very muddy this week............ I may get some time to play with it this weekend though, with luck.
-
Sounds like the flue is doing a very good job of ejecting the flue gases high into the air. Good news in terms of keeping the levels down in and around your house. I wonder how long it takes for the the particulates to fall out of the plume and drift back towards ground level? Quite a long time, I would guess, so they may not get down to ground level until some distance down wind.
-
Kingspan heating (or lack of) issue
Jeremy Harris replied to Lynford's topic in Air Source Heat Pumps (ASHP)
If the radiators are small, standard sized ones, then they won't deliver anywhere near their rated output, due to the lower flow temperature from a heat pump. There are ways around this, including some simple things, like adding quiet fans to each radiator, that will increase the heat output. We'd best wait until your return with the info before making further suggestions. -
Definitely heroic. We had a similar massive pile of plasterboard on pallets arrive, but luckily I'd been forewarned by our plasterer that it would be a lot of work to get them inside, and he gave me the names of two young lads that were as strong as oxen and only cost me around £50 each for half a day (actually it was £40 each, but I gave them a tenner tip as they did such a good job). The plasterer also told me how many boards he wanted stacking in each room, and these lads did a cracking job. Frankly that was £100 that I did not begrudge paying out at all, as it would have killed me trying to shift all that lot, especially all the boards that had to be manhandled to the first floor, with no stairs, just a ladder up the stair well.
-
The hardness setting is marked on the inner unit on ours. I have two, as I bought an unused one on ebay for something like £50, that was being sold for spares (it was a brand new unit that had been stored for two years, but they had lost the fitting kit), and that has the same hardness setting. I'm not sure how much variation there is available, but having taken the water meter apart on the spare, I can say that it doesn't look an easy thing to change!
-
Just had an idea. If I nail a roofing batten on the inside edge at the top, over the DPM, and set it a bit higher than the planks, then I can get a pitch with no real effort. I could also make the larch planks that I'm going to use as capping a bit wider, so they overhang inside and hide the metalwork. Might even make the planks last longer, a bit like the principle of a lot of the old chalk cob walls around here. They traditionally were topped with pitched thatch, to keep rain out of the chalk cob at the top and deflect it well away from the walls. It's a pity, but many of them now have cement tile pitched "roofs" instead of thatch. Spoils the look.
-
I'm inclined to take them off to put the bevel on, but sadly I haven't yet finished the table saw, it's yet another unfinished project waiting for me to get enthused enough to resurrect it. Willows grow like weeds here, I'm forever pulling willow saplings out of everywhere, including the lawn. We're right by a stream, that has willow growing all along it's banks, so our garden gets a constant flow of seeds. What's amazing is how quickly a seed grows into a sapling that has roots going down to the centre of the earth. Digging out any sapling more than a couple of feet high is a major job, as the main root will probably go down as deep as the sapling is high.
-
I found that this can happen with the Harvey (and all the many re-badged Harvey units, Twin-Tec etc) if the outlet pressure momentarily exceeds the inlet pressure during a regen cycle. In my case it was because I had a 100 litre pressure vessel after the softener and accidentally allowed the inlet pressure to drop too low (I was working on the borehole system at the time). This did result in salty water! The fix was easy, I just re-positioned the 100 litre pressure vessel to the inlet side and added a non-return valve to the outlet. That removes any possible chance of a reverse pressure event occurring. Since then all has been well. The main thing I like about the Harvey system is that it doesn't need an electrical connection. There are a couple of others that don't either, but Harvey claim to have the best water meter on their unit (not sure if that's true or not now).
-
Kingspan heating (or lack of) issue
Jeremy Harris replied to Lynford's topic in Air Source Heat Pumps (ASHP)
Welcome. The unit is the same as our Glowworm, a re-badged Carrier, and the problems almost certainly relate to the installation and set up. At the time that this unit was installed, Kingspan had only really dipped their toe into the heat pump market, as had Glowworm. A consequence may well be that both the installation design and the setup could be far from optimal. As above, we really need to understand the installation design. There were several different options, particularly with the way the switch from heating to hot water mode is done. I have to say that although these units will deliver hot water, they are a pretty expensive way of doing it - a hot water tank with an immersion heater running from E7 would almost certainly be cheaper. The external unit can operate in several different modes, with settings for each programmed via the Command Unit. Sometimes this is included with the unit (it was with our Glowworm badged one), sometimes it isn't. This is what it looks like: The only difference between the Carrier, Kingspan or Glowworm Command Unit is the name on the front. Both Glowworm and Kingspan sold systems without the Command Unit, that were pre-programmed at the factory. These systems cannot have their settings altered once installed unless a Command Unit is connected, but whether or not the settings need to be changed on your in-laws installation depends very much on how it is connected up. The ASHP itself is controlled by a number of "dry contact" connections that are ELV, so safe (they run on an isolated 12V supply that's internal to the unit). All any control system has to do is switch one of these connections to a common connection in order to turn that function on. The main connections in most installations are just the heat pump on/off one and the hot water one. There are also options for an "eco" mode, a "quiet" mode and setting to unit into cooling mode, for air conditioning. The chances are these aren't used, and only the on/off and hot water connections are used. If the heat pump is just turned on, by a contact closing the on/off to common connection, then it defaults to heating mode, and will deliver a flow temperature to the heating system that is dependent on the internal settings. The default settings for our unit were not optimised for the UK climate at all, I found. The heating flow temperature is set to change with temperature, so as it gets colder the flow temperature increases. In heating mode the unit will only work with underfloor heating or low temperature radiators - it will not work well with conventionally sized radiators at all, they have to be much larger in area because of the relatively low flow temperature. This may be an easy thing to initially check. When the hot water connection is closed, the unit switches to high temperature mode and delivers a flow temperature of around 50 deg C. I have to say it does this under duress, and although it works, it is not at all efficient when running that hot. The control system in the house should include a valve that allows hot water to have priority, so that when there is a call for hot water this valve directs the heat pump output to the hot water system and at the same time the heat pump is switched to hot water mode. Just like a combi boiler, the heat pump cannot normally (if it is connected and installed as the manufacturer intended) deliver hot water and heating at the same time. When heating hot water it won't deliver heating and vice versa. This means that if the current hot water settings are asking the unit to deliver hot water when heating is needed, then it won't provide heating during that time. The idea is to have the hot water set to heat up the tank when heating isn't needed, say over night, or perhaps when no one is home during the day, so there is always a tank full of hot water available. If you can give us a bit more information, ideally an installation diagram, and confirm whether or not the system has a Command Unit connected, I can probably have a go at working out what might be causing the problems.
-
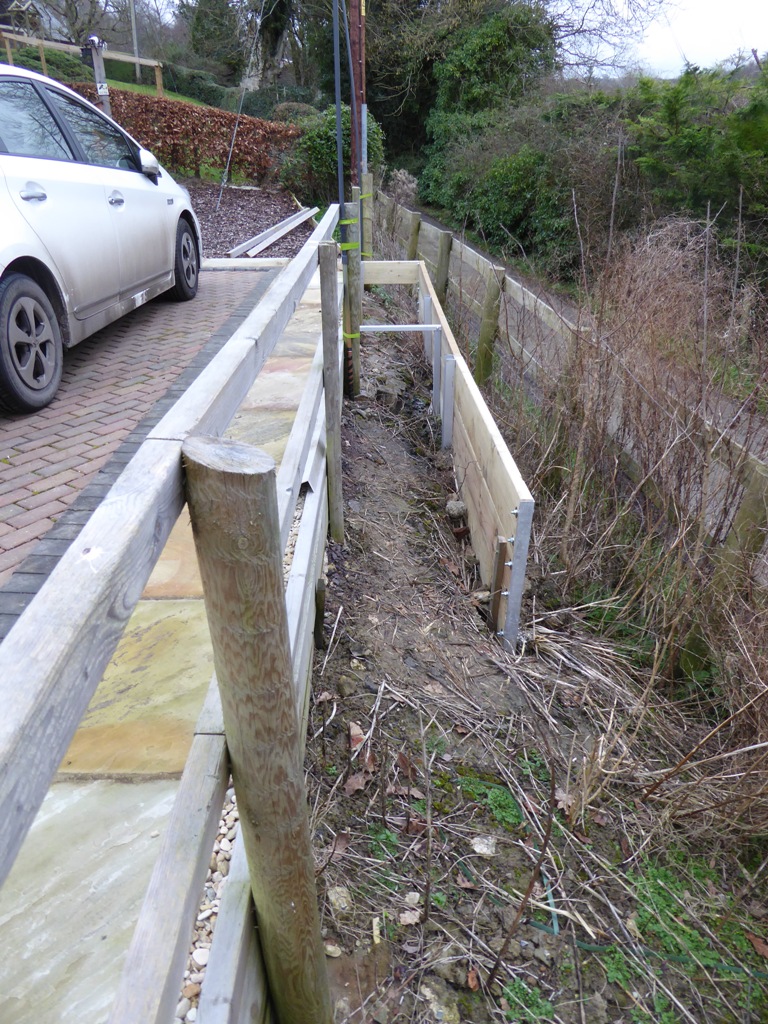
Thanks for all the good ideas. For the top I think I'll run the DPM over it and add a pitched cap of larch, like the house cladding (I have loads left over, in long boards), with a bit of an overhang to help keep the other side dry. It should be easy enough to just run the electric plane along the top of the planks to put a bevel on it, doesn't need to be much, just enough to shed water. As far as drainage goes, that#s easy, as I'm just going to use the existing big hole in the middle, where the power pole used to be, as a soakaway. I have loads of rubble left over, so will fill the hole with it and put a layer along the base to make sure that drains well across to the soakaway. There's always water in the bottom of that hole, that goes up and down in level as the stream over the road rises and falls, so it must be hydraulically connected. The top of the hole is at least half a metre above the highest stream level we've ever seen, so it should always drain, no matter what. The suns coming out now, so it looks like I shall be clambering around in the mud again today, armed with a roll of left over DPM and a staple gun................
-
Thanks everyone, looks like I will be lining it tomorrow! I also have some offcuts of the plastic slates we used on the roof, so I may see if I can fit a mini roof along the top, trapping the DPM. @Hecateh C24 is a timber strength and quality grade, important when using timber like this for rafters or joists. 8 x 2 = 8" x 2" = 220mm x 45mm regularised timber, again the standard size is important for things like rafters and joists, where you need consistent dimensions. The planter I've made uses this size and grade of timber.
-
Thanks, I'd not thought about bugs, but there are probably bugs in soil that eat timber, given half a chance.
-
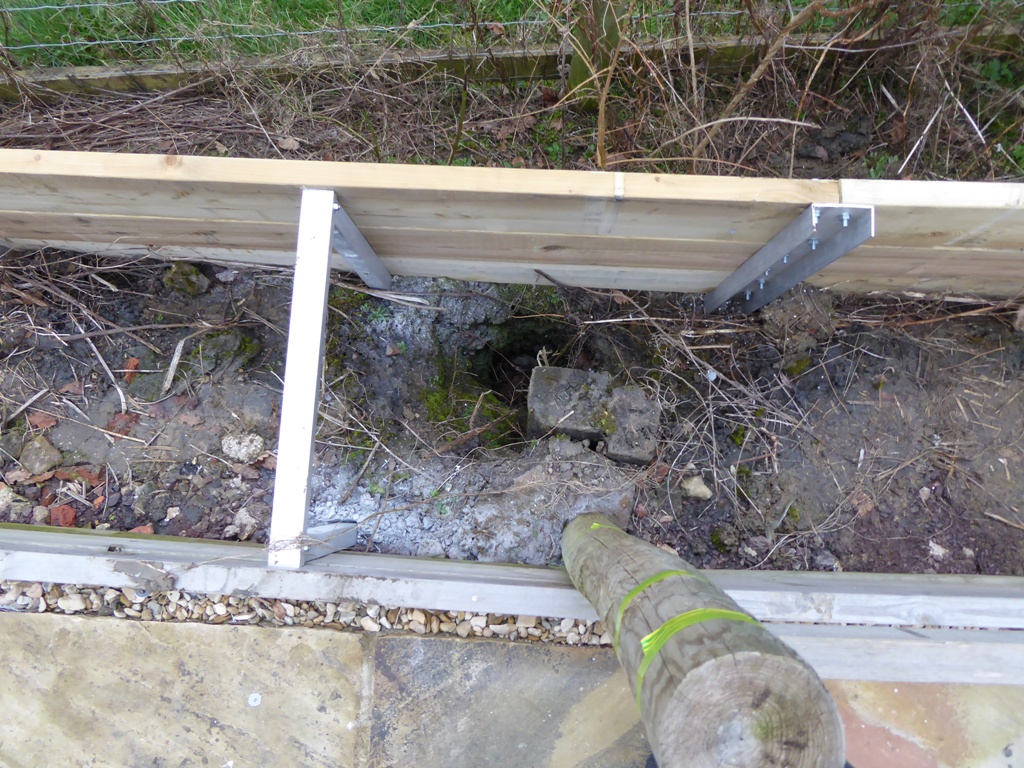
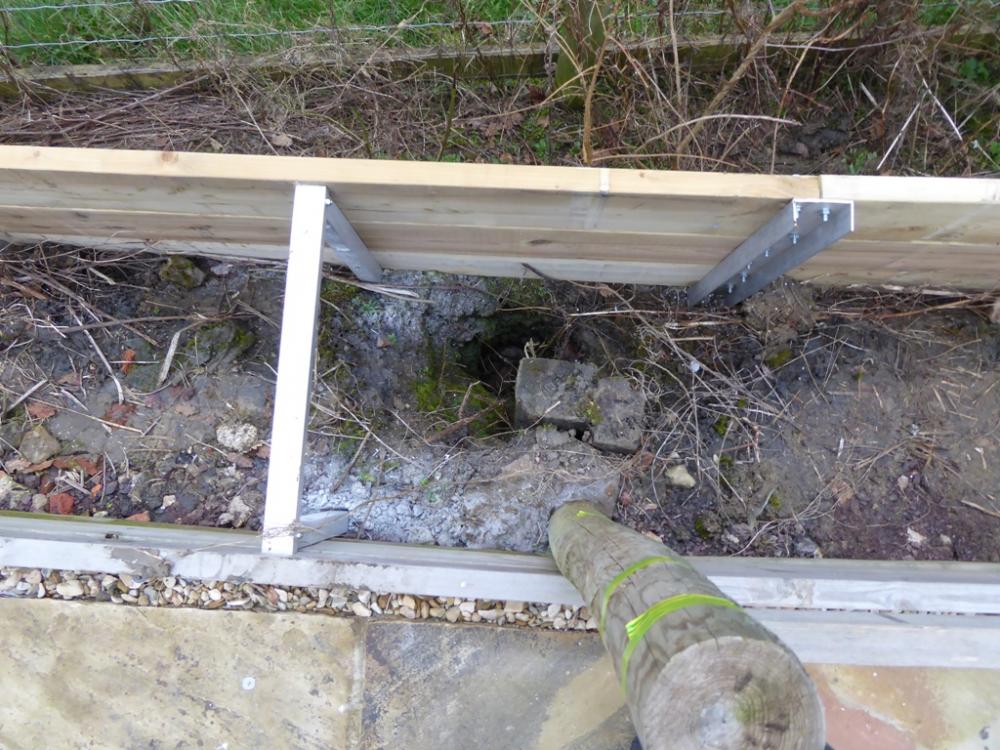
Right, I've been clambering around on what's turned into a very slippery clay bank, building a large'ish planter to raise the level and allow me to put in some better soil in which to plant the trees. Roughly in the centre of this there is a deep hole that used to hold a power pole, which I'm going to fill with rubble in the hope that it will provide a natural soakway to make sure that water doesn't collect in this thing (the gault clay underneath is virtually completely water impermeable). There are also some old railway sleepers that were driven down vertically, presumably to help support the power pole, and I'm just going to leave them, as they are around 600mm below where the soil surface will be: I could do with a bit more advice though. This is what I've built so far, using 8 x 2 treated C24 timbers, bolted with M10 bolts to some metal beams driven around 1m down into the ground. I've also driven metal beams into the top, again going down about 1m, to help stabilise the bank and also hold the thing in place. These are left over bits of aircraft alloy, a bit stronger than mild steel, and very corrosion resistant (it's the same stuff they may aluminium boats from). In this application it should be fine, as although it's more flexible than steel (much lower Young's Modulus) I'm using it mainly to take shear or tensile loads, so bending isn't an issue. This is what the part built thing looks like, I've yet to fit the ends properly and the other cross ties that hold the top in (not that it seems to need it; it's pretty solid as it is - it doesn't lean and isn't bent, that's just the camera distortion): The question is, should I line the inside of the timber with some heavy duty membrane or not? I have some DPM lying around, and could easily line the inside with this, folded over and stapled just below the soil line at the top, with a drainage gap at the bottom (I can fold the DPM under the boards at the bottom). My thinking is that a lining like this will help to keep the timber dry, but I'm also a bit concerned that it might make things worse, but allowing damp to be trapped between the membrane and the timber. Any thoughts?

-
Have you looked at the data available from PVGIS? It tends to be very accurate, certainly within about 5% or so, in my experience. The site is here: http://re.jrc.ec.europa.eu/pvgis/apps4/pvest.php#
-
I have to say the idea of using low grade plastic waste to make a product like this does seem to be a very good idea. Low grade plastic waste is hard to do anything with at the moment, as it contains a mix of different types of plastic. I know of one process that breaks all these mixed polymers back down to monomers, like ethylene, and these monomers can then be re-processed back into high grade polymers (plastics). It's a new process though, and expensive, so something simple like just making large, non-structural, plastic "logs" seems a good idea. The only downside I can think of is UV stability. Many plastics break down under UV exposure, and fade or crack. As these are made from a mix of plastics, some of which may be UV stable, some of which may not, there may be the possibility of degradation after a few years in the sun.
-
Just guessing here, but generally when you heat cycle any compound there will be some change, perhaps not an intrinsic property of the compound, but maybe a very small reaction that happens between the compound and the materials it is in contact with, for every heating/cooling cycle.