

Jeremy Harris
-
Posts
26430 -
Joined
-
Last visited
-
Days Won
360
Everything posted by Jeremy Harris
-
No problem with running ELV cabling around, just needs to be sized to take the higher current that 12 V stuff will draw for any given power, so that the losses aren't too great. The running cost of such a system will be higher than that for normal mains lighting, until you get the solar system and battery installed, though. A single 230 VAC to 12 VDC switched mode power supply, as a temporary measure until you get the solar system and batteries installed, will have a vampire power consumption 24/7 from the mains, so increasing the energy usage. Hard to know for sure how big this may be, but it would be a bit lower than using a transformer, rectifier and smoothing approach, I think, as transformers generally have a higher no-load power consumption. The main issue I ran into when looking at installing 12 VDC lighting is that normal light switches cannot reliably switch DC - their contacts are very slow to open, so they will arc if used to switch DC. I couldn't find any decent looking 12 VDC rated wall switches, there seemed to be none available that were suitably approved. The best I could do was find switches intended for use in boats and caravans, but these didn't easily fit standard wall boxes. The way around this may be to buy some standard blanking plates and then cut holes in them to allow 12 VDC switches to fit.
-
@vivienz may know, as I believe she was looking to include battery storage within their build as a zero rated item.
-
 How about putting the door to the garage at an angle in that corner? That way you may be able to both move part of the area taken by the steps to the hall, and also angle the steps so they take up less space in the garage.
 -
This looks pretty grim, not an easy thing to get fixed, either, in terms of the amount of disruption it will cause. @jack had a similar problem with a flat roof leak soaking the pumped cellulose in his build. I can't remember the details, but seem to recall that it meant removing all the soggy cellulose, fixing the leak, letting everything dry out, then reinstalling the cellulose , after making 100% certain that the new VCL was totally sealed up.
-
Quite a few solicitors seem to have standard rates for things like drawing up a mortgage deed, but over £1k seems a bit steep. We used Ecology, and I think our solicitor charged around £400 for the mortgage deed. Might be worth shopping around and getting another price, as there's not a lot of work involved in doing this, and Ecology don't seem to be any more demanding than any other lender as far as the mortgage deed work is concerned.
-
92.5 degree bend : the half? Really? Honestly?
Jeremy Harris replied to ToughButterCup's topic in Waste & Sewerage
It's to allow for a 2.5° fall on the roughly horizontal bit of pipe. -
Insulation and ventilation question
Jeremy Harris replied to rosswilliams21's topic in Introduce Yourself
I found that offcuts of plastic waste pipe, about 6" long, worked well as wedges to provide better ventilation through sarking felt overlaps. These were light enough to stay firmly in place just from friction. -
Our timber frame also had to have the first floor fitted as the house was put together. The flooring forms a part of the structure, and the first floor was boarded out before the first floor walls were stood up. I believe this is fairly common with some forms of modular timber frame construction. It is worth looking at whether heating is needed upstairs, though. I opted to not fit any heating in the bedrooms, just towel rails in the bathrooms. I did wire in switched FCUs so that we could fit small electric panel heaters if we found that we needed heat. In practice the bedrooms stay a very pleasant degree or two cooler than the living areas most of the time, but can get a bit warm in summer, so I ended up installing air conditioning to cool things down. I'm really glad I didn't go to all the hassle and expense of installing UFH upstairs, if I had then I'd be still kicking myself for the wasted cost.
-
'you've got a problem'
Jeremy Harris replied to Simplysimon's topic in General Self Build & DIY Discussion
I produced a window/door schedule and double checked it with our frame supplier, before sending it to the window company. They produced their own schedule and sent it to me, with the request that I sign next to every window drawing, confirming that it was correct in every way (dimensions, type, handle/hinge positions, etc). In addition, as soon as the frame was up they sent a chap around to check all the opening sizes, just to be sure. You'd think this would be foolproof, wouldn't you? Surprise, surprise, one window turned up 400mm too wide (a 2000mm wide x 1200mm high window to fit a 1600mm wide x 1200mm high hole). The really great thing about all the checking was that I had absolute proof that it was the window supplier that had cocked up. -
I'd put a strip of DPM under the sole plate all around, just to help keep that dry. As long as water can't get to it then it will likely last for a long time (~10 to 20 years plus). Untreated timber can be pretty durable if kept dry.
-
Radon underneath EPS only? No DPM (Insulated raft)
Jeremy Harris replied to SuperJohnG's topic in Foundations
The snag is that you need something to seal the EPS joints and form a tray to pour the concrete into anyway, and it's easier to just use a sheet of DPM to do this. It also saves having to have a debate with building control, plus it also gets around the problem with EPS being vapour permeable. -
Radon underneath EPS only? No DPM (Insulated raft)
Jeremy Harris replied to SuperJohnG's topic in Foundations
The arrangement that our guys were going to use was to fit the radon sump and vents into the Type 3 base layer and blinding, then lay the radon barrier, then the EPS, with the DPM being where it is, above the first two layers of EPS and below the last 100mm layer. The DPM is lapped over the perimeter insulation and folded back down. We had to install a radon sump, vents and barrier in our last house in Cornwall, as it had high radon levels. Pretty much anywhere over granite in the UK may be a radon risk area, whereas where we are, on top of ~40m of gault that's on top of hard sandstone there's no radon risk at all. -
Radon underneath EPS only? No DPM (Insulated raft)
Jeremy Harris replied to SuperJohnG's topic in Foundations
There's an Irish building regs requirement to install a radon sump, barrier and vents underneath a slab, I believe. The Irish guys that built our slab were going to fit one, until I told them that it wasn't a requirement where we live. It is a requirement in some areas, mainly those over granite, where radon can be a problem. -
OK so now we know where to blame...
Jeremy Harris replied to MikeSharp01's topic in Environmental Building Politics
Hard to see how that could be the case, TBH. The local distribution network is sized to be able to deliver much more power to homes than can be generated by any allowable PV system. The normal limit, beyond which DNO consent is required, is 16 A of microgeneration per phase. That's only about 3 A more than a single immersion heater as a load. The network is sized to allow each house to be able to take several times that amount of current. We generate more than the house uses each year with a system that can deliver a peak output of about 27 A to the local distribution network. That peak could easily be reduced by an export power limiter, which would still allow us to use as much of our generated electricity as possible, but would remove any grid related issues. -
OK so now we know where to blame...
Jeremy Harris replied to MikeSharp01's topic in Environmental Building Politics
Or any other panellised build system. The panels for our house were manufactured in a factory in Tipperary and delivered on a truck. Four and half days later we had a weatherproof house. The big office and lab that was built as a part of my last job had wall panels that were manufactured from a concrete and foam sandwich, with fibre reinforcement. and just craned into place. I believe that one reason for the reluctance to accept this type of build system may be that there is a market preference for houses made from bricks. -
Passive raft vs traditional (strip/trench) costs assesment
Jeremy Harris replied to SuperJohnG's topic in Foundations
The external cladding doesn't have a lot of effect, other than to keep the rain off and slightly increase the decrement delay if it's made from a material with a relatively high heat capacity (like masonry). There are several ways to deal with the way the external rain screen is built, but adding a strip foundation for it wouldn't have any significant effect on the passive slab performance as it would be outside the insulation envelope. There are some sections showing some ways to do this in that design guide above. -
Passive raft vs traditional (strip/trench) costs assesment
Jeremy Harris replied to SuperJohnG's topic in Foundations
It's perhaps worth having a read of the Kore foundations paper that Hilliard Tanner (an SE who's a bit of a passive slab expert) wrote: KORE-Passive-Slab-Design-Guide.pdf -
Research into the motivations for and barriers to self-build
Jeremy Harris replied to CharlD's topic in Research Resources
This seems to be a duplicate of another identical request, so I've merged the two threads together. -
We have a stream alongside, so had to submit a flood risk assessment. I found the EA helpful when I asked them about flood risk, and they provided a flood risk plan that was a reasonable place to start. The planners wanted more, so I spent a few days trying to understand the topography and modelling the likely 1 in 100 year flood risk level on to a large scale plan, that included the changed levels on our plot. The EA set a minimum finished floor level for the house, and a minimum level for the parking area, to mitigate the flood risk, so the house, garage and drive were restricted as to where they could go on the plot, because of this. I did a blog entry covering my approach to the design and dealing with some of the bureaucracy here, that may help: http://www.mayfly.eu/2017/01/part-forty-five-architects-and-consultants-what-are-they-likely-to-cost-and-can-you-save-money-by-doing-some-of-this-yourself/ I did all our plans on an old 2D version of AutoCad, only because I'd used AutoCad for years and had a copy of it. All CAD software has a pretty steep learning curve, but if you're familiar with traditional drawing principles then getting to grips with some of them isn't too hard.
-
Our ground works guy cleared our site, there are details of our build starting here: http://www.mayfly.eu/2013/04/part-one-in-the-beginning/ and the bit showing the site and initial clearance is here: http://www.mayfly.eu/2013/06/part-five-trials-and-tribulations/ that may give you an idea as to the sort of stuff groundworks people can clear. There is a cost associated with this, though, as soil that's full of small trees, large shrubs etc costs a lot to dispose of, as it's treated pretty much as if it's contaminated. The electrical installation not only has to comply with the regs in BS7671:2018, but also has to comply with Part P, and be certified as such. The simple way to do this is to use an electrician that is accredited by one of the Part P cartels, as they can self-certify the installation and lodge the IEC on a database that can be accessed by building control. The alternative is to DIY the installation and then try to find someone who can do the mandatory inspection and test. Some building control bodies may be able to do this, some may not. It does mean that all wiring must be accessible for inspection, too, which may well mean at least two inspections, one at first fix and another inspection and test after second fix. We had a small self-build mortgage from the Ecology Building Society . They were pretty good, and very easy to deal with. In our case we had the funds released as a single lump at the beginning, as it was a lot less than the plot was worth, and repaid the mortgage after the sale of our old house when the build was completed. All we paid during the build was the interest on the sum we'd borrowed.
-
Quercus Ilex/Horn beam - not available
Jeremy Harris replied to Adam2's topic in Landscaping, Decking & Patios
That's a shame. I've just tried our local supplier, Landford Trees, who are also pretty good (they supplied 9 of our trees), but they don't list it in their catalogue. The restriction only seems to apply to trees with a girth greater than 80mm at 1200mm above ground level, from what I can see, so you could probably find a supplier that has smaller specimens, perhaps. -
Quercus Ilex/Horn beam - not available
Jeremy Harris replied to Adam2's topic in Landscaping, Decking & Patios
Reading through the details of the restrictions that are being imposed, and looking at online suppliers, it seems that you can still get Holm Oaks from some suppliers, as long as they are in an area free from Oak Processionary Moth: https://www.gov.uk/government/news/restrictions-on-oak-imports-introduced-to-guard-against-pests I've used this online supplier before, and they were OK, and they seem to be able to supply Holm Oak trees: https://www.paramountplants.co.uk/plant/quercifs/quercus-ilex-full-standard.html -
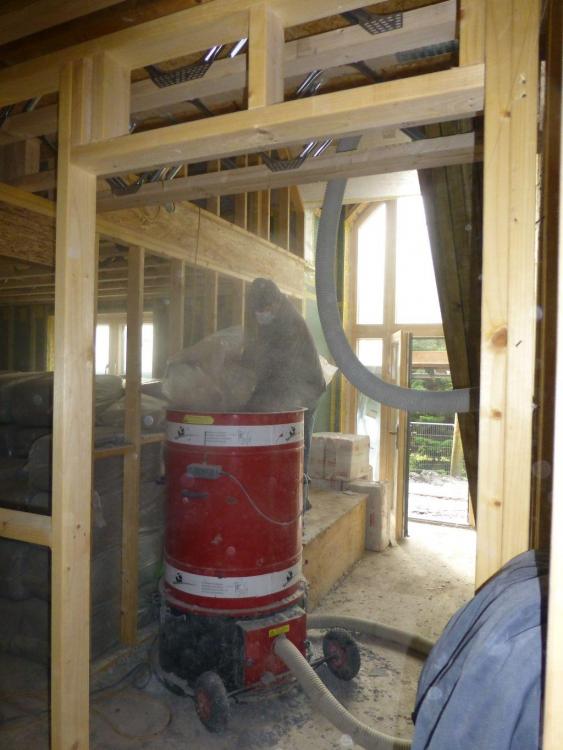
How expensive is the machine, I wonder? The cellulose blowing one that was used to insulate our house didn't look to be that sophisticated. It was essentially a large drum, that looked very much like an oil drum, with a stirrer arrangement at the base, a bit like that in a food blender, and a pump below that with a ~100mm diameter hose leading from it. The key bit seemed to be the remote control, so that the person holding the end of the hose could turn the blower on and off. It needed two or three people to operate, as it had a prodigious appetite for compressed bales of warmcell.
-
Our shower temperature control hasn't changed since the day I installed it. I set it to 38°C, based on having measured the temperature of the shower at our old house, and it just stays at that setting all the time.
-
Carbon Air Filter
Jeremy Harris replied to MikeGrahamT21's topic in Mechanical Ventilation with Heat Recovery (MVHR)
This Nuaire replacement ceiling terminal, with integral carbon filter, looks interesting, but is probably prohibitively expensive: https://www.nuaire.co.uk/residential/iaq-carbon-filter/iaq-valve Looks like it will just replace a standard terminal fairly quickly and easily. I wonder it there would be a way to be able to refill the carbon filter bit, without needing to buy expensive filters?

