
Leaderboard


Popular Content
Showing content with the highest reputation on 04/21/20 in all areas
-
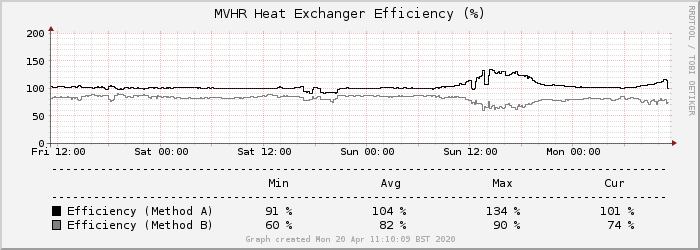
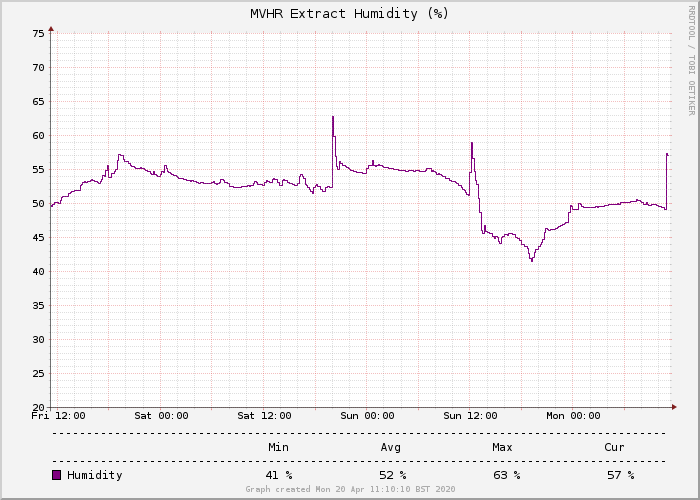
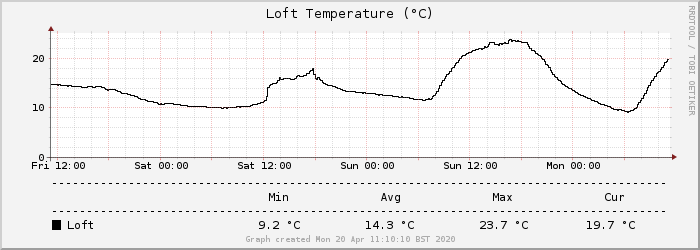
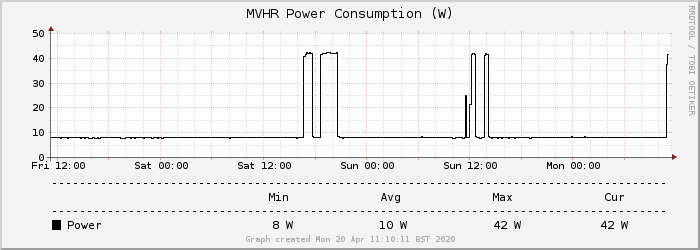
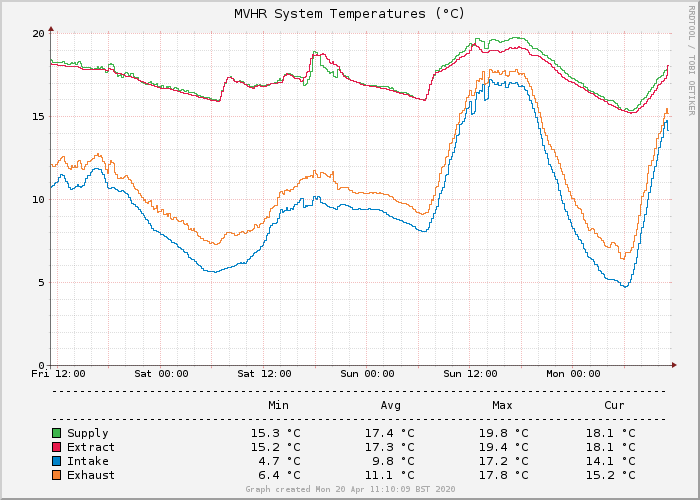
A few months back I promised (to @SteamyTea I think) to share further details about a side-project involving monitoring and controlling our MVHR unit with a Raspberry Pi. I was hoping to mature it to beyond beta stage before presenting it but, frankly, it'll probably always be in some unfinished state of development as between my extension and nearly-3yr old daughter I don't find much time for 'playing around' (as my wife calls this sort of thing). So, I thought I'd just share what I've got now in case it's of interest of use to others. As background, our MVHR unit is a Titon HRV 1.25Q HMB Plus Eco which I believe is towards the lower end of the range but I got it cheap (£350) on eBay (an interesting story involving a development of 50-odd houses all fitted with the wrong model MVHR!). As a seemingly basic model it comes with potentiometer-controlled fans speeds and boost timer, absolute humidity detection for boost, automatic summer bypass and provision for switched boost inputs. It uses a Recair heat exchanger which, being their party, could well be common with a lot of other manufacturer's units. There's no fancy screen or controls, although Titon do make such a device but I'm not sure it works with our model. Furthermore, it's something like £150 and my Northern genes made me think I could do better with a Raspberry Pi for a lot less than that! I'd like to show a detailed schematic showing all the component parts but as I don't have one I'll just list them: - Raspberry Pi Zero W (a cut-down, low power, version of the Pi with WiFi) running Raspbian as the OS with lighttpd (web server), rrdtool (stats gathering and graph creation), a couple of 3rd party tools installed for reading the sensors and a couple of scripts (attached) pulling it all together - Shelly 1 smart relay connected to the MVHR boost input (the Pi could handle this but the Shelly has been in for a while, hardwired to boost switches in the kitchen and outside the bathrooms, and has been left in for now as it works without issue) (Incidentally, the MVHR unit itself is powered through a Shelly 1PM smart relay which is connected to my smoke alarms such that if there's a fire the MVHR is switched off and I am sent an SMS to alert me of the fact, but all that is separate to this Pi stuff described here) - Four DS18B20 1-wire temperature sensors taped inside the MVHR ports to measure supply, extract, intake and exhaust. A fifth is dangling in the loft space as, being outside the thermal envelope, I've always been curious what the temperatures are actually like up there - One AM2302 humidity sensor (unfortunately not 1-wire and so requires different software to read and its own connection to the Pi's I/O port) As things currently stand, the attached script (capturetemps.sh) reads all the sensors every 5 minutes (trigger by cron) and records their values, and various calculated ones too, to an RRD round-robin database using rrdtool. I've always been a fan of graphs - not entirely sure why - and so via creategraphs.sh (and rrdtool again) it also produces some charts for whatever time periods are required, examples of which are shown below. Speaking of time periods, it currently stores - and produces graphs from - readings at 5 minute intervals for 3 months, 30 minute averages for 6 months and hourly averages for 5 years in a 12MB database. First off, system temperatures are recorded for all the ports which has been very reassuring in terms of the actually knowing this MVHR malarky actually does what it purports to do in terms of providing a supply of air at a temperature near to that being extracted (sometimes higher!) despite what's going on outside: These temperature readings are also used to calculate the efficiency of the heat exchanger which again appear to show it broadly working as advertised: The two calculation methods are as described by Paul Heat Recovery, the second of which (Method B) aims to factor in heat losses (or indeed gain) through the unit itself and hence be more accurate. I also measure and graph instantaneous power consumption (figures obtained from the Shelly 1PM 'smoke alarm' relay I mentioned that the MVHR is powered through): The system isn't yet fully installed (10 vents out of 12 done), balanced or properly configured and so the trickle (~8W) and boost (~42W) figures shouldn't be taken as necessarily relevant although that said we've been pleased with the performance at the current settings and so wouldn't be surprised if they don't change too much. This graph (not this actual one as it hasn't happened for a few days) also reveals when the summer bypass kicks in as it jumps the line up by ~5W. There's also the loft temperature graph which doesn't serve much purpose other than curiosity, and use up the fifth-of-a-pack-of-five sensors I bought: Speaking of curiosity, the novelty of looking at graphs will wear off one day I'm sure but one important reading I am logging is the humidity in the extract duct: This one has been particularly interesting, and indeed useful, given that the large 'spikes' correspond with taking showers and so are easy for the script to detect (it currently looks for a >5% rise in any five minute period) and request a 30-min boost via the Shelly smart relay. It hasn't missed a shower yet, and I am confident it'll work well for cooking as previous experiments show it being quite easy to pick up simmering pans. The script also looks out for an absolute value also being breached but it's only been running for a few weeks and so I really need to see a full four seasons, particularly when windows are closed in winter with washing drying indoors, to determine what sort of value would be suitable for that. Given the freedom and flexibility of the script it could even self-adjust over the year if need be? That's pretty much it! It's been good fun, a worthwhile learning curve and I think it'll have some utility too. My next step is for the Pi to take control of the summer bypass as the thresholds for operation cannot be adjusted on my unit - confirmed by Titon as being active when the extract temperature (dirty room air) is >22°C and intake (fresh outside air) >15°C, but not if the intake air temperature is greater than the extract as the heat exchanger serves to cool the incoming air slightly in such a situation. I think I'd like it to kick in sooner as 22°C is a bit warm for my liking on still summer nights where even the thought of 'cool' air being pumped in could have psychological benefits even if it won't actually cool the house down much given the volumes involved. Longer term I might even use the Pi to control the fan speeds too (reading the datasheets for them show they accept a 0-10v speed control input) but that might be overkill as I'm sure in time I'll be more than happy with just having fixed speed trickle and boost modes. If I can expand on anything I'd be more than happy to do so. And if there's any 'real programmers in the house please forgive my scripts as whilst I'm aware there's something called 'programming style' I'm not following anything other than what works for me as an untrained tinkerer! capturetemps.sh.txt creategraphs.sh.txt
 2 points
 -
Yes correct, the pieces are made to very fine tolerances, when you push two pieces together the gap is very small, in essence there is no gap, just a joint line which if done well will be very tight. If you look at the above then you will note the herringbone layout abuts a border, so this will require good clean straight cuts. If you need to cut a plank/tile that abuts a border or something then you need to make a perfectly straight and square cut, I used a combination of a 6 inch speed square, a steel rule and a Stanley knife with a brand new blade. Where the joint is going to be on show, such as at a border, you then bevel the edge to factory edge finish (assuming your product has this) by literally shaving a tiny slither off the top edge of the wearing surface with a small, sharp plane. I didn't really need to do this as although I had cut edges of the Amtico abutting factory edges of the cheaper Vusta stuff I didn't care about the bevel, but I did do a couple just to try it. The joint is perfectly straight and tight (look at the top picture that shows an Amtico cut piece abutting a Vusta factory edge). I pinged a line down the middle of my kitchen and worked out my ideal layout to minimise waste, I then started from the middle of the room and laid 1 full piece, I then worked out how much I would need to cut off the last plank in that run and made that cut and started the second row with this off-cut (my cut line to the wall), I the worked out what size the last piece of the second row would be and made that cut and put that off-cut in as the third row. The result was 3 starter pieces down in a nice staggered arrangement. I then left that over night to set. The result was on day 2 I was able to crack on with the rest and really push the pieces together hard knowing that the first 3 pieces wouldn't move. If you have 2-3 pieces set up and you push the last piece in tight the whole lot will move slightly so you need to work to something solid to get tight joins. I could have fixed a square cornered batten to the floor and screwed that down and done one side of the room to that batten but I was in no hurry to hit it in one go. I wonder if the pro's use a batten or a couple of panel pins knocked in as "stops" for the first pieces.2 points
-
I'll make a few comments on the plans in that thread Do you mean a planning team can 'approve on the condition I make xyz (e.g. the gable) smaller'? Yes, planning can easily say things like that. The architect is probably worried that the gable is already ahead of the houses either side and that you might be pushing it. Tempted to agree with you. Can you define 'small' though? The moves I'm thinking about are 50cm either direction I suspect legally speaking almost anything would officially be an amendment, but if it is so small no one would notice then I think you can get away with it. I would probably put this in the 10-20cm range. PD? Why would neighbours care? I'm .. tempted for sure.. but it is expensive of course. I should perhaps wait to see if my financials bounce back after covid.. PD is permitted development. There are things you are allowed to do to an existing house without needing to apply for permission, but it doesn't kick in until the house is built. Neighbours will definitely care. In general assume they will object to anything because they don't want building work next door. Their objections, however, usually are not over relevant matters. If you want a basement near to one of the houses next door the neighbours will complain that it will affect their houses, I doubt it is close enough to be an issue, but it won't stop them trying. Thus they are less likely to object if there is no basement.1 point
-
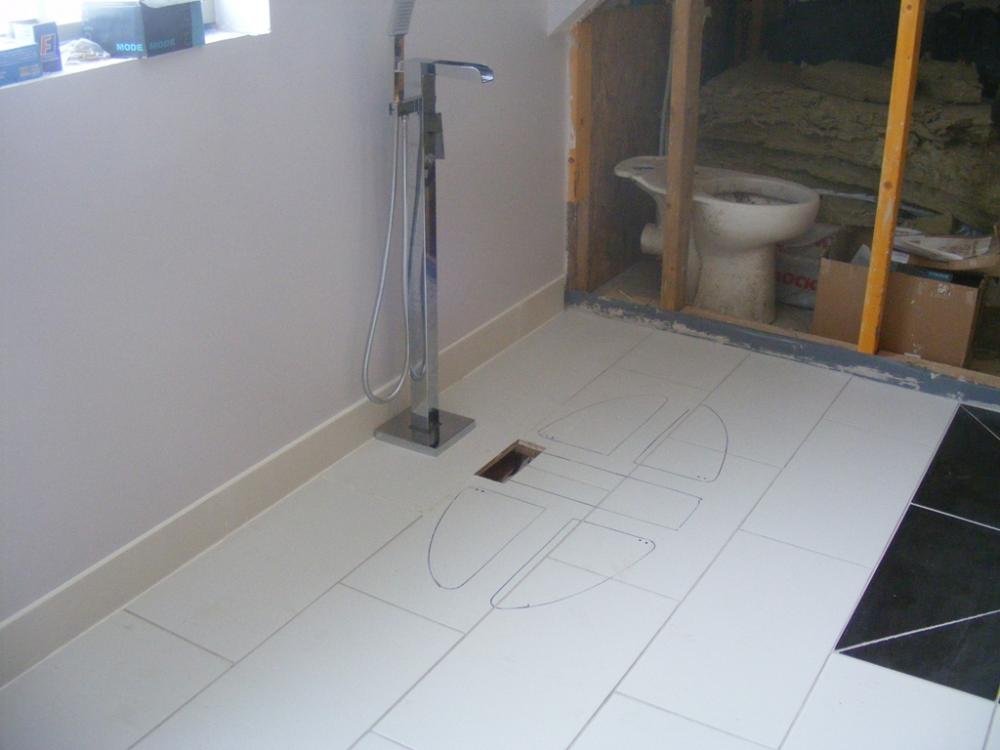
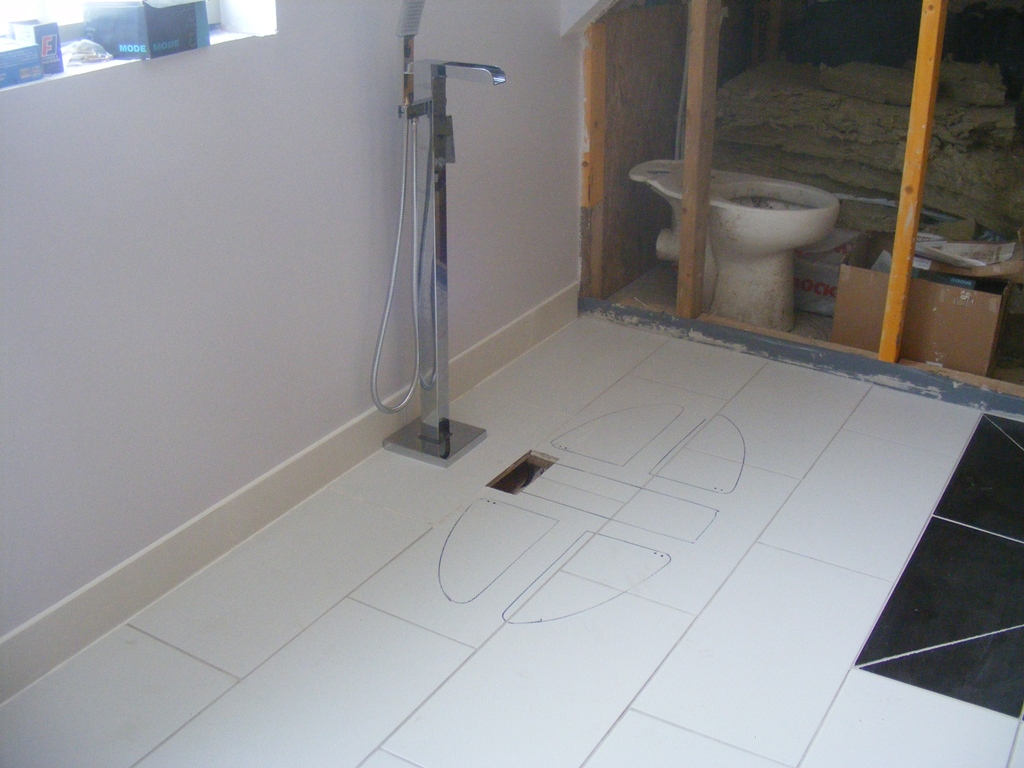
This is what I recognise as a floor standing bath filler. It screws to the floor with 2 flexi tails emerging from the bottom that are connected below. That would work with your little raised platform. You can't cut it to length, it is the length is is.
 1 point
 -
There are MUCH better ways to spend Tesco vouchers. Spending them on food in the store gets you face value of the vouchers. Spending them on rewards gets you 3 times the face value (it used to be 4 times) e.g we use them to buy our RAC membership each year. Argos vouchers is another handy use.1 point
-
Smack it a bit with a hammer. If it stays on, render over it.1 point
-
Well the girls did not want you to go back, so final for you.1 point
-
Yes, we established that when we were out on our last dogging adventure.1 point
-
And as you stand up from the bath to open it, what will the neighbours say?1 point
-
Mapei 1210 isn’t hard enough to be a wearing surface so you should be topping it off with something else such as ultra TT or another product. Paint will stick to the current one, but poorly, and it will dint and chip quickly.1 point
-
These came up on a Google search. https://www.window-openers.com/rv-2900-battery-window-opener/ https://www.window-openers.com/ks3040-electric-window-opener/1 point
-
Mapei appear to have their own floor epoxy primer. Perhaps you can put that on the self levelling compound? Give them a call.. https://www.promain.co.uk/manufacturers/mapei/mapei-floor-resins-and-paints/mapei-primer-sn.html1 point
-
let some air out of the tyres to lower it down...0 points
-
Yes indeed. £525 of Tesco vouchers is pretty good and I'm counting it as a discount as we'll use the vouchers for our normal family shopping. So that makes the windows £200 each including the flashing kit (excluding VAT) for GGL MK04 070s.0 points
-
@nod it wouldn't be so bad but I really, really hate wasps. Traumatic experience when I grabbed a t-shirt off the line and shoved it straight on (without a bra) and there was a wasp inside!0 points
-
I dealt with a nest in the eaves of the house last hear waited till dusk and climbed a ladder and sprayed powder the protection I wore was definitely not overkill ?
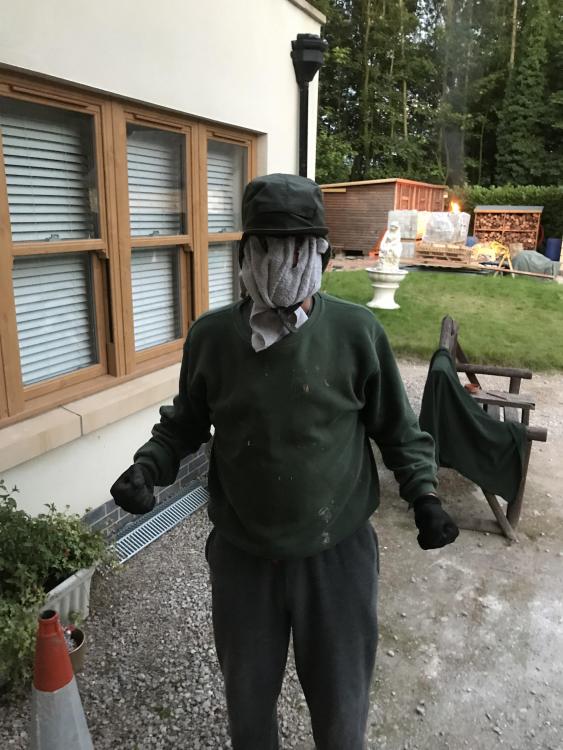 0 points


This leaderboard is set to London/GMT+01:00