Leaderboard
Popular Content
Showing content with the highest reputation on 06/12/22 in all areas
-
Today i had the steels delivered In the past I’ve manhandled them with a few mates This time due to the height (3000) and advancing years I hired a Genie 55 quid well spent with the help of the two steel guys we placed the steels on trestles under where they where going This allowed me to bolt them together and bolt Timbers in Unlikely previous times Once all the Timbers where bolted in It was a one man job to lift and drop them in position1 point
-
We used flexible external tile adhesive from B&Q for attaching stone slips. https://www.diy.com/departments/mapei-super-flexible-grey-tile-adhesive-20kg/38144_BQ.prd?ds_rl=1272379&ds_rl=1272409&ds_rl=1272379&gclid=CjwKCAjwnZaVBhA6EiwAVVyv9IssxJV-9uIJ6KgTYlWqGQqC49F8jyGu0_3At2PzDwuMc59QgehDIhoCg3YQAvD_BwE&gclsrc=aw.ds&storeId=12171 point
-
Exactly this, I could see a real issue when thinking about plasterboard over the top however when you don't have this issue you'll be fine. Maybe if you're feeling particular a few strips of expanding foam on the back of the pir to enclose any air gaps but I'd crack on. otherwise.1 point
-
Probably worth spraying SBR on to seal the mortar joints first Normal bagged adhesive is fine1 point
-
Shed company down south was happy to zero our supply and install.1 point
-
1 point
-
Your going well Nod, it's flying up, I was hoping to be up to first floor level next week myself but the bloody weather here this week has put that out the window, thankfully I've been 25ton machine ive left on site to lift the steels whenever we get there1 point
-
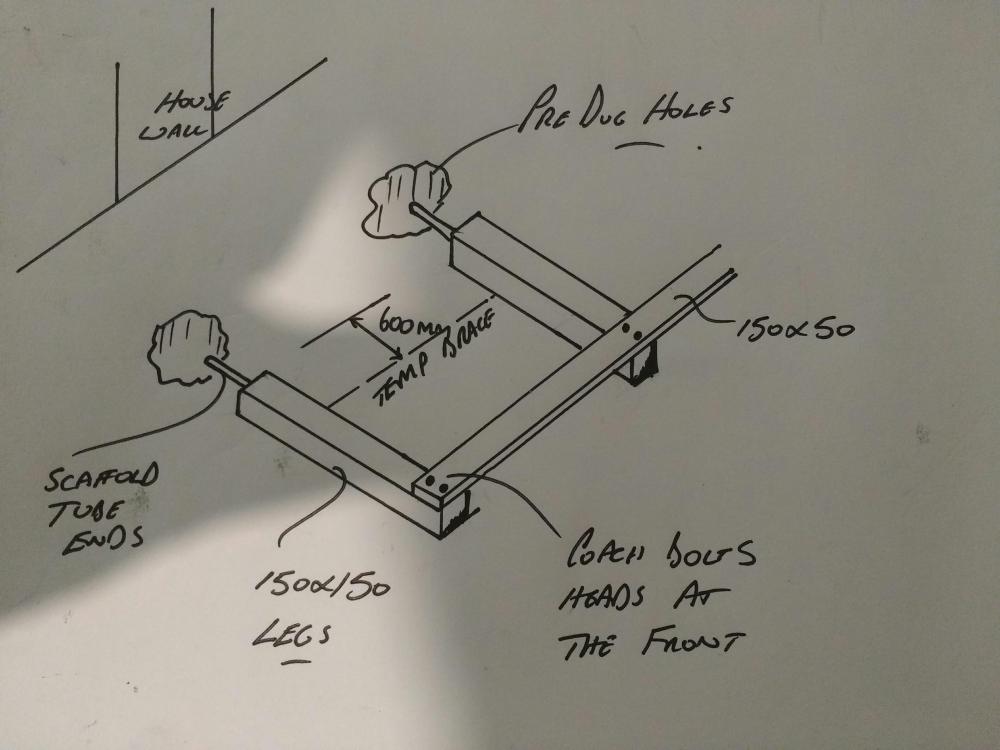
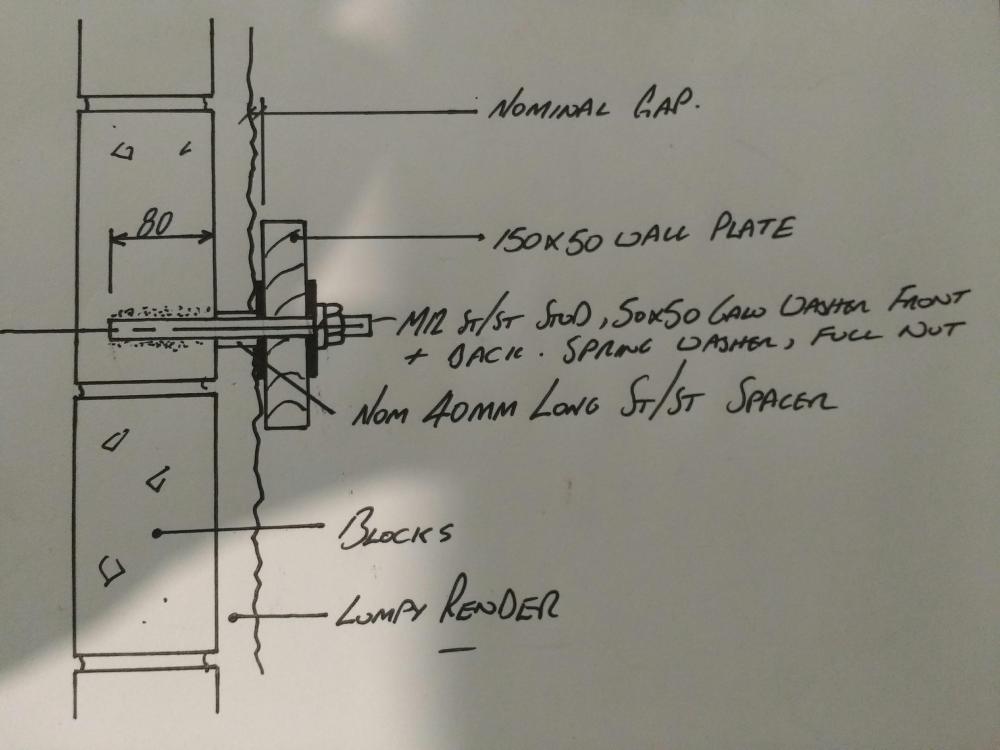
@Onoff great help there. Come to my rescue again! The ledger board's solidity, I'd assume dependent upon not hitting the block's mortar.. & not going all the way through (or the fischer gubbins will fall into void). And the 'pacific ocean' render: on the 1st wall face, thankfully the front of house, Mr. Render did a cracking job: subtle contouring (blends like a boss to adjacent old stone cttg shell). But he went a bit nuts on the 2nd & 3rd. 2nd = my balcony face. In retrospect I should've asked him to smooth a 6x2x4m ledger board area. But had no clue at this stage. Resulting in a very wavey 14" x 2" high "waves". Me, attatching a ledger board to this, well... not a hope in hell. Both of these 'tricky' aspects then, plus the legs holes idea (finally understood!!) fairly critical re placement & leveling/ plumbing.. makes this too tricky for me too. So it's sensible to get in my pro chap to do these two important jobs. Then I'm away. Thanks. Zoot And the1 point
-
Really good questions, I'll try and answer them as best I can. Doing it myself was definitely not taken lightly and it wasn't easy by any stretch of the imagination, but at the same time it also didn't end up as difficult as perhaps I'd thought once I got on with it. My project is technically a renovation/extension so I didn't have any VAT questions to deal with, but I went for self-fit mainly because I got such a huge variation in quotations for the fit. Lowest was about £4.2k, the hightest just under £8k. None included lifting equipment and I knew I'd need lifting equipment even if it was just to get the windows across the front banking to the house. Having personally seen (and read on here about) poor quality installations, I cynically surmised that I'd be better off ensuring detailing was done on installation rather than once the installers had already legged it from site, or further down the road. I know someone who used a known reputable company to supply and install and have had years of headaches down to poor installation, a fight probably going all the way to the courts because every time the company promises to come and fix the problems, they cancel a few days before visiting, or don't turn up. If I did it myself I'd only have myself to blame! Another reason is that all my ground floor windows are fitted externally to the walls to sit within the new EWI. I needed some additional detailing information about this for the most appropriate approach. But also to put it into context, I have built the whole house entirely myself, with the only exception of a 2 man team and crane to install the steel frame. I felt I'd be cheating on myself if I got someone else in to do this 😁 I measured, and re-measured, and re-measured, and re-measured.... the as-built rough openings. I know this part is a worry for a lot of people but it's just about being careful with the tape measure and re-checking the readings. I went for 8-10mm clearance. This really wasn't a problem. I ended up switching supplier having received a final massively inflated quote from the supplier I'd originally selected. This meant a change from aluminium to timber sills and a change in position of the frames within the openings - I had to move the frames slightly out from the timber frame on the first floor. All the relevant technical details about minimum frame support were available from the manufacturer. Then, in terms of weathering, it was just a case of doing the math to specify to total cill extension needed for either the cladding or render portions of the house. The more difficult process was detailing the rough openings within the timber frame and the EWI as I couldn't find a great amount of easily available and reliable information about this in the public domain. I got some from the window/door manufacturer which was very helpful, but then had to spend a lot of time doing research on this. I made up my own window and door sill trays where necessary too. I also got some detailing information from the EWI manufacturer. This part of the process was fine but time consuming. I've used a mixture of expanding tapes and airtight tapes internally (on the bay returns and EWI), and Soudal's SWS window system which comprises and external sealant, foam around the frame, and then either an airtight internal sealant or the LQ airtight liquid membrane. As a note of experience from the inexperienced, I've used a lot of the expanding foam tapes from several different manufacturers in the detailing of the EWI as the EWI requires a lot of extra careful detailing around any openings that comprises several stages of weather protection. What I've found is that when it's the middle of winter and the tape has been in the freezer, you've got loads of time to install the stuff before it expands. In the summer, when it's warm and you're using the expanding foam tapes to fill between about 3 - 12mm, it's expansion rate means you've got to work really fast even if it's been stored in the freezer! In this sense, when working alone, I prefer using the Soudal SWS sealant so you've got all the time you need to get the window into the rough opening, set it all true and plumb, get it fixed and then seal it all up and once set, fill the gap with foam. JMHO. Another tip is to have a section of soft plastic tube on the end of the foam gun so you can push it full depth between window frame and rough opening to ensure full fill of the foam. For the smaller windows I made up a simple dolly and used vacuum lifters as hand holds. For the larger items, I made up a trolly using kwikstage scaffolding with wheels (I bought the wheels with the kwikstage scaffolding). On the trolly I made a lifting arm for a chain hoist and vacuum lifter so I could lift the window/door onto the trolly from the pallet, then pushed the trolley round to the lifting point - with the really heavy items like the french doors I towed the trolley with my mini dumper. For the heay windows I used a rented vacuum lifter hung on the end of the chain hoist but for the smaller units I used a Grabo together with some Faithful heavy duty manual vacuum lifters used as handles to make it easy to move and position the unit.1 point
-
1 point
-
1 point
-
An interesting comment from my SE was that with a concrete slab, which is what we have, adding extra floor installation (we have 150 PIR) may not really make much difference as the earth around this will over time increase temp to close to slab temp, appreciate thoughts on that1 point
-
If you are using a builder, you know, do what he is used to, no paid for learning curve or expensive mess ups If he does block work go with that...1 point
-
@Barryscotland Hi Barry. If the trap is holding water then the seal is maintained. But you may be getting vacuum in the system. This often happens when you flush the toilet or use another sink say. The "plug" of water either fills the pipe to full or nearly full bore and that sucks the water out the shower trap as it creates a vacuum behind it and thus the smell comes out. These types of shower trap often have a very shallow water seal depth. 40 - 50mm as opposed to a kitchen sink washing machine trap with a 75mm water seal. Look outside to see if you have a soil vent stack. Has the top come off and/or birds been nesting in this? Is it cranked and some bits have fallen off and it is now facing into the wind or on the leeward side say. Next try first filling the shower trap. Then go around each sink/s and toilet/s one at a time. Use them in the way you have been doing and get someone to listen to the shower trap, or smell. Sounds weird but the first objective is to look for the simple stupid. Don't rush this, be patient. Now some sinks have an anti syphon trap fitted. It may be that one of the anti syphon traps is sticky and not letting air into the drain to relieve the vacuum. The objective is to find the appliance or the thing that has changed in the system as it was working ok before. Working up you may have a 110mm drain line that is like a branch line in the house. It may have a 110mm air admittance valve, a bigger animal than the small valve on say a sink trap. That may be sticky. Try this and let us know how you get on.1 point
-
In our case, we knew we were going for a super king size bed, so based the measurements on that. I assume in most cases people will know what size bed will be going in a space (OP said that there was only room for a double), but yes, they should consider the largest bed that would reasonably be put there.1 point
-
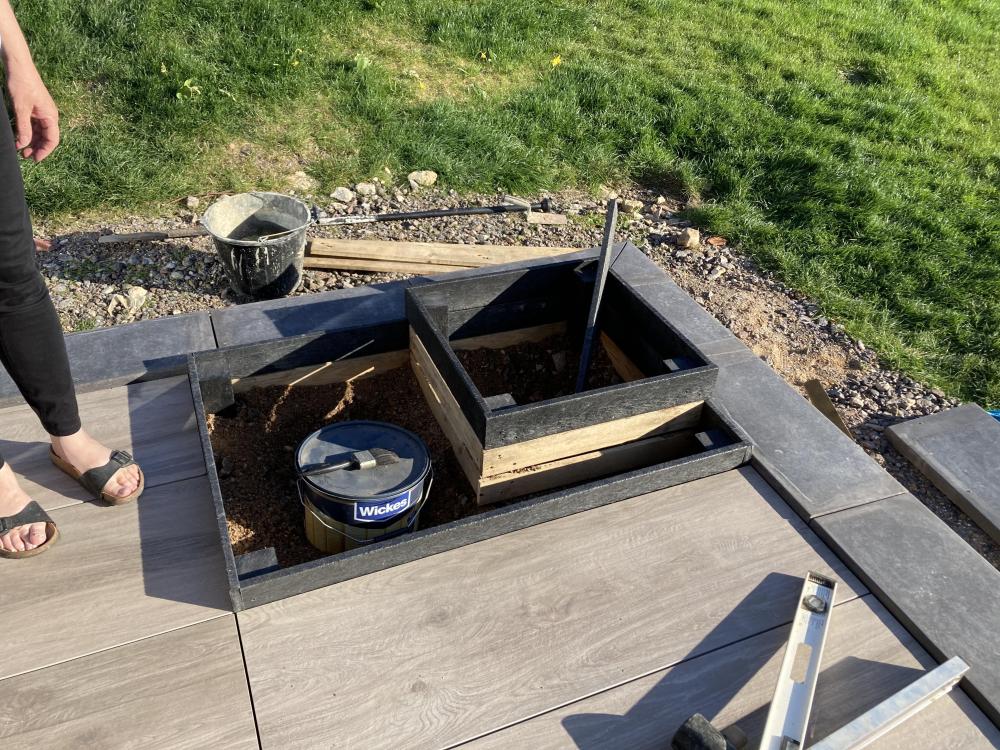
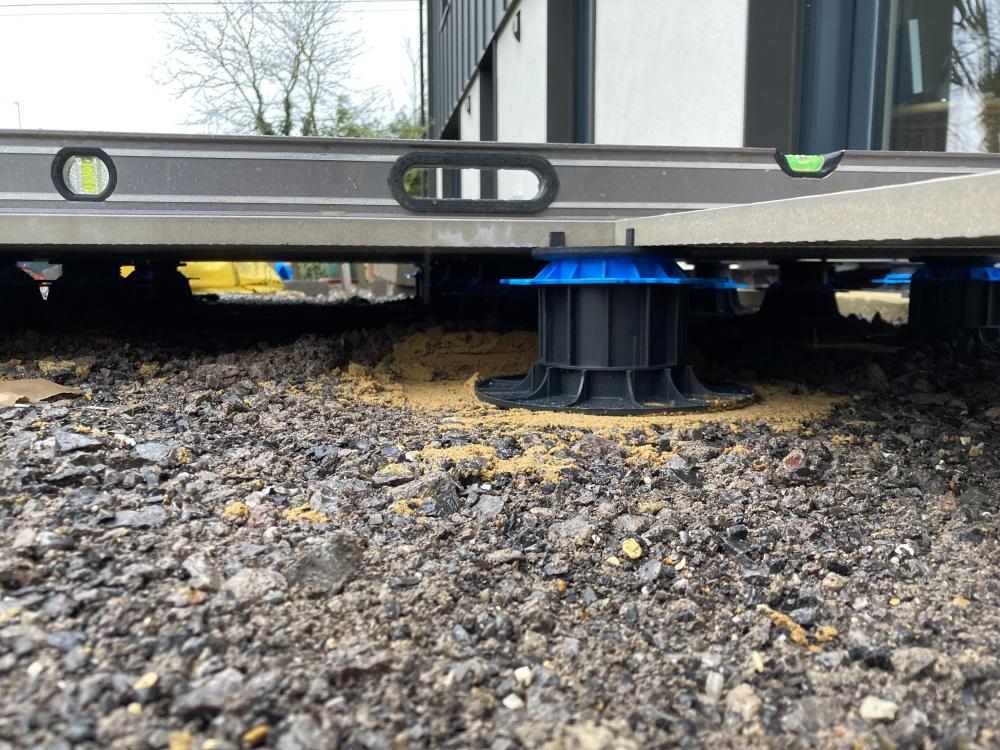
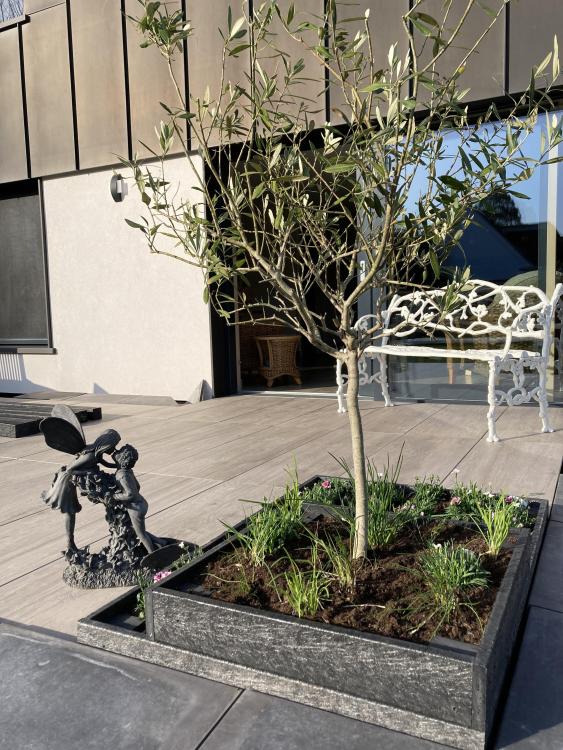
Pedestals would definitely do it, and on a concrete slab I wouldn’t have thought it would be too problematic. I’ve used pedestals on a compacted base of type 1 and a bit of sand to level than as we didn’t have the articulated pedestals. Whilst it’s taken me an age, problems haven’t been too many. They’re not cheap, but not massively expensive either, however if you change your mind about any aspect of your patio (which we have) it’s really easy to start over, for example we decided to remove two tiles and put plants there instead, we dug out the type one to make a hole, lined it with some leftover geo textile membrane and planted away. Really easy to do with pedestals and equally easy to reverse. (It’s still a work in progress, but the olive tree has been pruned!)1 point
-
At the risk of repeating myself, I gave all mine to a VAT specialist who deals with self builds and his fee was more than covered by the extra money he got for us. I cannot praise him enough https://www.vat431.co.uk1 point
-
A long time ago (about 15 years) in a county not so far away I met and married my wife. Soon after we had a couple of kids and started thinking about our future. When I was a teenager my parents moved us abroad and built their own house and I think that sowed the seed for me as it seems that I've always wanted to build my own house and would sit down and watch Grand Designs back in the day and be drawn to the idea of it all. So about 10 years ago we decided that we wanted to build our own house but weren't in a position financially to do so but I was always keeping my eye out for something with potential and signed up to self-build websites and plot searches just in case something popped up. As life went on we sadly lost my Grandmother to the sands of time. The upshot of that was my inheritance (every cloud does have a silver lining I guess) that gave us a bit more capital to allow us to widen our search a little. Then about 4 years ago we found a house within 1.5 acres that was ripe for knocking down and starting again. it would've stretched our finances but we could've lived in it for a bit to get those sorted out while we planned for the build. We put an offer in and it was accepted. We were so excited about it all that we got an architect involved and paid for surveys to be done and drawings to be made only for the sellers to let us know while we were out of the country on a family holiday that they'd decided to accept another offer on the house and would no longer be selling to us. talk about a kick in teeth! we were shellshocked. But, life goes on I guess and a year later we found a steel framed agricultural barn with 4 acres of land/woodland that had planning permission to convert to a residential property. offer made and accepted although with the old adage of once bitten twice shy we decided not to get ahead of ourselves and didn't shell out for architects etc at this point, although we did spend a lot on solicitors fees and also a contamination survey so it was not cheap as we moved towards an exchange of contracts. The barn had agricultural access over a 3rd parties land but no residential access and as the seller's solicitor tried to get that access it seemed to be apparent that the owners of the land (the Catholic Church) were against the development as they slapped a £200,000 price tag on the access (about 1/4 mile of farm track/bridle path). as we weren't paying that we thought the negotiations were ongoing with the sellers and the Church until one day out of the blue I got an email from my solicitor saying that he'd heard from the seller's solicitor and that they were no longer proceeding with the sale. this was 2 YEARS after the offer was made. it seemed that we were destined to never find somewhere to build.... ...but never say never as about 2 weeks later we found an old 70's built bungalow that had outline planning permission and full planning permission for a replacement dwelling in 0.8 acres of land surrounded by woodland. it was perfect and we had our offer accepted and started the purchase process. little did we know that we couldn't get finance on the property even though it was a habitable property no one would offer a residential mortgage as the construction of the house was 70's prefab and the banks wouldn't lend on it. I even had a bridging loan company refuse to lend on it despite the inherent value in the residential plot and land. it was crazy and the house was put back on the market while we tried to sort something out. fortunately, our family were able to sell an overseas property to allow us to get the funds to not need a mortgage and we exchanged and completed in October 2019. We're now living in the bungalow as we await planning approval for the new designs our architect has drawn up, but that will be the subject of another post. thanks for reading and I hope you find our journey interesting. I'm sure it'll have many more ups and downs as we progress but we're hopeful that at the end of it we'll have a house that we can live in for the rest of our lives.1 point
-
He's already got the neighbours complaining he attracts rats. Just slings his food scraps and tea bags out the bag door into the concrete!0 points
-
0 points



.jpg.c21f3ac78c9b7efd90cbdcb312744dc5.thumb.jpg.7adcad4c0e384f5ecd7d56b0618df6e5.jpg)
