Leaderboard


Popular Content
Showing content with the highest reputation on 01/10/18 in all areas
-
I have used a water repellent on an old porous brick wall many years ago. IIRC it was silicon based and worked a treat. You could see the rain beading on it for years after. Being a repellent it allows the brickwork to breath and it stays dry.2 points
-
Nothing like your scene, but this is what we gave our planners to satisfy them of what would be visible.
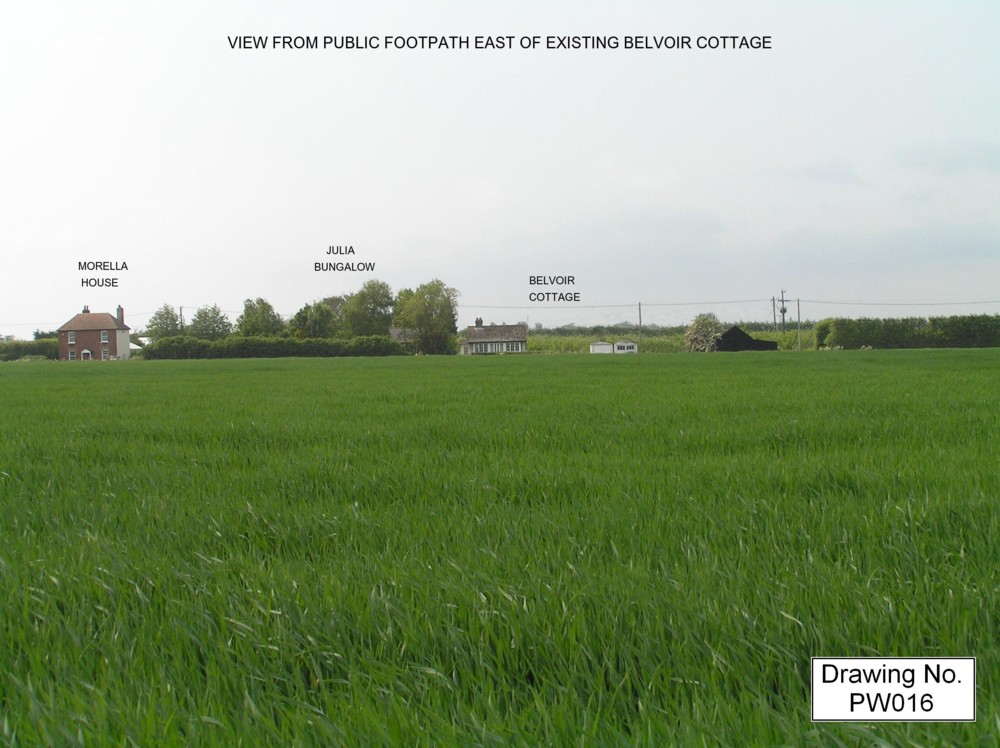
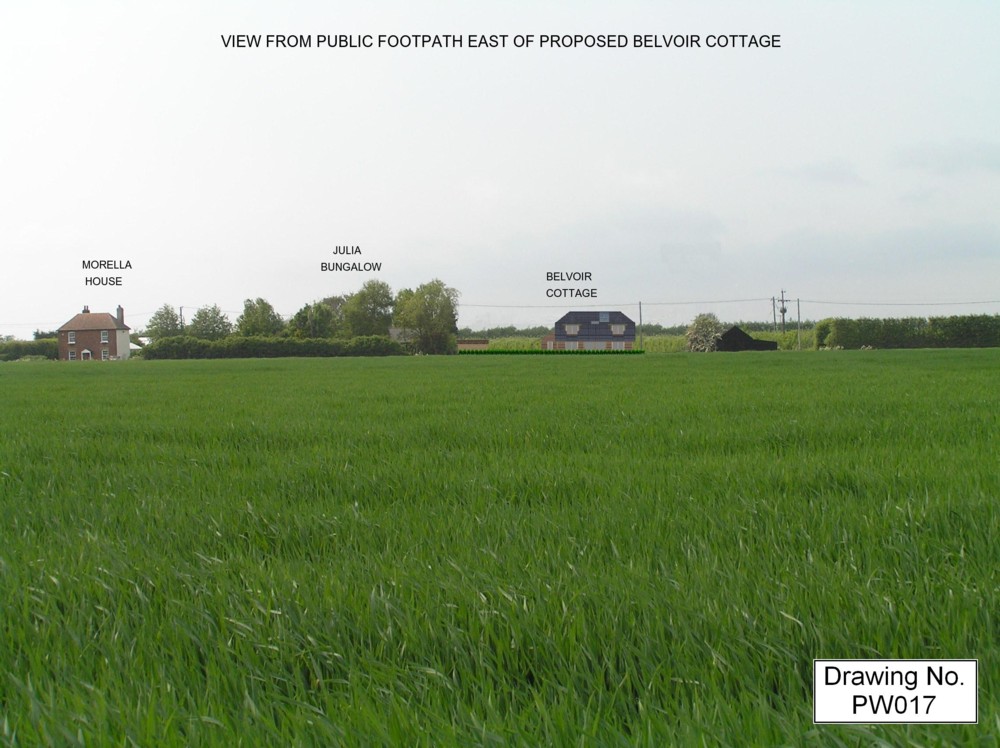 2 points
 -
This is the spreadsheet in question: I'd suggest that you do the calculations for the entire house rather than per room as that can get quite complex, which is exactly what that model does. First you need to know the following for each of the external surfaces of your house (Foundation, Walls, Roof, Windows, Doors) Surface Area (m2) U-Value (U) Temperature difference (dT) - usually 21 degrees inside, minus the ave outside temp. This will change with the seasons mind! That loss in Watts is equal to m2 * U * dT You can convert that to kWh to identify the total cost of heating your home given your current £/kWh for electricity by your energy supplier.2 points
-
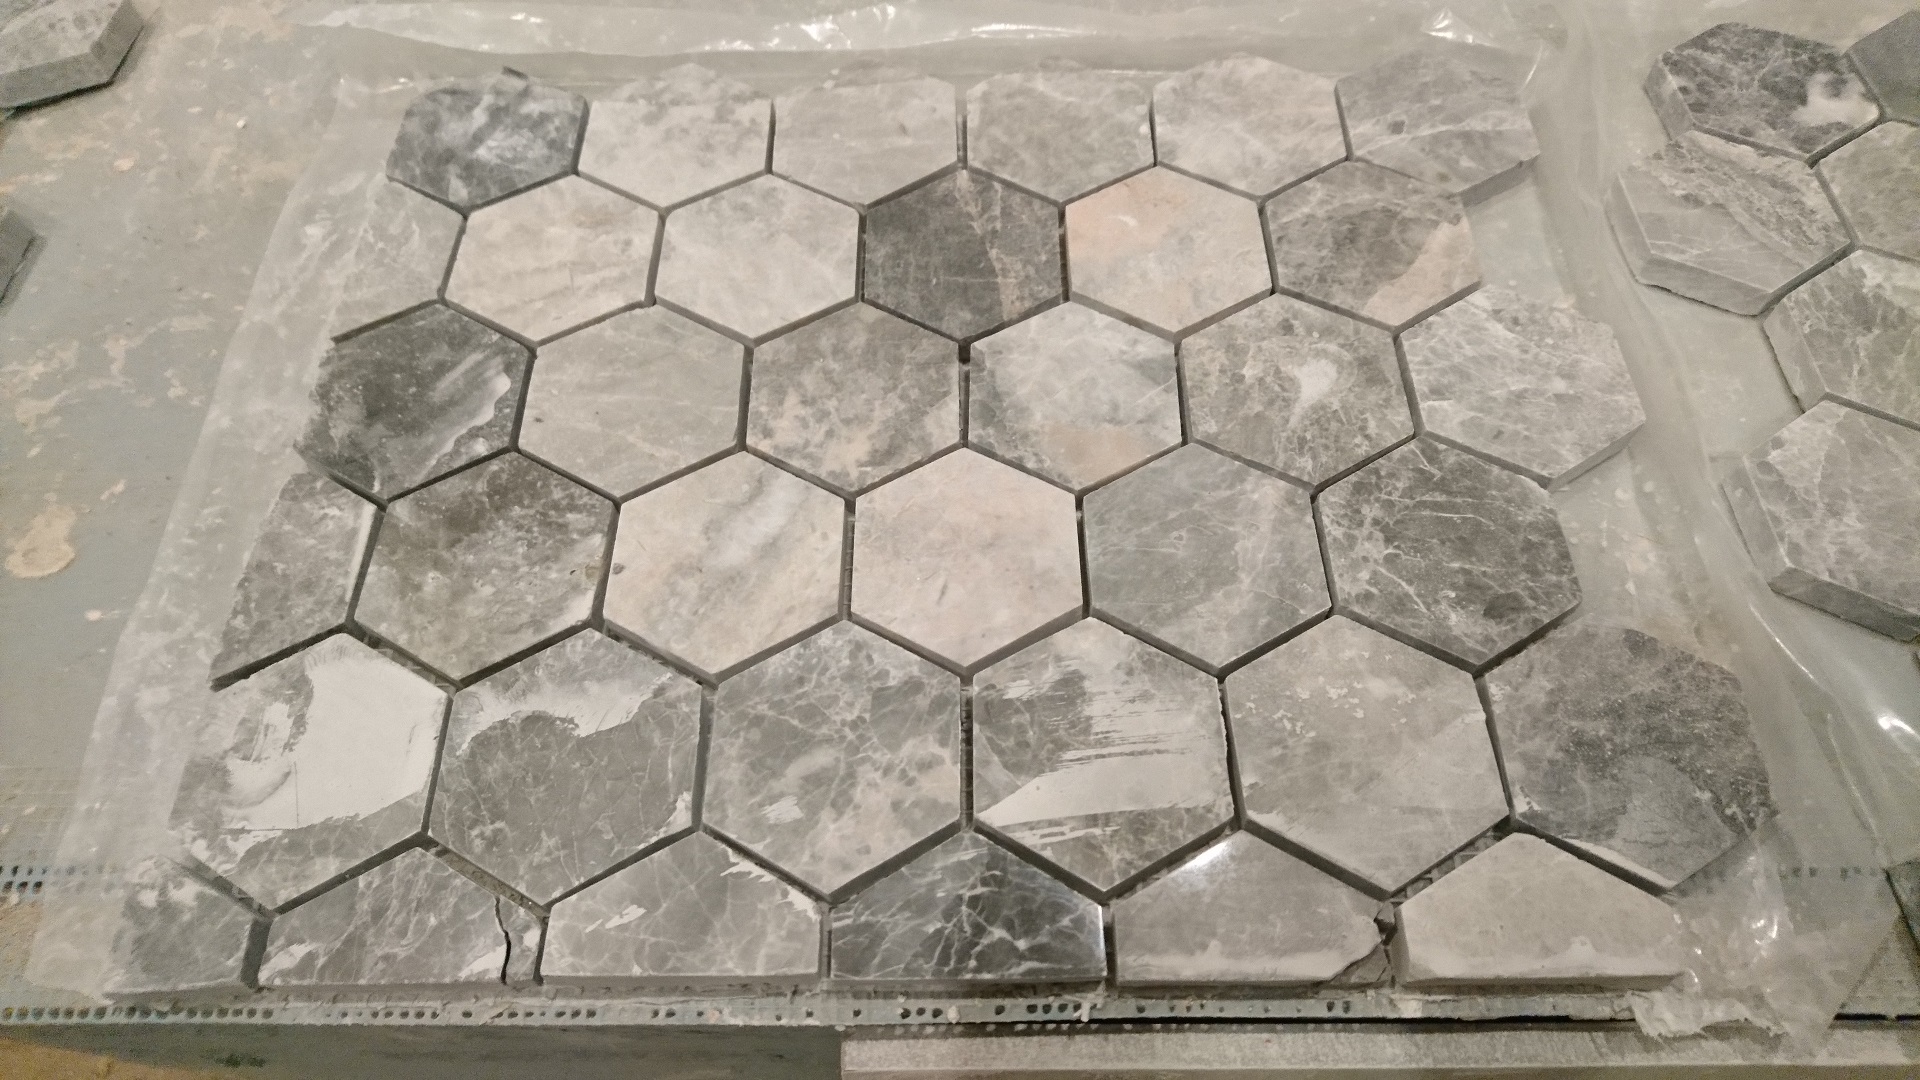
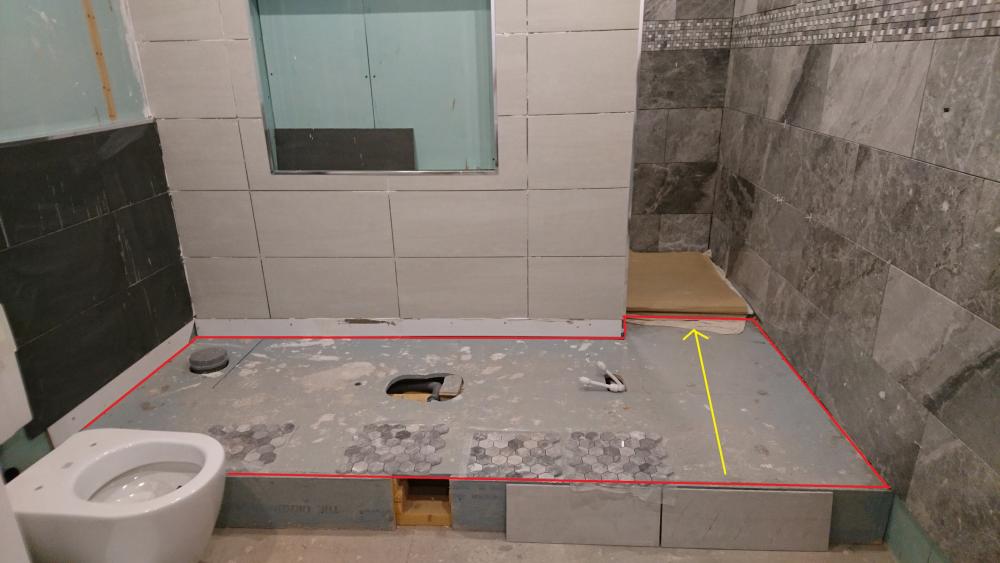
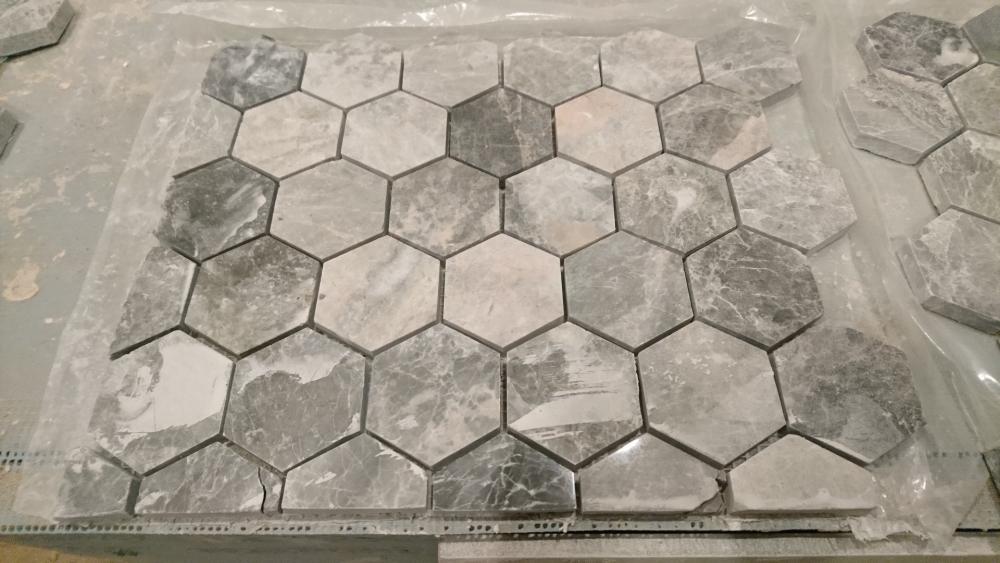
Okay, I've been putting this off for too long and need to get stuck into it next week to get the first bathroom complete. I've done the walls and fairly happy with the result (The inset to be finished shortly). However, the hex mosaics are troubling me slightly. They are to go on the raised area outlined in red. They are stone. What is the best way to cut them? I have one of these https://www.rubi.com/en/dv-200-1000-electric-cutter-r104 but a trial finds that they are too small really and prone to cracking at the edge. Should I use my angle grinder with diamond wheel in a shallow bath? Will be slow going as I need to trim at least one edge of 'tiles'. How should they be laid to get them as flat as possible? I have mosaic mats - however they are bigger than the 'tile' - and the edges are like the blockbusters board, so should I trim them all slightly small before applying to the back of the tiles and then try lay like normal tiles ensuring they interlock with the right gaps? How do I ensure they a re properly flat and not like the rocky road to Dublin? What order? I'm assuming best to start at the front (nearest the camera) and take my straight edge from that. It's all fairly square I think but any run off would be hidden mostly behind the bath. Trowel - Any special trowel for these ones? Should I aim for a thinner bed for mosaics? I think it's an 8mm notched trowel I'm using at the moment. Adhesive - I'm using BAL Rapid FLex Fibre plus rather than pre-mixed - Topps advised this is best for a large floor area of mosaics. Anything else worth considering or bearing in mind? Hints, tips, pics or encouragment welcome! Thanks, Jamie Thanks, Jamie @Nickfromwales - tagging you as per other thread somewhere else!
 1 point
 -
Do you need a big retaining wall, or can you terrace that bank instead? Terracing, with walls not exceeding 1.2m, significantly reduces the work needed, and below 1.2m a retaining wall can be a standard design, reducing costs still further.1 point
-
I’ve the dust free Robi cutter great for cutting slabs We normally use a small angle grinder With a diamond blade 4 inch if you get the continuous blade Not the ones with the cuts in You’ll find you can do quite intricate cuts If the pieces your cutting are very small it’s worth wearing an anti cut glove one hand1 point
-
Same for us. The wall ended up costing well over £30k, by the time it was rendered our side with a stone wall added on top for the neighbour, with a fence above that. The SE cost was pretty trivial in the overall scheme of things!1 point
-
It's the type of hangar and the way they are used that's key. Follow the standard detail in the Posijoist technical paper and hangars work fine; fail to follow it and they may not. There's also a relationship between the depth of the Posijoist (in this case 254mm) and the spacing. Use deeper joists and you can space them wider for the same floor stiffness. Finally, adding proper strongbacks across the joists at the appropriate spacing stiffens things up a lot too, by tying each joist to it's neighbour and helping to distribute applied loads over a greater area.1 point
-
All I can suggest is you address the issue the planners raise with supporting evidence. Print up elevations of other house in the road to the same scale a bit like you would for a street scene. Consider if any changes can be made to address their concerns. If you really don't want to make changes consider appealing. If the plot is big enough for two houses consider making an application for PP to build two houses. Make them slightly bigger and perhaps uglier than the neighbours. If the planners think there is a chance you might get them approved at appeal they may prefer your original proposal for a conversion.1 point
-
What typo ?1 point
-
Thankyou for this JSH I'm not on site today but will check my PH as soon as I'm back. No doubt you have already saved me much research and time already.1 point
-
We didn’t do a street scene, but at one of the homebuilding shows an architect suggested we put the outline of our current bungalow on the new front elevation of our proposed conversion to a 2 1/2 storey house . This helped us get planning after a refusal for dominating, massing etc. As whilst we were raising the ridge height by 3.5m it didn’t look too big compared to the bungalow that was already there. They also didnt like the proposed front gable, said it was not in keeping with the area. We got rid of it, but there are numerous examples of houses with front gables around us, so may have been worth arguing our case, but as other things were more important to us which they had not complained about it was easier just to remove it.1 point
-
Perhaps a series of photos, taken from different angles, from ground eye level, with a wide angle lens, and then make a photo shopped version to try and show the impact of your proposal. I suspect you won't see much at all in the proposal version, but that's what you need, really. The planner wants something on his file that shows there is no significant impact on the street scene, I suspect, so that box can be ticked!1 point
-
More to the point, they don't understand or foresee the consequences of missing such basic but vital links in the chain. A lot of them rely on Bco's that don't double check everything, a disservice to the customer who has paid for that service. On a garage conversion I was involved in, one Bco asked for holes to be drilled into the garage slab to PROVE that it was thick enough to take 5 courses of block for the internal, and then watched as the outer lip of the footing was also drilled for the same. Once happy he left after giving strict instructions on what needed to be done to open and clean the cavity out. He asked for photos of everything if it was being covered before his return. On another job, the builders used a petrol disc cutter to make two lines in the slab. They got the labourer to chase out about 2-3" of the concrete, bought some concrete in bags, mixed it and troweled it back in. When the Bco came out he said "have you dug a suitable footing ?" They replied "yes, of course we have, look the concrete is still soft from the 'pour'". Bco said happy days and left. He wasn't so happy when he came back and they were trying to hide the pair of 3600mm concrete lintels that they'd tried to put in stead of steels. That wall was load bearing and taking the hip of the roof. They beat my price by £2k, and bodged every single thing they did and cut every corner they could. They just kept redoing it until the Bco said that'll do. There are builders, and then there are men who bought building tools and a van. Huge difference. Check with at least two previous customers so you know if things went south on previous jobs.1 point
-
How about this:1 point
-
But it does have to be done properly otherwise the pour will be a disaster. This isn't just a case of putting out some EPS Leggo bricks. Our SE had a Geo survey to validated the depth of hardcore base, drainage, etc. needed and this varies depending on the subsoil type. As I have said on other posts, the guys were extremely particular about compacting this in 50mm layers to a survey level, and then adding a 50mm sharp sand layer. They rejected the first batch of sharp sand because it had too many fines in it. When I asked the gang-leader why they we so particular, his comment was that the greatest risk in this type of pour was differential subsidence across the slab. We've had one member here hit badly with this issue when his slab slumped by 25mm in one area because of poor compaction. Likewise the rebar design has to be properly engineered for the design loads and then properly installed and tied in. And the pour need to be properly compacted. We've had another member whose installer didn't compact the slab so it failed inspection and had to be broken up, removed and reinstalled. So yes, I agree with your basic thesis that this type of slab, when properly installed takes less work than a conventional beam and block foundation + insulation, USH and top screed, and both cheaper overall and better performing, but you need a skilled team. But these skill need acquired, and you need to proper quality checks when doing the job, otherwise things can go badly wrong. I just think that a typical jobbing builder won't have these skills or quality check in place.1 point
-
To me unfortunately it sounded very empty, the back side covering exercise, as I don't understand what character means with regards to our stretch of the street where all houses are set back from the road. I think this may well be quite critical. Our planners were obsessed with the "street scene" and wanted drawings to show the relative heights of our proposal to the neighbouring properties, including those behind up on the hill. I got the distinct feeling from reading the previous planning applications that understanding how the proposal would fit in was key, and that some of the consultees, in particular, just couldn't read a drawing properly (hence the scale models I ended up making - which showed the relationship with the surroundings well). It may well be that you can provide some street scene views that show the minimal impact and then argue that the planners have no reason for refusal on those grounds. There is (or should be) a presumption for approval, UNLESS there is a clear breach of planning policy or guidance, so that's worth remembering when making any argument.1 point
-
DONT TALK TO ME ABOUT PLANNERS, they wasted two years of my life. It appears their only intention in life is to refuse permission wherever they can. Don’t give up. Yes a street scene ( sketch roughly to scale showing yours against the neighbours including all hedges) will make a lot of difference. Long story short I went to appeal and the Secretary of State department came down firmly on my side and said my application was completely acceptable and the local planning authority were not abiding by their own policies ?. p.s. the planners kept telling me our ridge line was too high as the property next door was only 6.9m high, I went round and measured it and it was 1.2 m higher than they had planning for, so our ridge was lower than theirs!!!!. I would not pay them in washers. rant over!1 point
-
I'm sorry to hear your application was refused. The planning morons who tried to stop our build used similar words and phrases, planners have a limited vocabulary. We changed from a gabled roof to a half hip to try to placate them. Good luck and don't let the buggers grind you down.1 point
-
You get a ‘second go’ for free, subject to some conditions see below from planning portal: Exemption from payment If the application is the first revision of an application for development of the same character or description on the same site by the same applicant: For a withdrawn application: Within 12 months of the date when the application was received. For a determined application: Within 12 months of the date the application was granted, refused or an appeal dismissed.1 point
-
We had similar issues, see my blog part 2: Where the planning monkey we were working with didn't like it! Ultimately my architect debunked all her issues and it was rubber stamped by the senior planner. It would appear you can demonstrate no significant change of impact as viewed from the street. Do you have a full survey, this was pivotal in our ability to argue our case as it had the edges and heights of the neighbouring properties on it for comparison and argument, thought I did have to lower my roof to 25 degrees and 22.5 degrees.1 point
-
So I think my mind is being distorted by costs. The prices I have seen for eps look to be higher than the ones @IanR is quoting, and the cost of concrete is cheaper. I was typing this as Ian did his last reply. What an excellent reply and just what I was looking for. Top man Ian. So in essence having 20% of a slab with a slightly lower u value than the rest of it will be better than 100% of the slab at the lower value. I was having trouble thinking a colder area all around the edges would be sucking all the goodness out from the middle so why bother trying to improve the middle if the edges just rob it back. Excellent as always thanks everyone. ??1 point
-
Nothing to add abut the bricks - but great garage!!!!!!1 point
-
Evening. FWIW @HerbJ I was stating that I disagreed with a statement you had written regarding the structural engineer, it was by no means a dig at your capabilities or approach. From my point of view if we didn’t question the way things are done and look for various approaches then we would never progress and would still be building in 9 inch solid brick. I question everything untill im satisfied of the correct approach.1 point
-
Floor bounce is a product of a number of components, not least the floor surface and how it’s attached to the joists. We have 600 centres on our posijoists and what is interesting is in the ensuite where there is glued and bonded boards only across the centre section with approx 600mm either side with no boards, the floor is subject to more vibration and movement than the other floors where the floor is to the walls. Secondly, we have built in the joists rather than use hangers and I’m pretty sure that contributes to allowing the flex of the bottom chord. Before we close the ceiling up from below I may well glue and screw some stiffening plates to the joists to see if we can add a little strength to the floor.1 point
-
? 2 sheets of of 100mm EPS can be carried by one man. That negates over half a m3 of concrete ! Why on earth would you actively remove insulation from under your heated slab? 200mm of eps isn't exactly poor, but not as good as 300mm. Also, the additional weight of flooding to the full ring beam depth may push your groundworks and S/E costs up so I think this option is a ? ? Ask yourself one simple question...."Should I be buying more concrete unnecessarily, or fitting more insulation that will serve me better over my time in the property". Fwiw, I'm constantly arguing with customers 'builders' over slab construction, and specifications of, when I'm fitting UFH and screed after they have left. For some reason they prefer to pour ridiculous amounts of concrete into sunroom / conservatory / extension slabs instead of using more insulation. I can only imagine it's because that's how their great gran-pappy used to do it "during the war" and he didn't get any complaints. That and the fact that they won't be contributing to the additinal energy consumption that the poor floor type will cause .1 point