Leaderboard


Popular Content
Showing content with the highest reputation on 02/11/17 in all areas
-
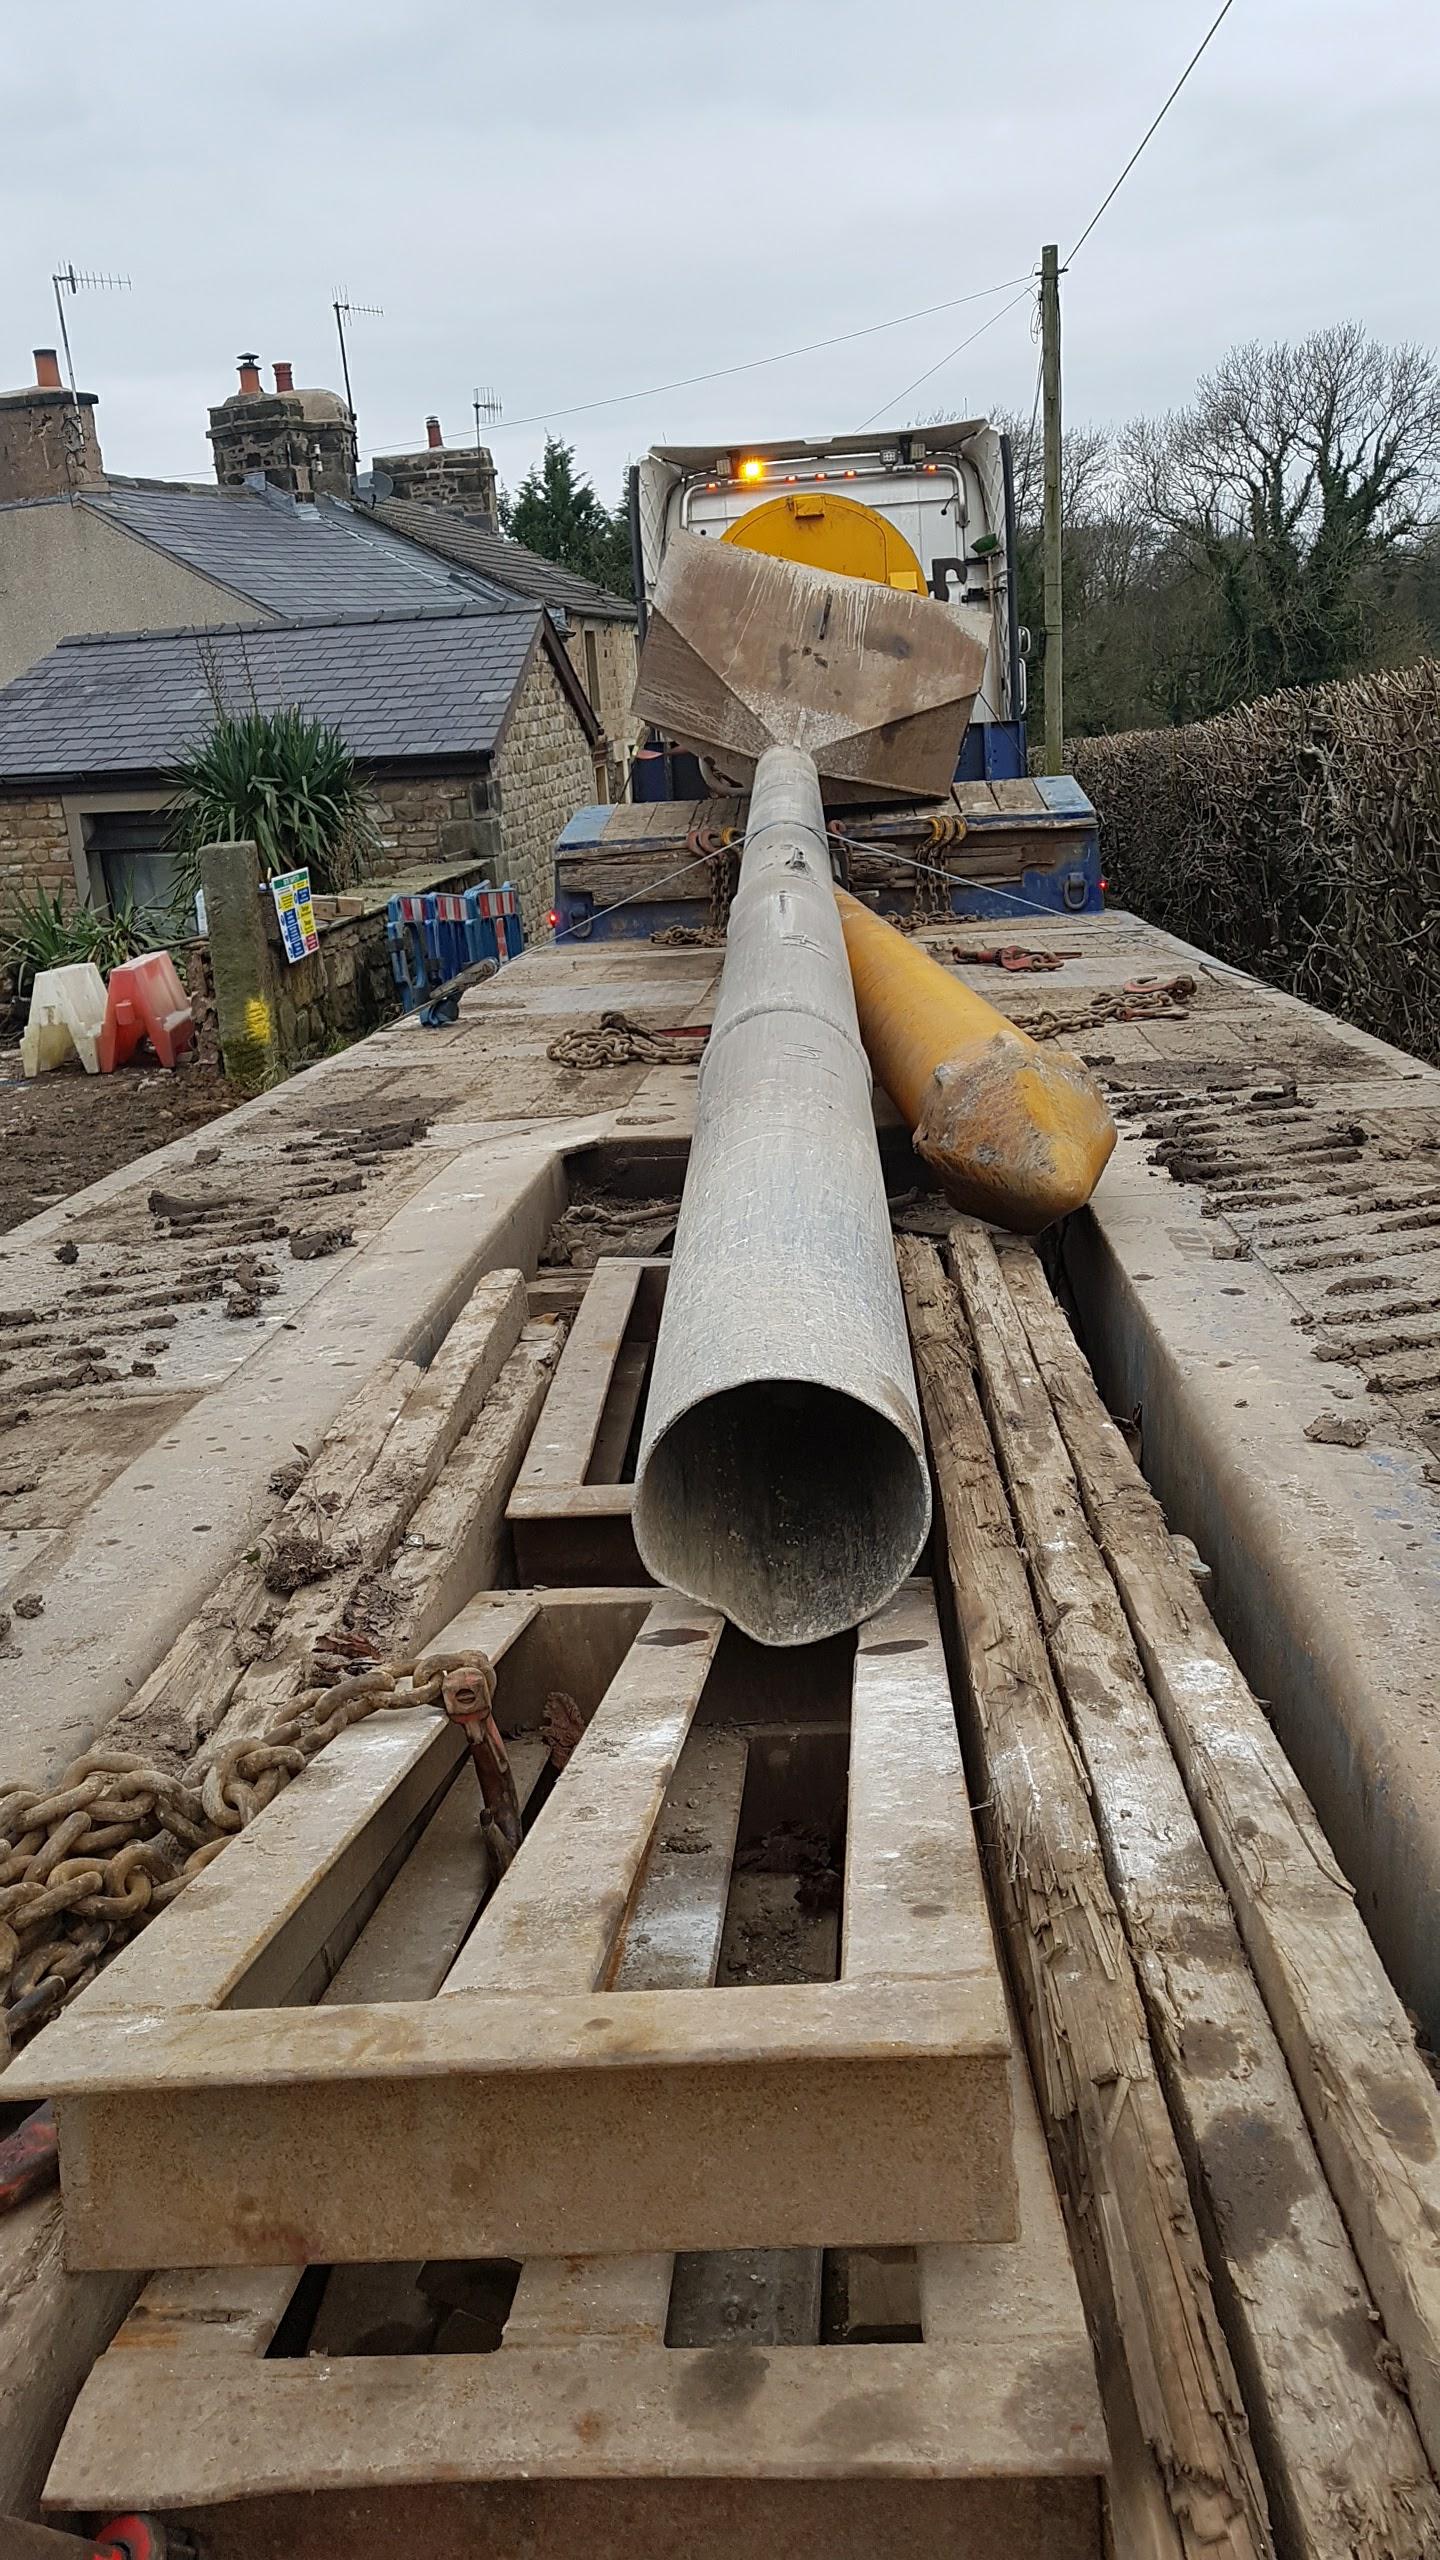
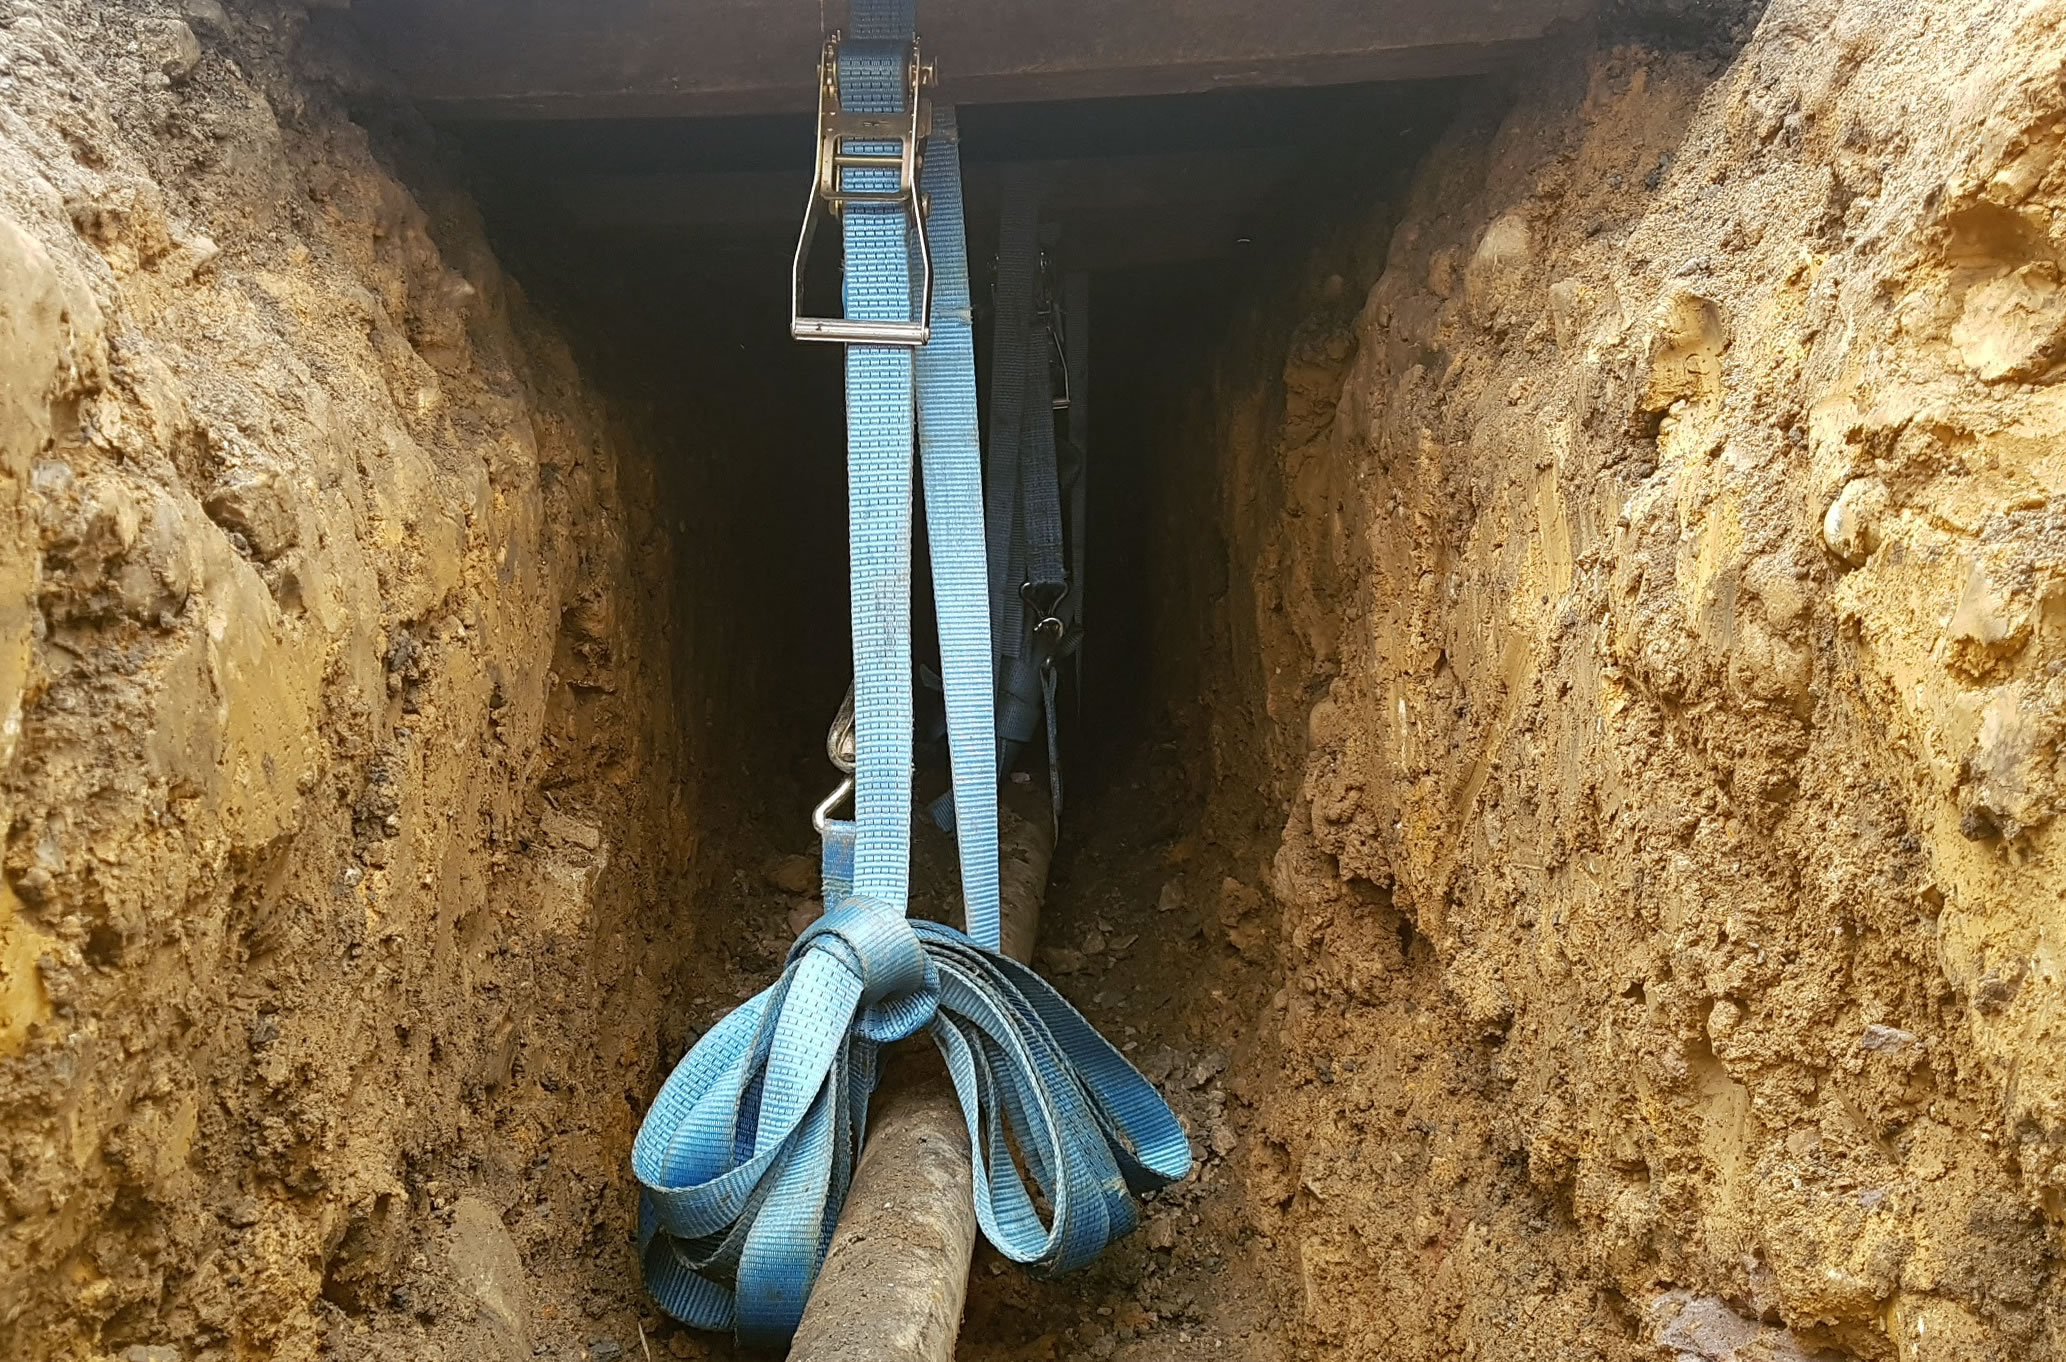
You see before you an extremely relieved person. 64 piles in, done, dusted, testing happening now. I'm trying to remember when I was so nervous for so long.... and can't. Tucked up warm and comfortable on our bed, and lying in the crook of my knees, the cat growled - he's never done that before - a car had parked outside the house and stopped at stupid o'clock. It was the pile driver chappie arriving a day early. Swiftly followed by a 42 tonne rig.... thus; and before you could say 'That's Big', this happened The piling probe (called a poker) that sits on the front of the rig looks like this Big innit? So how does it work? The rig picks up the poker (heart-in-mouth-stuff), and when positioned correctly, vibrates the poker into the ground to a predetermined depth: in our case 4m or less if refusal occurs before that point. But the trick is to tip some stone into the hopper at the top of the probe. Pull the probe back up a bit, reinsert the probe (into which more stone flows), compact, and do that a few times until the pile is made. Now, this thing vibrates. A lot. So for fun I did this with a bowl of water and some Vimto. Cos frankly, it worried me.... there's a water pipe running very close to 4 of the piles (2m) Not much, but it's hardly a scientific test. Town And Country Vibro set up a wobble meter (forgotten what it's proper name is) which is connected to a modem so the Head Office can see how much wobbling is going on. For comparison I went up to my office and had a look at my wobble waves there. None, or almost none. That did absolutely nothing to allay my fears of bursting the water main. We had prepared properly, though, thus; Man was I relieved when the vibration stopped. No leak, No fountain, no bill from United Utilities. That's not going to stop me taking photographic evidence of the pipe and pit when the road plates come off on Monday and it gets back-filled. Only to bump into a cliff-hanger on the last pile The probe had hit a glacial boulder smack in the middle and split the stone such that the remains filled the exact diameter of the probe. So none of the stone fill could flow into pile hole. Jammed. Solid. Four lump hammers and one sledge hammer all hitting the probe at the same time. Me hitting it as hard as an old codger can; which was a sight harder than the lads were. Too much invested in this pile.... Plop. Out it fell after 5 long minutes. Angels sang Heavenly music when the 8 litre engine stopped and the foreman jumped down. "Ya weren't worried were ya whack?" he asked grinning like a Cheshire Cat. "Naaah" I lied. Ian


 2 points
 -
Right For a simple, and basic temperature logger the DS18B20 is pretty good. You have to set the RPi up to accept the 1Wire protocol, which is done though the raspi-config screen. The General Purpose In Out (GPIO) defaults to GPIO4 (this can be changed with a bit of trickery). One thing that the RPi lacks is a real time clock (RTC). I bought some cheap ones a few years back but they never worked reliably, so have ordered some new ones (still waiting for them). Hopefully this will sort the problem. If the RPi is on a network, it just gets the time from a Network Time Protocol server (NTP). This can cause a few problems on a reboot as it has not always updated. The code in Python is simple, I can post some up, but there are many websites that have examples. Just recently I have tried to put a bit of error correction in, but have hit a snag. If there is an error, it stops logging. So I shall go back to post processing the data (if you now what you are looking for, error are easy to spot). Or I can learn now to allow it to recheck say 10 times (2 seconds), then carry on. A few months back I found a bit of free FTP space and played about uploading data to that, it worked well (until I hit my upload limit). I used a bit of simple shell (sh) script. I have also looked into using email, and splitting large data files into daily files. This is a bit 'work in progress' as there are some quirks between different versions of Raspbian OSs and getting a reliable connection (more of that later). But it does give one the opportunity to upload from a remote location via a cheap old mobile phone. As data compression is easy to do from a sh script, any old 3G connection is perfectly adequate. I have only scratched the surface of shell scripts, but they seem a very powerful tool to use. Many of the commands can be used within Python, but as I am not a programmer and have little interest in programming, I like to use simple scripts that I can understand (and write/modify), and then just get them to do their thing when needed. My CurrentCost data logger seems very reliable these days, unlike the copy I got from the internet. It takes a few minutes to set up initially, but then just chugs along writing to a comma separated file (.csv). Once you have data in that format, you can do just about anything with it. Other project I am currently working on are using DHT22 temperature and relative humidity sensors. These are a bit harder to set up as they need a separate GPIO pin for each sensor, and they do not connect easily to the RPi. To get around this I just download some C (a programming language) from AdaFruit, follow the instructions and eventually get it working. word of caution though, don't by the much cheaper DHT11s, they have limited temperature range and are not that accurate, pay the extra for the DHT22s (think I pay less than £2.50 for them, will need to check). I have also made a bit of Python script that senses when a switch is open or closed and puts a time stamp against it. This is so I can sense, via cheap 240V relay (still waiting for it to turn up) wired in parallel to a load, when that load is on or off. This is for a heat meter for a solar thermal system, but could also be used monitor just about any load, as long as wired correctly and safely. This is cheaper than buying in a flow meter, but I have an idea on how to make on of those. At the moment I only log data, I don't use it to control anything (not really interested in that side of things too much). I have got LEDs flashing for a laugh as an alarm, easy step from there to getting something fully controlled. I bought a PiFace, which is a board that fits onto the GPIO pins and has 240V/5A relays on it. But never got around to using it. Something for a rainy day. Now problems I have had. Well one major one that I cannot fathom out. With the old Raspbian OS Wheezy, setting up a static IP address for both the local area network (LAN) and the wireless network (WLAN) was easy, just edit one file. Since I bought a Raspberry Pi Zero (a cut down RPi, but just as good as my Model A), I decided to use the later OS, Jessie. There is two versions of this, one with a graphic user interface (GUI), and one without. As the RPi Zero (RPiZ) is really used with a screen and keyboard, I decided to use Jessie Light (the non GUI version). This has made it impossible, for me, to set up a reliable wireless connection. It works fine on the USB to LAN adapter, but changes the IP address every now and again, which means I loose connectivity. To get around this, just this week I have set up one of my old Model As with the GUI version of Jessie, connected via the main screen to my wireless network, and it seems to be working fine with the static IP I put in. I have searched though the files that seems to be associated with the networking (think there is 4 of them), but can see no mention of the static IP address I typed in. But for the last few days it has been working reliably. A mystery to me. There are a few projects I would like to try out, one it to make a reliable, but cheap, wireless energy monitor. This can be either via a clamp on meter (plenty accurate enough for most things) or a sensor to read the flashing LED on the meter. If CurrentCost where still in business, I would just buy their kit, but they seem to have gone (annoying that they sold a million plus units to the energy companies, who then gave them away to customers, who never used them, there must be half a million of these boxed and unused). There are cheap transmitters/receivers for the RPi, just a matter of fitting a sensor to them, finding out a way to transmit the data and then read it (bit beyond me to be honest). But all the 'bits' are cheap, so can't be that hard. Maybe even 'reverse engineer' a CurrentCost one. I also have an analogue to digital board (ADC) that I have only used once, there is a fair bit of scope for sensing there, and they are cheap. I have a £100 LabJack, which is a great bit of kit for playing with, and works very well with the RPi. But it is really only for lab use, not a practical, or cheap thing to use for everyday monitoring. Right it is late, I need some sleep.2 points
-
Moved from here Yes..! I'm currently planning where to put 10 DB18S20 sensors around the slab (including one under the insulation) and the fabric of the building. Current list is : - Outside Air (northerly wall) - Under slab - Kitchen Slab - Utility Slab - Lounge Slab - Cellar When finished, they will be added to : - UVC - ASHP Feed - ASHP Return - MVHR Inlet - MVHR Supply - Internal Air question is ... how to link them all easily as I'm an rPi fan at heart but something tells me Arduino would be easier ..? or is there an off the shelf logger at a reasonable price that can do this sort of sensor..?1 point
-
Can you take one of your small buckets to the local welder and get a hook or plate with a hole cut in it big enough for a shackle to go through welded onto the bucket.1 point
-
Sheet metal and MIG actually: http://craig-russell.co.uk/demos/cone_calculator/1 point
-
Today I used the left over foam for: * making a box around the generator earthing rod - prior to the garage concrete floor pour * making a box to prevent the Icynene spray foam going where the LPG boiler flue will go * sittng on it to eating my lunch off * stacking tons of bits - ready for when I come up with the brainwave what to do with this stuff I also tried setting fire to it: https://goo.gl/photos/ruuUZczYPTikMfsi7 Was quite impressed how it withstood a gas torch - not particularly recommended though as certainly some fumes were given off1 point
-
Don't bloody start him off !!!!1 point
-
I just decant into a plastic sports drink bottle (Lucozade) and give it the odd squirt. If I use RTD or Trefolex I usually apply with a paint brush.1 point
-
Don't worry i have got ALL the gear for it now But if you are thinking about it i will recommend Magdrill.com as a company, I dealt with a person called Graham on the phone and he was very helpful. IIRC that is £350 inc VAT and Delivery, so probably about 295 if you can claim it1 point
-
try http://www.plasticdrainage.co.uk iv always found them to be very competitive.........if they have what you need.1 point
-
Vented systems are usually specced for 1.5 bar max working pressure, to allow for say, a three storey house with the cold tank in the loft and the cylinder on the ground floor, or even in a basement, so it'll be fine at 1 bar. Edited to add: Just checked, Terry, vented cylinders are either rated at 1 bar, 1.5 bar or 2.5 bar working pressure. Gledhill have info here: http://www.gledhill.net/pdf/Spec 115 Vented Cylinders.pdf I know for sure that the Willis is good for over 1 bar, as I've seen one fitted to a cylinder in a hot press on the ground floor of a three storey Victorian house, where the head must have been way over 10m. Our buffer is just a vented cylinder from Newark, and came with a 1.5 bar max working pressure sticker on the side. I run it at around 0.5 bar, but with a 1.5 bar PRV, in a sealed system and the BI was fine with it. Edited again: I've found the spec for the Willis heater, it's rated at 10 bar TP! Here's the spec:1 point
-
Insatiable curiosity, Terry, and like the cat, it invariably gets me into trouble from time to time...................... PS: it helps being part-Irish, and having a load of Irish relatives who have all manner of bodged-up systems in their houses, some of which are really ingenious.1 point
-
What you want as a water heater is a 3kW immersion in a tube. They are an Irish thing, invented by a chap years ago over there, to go on the side of a conventional tank that doesn't have an immersion heater port. They are known as Willis heaters, see here: https://www.stevensonplumbing.co.uk/willis-complete-3kw.html1 point
-
Something like this any good? Link1 point
-
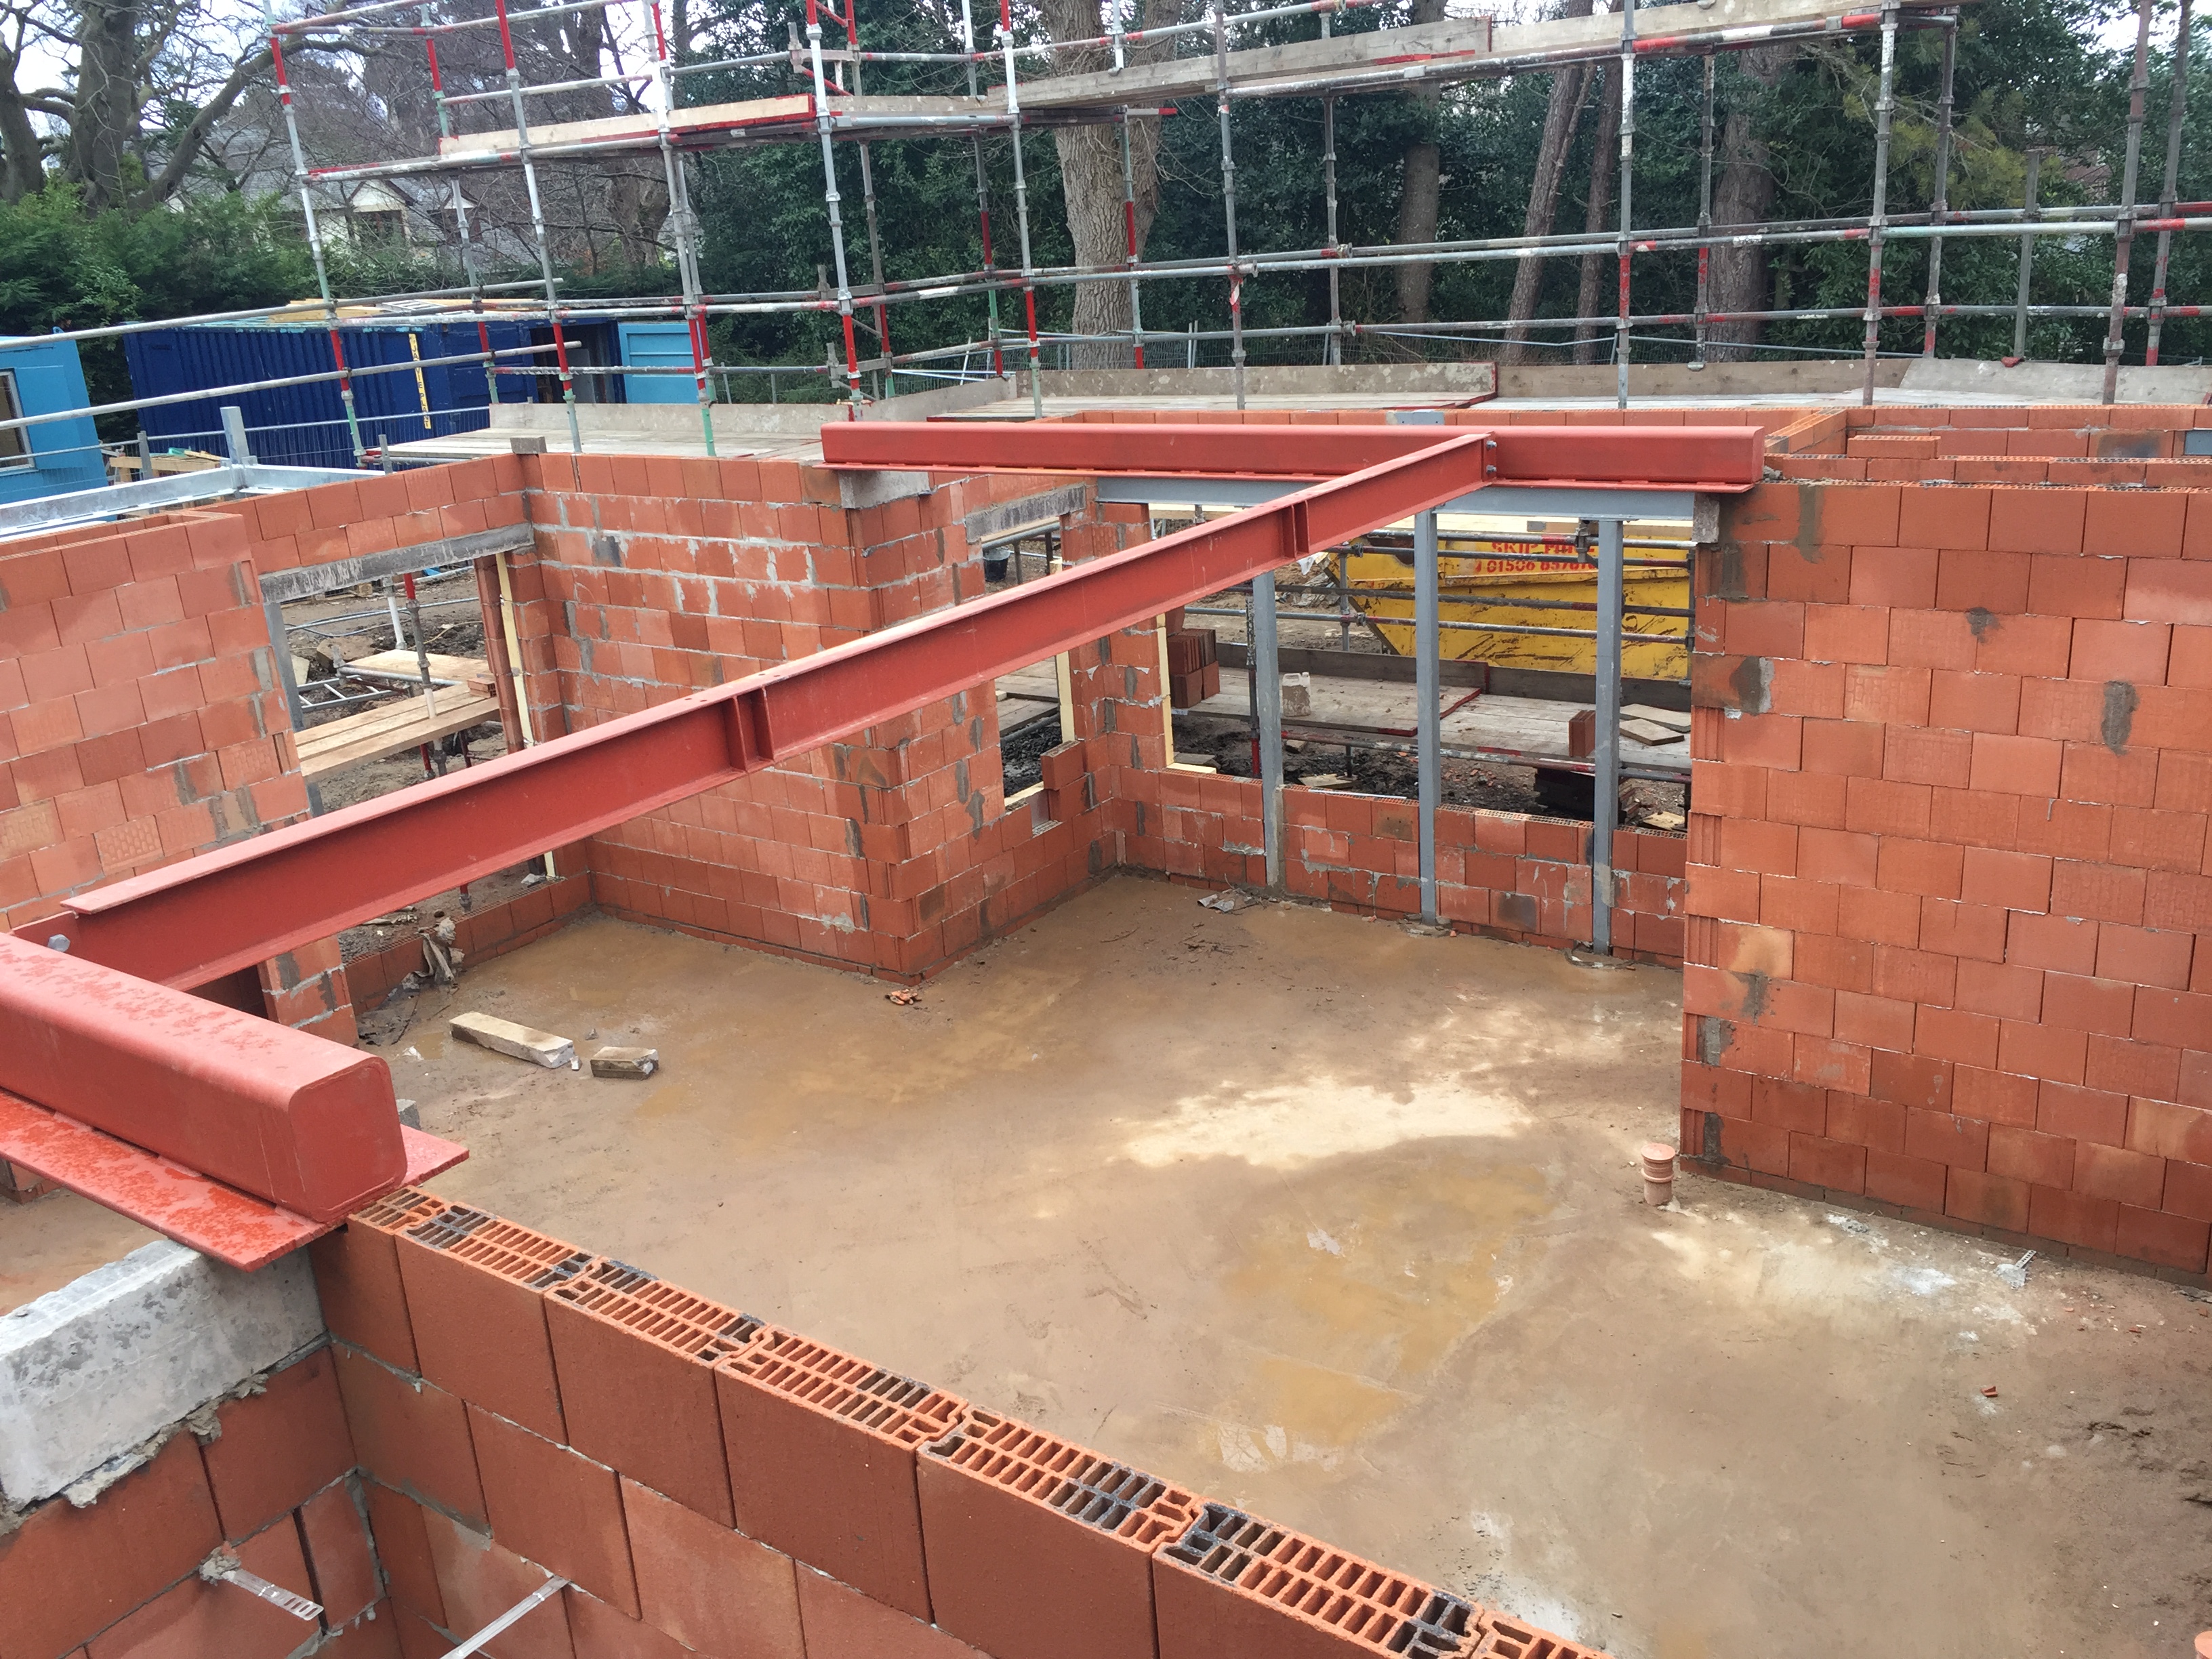
The braces are essential to prevent buckling failure of the yet-to-be-tied inner wall skin, under the compressive load of the first floor, applied to the top of the inner wall skin. Once the two wall skins are tied together they become a great deal more resistant to buckling failure under a compressive load, because the slenderness ratio has decreased. If you want to try and get your head around this you can either read up on buckling, crippling and slenderness ratios under compressive loads (tip: search for work by Euler, the 18th c mathematician), or you can do a simple experiment. Take an ordinary straight drinking straw (not the fancy ones with bends in) and stand it vertically on a hard surface. Push down on the top end with your finger and you'll find that it will buckle and bend in half under a quite modest load. Take another straw, and this time just very, very gently hold the mid-point between the thumb and forefinger of one hand (simulating the bracing) and push down on the top end with the other hand. What you'll find is that the maximum compressive load that the braced straw will take is a lot greater than that of the unbraced straw.1 point
-
Fyi you MUST fit the multi block within around 500mm of the UVC ( in the same room adjacent will pass TBH but you can't mount that remotely ). To retrofit an UVC it's FAR easier to fit a secondary PRedV directly after the stopcock. ( yes, where you've just done all that lovely plumbing ). That gives higher pressure for the outside tap ( say set the secondary PRedV to 4 bar ( primary being the one at the UVC )) and then all of the existing cold plumbing can stay as is.1 point
-
The hot water expands into a manufacturer supplied expansion vessel. Your current system does the same via the vent pipe over the CWS. Typically they operate around 3-3.5bar, as dictated by the control group / multiblock. Link That's a combination valve that provides 5-6bar cold mains PRV, a PRedV, a balanced 22mm cold draw off point ( to supply all mixer outlets with balanced hot and cold pressure ) and a, sometimes, a tapping to connect the EV. ( Fyi the EV goes on the uninterrupted side of the cold mains inlet to the cylinder ). Again, that's usually manufacturer supplied with the UVC ( they come with everything needed to complete the installation, less isolation valve ).1 point
-
I worked for a large light manufacturer once, mainly industrial stuff. Had to deal with lighting designers quite often. The industrial side was OK, they generally wanted loads of controlled lighting. The domestic ones where just a shower, kids that liked to play and make up words to describe it.1 point
-
One subtle tweak: maybe you put a plug/socket break at the boundary and slip the meter in at that point. Put it in a heavy duty polythene sleeve and ducktape it up to keep it weather-tight. That way both you and the neighbour can read it. The neighbour can be confident that all of your electricity is being metered and you can be confident that only your electricity is being metered. You can pay him 2× or even 3× the standard electricity tariff. It will still work out a lot cheaper than buying a genny.1 point
-
Well I hope she realises just how lucky she is!1 point
-
Rather you than me,,,, Two methods I can suggest to terminate 4mm to a normal plug, 1st is to use a 16a plug, then a short patch lead of 13a plug to 16a socket in 2.5mm 2nd is simply to use one of the proprietary inline IP rated connection tubes/tunnel thingies (I think that's the technical term) I prefer the first tbh, all my 'made' extension leads are done with 16a plugs/sockets and I have short changeover patch leads for each end, some of my stuff needs 16a, and some of my outside sockets are 16a, as is my house inlet (for Genny) and van inlet.1 point
-
The only thing I may suggest about @TerryE suggestion is, Don't buy a long extension lead, they are usually only 1.5mm , buy a 100m drum of 2.5 (or 4mm) artic flex and make your own, Allows a bit more give on the volt drop, obviously will need jointed down to 2.5 at the plug end. You could even get yellow so it's more visible, The blue for 230 and yellow for 110 isn't actually a fact btw, just a common usage thing. I once had a H&S guy come storming into a house I was working in on a large site with site foreman and contracts manager in tow shouting and demanding I get threw off immediately as I was using 240 (pre harmonisation) tools. He had seen the blue lead going through a window, He soon quietened down and shuffled off again when he saw 110 plugs and sockets on everything. I'd had some blue artic in the van so used it to make an extra lead from.1 point
-
Agree with all that. I don't think anyone's suggesting that a 300L TS is going to be a high performing solution if only heated to just above the required outlet temperature. My point is really just that when sized and heated appropriately the temperature fall-off isn't as severe as very simple modelling might suggest.1 point
-
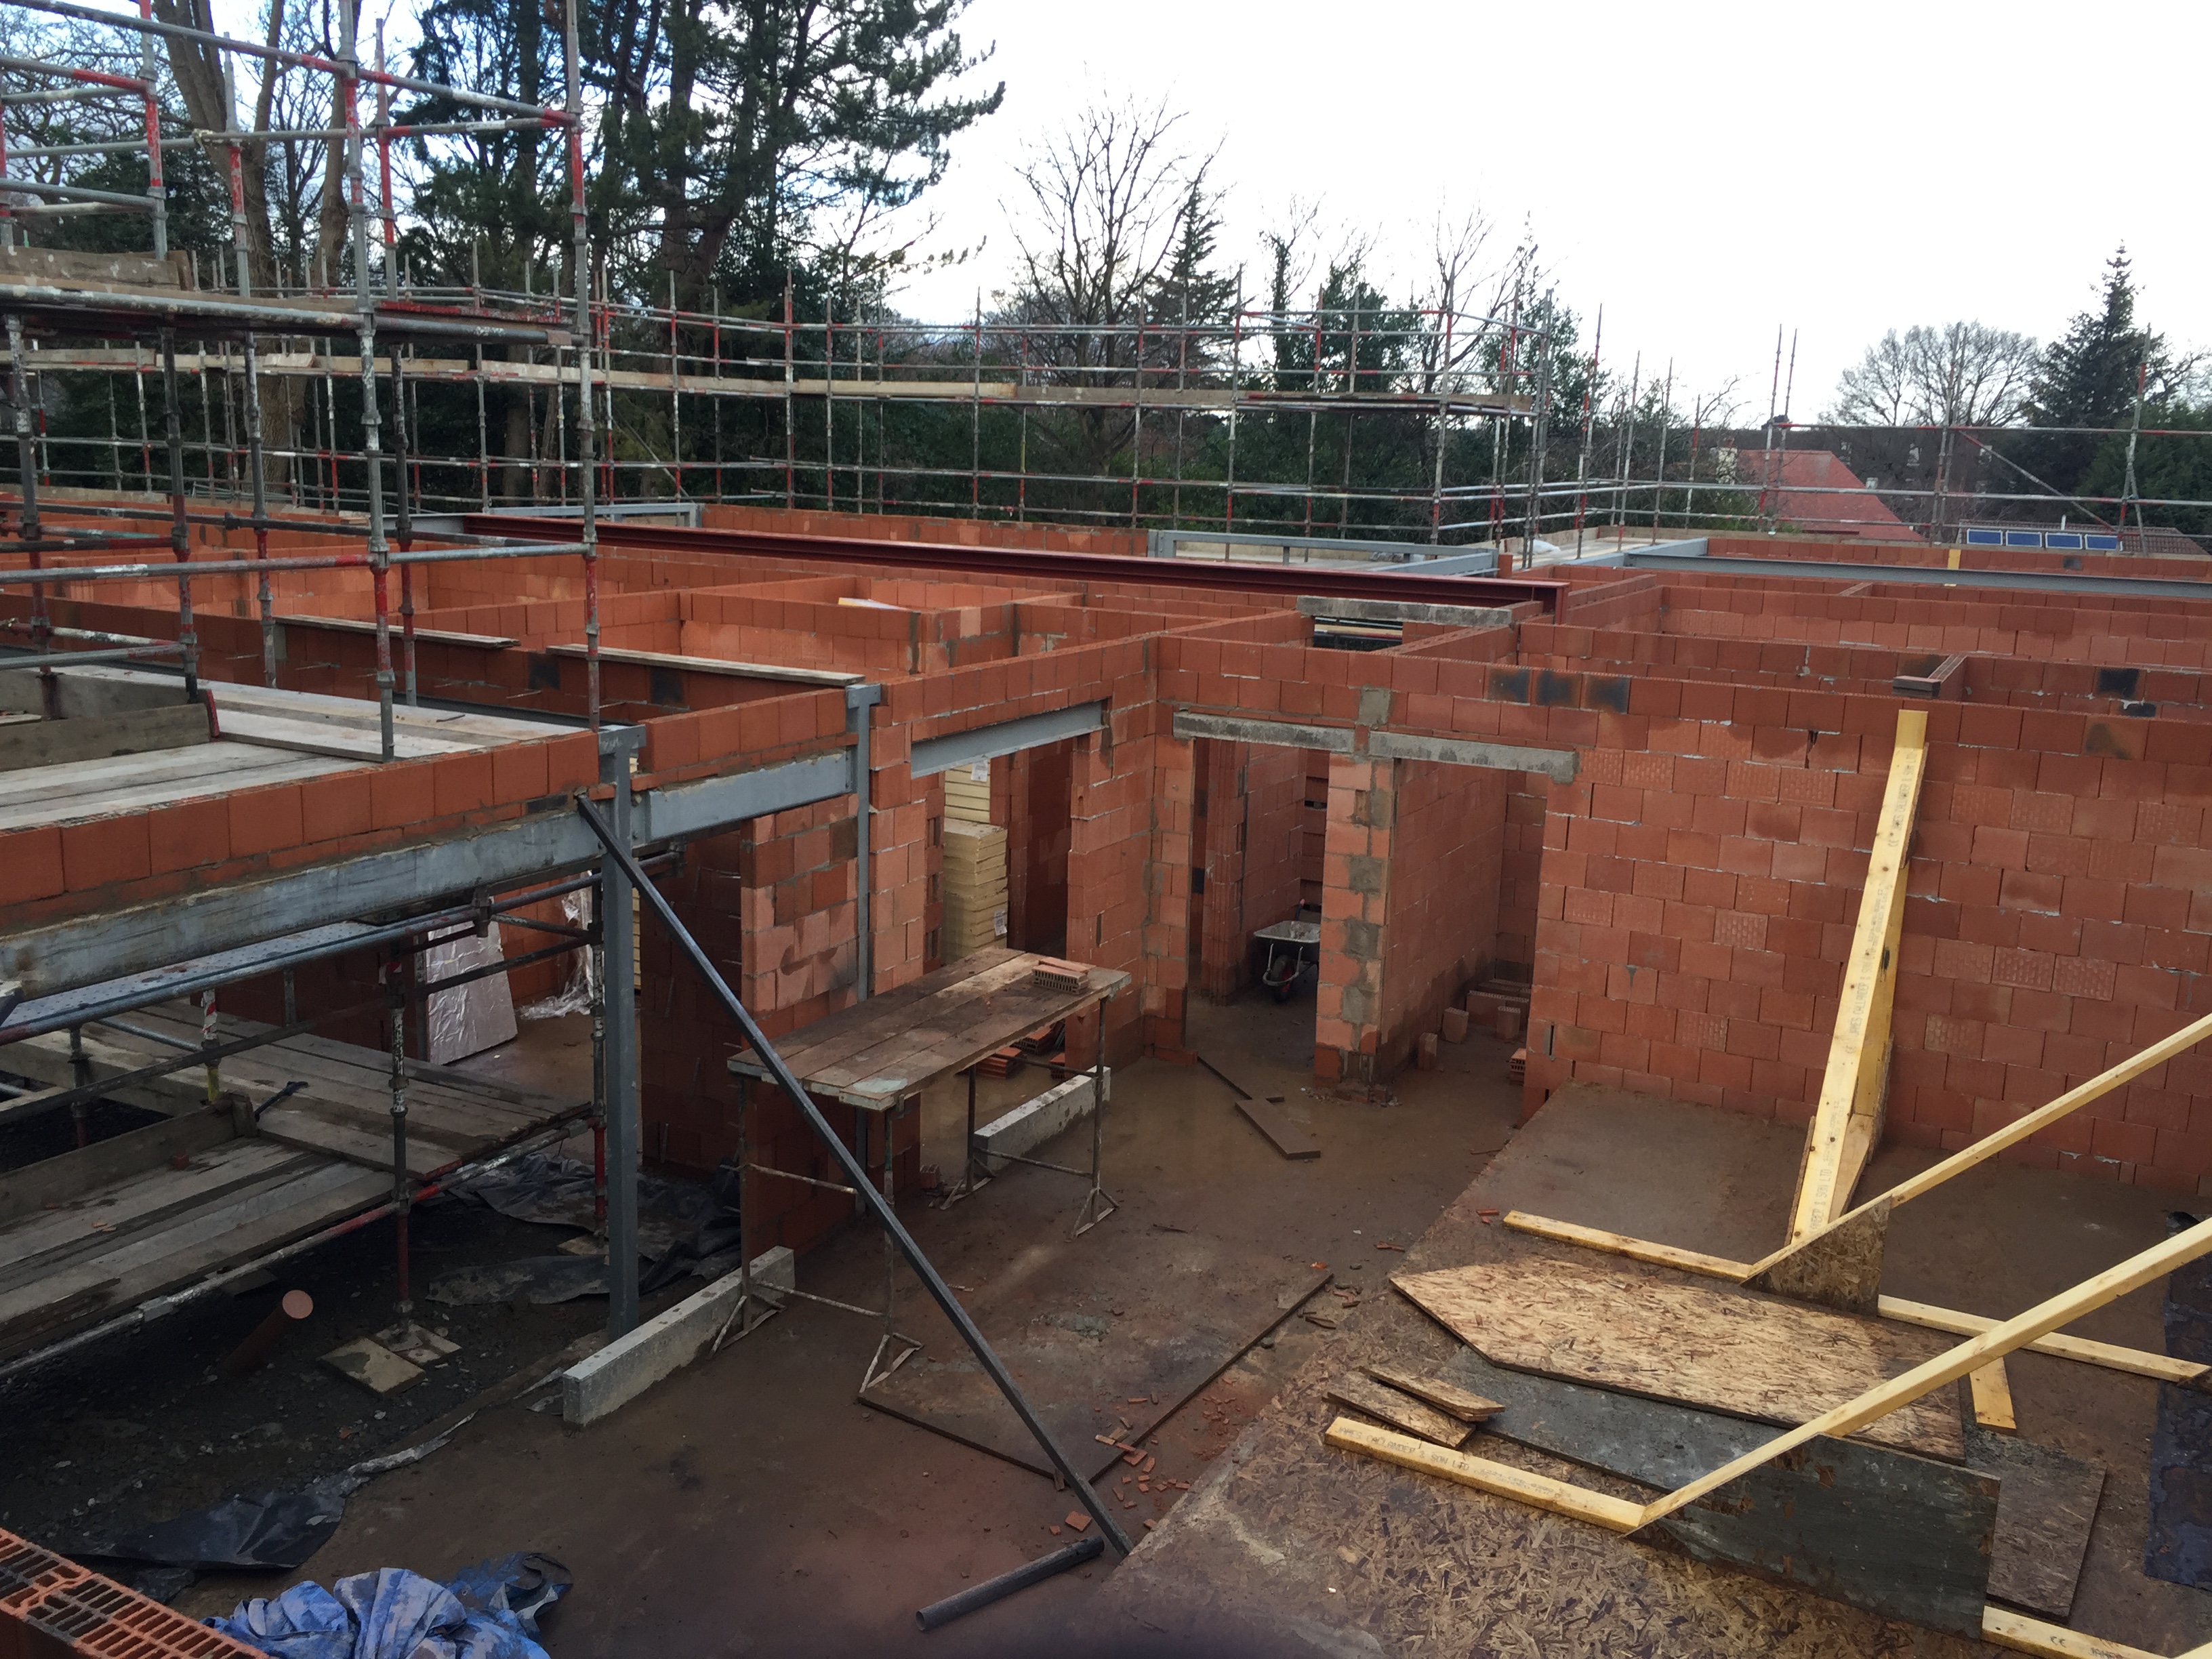
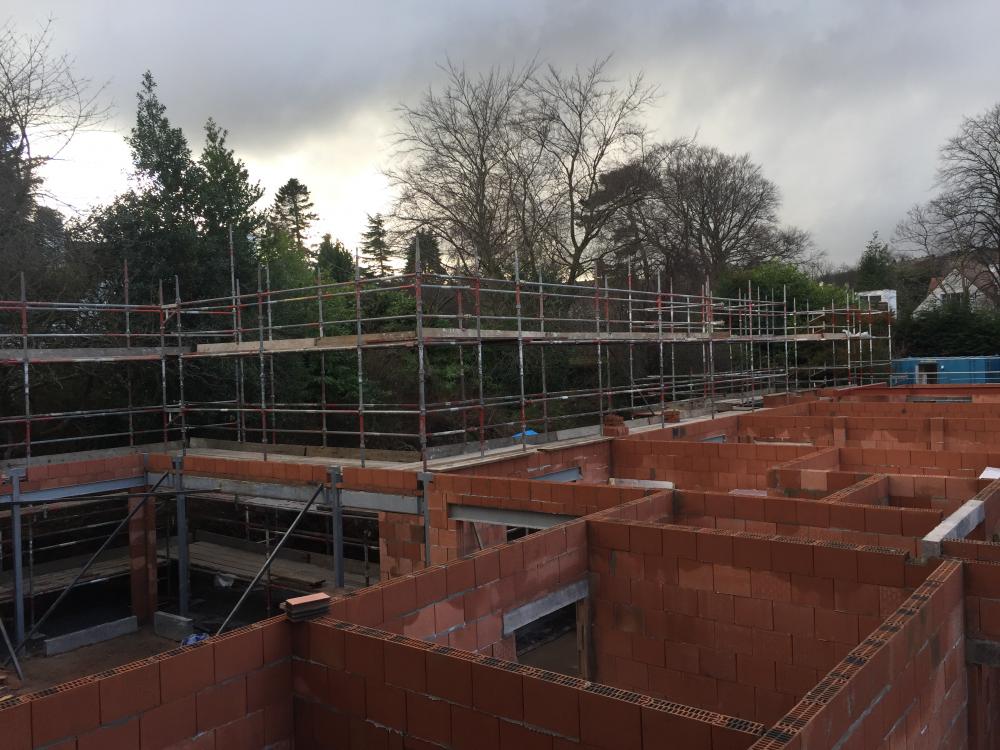
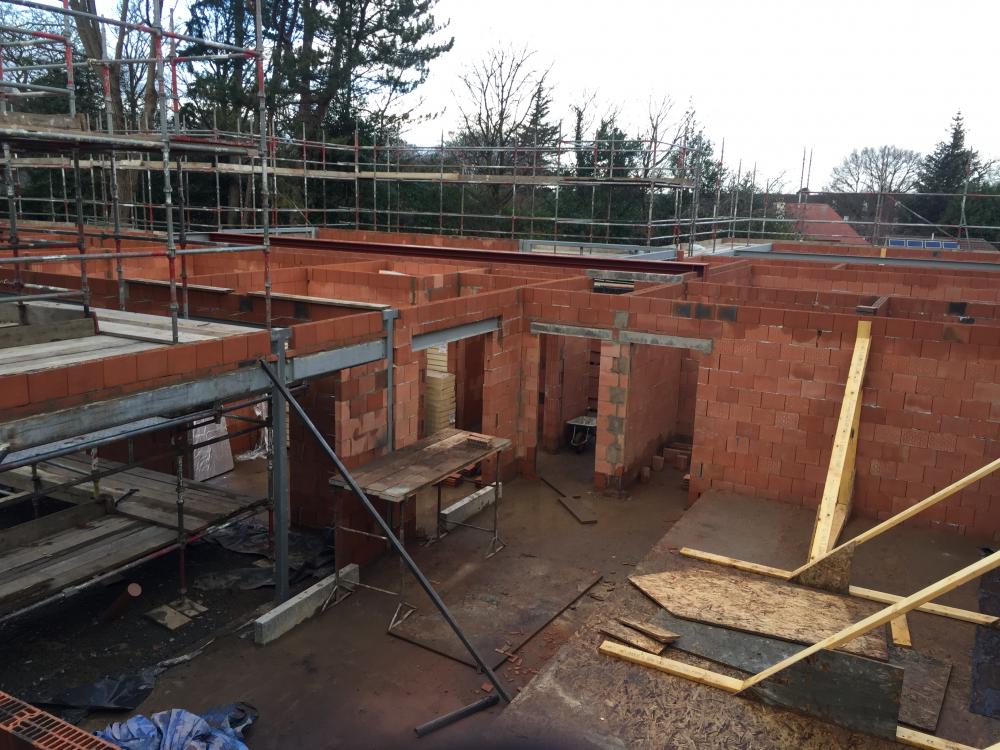
I was finally up on the scaffolding to see how things look from first floor level. I was still probably 450mm below the finished floor level but it gives and idea. The concrete people have insisted that the walls are braced before they put the first floor slab on on Monday. There's a lot more steel than I expected when we started.


 1 point
 -
Yes you are right - its very simplistic. It also doesn't take into account any losses etc. However - I can tell you from experience that the basic idea is correct - that a TS temp will start to drop immediately and a cylinder much less so. Therefore if the TS temp is not much more than the target DHW temp it can only produce a limited amount of water at the target temp. In our initial installation, with the 300l TS at 50c - we couldn't get even a single bath or shower out of it before it wasn't hot enough. Once we added a (smaller) DHW cylinder it was fine. Thermal stores probably work fine for DHW if the heat source is high temperature (80c say). Be very careful if planning to use a TS for DHW with a heat source at close to the required DHW temp (ie a ASHP or GSHP typically).1 point
-
I went up today and had a good look around at the insulation. The vast majority is tight up against the wall and looks pretty neat. The main issue seems to be on outside corners and at the ends of runs and I have asked them to seal these off. I think this looks tight enough?
 1 point
 -
Well, the beam and block is all done and foul drains work starts on Monday. Today we've been sorting through stone for a drystone wall.

 1 point
 -
Our electrician came up with a good lighting design for our house (which has a large open plan kitchen, dining & living area) based on ceiling LEDs (on dimmers), wall lighters, LED strips and lots of switched 5a sockets. Looks good, is flexible and did not cost much. He's equally comfortable installing high end lighting systems (KNX etc) but feels that (aside from colour changing) the same effect can be had at a fraction of the cost using standard fittings and a bit of thought.1 point


.jpg.c21f3ac78c9b7efd90cbdcb312744dc5.thumb.jpg.7adcad4c0e384f5ecd7d56b0618df6e5.jpg)