ProDave
-
Posts
30809 -
Joined
-
Last visited
-
Days Won
427
Everything posted by ProDave
-

electric fence energiser making iMac tick...
ProDave replied to Tom's topic in General Self Build & DIY Discussion
Get one of those clamp on EMC ferirte beads over the mains lead. It sounds like the mains wiring is acting like a big antenna to pick up the interference from the electric fence. While you are at it, have a good look at how the electric fence is set up. How is it earthed, you don't want it earthed to the mains, give it it's own earth rod and have no connection to the mains earth, and an EMC ferrite on the mains lead for the fence energiser as well. -
There is a legal definition of a "caravan" in the caravan act. It certainly covers up to 20ft by 40ft which is a standard twin unit mobile home. This is the Highland Council's definition of a "caravan" https://www.highland.gov.uk/downloads/file/1346/bst_018_caravans_and_mobile_homes However I think that dociment is out of date (dated 2010) I am sure the Caravan Act Scotland has been updated to increase the maximum size.
-
Whatever cable you use, if being connected direct to the transformer would have to be a cable approved by the DNO. In this case is is usual for the DNO to supply that cable to you. So you need to ask them, to supply you with their approved cable for a 3 phase connection. Or are you planning to leave the meter in the box at the boundary and only have your CU in the house?
-
garage consumer unit supply advise swa 2 or 3 core
ProDave replied to Neil Gray's topic in Power Circuits
This bit worries me. You do know how to terminate SWA, with a proper gland designed for the job that clamps the armour mechanically and makes contact to it. You then take the earth connection from the "banjo" supplied with the gland. It does not take up any room "in" the CU. -
Sometimes you wonder who designs the forms etc, thinking of the MHRC. So you get outline PP first. Then you get full PP, sometimes referred to as Approval of Reserved Matters, but not always. So surely it is only the FULL planning permission that matters? WHY do they want a copy of the outline planning, that became an irellevant document the day the full planning was granted? My concern with the VAT claim thing was what happens if the post fails and your claim and your valuable invoices never arrived. You can't insure a packet of documents for the value of a VAT claim. All I could come up with is laboriously scan every single invoice and store a copy on my NAS drive, so in the unlikely event of the claim getting lost in the post, I could reproduce all the invoices but they would clearly be a copy not originals. So the lessons to anyone early in the self build sage: Keep a copy of all planning documents. Keep every single invoice in date order in a box file or similar. I chose to do my VAT claim the old fashioned way by filling in the paper form. If I were doing it again, I would enter each invoice onto the form as I got it, to save days of tedious work when compiling the claim at the end.
-
Do I need skim plasterboard in bathroom?
ProDave replied to Listless's topic in Bathrooms, Ensuites & Wetrooms
You will need to tape and fill the joints, but painting raw plasterboard in normal in many houses now where only the plasterboard joints are filled. You should have used the green "waterproof" plasterboard and use a bathroom paint. But I have seen plenty of old houses with the normal plasterboard just taped and filled and painted without issue. -
And the VAT money landed in the bank account today.
-
Board on board cladding - fixing advice / critique
ProDave replied to markocosic's topic in General Joinery
So how does that work? Your single nail fixing by reckoning goes bang into the gap between the bottom layer boards? So either you are trusting to luck a bit, or you used long nails to go through the top layer, through the (gap in the) bottom layer and into the battens? Me, I have wider top boards fixed with pairs or screws that just screw into the bottom boards. -
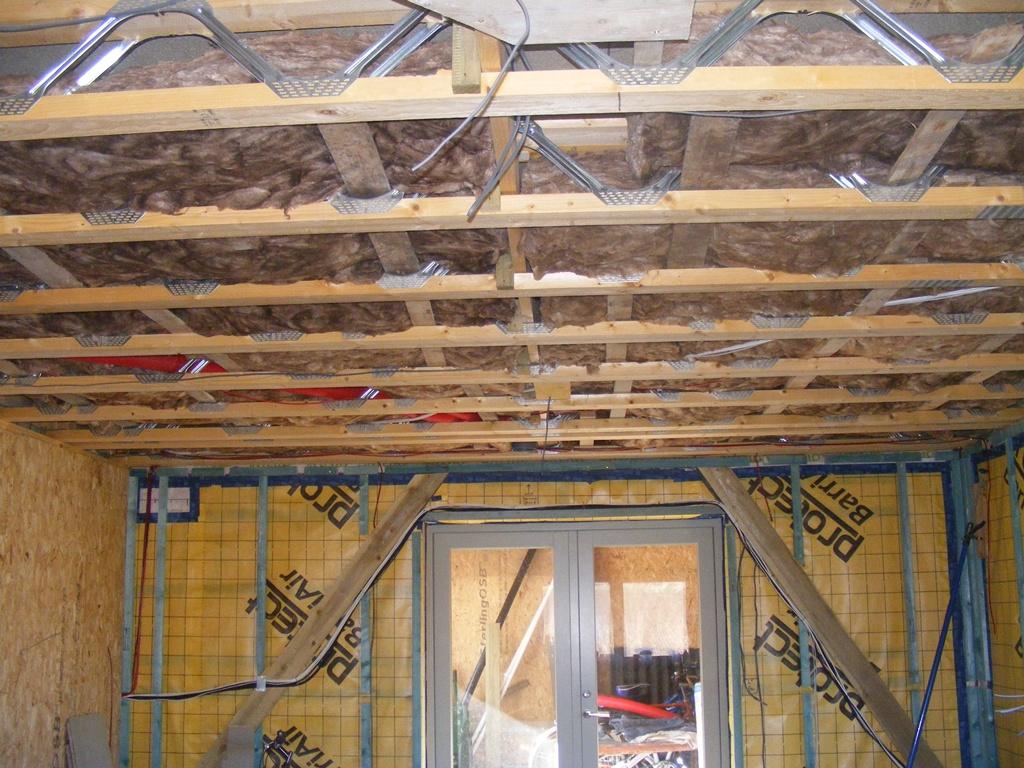
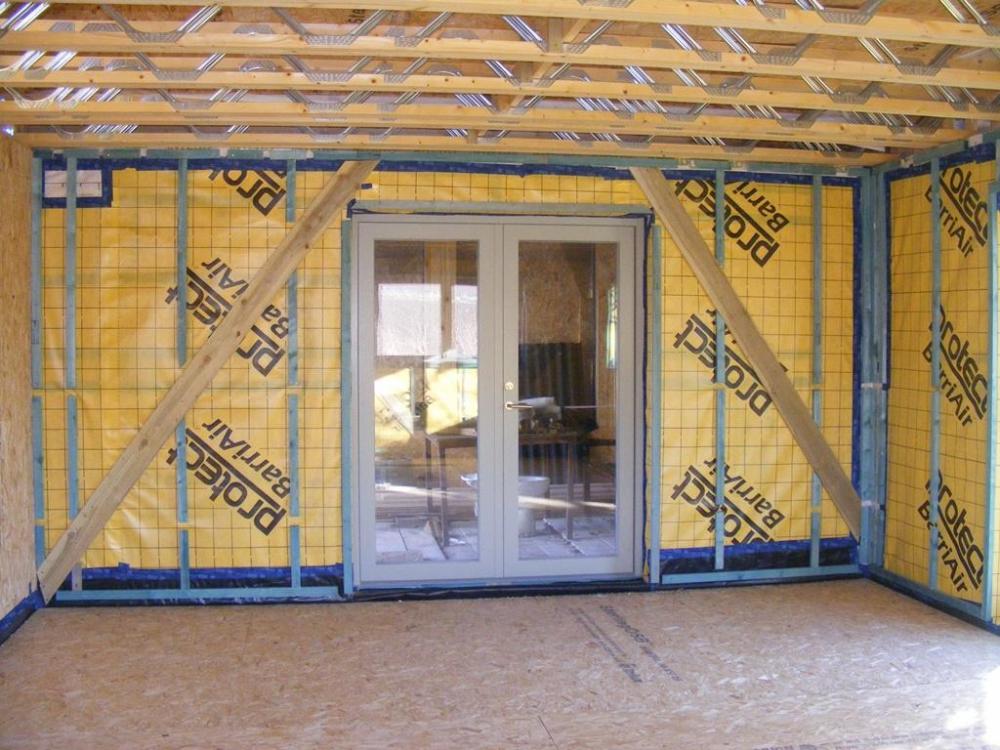
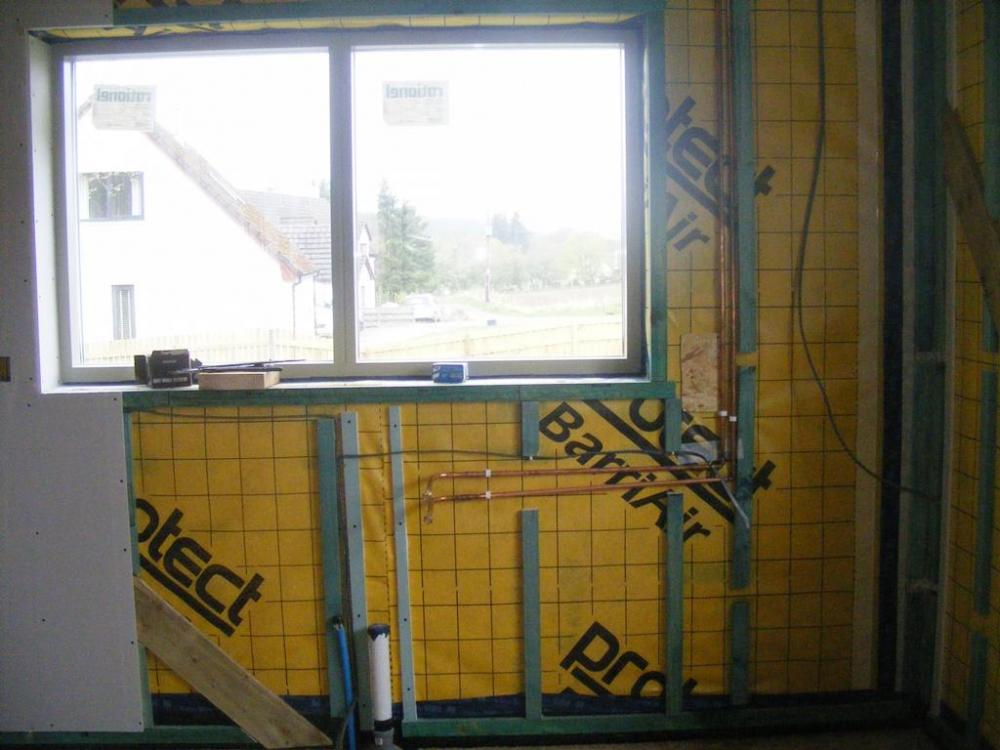
Service void before services: Note the gap in the vertical battens at 450mm and 1200mm above floor level. This is to allow socket and light circuits to run horizontally without having to drill the battens to do so. Similar view with some cables in. That's a bundle of AV cables that I wanted to take the shortest route. AV cables are not confined to safe zones like other wiring. And here are some pipes as well in the service void, hot and cold water for the kitchen sink.

-
So you have the power in so you will have your MPAN number. You can now contact any energy provider you wish and sign up with them and as a new customerthey will come and fit the meter. I found it a lot simpler to sign up with SSE who is also the DNO here on their standard variable rate, no fixed term contract, and then swap energy supplier once the meter was in, as not all suppliers will fit a meter.
-
Tail cable diameters from meter to consumer unit
ProDave replied to Happy Valley's topic in Electrics - Other
Black 65mm duct if you can find an offcut. If not a bit of black rainwater downpipe. Do not under any circumstances use blue water pipe and then get offended when the electrician refuses to feed cables through it. -
To save other readers from looking it up, this describes what HVO is https://www.crownoil.co.uk/faq/hvo-fuel/ A lot of waffle about how good it is with lots of claims but little actual figures to back it up. If it is as good as they say, why is road transport not swapping to HVO en-mass? Why is in never mentioned when discussing CO2 reduction?
-
Help!!! Getting very confused and very stressed :(
ProDave replied to patp's topic in Kitchen Units & Worktops
Don't be rushed. Get the kitchen right. If you must move in, set up a make shift camp kitchen until you get the design right for you. I fully agree on Fridge Freezers. Our freezer is constantly full and we occasionally have to turn on the spare one for extra capacity. Why does nobody make a FF where the freezer is bigger than the fridge? Obviously I am not the only one to want that. -
Is it a daft idea to take out a glazed unit just to shift a sofa?
ProDave replied to Crofter's topic in Windows & Glazing
We sold a sofa a couple of years ago. It was a nice leather reclining sofa, very comfy (I didn't really want to sell it) and heavy. Someone wanted it but "could we deliver" we will pay extra for delivery. So we loaded it on the trailer and set off complete with the sack truck to transport it. It was a ground floor flat, accessed via a narrow alley, then up some steps with a wall either side, then a right angle turn to get in the front door. MUCH heaving, shoving and pushing and we finally got it in. Then the hall was barely any wider than the front door with the added fun of a storage heater intruding into the space. And finally a right angle turn into the living room. NEVER AGAIN. "Buyer collects" ONLY. -
Shower Screen Leaks and Bath Problems
ProDave replied to Listless's topic in Bathrooms, Ensuites & Wetrooms
If the bath is sagging, you do not "fix" it by securing the edges, you look at the feet, make sure they are properly supported and the board they are standing on is not flexing, if it is you insert some kind of batten under them so spread the load. A lot of these bath screens are notorious for leaking. Just plain poor design. It helps if you have a bath actually designed for a shower with a small slight upstand to prevent any water that gets past the poor seal to at least not spill over the edge of the bath. -
What nobody has mentioned is joining them DEVALUES both properties, turning them from semi detached to mid terrace. This is probably what your neighbour wants to avoid hence he built his extension on his land with a (small) gap and you cannot join to his wall without trespassing. I would just carry on building on your side leaving a gap as well. What happens at the eaves? There will be some eaves overhang you have to allow for that in setting the position of your wall so your eaves overhang and his don't clash. I would not make any attempt to fill the gap between them. Have building control raised any issues with building so close? A friend of ours was not allowed to build so close and building control insuisted they left space to maintain the wall.
-
PTFE tape and plenty of it. Some recommend a sealing compound as well and no doubt will come ad add to the conversation. Before you cover it and tile, fit a blanking plug and a sealing washer over the open end of the brass pipe and pressure test it to ensure your joint does not leak, then make sure when undoing that temporary blank plug you don't rotate your brass pipe.
-
There is no FIT any more, that stopped a couple of years ago. "How do you do it"? Buy some panels and some mounting hardware, fit it to your roof and pay an electrician to connect it all. If it is the "standard" 3.68 kW system, you install it and then notify your DNO under the G98 procedure. If you want more than 3.68kW output, you have to get prior approval from the DNO under the G99 procedure and there may be a charge for network upgrades before you are allowed to connect it.
-
Possible options to increase upstairs floor space?
ProDave replied to flanagaj's topic in New House & Self Build Design
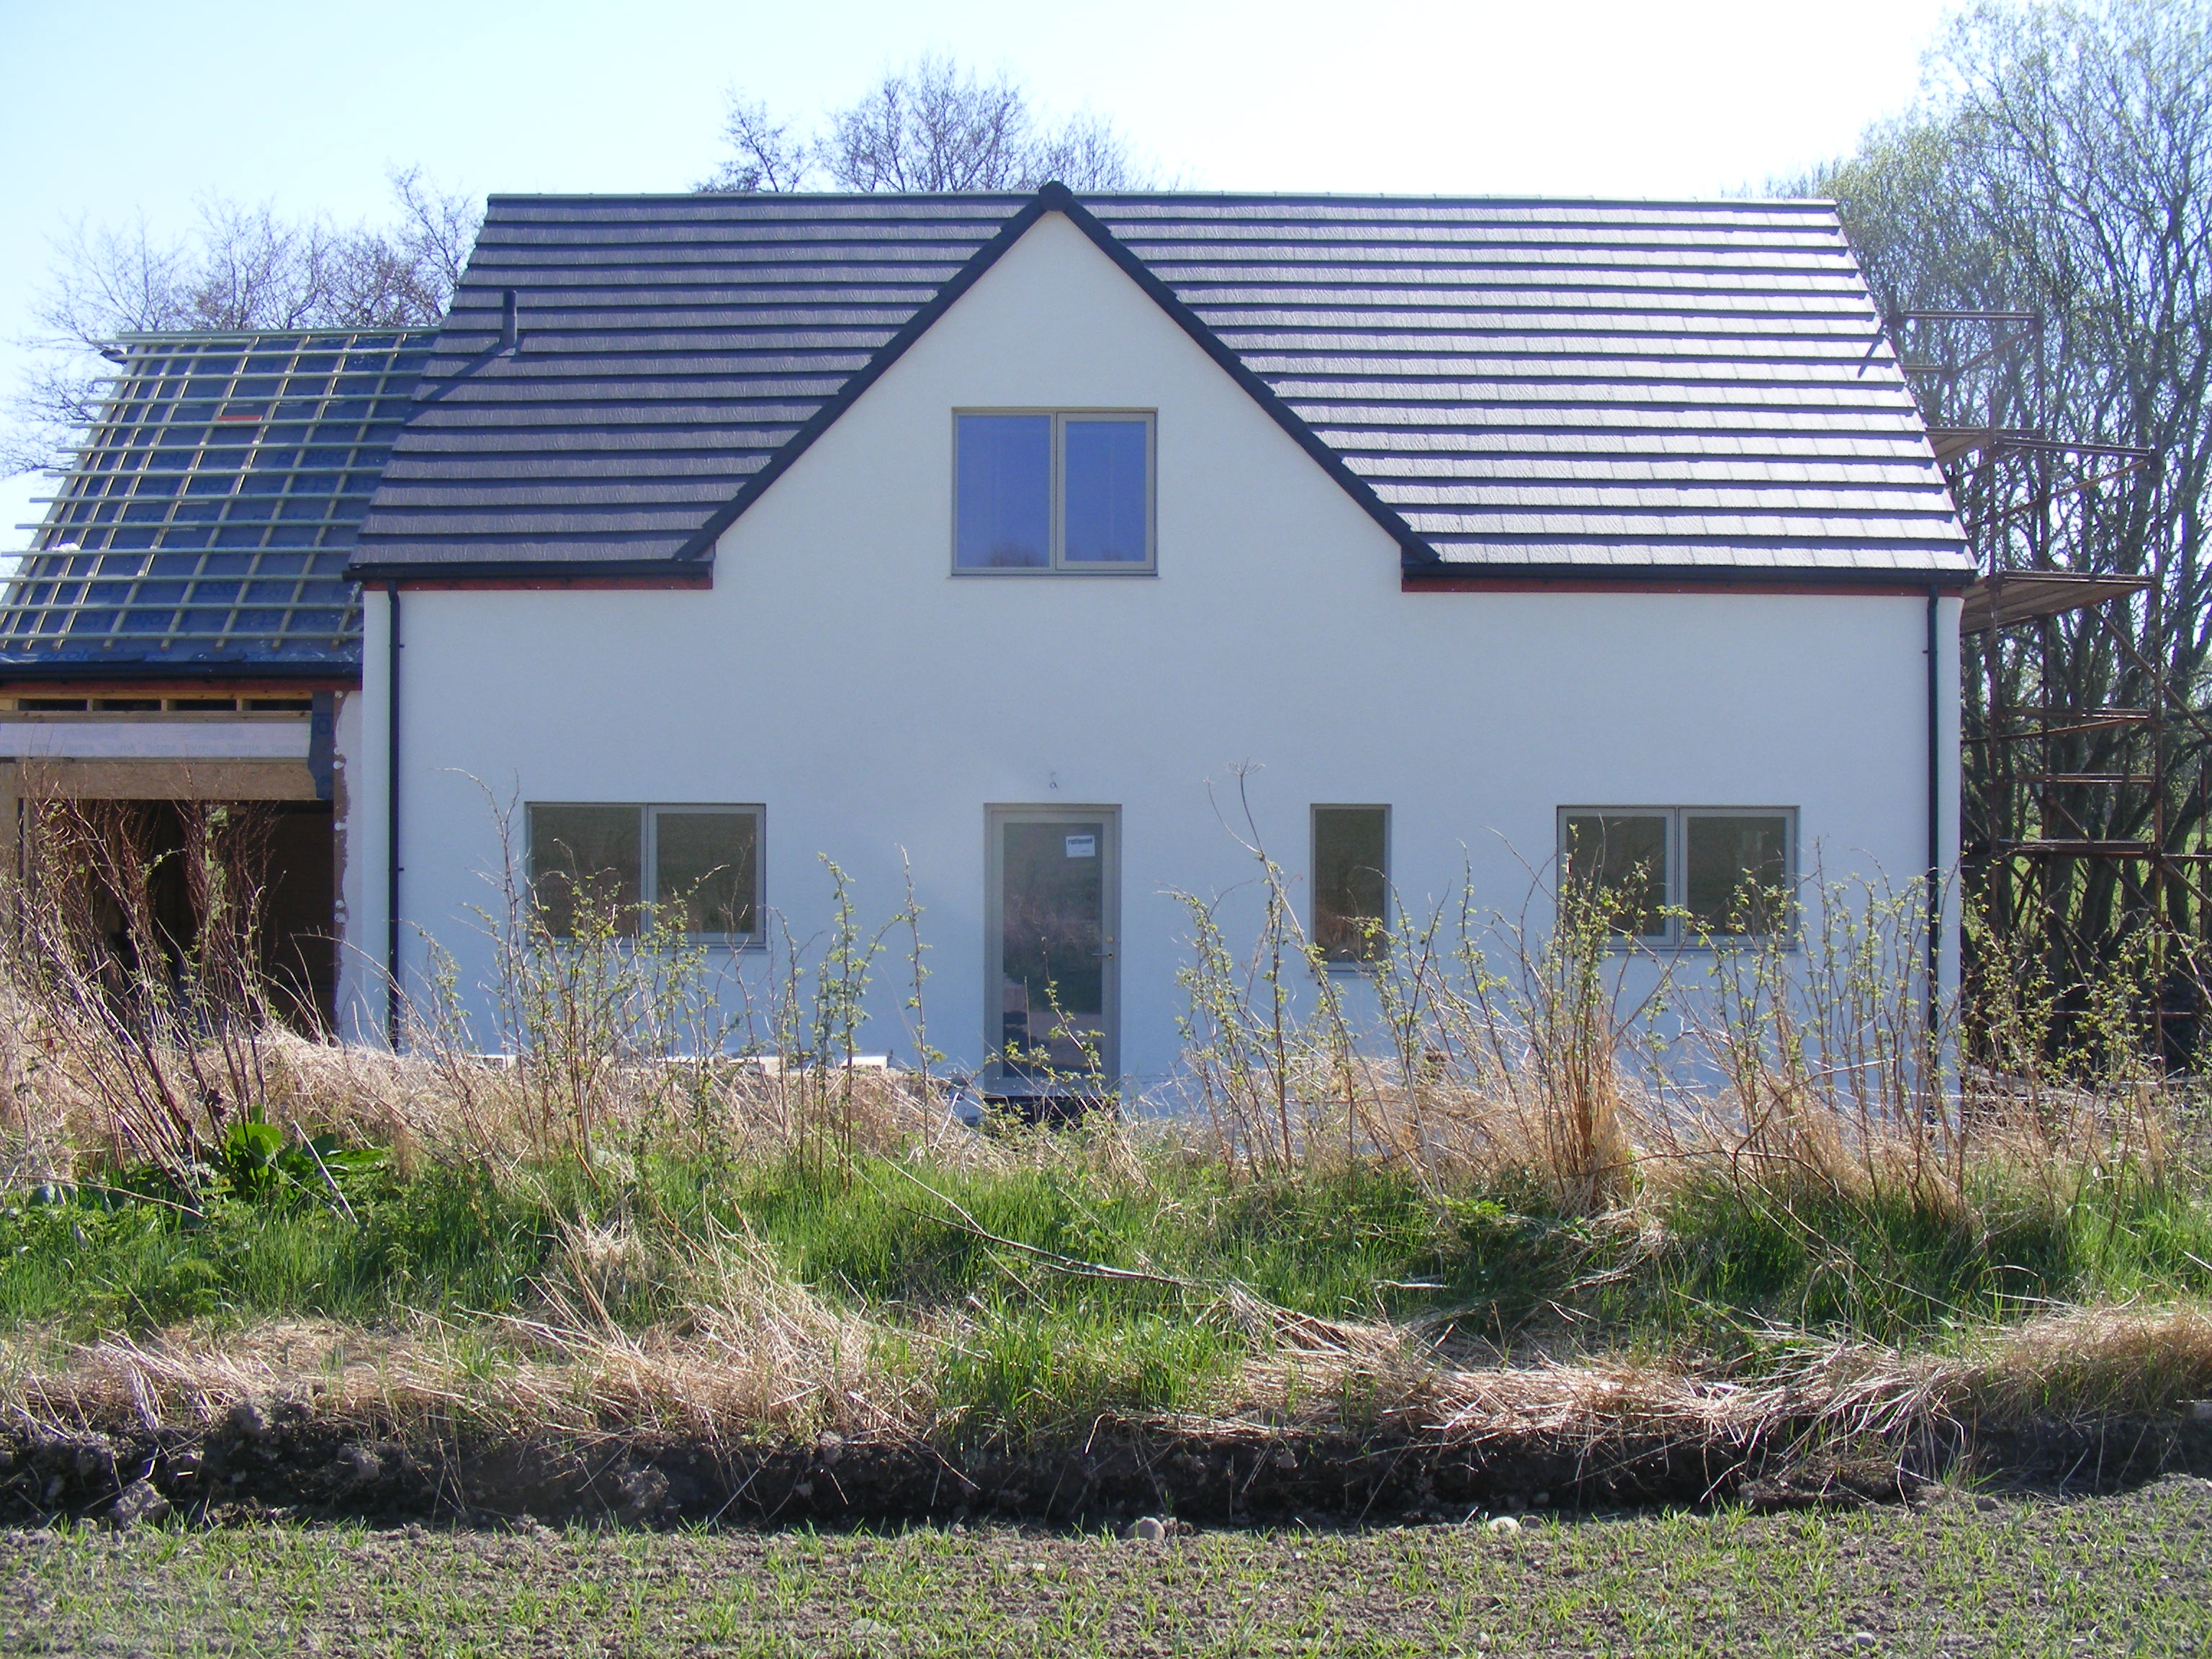
The basic problem is the upstairs is a smaller footprint. It creates a difficult / more expensive to build building which is ironic because the function of that difficulty is a smaller house. I would look at the planning permission carefully including all correspondence documents you can find. Was there a ridge height limit? If not I would re submit making the upstairs the same size as downstairs which not only gives you the extra space you want but makes the building easier to build. The downside is the roof will be deeper and so the ridge height will increase. Looking at the text on the plans, this is already a second application increasing the size of a previous application so look at what the planners say. Is there any reason they would reject it if you tried to enlarge it again? -
Personally I would strip out what you have there right back to the pan and start with a standard pan connector and work from that.
-
Inspection hatch in P5 - how do you do it?
ProDave replied to Digmixfill's topic in General Flooring
At the back edge, the tongue and groove is intact so you slot the groove of the hatch into the fixed tongue of the adjacent board. Then, to get the hatch to drop down, you will find the tongue that sticks out stops it dropping down, so you cut the front off the tongue until it does drop down into place I don't have a picture, but I have done it many times. -
I am making the "box" around the window end flush with the inside face of the cladding, and the cladding then continues down in front of the "box" with the bottom edge of the cladding ending lower than the "box" and cut an an angle with the lower edge t the front.
-
Think about a breathable membrane on the stone wall side of your timber frame, and an air tight membrane on the inside of it.
-
Inspection hatch in P5 - how do you do it?
ProDave replied to Digmixfill's topic in General Flooring
Cut the hatch as you go. Make the hatch a full board width and cut half the tongue off so it can lift out. It it runs joist to joist that's your ends supported as well. -
This is one of those houses that even if you were given a plot of land for free, I doubt you would be able to build it and then sell it (in that location) for more than it cost you to build. There is plenty I don't like about the layout.