

ProDave
-
Posts
30861 -
Joined
-
Last visited
-
Days Won
427
Everything posted by ProDave
-

Rendering over Knauf external insultation
ProDave replied to Walshie's topic in Plastering & Rendering
What type of insulation is it (link?) -
I read the issue as lack of sufficiently talented people. He might be a brilliant joiner, but to design it such that to replace a switch you have to remove the whole think is just lousy design. I am sure you electrician could have designed the location of the switches better than that, but he is not a joiner and not making the cabinet. And this is the problem when you ask 2 different trades to contribute to one finished product. When there is a problem, they will each blame the other and you will get no satisfactory resolution. I know on this job your expectations and standards are high, there is nothing wrong with that, and sadly it seems they have been unable to meet those standards. The only way to determine if it is an installation problem (the "bodged" joint) or an equipment problem (either a dodgy switch or a dodgy LED strip) is by substitution. I bet nobody is offering to do that? In a perfect world you would have been able to get the cabinet, with lights fitted, supplied and installed by one person with a performance guarantee on the end result. And there is you lack of skilled people because nobody would offer that. I am in fact doing this with a neighbour. He has a brilliant German cabinet maker building the shelving unit and I am installing the lighting. We are of course testing the lights are up to expectation before installing them.
-
I am not convinced the issue is the soldered connections instead of a plug in connector. Before installing and connecting the strips I would have given them a dry run on their own to make sure the light they give and the startup characteristics are to your satisfaction before fitting them into the cabinet.
-
Do you also need an arbor to drill a hole with this?
ProDave replied to Adsibob's topic in General Construction Issues
The teeth on that one look a bit coarse to me for cutting metal. -
what professional to use in assessing building plot?
ProDave replied to redjeff's topic in General Construction Issues
You are right to check. Planning means you have a legal right to build a house there. It does not mean it is actually physically possible to do so, or that you can connect to all services to make it habitable. So as well as ground conditions, check you can get at least water and electricity, and if it is a rural plot away from mains drainage, then you will need a treatment plant and some form of soakaway which may require a lot of space. And check the site measurements. It would not be first time a plot turned out to be smaller than on the approved plans and the approved house would not fit on the actual plot. -
It sounds more likely the air bladder in the expansion vessel has failed and on the higher heat cycle it has ran out of expansion capacity and the over pressure valve has opened.
-
Recommend me a ceiling extractor
ProDave replied to Martin-W's topic in Kitchen & Household Appliances
If you hit your head it is too low, no excuse for that with a 3M ceiling height. -
Already been invented. It's called a "hot tub"
-
Your 2 options are a good steady hand and a good paint brush, or a good quality masking tape such as Frog Tape.
-
Percolation Test - local suggestions near Edinburgh?
ProDave replied to Meabh's topic in Rainwater, Guttering & SuDS
If you have the digger there, dig a 1 cubic metre hole in the ground, and then in the bottom of that dig a 300mm cube hole. Fill that small hole with water and time how long it takes for the water to drain away. -
Is a drainage field required for a sewage treatment plant?
ProDave replied to flanagaj's topic in Waste & Sewerage
I had quite a "discussion" with SEPA when I registered the TP on our new build, in fact I actually raised a complaint. The gist of my complaint was I paid what I thought was a high fee just to enter some VERY basic details on a website and immediately got my registration number. They NEVER asked for any details about the treatment plant whatsoever. During this discussion I raised the question as to why there are at least 2 septic tanks discharging into a watercourse near me, and surely now they are registered (both houses recently sold) they should be enforcing their upgrade to a TP. The reply was we only do this in individual cases and only if there is a reported pollution incident. -
If I am reading this right, the ONLY room thermostat is in the hall which is often a cold a draughty place. What is the room temperature in the living rooms? I take it there are no individual room thermostats as is sometimes common with UFH. My point being if the rooms are warm enough, and it is just the silly placing of the only thermostat that is the problem then you need to move the thermostat. You can get wireless thermostats if re routing the wiring is too disruptive.
-
Is a drainage field required for a sewage treatment plant?
ProDave replied to flanagaj's topic in Waste & Sewerage
^^^ ALL that is saying is a TP can discharge to a watercourse, but a ST can't so must drain to a soakaway. If you have no watercourse available it will need a soakaway. In Scotland SEPA are less keen on discharge to a watercourse and only allow it if no suitable land drainage option is available. Yet SEPA are not enforcing existing septic tanks discharging to a watercourse to be upgraded -
Is a drainage field required for a sewage treatment plant?
ProDave replied to flanagaj's topic in Waste & Sewerage
I would organise a percolation test. Only then can you calculate the area of land required, and then with that, and the limiting distances to buildings etc, work out just where it can actually fit on the plot. Our previous house required 85 square metres of soakaway. -
Is a drainage field required for a sewage treatment plant?
ProDave replied to flanagaj's topic in Waste & Sewerage
This should be checked before you bought the plot. You WILL need a drainage field. And depending on the percolation test results it might end up using a lot of land. I do hope you have enough land to accommodate it, or an agreement with a neighbouring land owner for the drainage field to be under their land. It is perfectly possible to get planning permission for a house you cannot actually build or cannot occupy if you cannot get a drainage solution. -
That will be down to the amount and decrement delay of the insulation. Our house is all timber, plenty of insulation but of a type with a slow decrement delay. The house only ever heats up or cools down very slowly. That is not because it has lots of "mass", it doesn't, but because the type of insulation.
-
How much do drywall screws impact insulation value of a wall?
ProDave replied to nostos156's topic in Heat Insulation
With a properly air tight house, very little draught enters the house when you open just one window or door. -
Perhaps the rogue current your smart switch draws reduces once it's storage capacitor is charged, so it is only an issue when the switch is first connected from new?
-
Is this your no neutral smart switch?
-
Proposed design - suggestions gratefully received.
ProDave replied to ChrisInKent's topic in New House & Self Build Design
In many ways your downstairs layout is similar to ours. I suggest you make the living room just a little bigger (shrink the plant room which rarely needs to be large) and then have double doors into the living room directly opposite the double doors into the kitchen / diner. Ours are double glass doors and we like being able to have all the doors open making the whole downstairs feel like one big open space, or closing them when we want it to be snug. Edited to add a picture looking from the kitchen / diner, across the hall and through into the living room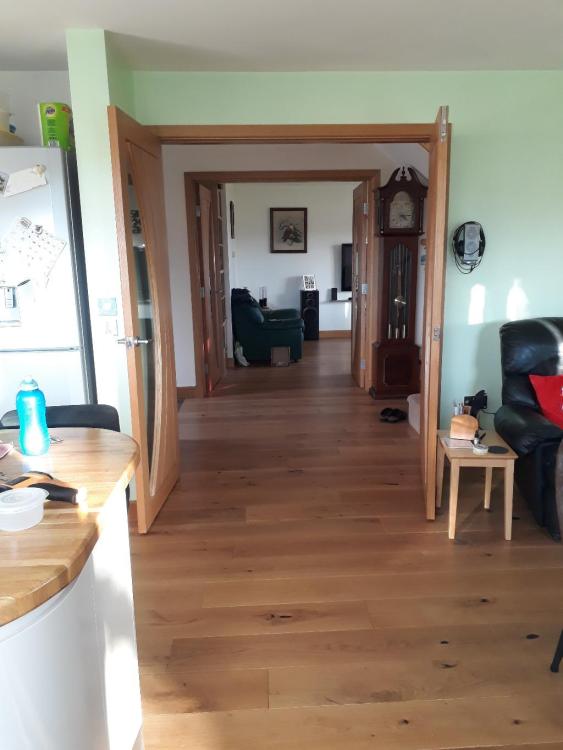
-
Yes BUT. The replacement plant will be electric. That is a lot of extra green electricity needed if it is not to simply shift the emissions to a power station instead. AND that will only recycle old steel, not make new virgin steel from ore. We probably still need that new virgin steel somewhere in the world, so it is almost certain that new steel will just be made somewhere else, another country getting the jobs and the profit, while being "blamed" for the polution. But not to worry, it helps us meet our target so none of that metters.
-
The lack of tundish and discharge pipework is serious. Has the installer signed this off as it is non compliant. Get them back to correct this. What on earth is that rats nest of wiring in the bottom, did they do that? It sounds like your mains supply cannot support much flow. You will be lucky to get 2 simultaneous showers from that. Perhaps a mains accumulator would solve that?
-
I did my own. I bought an old Komatsu 3ton tracked digger. Digging foundations needs a bit of thought as you want to dig them in an order that avoids you tracking back over a finished trench, and working out how you are going to shift the excavated soil and where are you going to store it for re use or muck away. And the depth is not always constant, it is usually once you pass through the top soil into the harder sub soil, which may not be the same depth all over especially on a sloping site. There you want to step the bottom of the trench not make it sloping. Drains are easy it's the working out how to get a downhill fall all the way without it being too shallow or too deep. That is something you need to work out on paper, not in the seat of the digger. Also be sure before you go down this route your builder is happy for you to do this work.
-
I lie somewhere between your view and that of the climate change fanatics. It makes a lot of sense to move away from excessive oil usage for no other reason that it will run out one day. So moving what we can to wind generated electricity is perfectly logical, And if that gives cleaner air to breath, then that is good as well. I do love my new house for it's low energy usage and lovely internal climate, near constant temperature, constant fresh air, low humidity, no damp or condensation etc. I really would not want to go back to the 1930's house I had that was cold and damp and frightfully hard to heat, or even the 1980's house I had after that, that was still hard to heat but at least it was not damp. Most people seem to worry how are they going to afford to heat their home. Heating is a minority of my energy usage. I do honestly hope EV's will mature and eventually I will drive one, but that may not be until I have ticked off most of my bucket list and am too old and decrepit to be dragging a tin tent behind me around the countryside (some will say that day can't come soon enough)
-
Well an update. The oven was due another clean. SWMBO works in a cafe and tells me of their oven cleaner (just branded as M3) works like you expect, squirt it on, wait a bit, wipe it off. I have been unable to identify any "M3" oven cleaner so I took a punt on this one on ebay https://www.ebay.co.uk/itm/404801471547 It is branded as "K3" (anyone know exactly what these mean) SWMBO says it looks and smells like the M3 stuff they use. Today was the day to try it, and almost effortly I have a clean oven. Just why is it all the stuff on sale to the public in the supermarkets is such ineffective rubbish when proper cleaners are available?



