

Stones
-
Posts
3761 -
Joined
-
Last visited
-
Days Won
23
Everything posted by Stones
-
 It is my intention to order my MVHR unit and ductwork by the end of the week. The ventilation plan (kindly provided by BPC before any order has been placed - outstanding service from the team there, extract of the relevant area attached) shows the air intake and exhaust vents positioned on the same length of wall in the soffit / overhang. MVHR vent position.pdf Unfortunately, there are a couple of issues in respect of the position as currently marked. The first is that I have no soffit / overhang to speak of (the trusses currently being fitted do overhang the ICF walls as they are by 195mm, but the walls still have a 100mm layer of EWI, batten and timber cladding to be fitted on). The second is that the vents are currently shown on the prevailing windward side of the house. As I see it I have two options in respect of the soffit / overhang issue. I could bring the intake and exhaust air ducts out of the insulated loft/service space I am creating, down the outer face of the ICF block wall before the EWI and timber cladding goes on, terminate with a 90 degree bend and finish with a grille or hood once the EWI has been fitted around the ducts and the cladding is on, even if it meant creating a decorative cladding box around the duct to give me sufficient depth to return the 90 degree bend out . The second option is to put both ducts through the roof. Ultimately, whatever I do means penetrating the insulated layer. The issue of both vents being on the windward side seems easy to solve, by moving them to the leeward side, except this is where our entrance door is, and I'm not sure how sensible it is to terminate the ducts, either side of our door. There is also the potential issue of how close the vents will be to each other (duct centres of 1.8m) Any thoughts?
 -
One of my friends is facing off part of his build with stone (small stone, 300 / 400 mm in length, 50 / 100 mm in height, all pre-cut so they are approx 100mm in depth). The guys he has laying the stone get between 2 and 3 sq metres done a day . Perhaps puts £125 / m2 in some context?
-
I must admit when we did see the finished floated slab, we did talk about using it (properly sealed) as a finished floor surface, but it's a bit too industrial looking for our liking. We may yet retain it in the utility room, could work quite well in there.
-
Heat loss and running cost
Stones replied to Jeremy Harris's topic in Energy Efficient & Sustainable Design Concepts
I'm actively considering the spec of the insulation to the vaulted ceiling in my build. The current spec is for U value of 0.1 but changing insulation type gives me a U value of 0.14, is cheaper in terms of materials and installation time. I'm waiting on a revised price from the builder to see what the price difference is so I can work out whether it is worth spending the extra to achieve the £17 a year saving in heating costs that I gain with the 0.1 U value roof. -
SuDS and Off Mains Drainage : beware, here be dragons
Stones replied to ToughButterCup's topic in Rainwater, Guttering & SuDS
I've had similar experiences with SEPA in the past as well. In a way, I understand their logic, not wanting to risk adding pollution from a poorly maintained system into a watercourse, however, the fact that you can do it so easily elsewhere in the UK, just bonkers. Interestingly, the system (up here at least) for applying for consent to discharge has recently changed. When I applied late last year, all I was asked to provide was a grid reference for the soakaway position. No requirement for treatment data / figures as per my last house / application - in fact SEPA were happy to accept aseptic tank if that is what I wanted to install! -
As you know, we are building with ICF as well. We've decided to go with what the builder specs on all his houses, a spray on self cleaning silicone based render. I'll try and find out the manufacturer / product name. Best described as a fairly smooth finish with a bit of grit and texture (1 - 2 mm sized) in it. The other ICF contractor up here finishes houses with dry dash, and by chance I saw the render going on. As Dave describes, base coat goes on an a fibre glass mesh pressed into it, followed by primer then a top coat which is dry dashed. The chap doing the render said that although expensive (compared to sand / cement render) it was far more flexible and therefore robust in the long term. I think you can achieve any finish you want, but I think ultimately it will be a render system you need rather than sand / cement based.
-
Thanks chaps. It's clear from watching the builders that they are very good at what they do. They have been building with this system for the past 6 or so years, and have as Dave indicates, got very proficient at doing it. Of course, having the right kit for the job makes it seem almost effortless. Having never built with ICF before, ( having always built with timber frame ), I have to say I am a complete convert. I'm finding the whole process of how the ICF system goes together really interesting, and I'm glad others are as well. It certainly is a very robust structure! To answer Dave's comment about the fixings used to secure the bracing to the slab, they used 50mm fixings and a spacer (10mm nut). Once the fixing plate of the brace is taken into account, the fixings only penetrate the slab to a depth of 35mm, well above the UFH pipes (100mm slab). At this stage I have no idea how the fixing holes will be filled. The slab will be covered with a mix of tile and engineered timber flooring so we aren't going to see anything.
-
That's what I did in my last house and it worked for me. One of my friends doing a whole house low energy refurb did likewise and hasn't had any issues either.
-
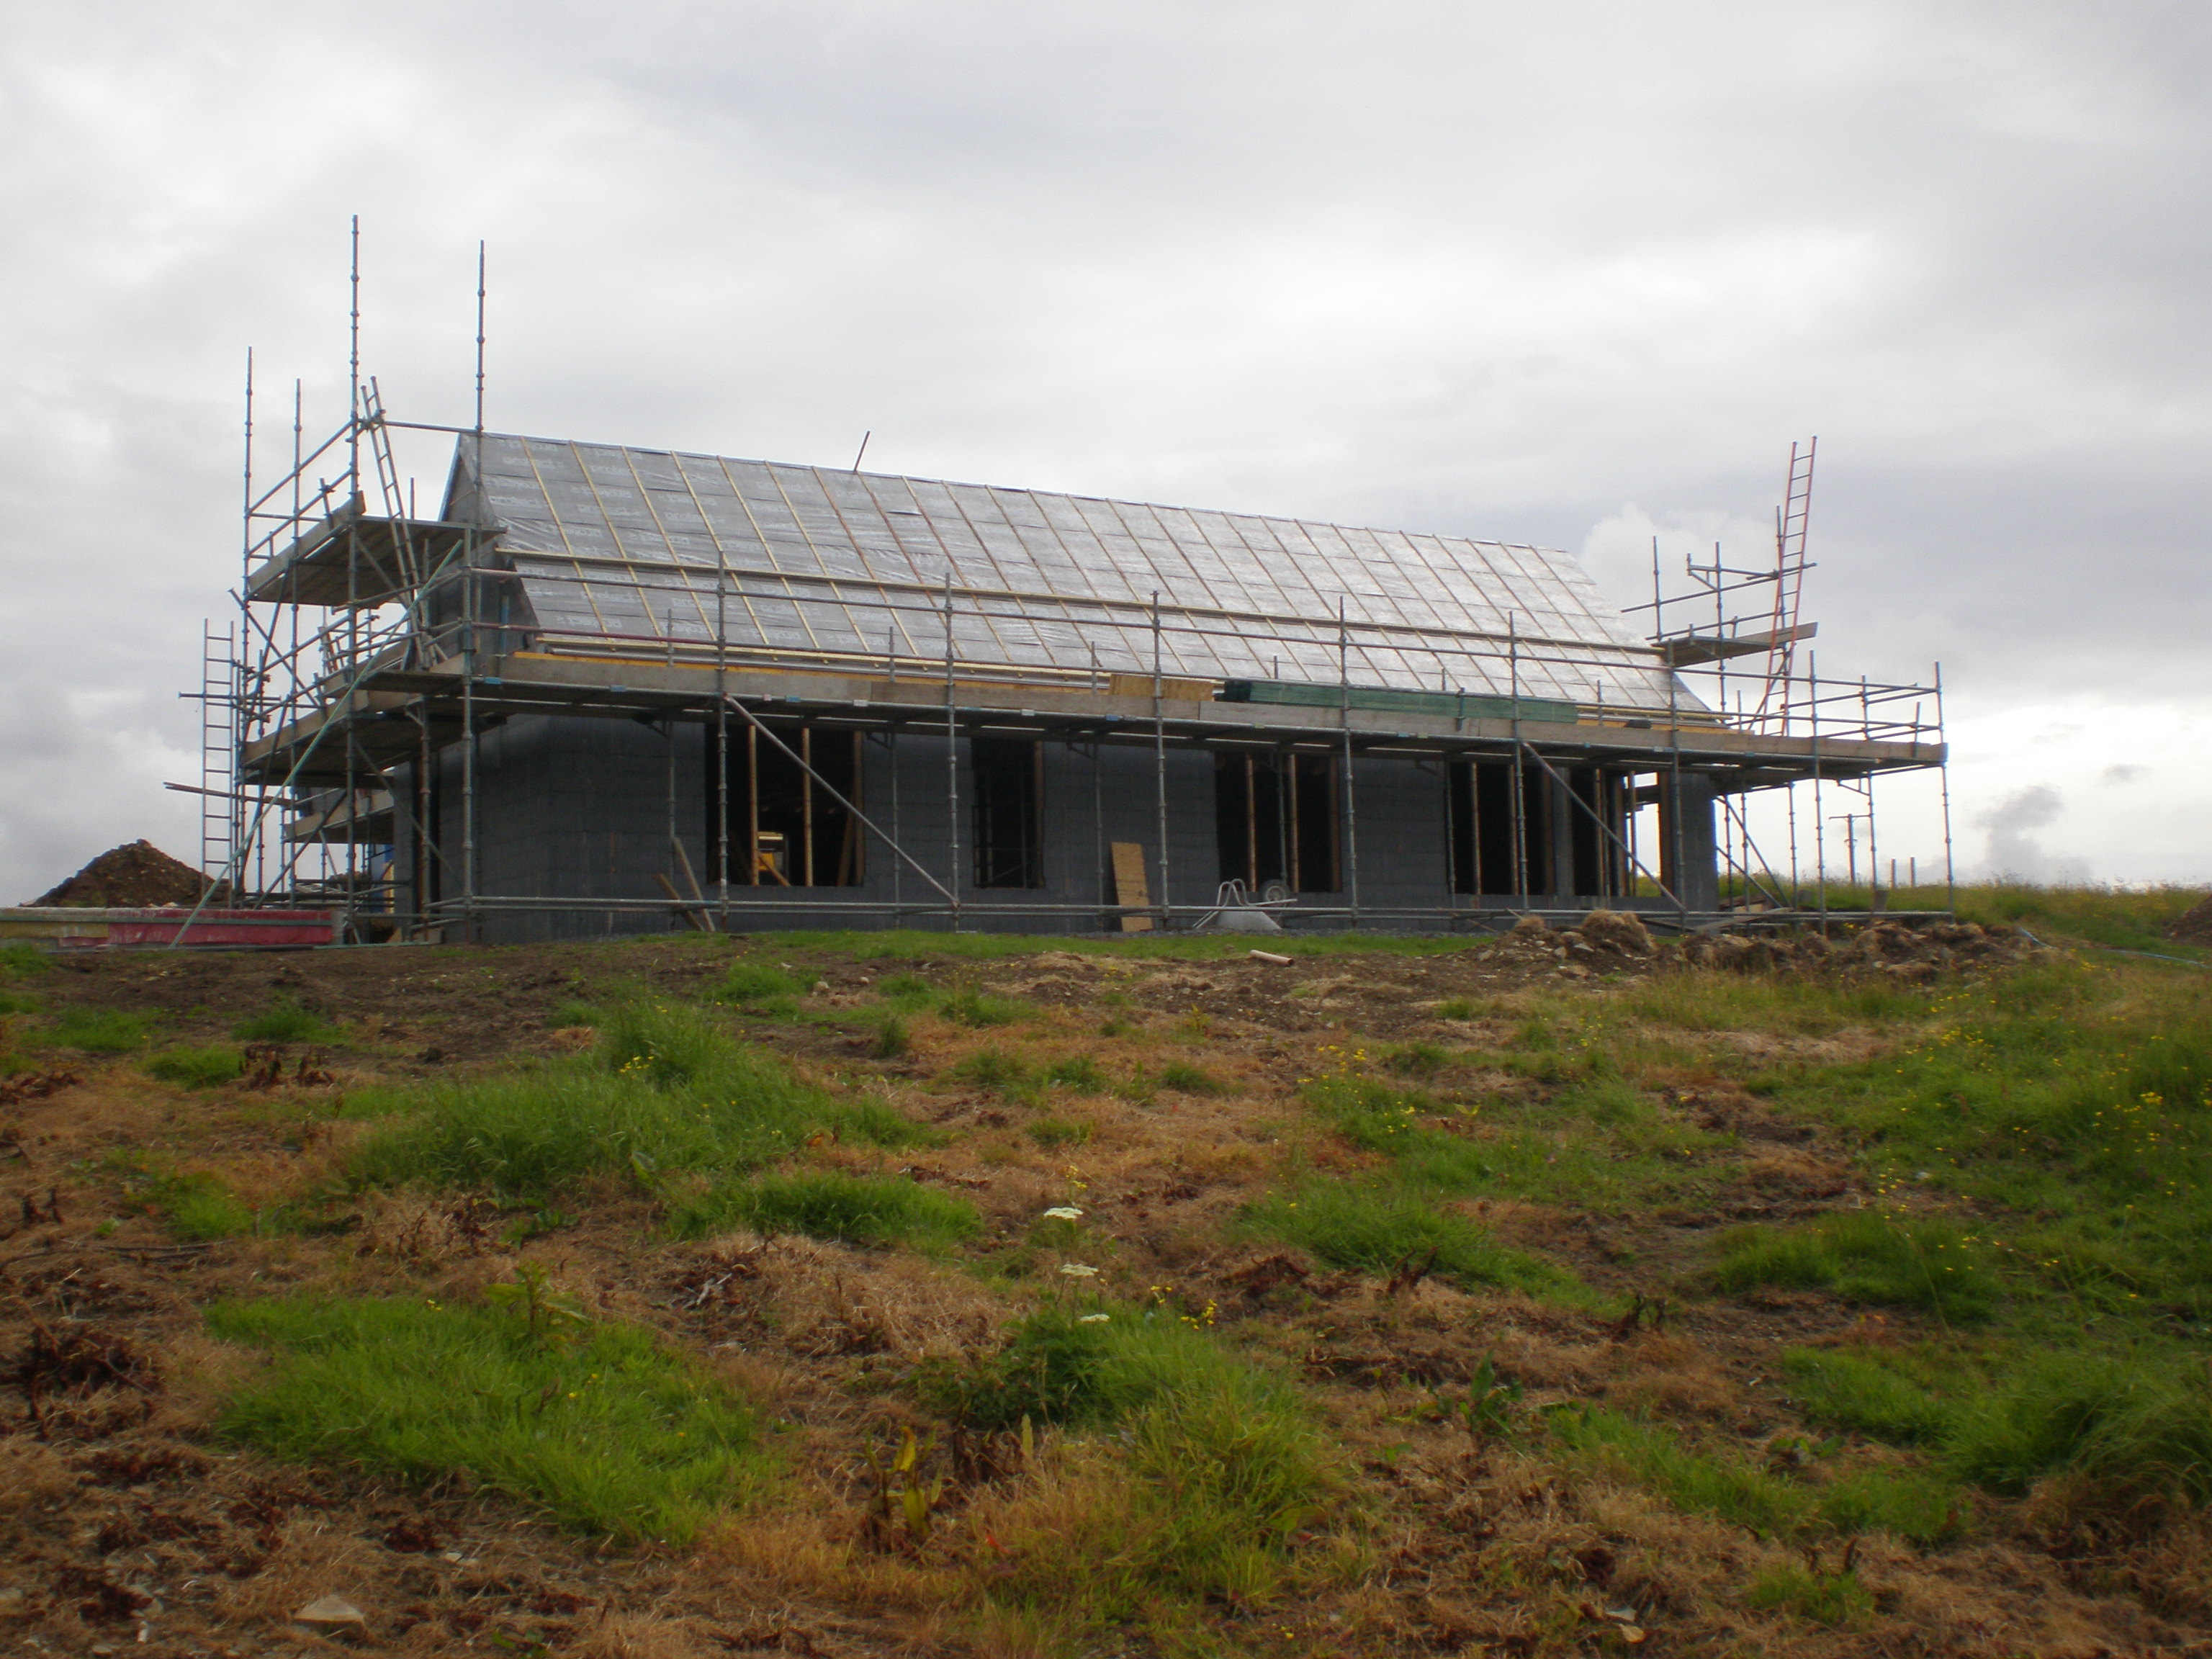
A busy week on site has seen us transition from foundations to solid structure. First order of the day, getting prepared - ICF blocks, braces, window formers and other equipment moved onto the slab. Building the walls up - basically a giant lego kit! Blockwork finished and scaffolding going up. Although the ICF blocks interlock with each other, the walls themselves (6 blocks high) are subject to a lot of movement. To counter this and secure them for the concrete pour, adjustable braces are fixed to the slab, and to tracks bolted into the plastic ties that form the core of the ICF block. Timber sheets are bolted over internal and external corners for additional strengthening, Timber window formers are fixed into place inside and out to prevent movement during the pour. Rebar is used to reinforce around openings; and finally, any gaps or damage to the ICF blockwork is sealed with expanding foam; Erecting the ICF took two days, with all the preparations taking another two. Concrete was finally poured on day five, using exactly the same method as per the foundations. A hoistable skip attached to a crane, was filled with steel fibre reinforced concrete. The builders worked their way around the walls in three circuits, filling to a depth of 2 1/2 blocks on the first two passes, and finishing the depth of the last block on the final pass. Again the same hopper was used to run along the top of the block wall and direct the concrete from the skip outlet down into the wall. A vibrating poker was used to help settle the concrete. A lot of work went into getting the concrete to flow around the window openings. To ensure full fill beneath the windows, the builders cored holes in the window formers and manually topped up the concrete in areas where required, again using the vibrating poker to ensure the concrete filled any gaps and settled. Having filled the ICF core, the final things to be done were floating the surface of the concrete in readiness for the wall plate, inserting lengths of rebar into the gables in readiness for the final sections of ICF being built when the roof goes on, and checking all the walls were true. Two separate rounds of checking the walls and adjusting the bracing were made, to ensure any movement in the curing process was countered. In this picture you can see the curing process in action - water from the concrete being forced out of the joints in the blockwork; Around 22 m3 of concrete went into the walls. The builder had ordered an additional 1 m3 but it wasn't wasted, being deposited in the garage foundation (it's a useful tip - have somewhere prepared where you can deposit / use any spare concrete) All being well, the roof goes up this week.
-
I absent myself for a few hours and you lot end up discussing wobbly walls and squint extractor fans! Focus people
-
And there in a nut shell is the problem for any forum, members trying to convey the right tone in written form. It's not easy getting it right 100% of the time, and each of us will no doubt have caused offence or upset or been offended or upset ourselves in equal measure. We are after all, only human. I was chatting to a fellow self builder earlier tonight, discussing amongst other things how frustrating it can be researching build techniques online and there being so many different ways to do things, and so many different points of view, as it's only natural for members to make comments which validate their own choices. I've taken the view that there is no such thing as a silly question, as it such questions which end up generating thought provoking discussion and from time to time innovative solutions. I'm on my sixth build and still learning...
-
But BC don't really inspect the build, or at least not in the same way as the warranty / PI providers do.
-
It's maybe not a fair comparison, but when we had our EAHP, it would freeze up after 45 minutes of operating. It would then require a full 15 minutes of warm household air (circa 20C) flowing over the evaporator to defrost it. I'm not convinced that an ASHP positioned outside would defrost that quickly. UVC - unvented cylinder Interestingly, when I last costed this out, I came to the conclusion that the overall cost of providing DHW by this method (so assuming normal tariff electricity for ASHP and inline boost) was the same as using off peak electricity to heat up a cylinder of DHW.
-
4 of our builds were NHBC (as the builders we used were NHBC registered). 1 of our builds was signed off using a structural engineers PI certificate, valid for 6 years or 3 owners. We had no trouble selling that house, as at the end of the day, the buyers lender had a bit of paper that certified the house had been built according to the approved plans. This is the route we are using on this build. For a few hundred pounds, we'll have a PI certificate from an inspecting surveyor to confirm the house has been built according to the approved plans. My builder, who does the odd speculative development, uses this method for his builds and has not had an issue selling.
-
BT/Openreach New Connection
Stones replied to worldwidewebs's topic in General Self Build & DIY Discussion
Openreach have (so far) been great on mybuild. I filled out the form via Openreach New Sites, had my acknowledgement within a day giving the local guy's contact number. The local chap told me where my connection would be made and asked me to call back a week or so before the digger was due on site. I did so, he came out the following day, and marked the position of the cable I would be connecting to. He came back out the day the digger started with some split ducts to put around the cable that runs across my driveway entrance, and left me a roll of SWA cable to run into the house. -
Walls to be finished with taped and filled plasterboard on battens to form service void. Useful suggestion re filling the grooves. I'll be speaking to the builder in the next couple of days and report back on what he suggests.
-
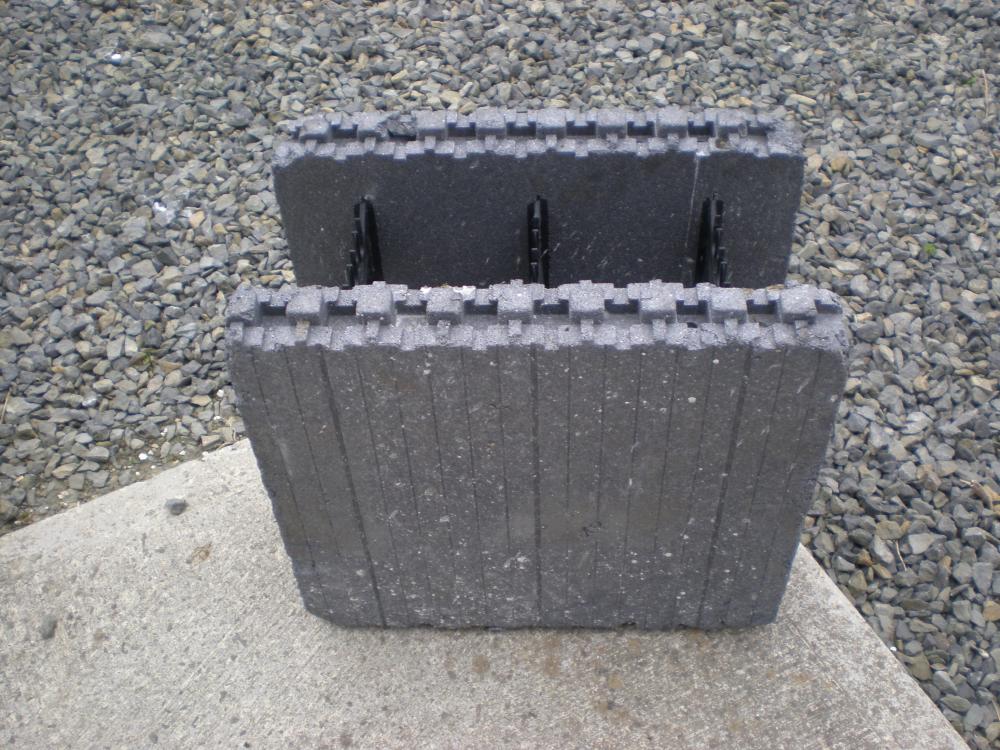
Good point - Not the best of pictures, but the block has grooves on the surface. 0.5mm for the thinner grooves, 1.5mm for the wider groove. How forgiving are the airtightness tapes - they obviously cope with OSB ?
-
I used a multifoil insulation on one of my builds, because at the time, it was billed as the best thing since sliced bread. The performance was worse (in terms of amount of energy used for heating) than a previous house which had 140mm of mineral wool in the coombs and loft. You may think this is subjective, but is our experience. Of course there are many reasons why this could have been the case - poorly fitted, areas missed etc but the interesting thing was that when we sold that house and bought our next one (from a small developer) they had to change from proposed multifoil insulation back to mineral wool as NHBC withdrew their support for the product and said they wouldn't cover the house if it were installed.
-
Nobody? I feel so alone...
-
Do you mind saying how much you paid for the unit you installed?
-
Critical as such detailing is, with various other build issues, and all the time spent getting the forum up and running, I've overlooked one critical junction Thankfully I am still at the stage where I can do something about it. Our house is single storey, 2/3 of which has vaulted ceilings, the remaining 1/3 being standard height (2.4m) ceilings. Vaulted ceiling current spec, Roof tiles, tile battens proctor roofshield breather membrane, OSB, 200mm PU between rafters, 25mm across rafters. PU joints to be taped and sealed to ICF block at wall plate junction. Under the ridge beam we have a service void for lights, cables and ductwork. Service void to external walls created by battens fixed to interior face of ICF block. I am debating whether to swap out the PU between the rafters with earthwool batts and increase the across rafter PU depth, but regardless we would still have the continuous layer of PU taped and sealed. So far so good. Normal ceiling current spec, Roof tiles, tile battens, OSB, ventilated roof space, 450mm earthwool between and over trusses, plasterboard. I'm happy enough that the total roof build up will be okay in terms of condensation risk, and with the level of insulation it will be warm house, but even paying attention to ceiling light penetrations, I can see the glaring omission in terms of the junction between ceiling plasterboard and ICF block walls. As there is no VCL or airtightness membrane on the ICF walls, there is nothing to fold/lap behind the ceiling plasterboard to close the service void. In my last house, the reflective VCL from the timber frame was folded and fixed to the underside of the trusses and ceiling battens, a bead of silicone used to form a gasket and plasterboard fixed thereon, the ceiling subsequently taped and filled. Three options. Do nothing and hope for the best. Run a strip of of membrane around the perimeter of the ceiling in question, tape one edge to the ICF block walls and fold / clamp it under the ceiling plasterboard as per the detail in my last house. Run a continuous AVCL membrane on the underside of the roof trusses to meet the walls, fold down and tape to ICF block. I'm not that keen on option 1, option 2 seems like a faff but would leave the roof design otherwise unchanged. Option 3 seems to be the most straightforward in terms of ease of installation and being able to get properly sealed up. Not sure whether I can just fit the plasterboard directly on top of the AVCL or whether I would need to form a ceiling service void with battens to the underside of the trusses. For any penetrations through the ceiling I'm planning to use offcuts of EPDM that I have to form 'grommits' which I can tape down to the plasterboard (if option 2) or the AVCL (if option 3) Any thoughts or suggestions?
-
I understand that. My question was how the performance of a TMV would be affected given a rise in the temp of a preheated cold supply. As Peter says, I suppose all that happens is the valve will take less hot water, and more preheated cold to achieve the output temperature. Is preheating the cold supply direct to the TMV the best way to it (in applications where you are not using a Sunamp or TS)? Any reason why you couldn't preheat the cold feed into a UVC to assist in its replenishment as DHW is drawn off?
-
I can see the benefit of preheating input water into a point of use heater for your hot water, but lets assume you are taking DHW from a cylinder to a thermostatic shower valve. Will raising the temperature of the cold supply have an impact on the operation of the thermostatic mixer?
-
Retrospective planning permission for oversized porch
Stones replied to VickyHodges's topic in Planning Permission
Your local authority will have a planning enforcement charter setting out the processes and options they can progress in relation to breaches of planning. Retrospective planning applications are one way of making such unauthorised developments regular. As Jeremy says, the only thing that will be considered is 'does this application comply with planning policy and guidance' (all of which will be available on request / online). The fact that the structure is already there, whether partially built or completed, (and the fact you don't like it), are irrelevant. You will have your opportunity to comment on the planning application. As has been previously stated, this is where you need to highlight any failure to comply with planning policy and guidance, or show how the impact of the development on you - loss of light, privacy, traffic concerns etc. -
MVHR with active cooling
Stones replied to worldwidewebs's topic in Mechanical Ventilation with Heat Recovery (MVHR)
After working out the fairly minimal heating/cooling capability of a MVHR duct heater/cooler I had come to the conclusion that it wasn't worth installing, but as a precaution I would make provision for retrofitting one at a later date if I found it was required. From what I've read so far about fan coil units, they look ideal for what I want, and the really good news is that the pipework and wiring provision that I was planning doesn't need to change.

