Carrerahill
-
Posts
2132 -
Joined
-
Last visited
-
Days Won
10
Everything posted by Carrerahill
-
Fireplace removed. How to fill?
Carrerahill replied to Invader75's topic in Stoves, Fires & Fireplaces
I tend to use the aircrete blocks (same size and shape as a concrete block but, lightweight and can be cut with a hand saw to the awkward shape). Go for a fairly weak mortar mix, particularly where it joins the existing brick so someone can if they want, reinstate the lovely old feature with minimum damage to the brick. Just brick it up and leave an air-vent towards the bottom and put a little vent over it. No need to plaster or anything. Don't be tempted to use timber - it can get damp and rot as well as giving creepy crawlies a nice place to live, although the block can get damp it won't rot and will dry out well. Remember to get the chimney capped with a proper vent cap - I cannot stress how important this is. -
If it is going to come out the WC and into the existing vertical soil pipe then you would not need any AAV or vents as the existing one would do all this. If you are going to tie into another section of the soil pipe not served by upstairs vent then you will need to consider AAV. I have also seen a vent done with a reduction boss, and run out on 50mm, my building control officer is letting me alter the vent to our soil pipe as I said I don't want it going through the roof of our extension, so it is going to be reduced in height then taken at a 90° in the new extension ceiling void, and then go out the side of the extension to a wall vent.
-
Having been through this several times before I think I would redevelop it a fair bit but I would, as usual, do much of it myself. I would also try and keep most of the garden on the same level just graded, walls and changing levels and things are a pest in this size of site. Looking at your site I would be tempted not to lower that drive way (not sure what you are going to level and would you still be able to drive a car into the garage?) as although I am sure it would be "fine", lowering a drive and building a retaining wall really ought to be carefully considered and designed, if a landscaper or builder claims they can do it, and I am sure they can, I doubt they will actually design it as such and just go and build something, potentially leaving you with a mess, or potentially dangerous development. Owing to the proximity to the house I would not want to work on any major level changes as you could create issues with the retaining wall potentially taking on ground shift forces or if very well built ground heave could occur as the expansion zone has been reduced - you then end up with cracked walls, potentially foundation issues and the list goes on. So you ask what we would do, well here is my (albeit not knowing how you use your space, access requirements etc. utility routes...) fairly quickly thought up proposal: It looks like there is a slight level increase before it dips down to the garage (is that what you meant by level off?), I'd hire a 1.5ton excavator (and driver if you think you will just make it worse!). I'd strip the lawn's and create a pile of the good topsoil - get as close to the perimeter wall as you can but be mindful of the founds, I would not go deeper than the founds, I would probably stay about 50-75mm above them. I would also dig some deeper areas in the middle of the lawn, big square holes that bricks can be carefully packed into. Try and retain mature shrubs and the little tree because its nice to keep some of it, I hate seeing total destruction of a site. I would then pull down the driveway retaining walls and fill the holes you have dug - do it neatly and pack the brick in like a big thick wall and you will not have any subsidence issues. Break up the concrete into fairly small pieces and place this on the inside of the perimeter wall down at the subsoil level that you have just exposed - you don't want to load the wall up too much, but this layer of concrete will allow drainage and help stop the ground pushing on the wall, I would also probably dump in a ton of pea gravel and create a drainage boundary potentially even creating a gravel boundary so the new lawn isn't hard up against the wall and can't push on it. As a detail you can research this. I used a backfill of lean concrete to create a retaining wall protection zone - as said lots of details on Google of how to protect your wall and each type and soil type calls for different approaches, but of course it depends how much higher you go, you could grade it off to about the same level . Now, depending on what is under that concrete will depend how to proceed, if it is laid on good hardcore, or crush or something then leave it alone, but scrape the high spot and lower it beyond the finished level you want. Think of the make up, if you go sets or slabs etc, workout the makeup, i.e. good base of hardcore compacted, blinding compacted, then cement/sand mix plus height of paving product. If what is under the concrete is poor then scrape down about 150mm and drag this out onto your lawn site, spread as evenly as you can and drive the excavator over the site to help pack it as you go. You can then bring in hardcore and makeup the ground for your drive - hire a compactor for the weekend and whack it as you go, depends what you are left with but you could need 6-8 tons of hardcore, ideally arrange for it to come when you have the digger. Now depending on where all the brick and concrete and scraping got you will depend how to move next, if the site is looking a lot more level and will nicely grade level or with a slight fall to the wall for a new lawn then great, if not you need to bring in some more material. Once you have your sub-layer level sorted pull all the topsoil from the pile down and grade it out over the site, hopefully you now have a much more level site and will not actually need a new retaining wall between lawn and drive if you get it right, and I would for sure be keeping the lawn's it's a nice thing, so many people trash gardens with paving the whole bloody lot. Concrete jungle. Horrid! So ideally after a weekends work you have a slightly raised lawn area, slightly lowered drive area, compacted hardcore and you are ready to do your drive - at that I would possibly be tempted to pay someone to lay the drive but it depends on your time, how many able friends you have. With the drive done you can then lay a new lawn and plant up the garden as you want. If you also want to change the perimeter wall then you could look to re-face it if it is in good condition, it could be smoothed out and rendered but it looks pretty good as it is. and is in-keeping with the rest of your street.
-
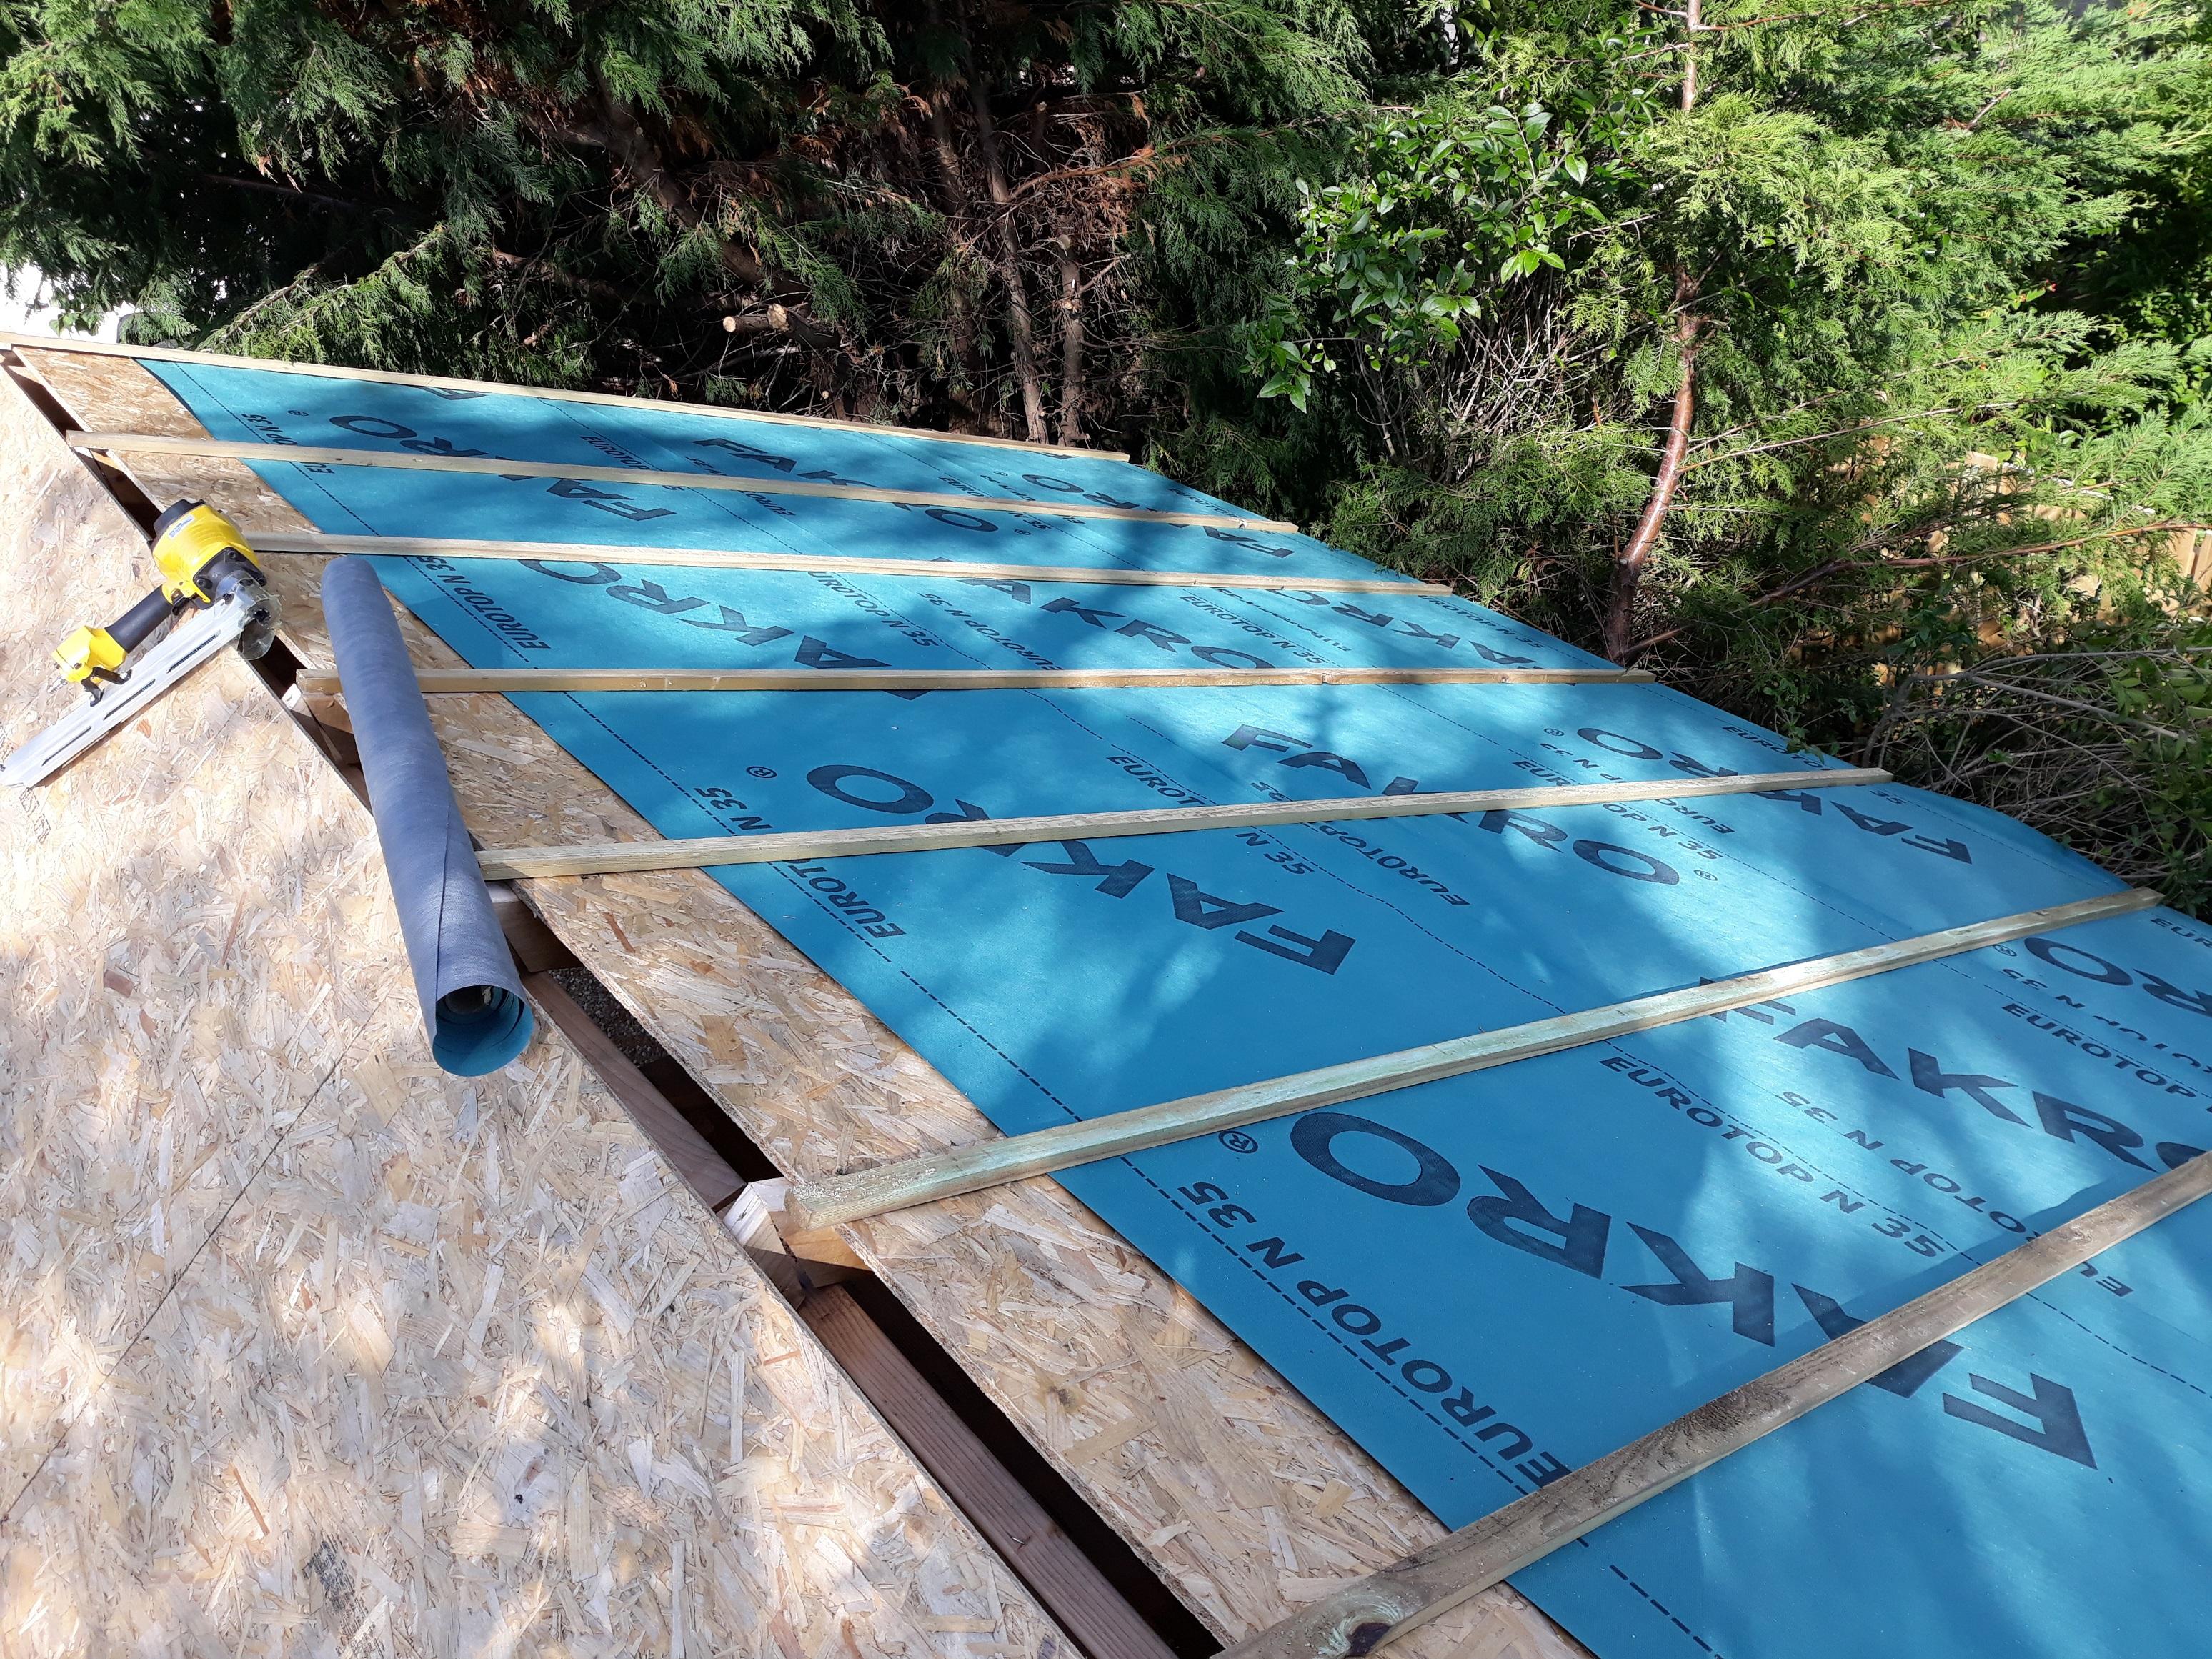
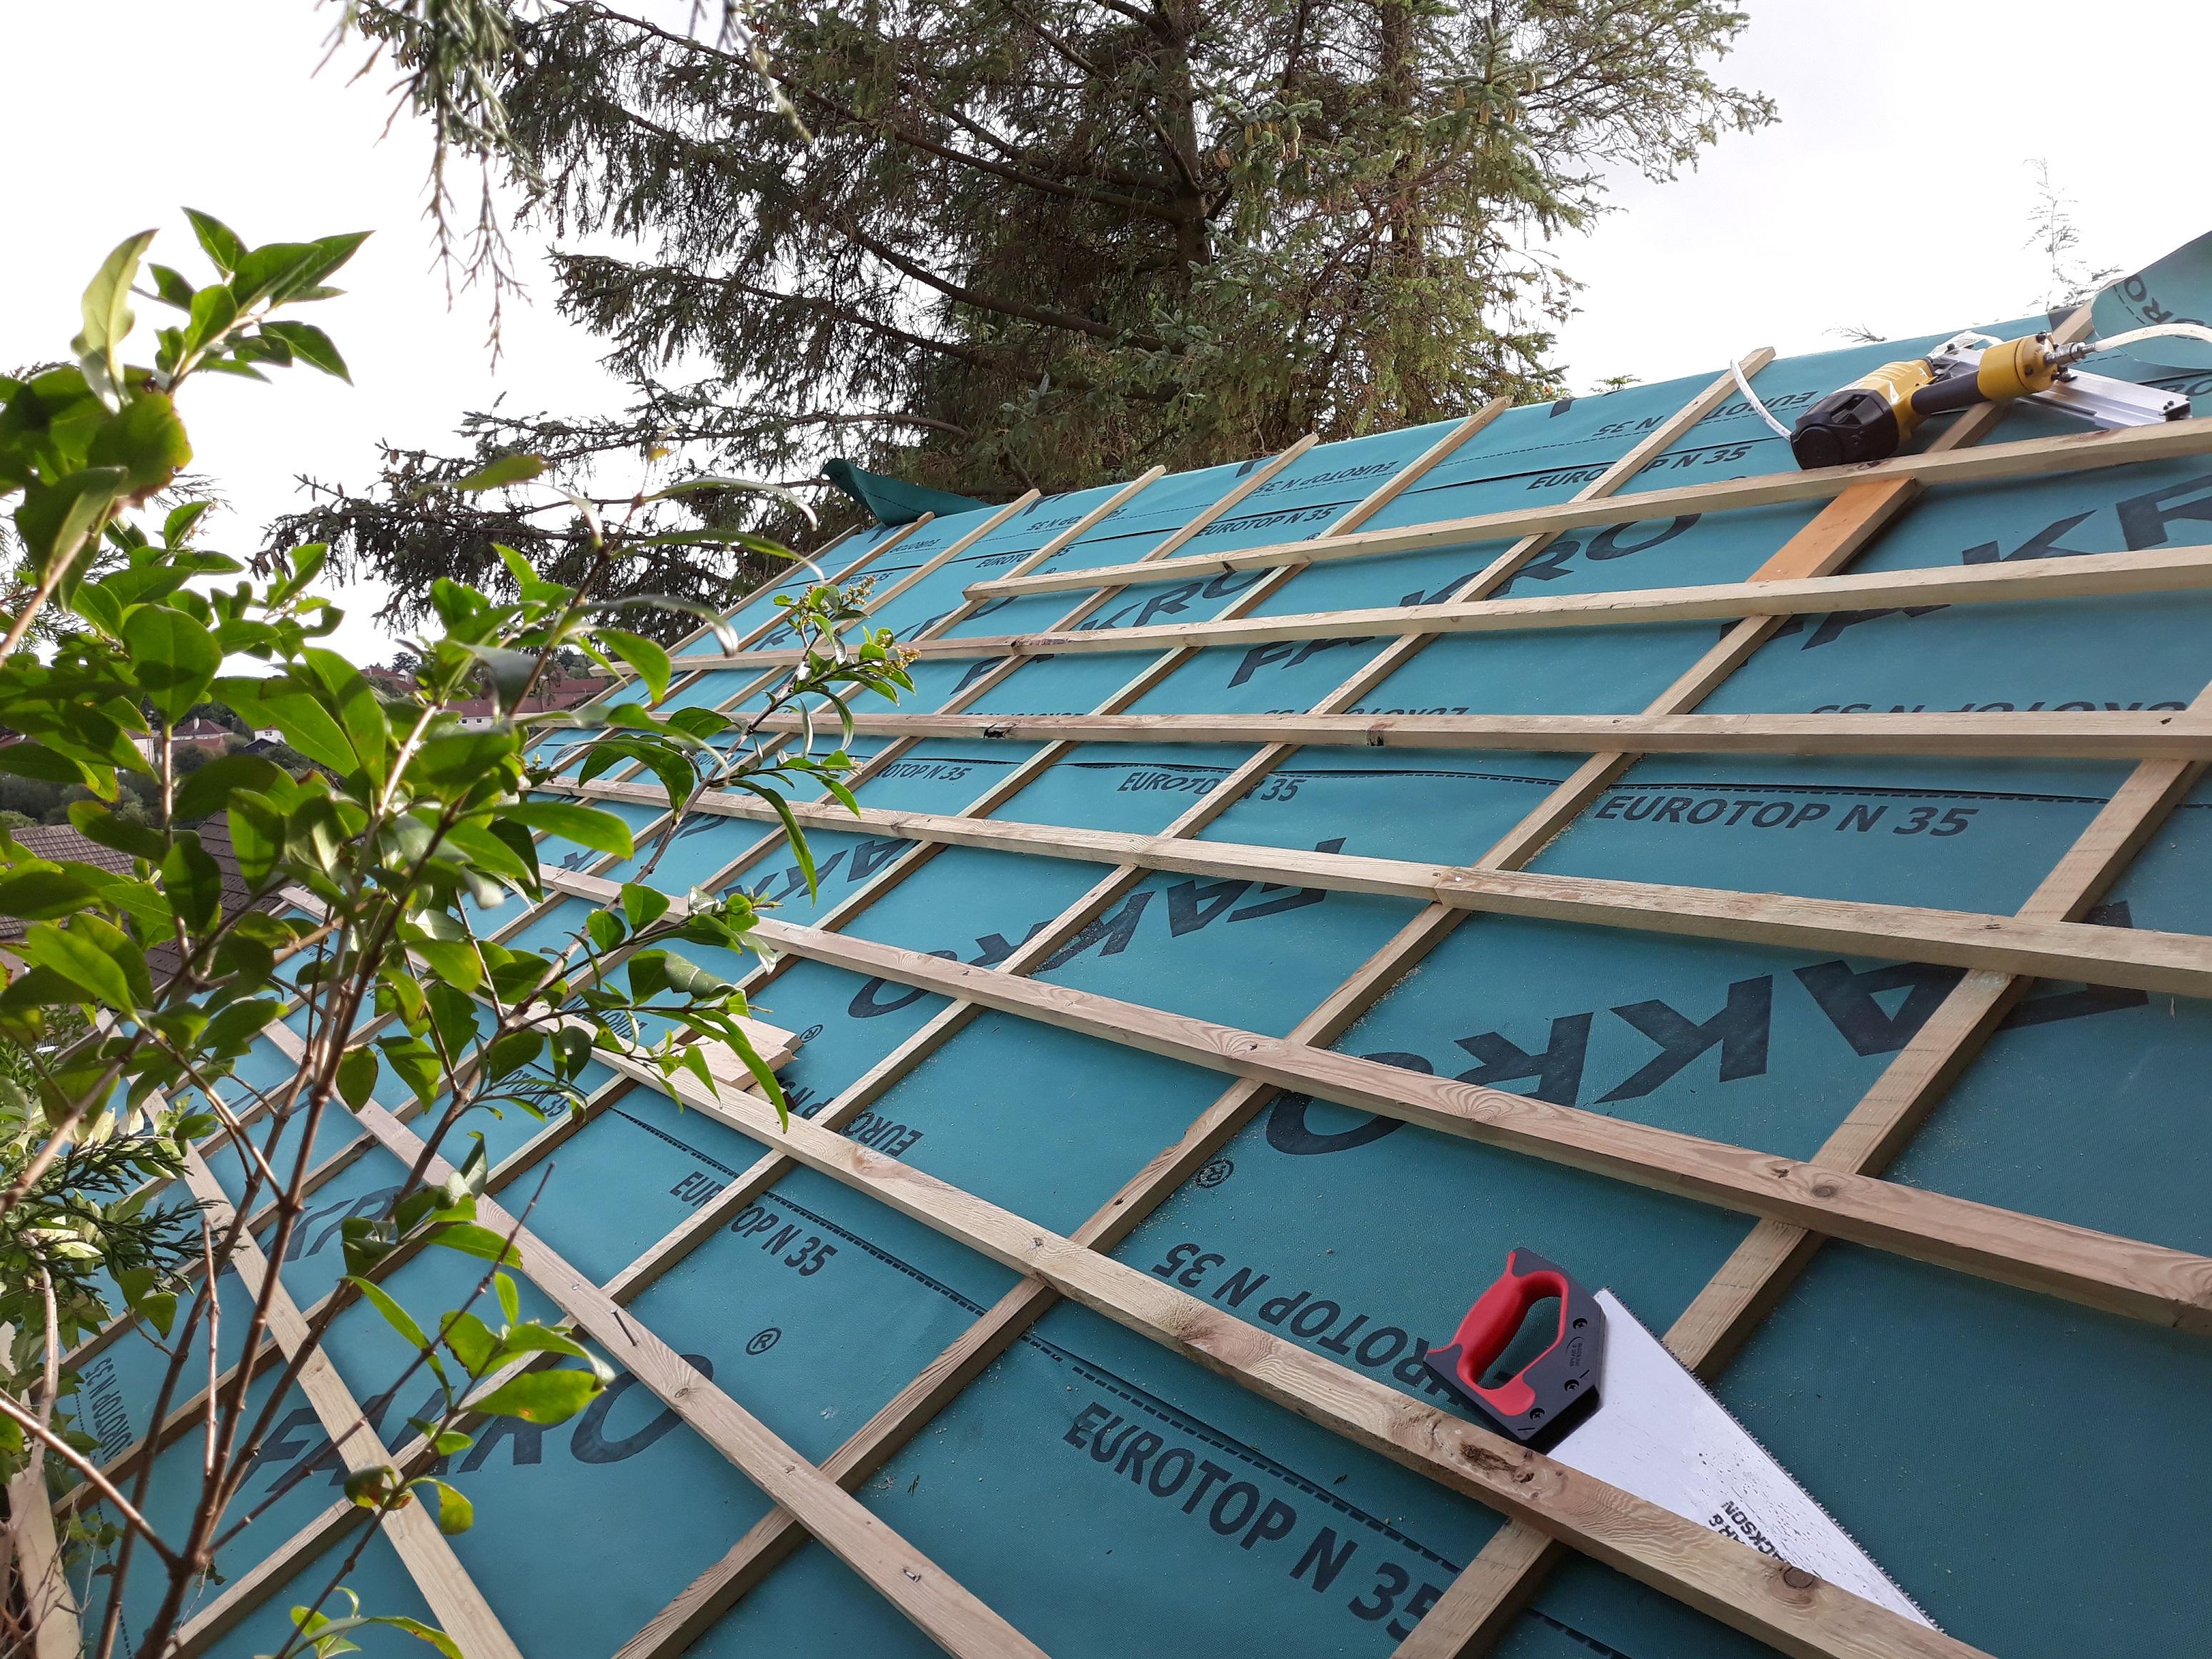
That will do! I did consider this, but having only seem images of it, and seeing the profile of the batten in the top, I just assumed battens were needed - but I don't necessarily see why - once tiles sit on it and screwed down it is not going anywhere. I also like the idea of the ventilation, I used a breathable membrane so assuming a bit of a vent up top will work well. The Manthorpe I looked at look like it needs supported by a batten, can you further comment on your install - sounds good to me, lay it in, bracket in, tile down, screw down, move on - job done.
-
I have been thinking... if I use dry ridge I could get the ridge on in any weather (well maybe not hurricanes, snow and ice). So although I have put the end units on with mortar - I did these first so I could do the dry verge and also to attach a string line - I was thinking I could always use the DR system for the rest... Face my reservations head on and go for it. So I have Marley sentimental ridge tiles, I can get something like this: https://www.roofingsuperstore.co.uk/product/manthorpe-roll-out-dry-vent-ridge-system-black-3m-pack.html The fixing of the ridge batten is my only "unknown" for now, I actually have a big bag of ridge batten brackets, the type you would attach to the rafter and it creates a little up-stand to which a batten can be fixed, that system would pose an issue for me as I would need to take the top row of tiles back off to fit these and I am not really in the market for undoing my work. However the datasheet for the system linked to above doesn't appear to come with brackets or even use them in the installation process. I have a 6x2 ridge beam on which the notched rafters sit, so not really that far down is a solid timber, my membrane covers this, my thinking is that I could cut pieces of batten to fit between the rafters and sit on the ridge beam, I can use this to build up to the required height a batten on which to fix the dry ridge system. Thoughts please gents.
-
In all honesty I don't really like them - I am a old school, if it was my house I would but for my garage considering I can hop up onto the roof to maintain it going forward I am not too fussed. I used a flexible dyed mortar from Instarmac which should remain in good nick for many many years. However, I did use dry verge! I know the benefits of the dry ridge, the installation benefits and the longevity of the system, I am just being a Luddite. I can be like this some times. I still prefer CAT5 and a cable from a socket than Wifi yet I like ICF's! Go figure!
-
Been a while since I posted but the garage now has doors, a full roof, gable end cladding (timber to the front, UPVC to the rear) and most of the fascias and things on - 2 ridge tiles (front and back) but the cold weather kicked in and I don't want to be setting ridge tiles in the cold as the mortar would probably get damaged and I know I can frost-proof it but to be honest the membrane has only had 1 rainstorm it could not cope with and the leak was only via a batten nail hole. I'll get a selection of photos to post. I am also about to start the rear extension which I hope to have done by spring.
-
Transpired it was a Marley - discontinued. I ended up doing my garage in Russell Pennine's which looks great, but I still need Majors for the extension roof.
-
Financing Self Build In Parents Garden
Carrerahill replied to Johnny Jekyll's topic in Self Build Mortgages
You have not answered my question - but don't bother. Your evasiveness says it all. You didn't need to explain the principle behind the basis of your original comment; it's the manner in which you deliver your comments time and time again - you have an issue, you know you do hence the deflection and you don't like that you were called out on it. Across your posts it is clear you don't like that many people on this forum can afford things you cannot - you are obviously doing your best in this self-build world, but due to the nature of this type of endeavour it takes a fair bit of money, even if just secured finance, to build a home that most people could only dream of. -
Financing Self Build In Parents Garden
Carrerahill replied to Johnny Jekyll's topic in Self Build Mortgages
You have a real chip on your shoulder don't you? You have made very similar comments like this before which I ignored as a one off, perhaps you were in a huff over something but you do have an issue. What I don't understand, is what someones class has to do with their ability to peel cash from your paw. Explain that one to myself and other members of this forum please? Conversely, IF, I were to say, "I don't like working class hammer wielding monkeys stealing my money" in context of trades working on my build, do you think that would be acceptable? They can steal plenty money too! I could make some very controversial remarks here that would sting a bit, but they would be quite true. -
Right this is a bit of a ramble - every time I thought it was ready to post I decided I had forgotten a variation or difference I thought should explain in better detail - lets call this a concept stage reply! I think to do this properly it would need to be a fairly lengthy article - it's like trying to explain something quite detailed in 2 or 3 paragraphs - you just can't. However here is my attempt. By staging I mean if you are following a true construction stage framework i.e. RIBA stages. Being a self build it could be done with no particular structured stages and it's all a bit off the cuff - which may be the result of ever changing budgets and evolving design or just wanting to be as fluid with the build as possible - or total disorganisation! So to answer your question directly: Planning drawings are really quite lacking in detail but warrant drawings are usually good enough to build from. In a nutshell yes tender and construction drawings are more or less the same assuming everything is as you want it and you know details such as fittings and fixtures from a spec doc etc. So if you get drawings done to planning and warrant stage then no longer hire any more professionals for the design aspect then your final drawings really will be the warrant drawing and that is you. Technically you can just use your warrant drawings from here on - for a builder to price and indeed build. The details of the build can be built, hopefully, by a competent builder (or yourself) who knows what he is doing without any more drawings. A typical build with no difficult structural or glazing or cantilever details for example would not really need further detail. Your builder knows how to build the walls and roof and floors and he will price accordingly knowing what he is doing - he will adhere to spec within the warrant drawings i.e. roof to be C24 timbers on 600mm spacings etc. but that is just specification of materials and doesn't require a drawing. However, if you retain pro's (or even do it yourself) to the end then you may then take drawings to tender stage which is just to as the name suggests get main and sub contractors to tender for - prices may come back high and you may have to VE (value engineer) it thus the drawings will change again and may keep changing until something that you are going to construct is drawn. Or the prices may come back as you expected and the tender drawings will really just become construction drawings. A tender package will usually include makes and models of fittings and fixtures or a well written spec of these items to keep the quality high. At this point it depends on how the project is being run and the contract. You could build from tender drawings using the spec document, to be honest they are detailed enough for most builds and I would happily rename good final tender drawings "Construction" - remember drawings should always be viewed in conjunction with specification documents.
-
Perhaps in some circumstances where for example it is a fully stripped PDF and there is no scale and no dim's on the drawing, but to date we have never had an issue with a PDF and re-scaling it once converted to ACAD. Thinking about it almost all PDF's need to be scaled properly once brought in because dim's are almost never picked up. Remember a PDF is a printed view at a scale, so you sometimes need to know paper size and scale but it's not the end of the world.
-
None of these methods are unsurpassable. You can un-tick "Read Only" in windows and that's that. A PW protected PDF (in terms of read only) only locks up fully in some PDF editors - we use 3 or 4 PDF editors including BlueBeam, Foxit, Adobe and another to allow us maximum abilities. For example I can have a locked PDF made in Adobe and BlueBeam will just open it. One of our CAD tech's is a bit of a whizz at cracking and opening just about anything we need. We recently got a drawing package in PDF from a building built in 2005 it was PW protected so we could not even read it, half an hour later I had a set of ACAD drawings in my inbox from him! The client was even delighted as he had forgotten the passwords! It was epic as the other option was to have a costly survey done and draw the whole building. We don't ask any questions.
-
If you have the PDF's you basically have the CAD drawings. ACAD 2017/2018 (maybe earlier versions I cannot remember) etc. can convert PDF to CAD - as of ACAD 2018 full text conversion exists too.
-
It depends how you are staging it I guess. The first drawings to a builder may be "Tender" or if you were sure that was what was to be build we would call them "Construction Drawings". Then on commercial projects we then would create "As Built". RIBA has the stages all listed with details.
-
It really depends on many many factors, the simplest obviously is to have the window of the room facing the sun - generally we say South facing however it depends on the use of the room. Often a well designed building will make good use of natural daylight (where requested extensive 3DS Max (or similar) daylight modelling is carried out) for the particular room in question, hotels may have breakfast room facing East and evening dining areas West. The next thing is overhangs, a high summer sun may be partially blocked by deep roof overhangs but a low winter sun may penetrate well - the size of the opening and the placement within the wall is important to counteract a deep overhang on a sun facing wall. So it's a how long is a piece of string sort of a question. Your possibly better to suggest your requirements and or parameters and then it can be answered from there. Your room is already built, but are you looking to add remove change doors, windows, skylights etc. can you improve natural daylight by adding glazed doors? Light finishes on surfaces help to reflect light, natural or artificial. Also bear in mind that a domestic kitchen shouldn't really need to think too much about glare as you are not likely to be sitting working at a PC or watching TV or spending long periods of time sat in one place with the sun bothering you so my thinking is include loads of natural daylight, get it all in and then design in appropriate shutters, blinds, curtains etc. to suit.
-
All of these 'professional memberships' and "councils" are just clubs to make money for the boys. I have spent my entire professional career avoiding them to the best of my ability. RICS and Engineering council etc. are slightly different as they allow professionals to be chartered, but if I don't renew my subscription am I any less of an engineer? They offer nothing in return. Not being a chartered surveyor will probably be cheaper as he is not paying membership fee's etc. ask what his credentials are, maybe he was with a firm, went out on his own and decided not to sign up to the "clubs" I bet he is just as qualified, potentially better, than someone who comes with all the RICS stamps and accreditation. Look at the background of almost all these associations and it started out with a couple of people deciding to set up an organisation for "insert profession here" and offer some so called "service" for a fee once a year - then with good marketing have people believe that they must have said membership or they are no good.
-
Feel sick with worry about escalating build costs
Carrerahill replied to Jude1234's topic in Costing & Estimating
I am sorry to read this, this sort of thing can indeed cause someone a great deal of stress and anxiety. Sadly this is a fairly typical story in the construction industry be it domestic or commercial projects. Usually it starts with the client asking for the highest quality build with lots of high spec fittings and fixtures, then through budgeting (QS), planning etc. it can get whittled down to what can actually be afforded but sometimes, it all makes it through to near completion before the client starts to take an interest in costs and invoices for things - contractors love this as they just go for it and do what they were told, sadly they also often neglect to tell the client what it is now costing (they don't want to cut off their open bank account), so they just keep spending your money. I think it is safe to say you didn't have a strong grip of this project and it sounds like your main contractor (single all trades?) or contractors have just gone for it to get it done for you, possibly, they thought, in your best interest or possibly they just want to take as much money as they can and give you the spec you asked for. I would not worry too much about some brushed chrome sockets and switches as in reality the cost increase from a decent quality white socket/switch is not massive - overall in the whole build it may cost you an extra £300-600 depending on what they bought you. Here are my thoughts on what your immediate actions should be. Call a meeting with your builder, I would also call in any other professionals you have appointed, do you have an architect or any engineers? Just tell them it is a Progress Meeting - give them an agenda and put into it anything you want to discuss and slot in Cost Reports into the itinerary somewhere! You can also discuss 'Issues that may impact on costs' 'Warranties' all sorts. Kick off the meeting, you are in charge, I don't know your background but this meeting is your chance to be CEO at a boardroom meeting and get some answers, tough but fair attitude. Don't show your cards, don't outright suggest budgetary issues, when it comes to costs you can bring up the garage, why is it costing an additional 8k and can anything be done to mitigate these costs. Why are things going over budget and work through them all - frankly they always do and no plan survives first contact, unless it is a very well detailed and quantified program has been put together, but even then, there are factors beyond our control. Make sure you give them an agenda say today and call the meeting for Friday AM or Monday next AM - by telling them you will want to hear a cost report you are effectively asking them to bring budgetary information - make sure they know this - i.e. suggest they bring all supporting documentation as you don't want any "I'll need to find out answers" they MIGHT bring quotes and invoices for materials but it depends if they are incorporating a cover for themselves into them, then they may not want to. Take all your budgetary information, your quote from the builder etc too and have your facts and figures hand written in front of you in a big A4 note pad - this is a good trick as people often cannot read handwriting easily across a table, it also looks like it may just be your notes and that you actually know all the information you are discussion off the top of your head putting you in a stronger position. -
A 240V supply is a 240V supply regardless of how it gets there so the flexed up to a plug option is a perfectly acceptable test means for this device. Sounds like a PCB issue if it will not go through self-test - take a look at it - often damage will manifest as corroded solder joints, blackened components etc. One thing I would consider is how you have installed it and the associated ducting. Have you installed it as per an approved method, reason I ask is often these fans can die if condensation can run into them from inappropriately angled/connected duct runs etc. In some of these circumstances a 12V version with remote PSU is a good idea as the fan is then just a simple 12V fan - but try and iron out any install issues first.
-
We need more details on your Honda genny. Check the rated load (i.e. continuous), it may be 1000W - but they often con you and say 1000W but that is only peak and the rated load is 850W or something. Now, the mixer will be 550W load, however startup will probably be about 1100-1200W for a split second for a motor of that size as I doubt they will have soft start so it is quite possible your Honda will trip out or go into over-current on startup meaning you can't get it going, however, if you are lucky and the Honda can take that load for the split second (it probably will actually as it's not going to overload the winding or inverter circuit - assume it has one as it's a suitcase gen) during that length of time it will start it and once spinning even if you load it, the mixer should not pull more than 550W as that is the loaded motor rating - it will run at much less during empty running.
-
Static caravan = no probs. Humble shed = noooo.
Carrerahill replied to epsilonGreedy's topic in Planning Permission
This is a good idea. I have done this. My garages first job is to serve as a extension build storage area and workshop. -
Using "off the shelf house plans" yes or no?
Carrerahill replied to Olly P's topic in New House & Self Build Design
Odd comment, frankly very odd! Bit of a chip? It seems you have an issue with professionals in the construction industry, the professionals who design aspects of of the built environment. I was approached a couple of weeks ago by a women who wishes to build a large extension, she is unsure how to go about it and the way to get best value for money. I suggested that I would have her planning permission drawings produced and I would have various details drawn up by our structural engineer and the building warrant drawings I would produce using the material produced from various sources including the "standard text" which is part of our library (roof makeup, renders, fire stops, drainage etc. which as you know is not detailed as a drawing but often just provided as text which specs the makeup). We would then obtain her permission/warrant. This will give her a full design and PP and building warrant when complete and will cost her little more than £1500.00 for our fee. She is not buying a comfort blanket, she is buying security and she is buying detail that we will insist her extension is built to. This gives her a high quality well designed build without "professional builders" erecting some cheap tat with poorly or non-designed aspects. If anything goes wrong due to the detail provided then it is our practises liability, for which we have insurances which will protect her and she is aware of this. We as a firm would protect her and would even step in to cover costs if we made a mistake that cost her or her appointed builder due to our negligence - we will also plan to PM the build for her and provide a site PM who will keep an eye on details as the build commences and allow for variations to be produced if anything must change due to our error or factors beyond our control which we may or may not change for. What you possibly don't understand is the RIBA/CIBSE stages and how a building design evolves. Clients will have ideas and this allows a design brief to be produced, the client will then agree or disagree with this and it is revised until the client is happy - this then may end our involvement and gives them something to go and tender the design stages to several firms. Then the original or new firm will undertake a concept design which as the name suggests is just the concept then the process goes through similar stages as the DB and if all is approved will go onto detailed design - at this stage it is entirely possible things will be designed and detailed that will never make it to the final building but that is due to many many factors, almost always the client seeing something new they want during the design stages. What may end up on construction drawings may not resemble the concept design at all but that is how buildings evolve, if everyone knew what they wanted from stage one then we would go directly to construction drawings but the chances of us designing exactly what the client wants would be slim, therefore we have stages. We do not aim to rip people off and often trades resent professionals because they don't like being told how to do their trade - I can see this from both sides of the fence, but a consultant engineer sitting with for example with a DuPont technical representative and discussing precise use of a product and specifying all the sundry products to go with it will often ruffle the feathers of your roofer who wants to go and use Fakro Eurotop because that is what he uses and he can get a deal on it at his favourite merchants. The client then may end up with a mongrel of a roof. The roofer may be a brilliant tradesman with excellent skills but they might not actually know how all the materials precisely go together for that guaranteed 30 year roof. Pro's might not be able to fit it, but the chances are we know damn well how it should go together. The roofer can go about this the correct way and ask if they can apply for a variation but they often don't and if they are met with resistance by the engineer due to DuPont being used for a particular reason they go in a huff. It's an age old issue. Designed detailed building built to spec should and in almost all cases will work properly, most issues we read about on this forum and see in shows like Grand Designs you will often note are due to lack of design and planning. Pro's and trades will never see eye to eye, simple as that. I argue with very skilled electricians weekly - usually because they didn't read a spec properly and or made a colossal mistake. Look at Grenfell, penetrations in service riser fire stopping... 1 of two things happened here: 1. Someone didn't read the spec or neglected the spec, written by an engineer. 2. A "pro builder" decided to undertake it himself with no design and decided not to carry out remedial work on the penetrations or simply didn't understand what it was for. -
So, here we are as of just now... As of last night I had 10 tiles fixed. The garage is now at least bone dry!


-
Sounds far too long to me! Even the original 3-4 weeks seems too long!
-
Your understanding here is slightly flawed so tread carefully. Those voltage pens are a bit limited in that they only show there is AC electricity present not continuity of wiring etc. and should only be used as a basic check and test - they also don't tell you if there if full 240V etc. so they can actually detect e.g. 50V and will still imply there is voltage - there is but not enough to do much on a 240V circuit. If you meter across the switch (Com and L1) and there is an open circuit elsewhere (probably is as your light doesn't work) you would see 0V between common and L1 - which in your current thinking would probably cause you to think there was a fault there. First thing I would do is see if you have 240V between Live and Neutral at the terminal block of the light fitting, or 240V at the lampholder assuming it is a standard B22/E27 lampholder fitting (take care not to short the lamp holder with your probes) if the fitting is an LED etc. then you will need to probe at the terminal block or feed to the driver etc. It matters not a bit if you use the red or black probe on live or neutral. If you see no voltage between line and neutral then try between line and earth - if you see voltage between line and earth then you probably have a break in the neutral or a loose/pulled out connection. If you see nothing there try between neutral and earth (just in case!). If the supply at the fitting seems totally dead then assume a broken wire or missing/loose connection somewhere before the light. At that point go back to the switch and prove voltage, if it is just a switch drop then you may only have feed and switched lives with no neutral, in which case you can meter between the live and the earth to prove a feed - check for 240V. If this checks out you will need to find the junction box where the switch drop is taken from and start to meter out the supply and check the neutral. Don't undo or move anything at this point - assuming it worked before then moving things will not help if you don't know what you are doing you could create a dangerous situation.