


Gus Potter
-
Posts
2339 -
Joined
-
Last visited
-
Days Won
29
Everything posted by Gus Potter
-
Concrete screws for cladding batons ?
Gus Potter replied to Firsttimer's topic in Insulated Concrete Formwork (ICF)
What type of cladding are you fixing.. can you do us a wee sketch of what you are thinking about doing? -
Concrete screws for cladding batons ?
Gus Potter replied to Firsttimer's topic in Insulated Concrete Formwork (ICF)
So would I after say 3 months once the insulation has compressed / suffered from creep.. then you lose the friction that intialally makes it seem solid. Also if using timber battens the timber shrinks and that too further reduces the friction resistance. After that you are relying on the bending capacity of the fixing alone.. -
Although folk on BH may disagree, SE's and Architect's often work on quite a tight business model, especially if they employ folk. I offer from time to time offer a service where folk pay me for an intial SE consultation. But as I used to be a building contractor in my last life this turns in to a general over view. This starts off with a phone call and a general chat, I ask a few questions but mostly try to listen, then I identify what initial info we need to make some basic decisions. I try and explain why we need to do things and answer any questions you have.. the objective is to inform you as much as I can and give you the tools to make your own decisions. Part of this process allows me gauge how knowledgeable your are and where you may need help. You can cover a huge scope in a couple of hours on the phone. My approach is to say up front.. here is my hourly rate for; general advice, a supportive chat and advice on the process of selecting other advisors / designers and how you put together a document that specifies what you think you need and importantly where you think you may need help. At the end of the day I always make sure that folk feel they have got value for money, usually this results in over all savings and that justifies my fee. What I do is different but it does work for some Clients and me. Try if you can to find an experierienced SE who will spend a couple of hours chewing the fat with you.
-
Concrete screws for cladding batons ?
Gus Potter replied to Firsttimer's topic in Insulated Concrete Formwork (ICF)
Not quite sure how you want to set this up but have a look here: https://www.ejot.co.uk/Building-Fasteners/Products/ETICS-Anchors-/c/ETICS_ANCHORS -
Mention to them and ask for their views.
-
I appologise.. I should have used different language. The proximity to the boundary is one big key. Please check that this has no structural implication as the roof may have been designed as a diaphragm thus making a hole in it for a Velux may not be the best thing. But later you could if you fail to comply with the rest of the regs. I rest my case.
-
Yes.. but they have lost their shirt and by the time they called me in it was a bit too late. This is much more complex than you realise. The design loads are often increased, the steels coroded.. then you add openings.. large area of glass for example that are sensitive to movement. Often we want an old building to move as freely as possible. Archaeology, flood risk can cause major design challenges that can massivly impact on your budget. For me I love this stuff as it is a big challenge.. gathering together what you know with the site information, fitting the jigsaw together and adapting the design to suit.. often we go back to first principles.. the SE stuff feeds into the Archaelogy.. the flooding.. it's fascinating.. and then you have to get that to work with a budget and still keep the Architectural design concept. The best advice I can give is to go though each of your design team and look for the most experienced with the broadest knowledge. Then see if they are excited about your project. This does not have to be the most qualified person on paper. Then ask.. will they fight my corner and pull the rest of the design team into place. You are the Client thus the big decisions will always rest with you.. but you need a good "wingman" that is invested in you and the project. In terms of design cost expect to pay more up front.. as the design progresses you can easily realise £20- 30k plus savings on a 450k refurb or the like that will basically pay for most of the desing cost. Skimp now on the design fees and you will regret. well you may not.. often folk just blame the cost over run on the poor builder who has got to sort out crap and unrealistic design on site.
-
Float or glue engineered flooring over chipboard with UFH
Gus Potter replied to gOBO81's topic in Wood & Laminate Flooring
Agree with Nick here.. but.. Here lies the problem as I mentioned in my earlier posts. In my own case you just don't get to have you cake and eat it. Designing stuff is my day job so its easier for me to get my head around it. I recognised that I have a big open plan floor that extends over different substructures that all move about differentially quite a lot. To compensate I over designed the UF in terms of pipe spacing close to the exposed perimeter of the building. The thermal conductivy is not as efficient when retrofitting to timber joists with screed / insulation between . Each different element, concrete slab / suspended floor has got its own UF pipe loop so I could muck about with it.. cool parts if need be and so on. However the extended part of the house is exposed to the weather. In the concrete slab near the big bits of external glazing I decreased the pipe spacing. The timber suspended floor has little exposed perimeter and thus it needs less "poke" from the UF. At the end of the day I use my own engineering judgement (how materials behave) and past experience ( have done a few UF self builds / extensions) to put something together that works well. Could I prove this by calculation.. no chance without expending some 5- 10 k design effort producing some meaningless thermal model. I also pinched design principles from some of the industrial building I've designed over the years so this gave me confidence. In summary.. I would put together your requirements and ask all the folk that need to contribute to the design.. look at their fine print.. and you may eventually conclude that with say a refurb / extension you need to take some extra risk as each supplier will put so many caveats on things you can't make them all meet in the middle. I mitigated this by practical and common sense design and some careful but practical drawing detailing. -
We're featuring on Grand Designs next week 🎥
Gus Potter replied to thefoxesmaltings's topic in Property TV Programmes
Wishing you all the best for the transmission. Help ma boab as they say in parts of the UK. In all seriousness I think you have gone a good way towards being as open as you can, a thank you from me. -
Now do you want to go the whole hog and make it building regs complaint and get planning approval for it? If you do so it could add a lot of value to the house?
-
What a topper of a response!
-
But I love her to bits and she is my sole mate. Anyway my wee car just looks like a standard car to me. Kwick fit said it might have be "modified" I think they were referring to the sound system.. I'm an old raver and like old school techo music.. the sounds are great.. like the frosties ad. Sometimes Techno music helps my creativity as an SE, other times classical music. Very happy for my best pal to have the posh car. I do worry how much it will cost if I prang my wee car.. but "we buy any car.com" don't put much value on it anyway.
-
Tell us what they are. There may be some fire boundary conditions or other reasons. It's not build hubbers job to second guess? Are there any fire boundary conditions for example? Yes we do but you are not providing all the facts and drawings. Do this and you will get some free professional advice and adivice from folk that have done it DIY and worn the tee shirt. Think about this.. you are asking BH folk to help you break the law and potentially put other folks lives at risk. Have another go at asking for help and free advice... everyone will cut you loads of slack and pitch in.
-
I've got a Seat Ibiza... that I use for my SE surveys... and it goes like stink to my surprise. I thought it was a run around.. I've never looked under the bonnet and it just looked like a wee small car when I bought it. Can't understand why it goes faster than I expect. Wife has the posh car and it goes a bit faster and that car seems to be a points magnet.
-
No mincing from ETC here on the pointing and I agree. NHBC recommend 40mm of a drip which is what I spec as sometimes the render etc are a bit out of line. Your starting point is to work out how you are going to insulate the reveals, cills and head of the window. Then make sure you can fix the window securely and last make sure it is all weather tight with DPC etc. It's OK to mount a window on the outer leaf. Velfac windows adopt this principle. Have a look at their detail.
-
Hiya. If you want a bit of moral and technical support give me a call and we can chew the fat. Text me first as you know Im a bit of a deafy.
-
Float or glue engineered flooring over chipboard with UFH
Gus Potter replied to gOBO81's topic in Wood & Laminate Flooring
I'll post a photo at some point so you can see where you advice was implemented! Thanks again. Do you want to come up and work in the Glasgow area? -
That makes sense. I presented the maths but your reaction time is slow so yes you will probably not stop and still hit folk with enough force to hurt them.
-
It's hard. There are so many shades.. nightmare!
-
We're featuring on Grand Designs next week 🎥
Gus Potter replied to thefoxesmaltings's topic in Property TV Programmes
If you want a bit of free advice make a contribution to BH that reflect what you have learnt... Say nothing here that you have done so. The mods are very discreet and professional.. it will stand you in good stead. There is an old storey about business that involves a young and old bull in the top field and some young cows in the bottom field. Its vulgar so will not complete.. look it up and mull it over. That is good to hear no cash deals. Any advice you can give for build hubbers re negotiating would be hugely welcome. What you have not addressed is my question about the things that normal folk can't access. You are on the telly.. insta etc. It would be great to hear that you have done this straight off the batt without weaving in any other business interests you have. If you have done so then loads of folk would love to hear how you have been innovative business wise to make your dream a reality by marrying up all the skills you have. There are loads of young, skint but hugely talented folk on BH that have the same dream as you. Maybe you can give them some tips for free? You are clearly media savvy. I use my own name on BH as you, appreciate your commitment. I am a designer as a day job and a past ( the baldy patch and sore hips are telling me something) self builder. Now our Kev.. I suspect he may be a Build Hub lurker? BH is the real deal not for profit set up.. the cumulative knowledge on BH is exceptional.. we have Lecturers that teach folk like Kev.. highly experienced Contractors, all the professions from Architect, Geotech folk to SE's, glazing specialists the list is endless. Then we have all the folk at the sharp end of doing self builds, going to exhibitions and passing on what they have learnt. Maybe Kevin will come on BH? There are a lot of professional designers on BH who would love to get his advice. Myself not least. -
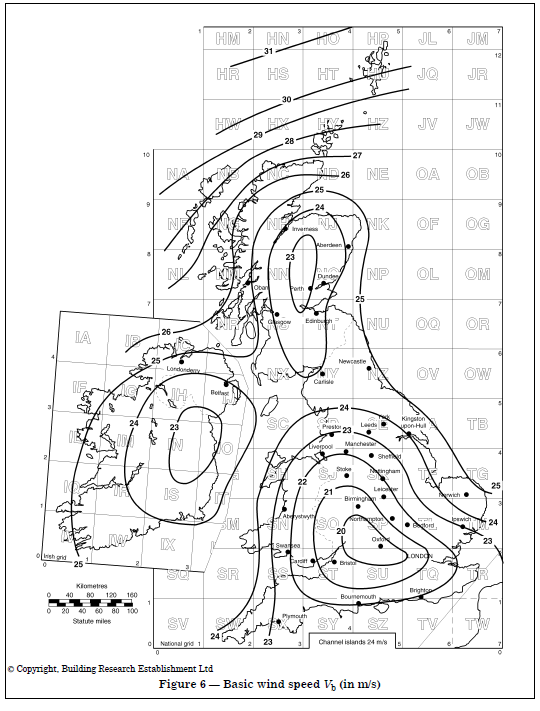
I hope not! Of course.. voluntary work is so good for the soul. Ok the maths. I'll relate this to wind load on a house then cut to the chase about driving at hwich I'm a bit not Nigel Masell.. more like Rowan Atchinson.. enough knowledge to be dangerous but without the cash to excecute well. Excuse the spelling and grammer please. Simplistically the wind load on a house is related to the speed of the wind as we know for life experience. The general equation is air mass x the wind speed squared. For interest ( if you have nothing beter to do) I've screen shotted a wind diagram from the BS design code. . For the non mathematical often we can simplify maths by removing things that stay the same.. say the weight of your car. This lets us quickly compare like with like even though the number we get at the end does not equate to say a true real life value that we could then use to design a roof truss say. We can call this a qualitative analysis. In Oxford the basic wind speed is 20 metres per second... about 45 miles per hour (gust speed).. Build Hubbers.. do not use this as a value for your design.. as it then gets modified a lot. In the North of the country it is say 27 - 31 metres per second. Using the equation.. force = mass x velocity squared the two results can be compared in a qualitative manner. That said I hope the wind diagram helps you see how things could change for your house design depending on where you live. If you have big areas of glass then its a consideration.. is the glass and double glazing going to be ok if I live in Cornwall say. The mass of air is the same (except in the far north and the Hebrides where it is rarified by Whisky fumes so is a little lighter) so the "Energy ~ = mass of air * wind velocity squared. Just say the mass of air is 1.0 something units 1.0 * 20^2 = 1.0 * 20 *20 = 400 units. In the North it's 1.0 * 27^2 = 1.0 * 27 *27 = 729 units.. nearly double the force! When explaining to other designers about wind behavoir I often use the car velocity / breaking distances model as an example as most folk can relate to it. If you hit a kid when driving at 20 mph the energy you hit them with is similar to the wind. Your car = say 0.75 - 2 tonnes.. but it's the velocity that causes a lot of damage. Say your car weights 1.0 unit of measure. At 20 mph the qualitative units are mass of your car 1.0 * 20 * 20 = 400 units. At 30 mph it mass 1.0 * 30 * 30 = 900 units. In other words that extra 10 mph matters a lot. The extra 10 mph has more than double the energy. Now it's known that the survival rate for humans rapidly decreases when the intensity of the energy delivery increases if you get hit by something. This is what we call accelerating or braking if you are in the car. When folk go to the moon they get accelerated by a rocket but slowly. Now the driving courses are intended to make sure you stop before you hit anything.. as a kid could then get slowly rolled over by the wheels of you car at 1 -2 mph. The main thing about the above it to recognise that with a small increase in speed you need to exponentially decrease the rate of acceleration. To be frank.. if you hit someone at a couple of miles an hour you are unlikey to cause them organ damage. But as above the collateral damage comes from then running them over with your car or causing them to fall over and then damage their head say from the fall. Now if you are in an airplane.. the guy / doll up front has a big interest in not crashing at any time! At 150 - 300 knots a bit of difference in relative ground speed is not going to make any difference to you not getting squished. The last thing they are wanting to do is to make contact with anything solid or semi solid in the air.
-
We're featuring on Grand Designs next week 🎥
Gus Potter replied to thefoxesmaltings's topic in Property TV Programmes
Well done both. There is as expected a wide spread of comments on BH. Grand Designs enthuses people to think and encourages. Do you know what it actually cost you? The builders would chew your hand off to get their sign up on the scaffolding. Did you do any cash deals with the builders or discounts that normal self builders can't access etc? I know you have to say no or you'll have the tax man chasing you! What other business relationships exist.. see you are on insta for example. It would be great to hear you are a Nurse say and hubby works for the council cleansing department as it would really show the C4 audience what can be achieved if you are just an ordinary run of the mill type. Have you or are you making a donation to BH? -
Float or glue engineered flooring over chipboard with UFH
Gus Potter replied to gOBO81's topic in Wood & Laminate Flooring
It's a dilemma! Over the years I've done a few UF systems and each time I learn something new, improve where I can and adapt the design the based on my learning and what new on the market. The house we have at the moment is a 1955 house with suspended floors. We took the back off it and extended out to form an open plan space. The extension is a concrete slab on PIR on grade. But the floor levels in the existing house vary and as they are now forming part of the open plan space we have a mix of materials forming the floor. Timber / concrete and a level variation.. it's small but it is there. Also the existing house solum is sealed with tar and a bit compromised in places thus we have different moisture levels. All of the above results in movement between winter and summer which is noticeable.. if you are inclined that way to have these thoughts. For this house I floated the engineered flooring on a 2.0mm thick layer of foam, just the bog standard stuff. If you jump about on the floor you are aware that the different parts feel more solid than others. But again I'm always "monitoring! most folk wonder if I'm ill when I mention. Now fair enough the foam insulates and makes the UF less quick to respond. In the odd spot where the floor levels were a bit off locally I added some extra strips of foam as a packer. But we have lots of rugs and so on which do insulate the floor much more so than a thin layer of foam. If you lift a rug the floor is much hotter under. We have a bathroom on a supsended joisted floor. The tiles are these large format ones. The UF pipes are in a screed on PIR between the old house joists, no spreader plates. A while ago I posted about this and @nod as always provided some great advice. I followed it and sure enough after almost two heating seasonal cycles no cracks in the tiles. Thanks @nod! The main thing was the use of a decoupling matt. When I first started messing about with UF these products were not available.. mind you neither were large format tiles available to the DIY market at an affordable price. Now when you read the fine print of the flooring suppliers you nearly always breach their T & C's in terms of what you need to comply with. One it the temperature range. Where you have UF pipe conjestion the floor can get quite hot at times cf other areas. I just accepted that is was nearly impossible to comply for our house so took a pragmatic risk based approach. In summary I did think about glue the floor down. But then I though what happens if I get a leak in the kitchen sink say . Lifting any damage glued down flooring could be a nightmare! We have had a plant pot that leaked water and did not spot. Some minor damage has occurred but I know I can easily fix the floor if need be. -
Have fun. Good design is very much an iterative process... so many things you can do. Sometimes it's easier to say.. we don't want that and that can help narrow down the field a bit. Alway sleep on stuff and let you mind work away over night. I've still go bits to finish off in our own kitchen.. just waiting for the time to do it. One think though. The sink is under mounted and not expected to last as long as the worktops..I hope! The worktop is Silestone and the cost of that makes you less inclined to change it. All the worktop fitters said you need you sink in place and we will stick it to the top of the sink with our super strong resin / glue. mmm.. how do I then replace the sink if we crack it say and not risk damaging the worktop? What I did was to say.. fit the worktop with no sink. I then build a timber cradle, took it to bits again, lifted the sink up from below and siliconed it into place.. then reassembled the cradle. Now if we want to relace the sink all we need to so it to cut the silicon bead and drop the cradle... well that is the theory!
-
The right compactor for Geocell floor???
Gus Potter replied to eros_poli's topic in Tools & Equipment
Yes type one is aimed at good compaction and achieving density. Add a little cement content and you have a lean mix that forms a lot of the sub base of our motorways. I think Geocell is much more like a single size aggregate.. like railway ballast. Now as an SE I should be using some technical terms.. but my best answer is that for Geocell which is pretty much a single size material it just needs "shoogled" into place. Thrashing it to death with say a 10 tonne vibrating roller will just damage it. I've specified this stuff and the results (feed back) so far are good for the loads I want it to carry. Goecell is not new in terms of material composition. It's stable, not frost succeptiable for example. It is bulky and a bit of a shit to shovel apparently. The top of it is a bit rough so maybe needs a bit of blinding. I'll leave the last bit out as this is my IP property. Now @Alan Ambrose for example. The NHBC put a limit on hardcore fill for rafts foundations at 600mm.. and this would apply to say EPS and XPS material on hard core. I wonder if Goecell have ideas o how thick thierstuff can be? Their stuff is not heave prone, not frost prone and has insultating properties. This has got me thinking.. can we do rafts with lots of Geocell and little if no EPS or EPS where we need to go deep to avoid clay and tree root heave for example. Now Geocel is light weigth so on bad ground we dig out some crap stuff and replace with a lighter structural fill.. now we further reduce the soil loadings. I'm just chewing the fat here folks but BH is at the cutting edge of things.

