


crispy_wafer
-
Posts
1144 -
Joined
-
Last visited
Everything posted by crispy_wafer
-
Will do, I tend to follow it, but that thread moves very quickly at times I may have missed the bit about depth... Sorry my poor explanation previously. I'll be using brass wall plate elbows with the hep 1/2 - 15mm plug on it.
-
This is the fella I've been watching on youtube... He uses couplings to set the depth, guess this is ok to do?
-
Thanks, I've absolutely no idea on final wall finish 🤣, I'll get the Mrs to do some browsing, then get the tile thickness of the sort of things she likes. Then I guess from there on in, I can just filter for 9mm tiles or whatever and tell her to pick something at that depth. Would you set tile adhesives at different depth's depending on tile, or is it just a standard thickness? We are not doing anything too special here. The known's at this point 20mm tile backer So I need to know: Tile Depth Tile Adhesive Depth I've ran HEP to the outlets because it was easy to thread through the studs, and assumed I was going to use a 1/2" to 1/2" wall plate elbow with a HEP 1/2" connector. Now thinking about it the angled wall plate wont project far enough through the backer board + finish. And I don't know at this point how long the thread is on the wall outlet and rainfall head as I'm waiting for them to turn up. What do the pro's do? I don't mind if I have to start again if I have to, it's only a bit of time, and all part of the experience!
-
Yes, that's right I remember you posting the link now! 🤣
- 14 comments
-
- 1
-

-
- the windy roost
- icf
- (and 1 more)
-
Well done you. Must say I'm super impressed with how you've made your compact plant room work. I've just zoomed in on your cylinder and see it's just like the one I've got, but with a different sticker on it, right down to the buffer underneath.
-
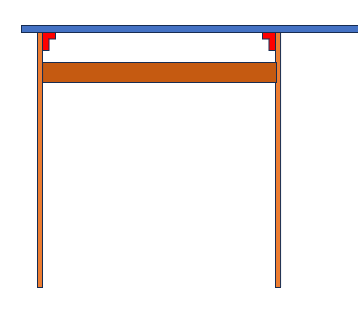
Morning all, I'm Finalising the first fix plumbing in one of the bathrooms and I'm trying to work out how to set the depth of the wall plate elbows for shower outlets. Does it even matter, is it a non issue to be concerned about? Can I just thread in a 1/2 inch thread extension to bring closer to the tiled surface, if I need to? Also, I have PTFE tape, Fernox Hawk white, water hawk and rectorseal tru-blu at my disposal, I've only really used PTFE tape in previous one off tasks. This thread sealant stuff, I guess must work or they wouldn't sell it, do I just paint a glob of it onto the threads and tighten? Any special methods of use worth knowing?

-
screw short side of the bracket to the wall 1st then push cabinet back to wall screw long side of bracket into side of cabinet using an angled driver,
-
Love that, well done.
-
Spot on! I'm just roughing pipework in at the moment, and ready to put some noggins in for the wall plates elbows. I may toddle off to a bathroom showroom aswell and measure what their outlets are set at, I'm also thinking that housebuilders dont always get to see end customers so must have a rule of thumb regarding heights too. How did you work out depth for the wall plate elbows for the outlets taking into consideration tiles, adhesive, backer board? I think that now I'm onto using 20mm backer rather than PB, I've got to move my control box forwards a touch, trivial but another task on the list.
-
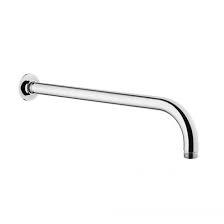
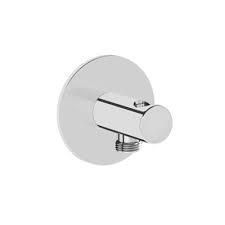
Height, about 1.8 ish Thinking of mounting the arm at about 2-2.1m, Haven't got it yet, but I guess I ought to see how much of a curve it has before the shower head. The handset will be attached to a riser. I wondered if there was a general rule of thumb? If I mount at the same height as the main valve control box then it shouldn't look too out of place! The V box is on another wall out of the main shower area.
-
Hi All I'm running in some first fix pipework for the shower, What would be a good height to mount, Wall mounted Shower handset outlet, before it attaches to a hose, Similar --> & Wall mounted rainfall connection arm similar --> Ta Marek
-
There's your diagram for the UH4, substitute the word actuator for valve on zones 1 and 2 & Jobs a Goodun. Probably need someone who's done this before to confirm though!

-
A thin blade with loads of teeth!
-
Nice, What is the architrave you are using?
-
Awesome, he’s given me 3 deco sockets to look at with different coloured inserts, mrs is ok with them, and I like them, so looks like they’ll do nicely! Don’t need them just yet, so will chip away buying a few here and there.
-
That’s good to know, thank you.
-
A couple of Plasterboarding questions
crispy_wafer replied to crispy_wafer's topic in Plastering & Rendering
Just reading the aquapanel data sheet and instructions, reads like it is quite a simple product to deal with and use! -
A couple of Plasterboarding questions
crispy_wafer replied to crispy_wafer's topic in Plastering & Rendering
Aah, my studs are about 400, so 20mm product would be fine I can lose a few mm. A couple of my stud walls now look like dogs dinners tbf, all because I built up my stud walls then decided (or discovered) things like concealed cisterns, or me deciding to turn a 100mm stud into a 150mm stud just to hide a soil pipe. Next time, I promise I shall have a proper plan! -
My mate has put me onto scolmore sockets and switches, mainly due to the fact that I wanted a raised double lounge plate which Hager don’t do in the style I wanted. He rates them highly and is bringing me a couple of samples tonight to play with and show the foreman! Never heard of the manufacturer myself, but my pal who sells this stuff seems to rate them. Anyone else able to tell if me they are decent enough to use? Ta Marek
-
A couple of Plasterboarding questions
crispy_wafer replied to crispy_wafer's topic in Plastering & Rendering
Another question I’ve got a small downstairs WC and shower room (2*1.4) it’s going to be tiled from floor to ceiling on all walls, walls are studwork. What’s the best product to use? Backer board or MR Plasterboard. Will likely use the same product on all walls to be consistent in my approach. If backer board, is there any specific brand that is better than others? -
@James94 What did you do in the end with this?
-
With ours, 3 beds and two bathrooms upstairs. Electric Towel Rads in bathrooms, ducted air to air in bedrooms. Cooling as well as heating is a consideration for a good nights sleep!
-
Electric towel warmers, how to control?
crispy_wafer replied to crispy_wafer's topic in Electrics - Other
Thanks, I discovered the neostat -e has switching capability to 16A which should be more than ample, so that's what I'll use. It's a bit of a compromise in that I'll have 1 for each room that requires, rather than a single point, but in the grand scheme of things it's not a bitter pill to swallow! -
A couple of Plasterboarding questions
crispy_wafer replied to crispy_wafer's topic in Plastering & Rendering
ok cool, Walls will be skimmed. Yes all walls have noggins at 1200 ish allowing for pb to be lifted slightly off floor, and corners too. Sounds like I'll be ok then, I was just concerned about the practicalities of the plasterer when skimming a taper flat when tight to floor, or tight into a corner... Really just trying to minimise wasteage and making best use of each board. -
I've a few areas where I think it's sensible to board horizontally, being mindful of getting funny looks from a plasterer, 1) is it ok to have tapered edge boards horizontally, is it an issue with the tapered edge being close to the floor? 2) Likewise, when I board vertically is it ok to have tapered edges into an internal corner?
