
PeterW
-
Posts
18480 -
Joined
-
Days Won
207
Everything posted by PeterW
-
You could just use a 25mm/1” Male MDPE with a back nut if you can get inside but my worry would be the connection is right at the top so you have no air space nor any surge space. A 25mm pipe won’t push that much water quickly through so I’d try and have the largest pipe possible. Look for Koi carp pond fittings - they are done to fit all sorts of tanks and they will also allow you to use bigger bore pipes.
-
UFH would be better in zones where it doesn’t cross the boundary but you use conduit sleeves where it has to and that allows slight movement. Casting the whole ground floor as a single slab, where half is a new structure, half is old could be a real challenge unless you reinforce the crap out of it.
-
Are you talking about an insulated raft then ..? Something like a Kore foundation ..? If so, the slabs can be poured together but I would want a movement joint between the two slabs. Will still need an engineer to design.
-
Why do you want to use a raft ..?? Not going to gain much tbh as it sounds like you’re trying to match floor levels and a raft would need insulation and screed on top of the raft. 3 x 11 which is only 17 linear would be dug in less than a day with a mini digger. 6 cube of concrete and job done. Don’t forget you will probably need an engineer to design a raft.
-
Looks good - using 32mm MDPE to join everything together too ..?? Just as a thought, that join between the two ranks may be better done in 110mm as you can get decent flanges and also get your hand inside to hold the back plates on ..!
-
@Cpd how are you piping the tanks together ..?? As they are different sizes, are you planning them to be level at the base then draw from both and let them balance across the MDPE..??
-
Check the MIs carefully but unless you have some strange sadistic tendency I would leave the Egger alone and bed onto a decent cement based tile adhesive. Once you’ve added 5-6mm for UFH in self levelling compound and then tiles and adhesive, you’ll have a 7-8mm upstand at most and it will be virtually flush from tray to floor.
-
Ahh ..!! All is ok as it’s a commando socket wrapped in black tape ..... why do people think this sort of stuff is ok ..??!
-
Part numbers on that would be : 350313 350363 352080
-
One of these could work with the reducer from 2-1 or 2-1 1/2

-
WDepending on the depth you have, it may be “shorter” to use a 2” threaded socket with a 2” to 1” reducing bush in one side, then use a 1” - 32mm MDPE connector.
-
So at some point, grey becomes blue ..!! Wonder what that junction looks like ..?!
-

UFH and screeed before or after plastering walls?
PeterW replied to Wagas's topic in Underfloor Heating
As @bassanclan said - internal studs after screed. Means you have bigger areas to work with to get the screed flat, also means you can still have a little flexibility in positioning (assuming UFH layout isn’t prescriptive) -
Branch is fine - what they normally suggest as best practice is to put it on a spur and put a tee with a screwed access cap on the top. Arm of the tee then goes to the WC but that is belt and braces. And only one vent required - its for pressure relief on the system and you could just put anti syphon bottle valves on the hand basin in there to stop any sink gurgles.
- 1 reply
-
- 1
-

-
Upstand for a velux rooflight on a 15 degree pitch roof
PeterW replied to Lots2learn's topic in Skylights & Roof Windows
Who specced the install ..? According to the installers guide, a velux window should be red line flush with the roof surface with an EDE flashing. What was the purpose of the kerb..?? Handbook is here if you want a copy.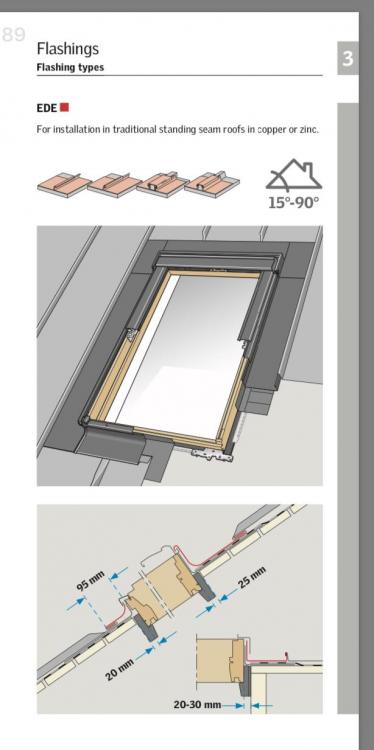
-
MT-TUA-17S-11-9240 not responding to input signal
PeterW replied to readiescards's topic in Other Heating Systems
They are hall switches with a magnetic float in them. @readiescards it is the right way up isn’t it .??? -
Unlikely - most are a pretty standard shape, but you’re unlikely to get spares and a lot have concealed stainless hinges these days anyway.
-
Upstand for a velux rooflight on a 15 degree pitch roof
PeterW replied to Lots2learn's topic in Skylights & Roof Windows
I think from memory the total protrusion should be 150mm, not the frame itself which is why it looks so high. They would probably be better fitted onto a 50x50 block but I would also be concerned about the cold bridge with that size upstand. -
Depends which port it goes into, but at 65c 1/3rd down you will have 75c at the top. Plenty to go at.
-
irrigation system from water butts
PeterW replied to mike2016's topic in Landscaping, Decking & Patios
You can buy linking kits but a couple of overflow straight connectors and a bit of pipe ash some solvent and job done. -
Nothing stopping you doing ground work on land you own today, and widening of ditches for flood prevention is widely seen as good practice given the recent weather we have had ... So I’d be the good land owner and get on with that drainage ditch work, and errr any minor tree work that may be required to enable the proper drainage to be installed ....
-
Second one in looks unstable anyway .....
-
Take them out now ... If the tree officer has used an old aerial satellite map as they can’t be bothered to leave the office to do the survey ...... how do they know they are still there .???! ?
-
irrigation system from water butts
PeterW replied to mike2016's topic in Landscaping, Decking & Patios
The solar units I’ve seen are dead simple. They have a timer circuit that counts down 3 or 4 hours and then operates a 6v washer type pump that runs for as long as it has power in the capacitors. The solar panels just charge a set of capacitors that are split into the pump supply and circuit supply. The sunnier it is, the higher the charge and the more the pump runs. Downside is warm but windy days may need more water but charge levels won’t be as high. This is an example of one I’ve seen https://www.waterbuttsdirect.co.uk/c24-automatic-solar-powered-watering-system.html -
irrigation system from water butts
PeterW replied to mike2016's topic in Landscaping, Decking & Patios
There are systems that already do this but tend to use drippers rather than sprays. They were at a couple of the recent RHS shows, let me see if I can find details.