


Onoff
-
Posts
21127 -
Joined
-
Last visited
-
Days Won
206
Everything posted by Onoff
-

Inserting an Extra Floor in a Double Height Space?
Onoff replied to Ferdinand's topic in General Construction Issues
How about exposed "rafters" as part of the build which then become the floor joists later on? -
Video wall using Raspberry Pi I reckon: http://www.piwall.co.uk https://www.raspberrypi.org/blog/video-wall/
-
Video wall using Raspberry Pi I reckon: http://www.piwall.co.uk https://www.raspberrypi.org/blog/video-wall/
-
Absolutely LOVE it! So with full height panels I could have RR & Jennifer Lawrence in the shower with me? Can't see how you could do it "cheap" unless you could source cheap display panels.
-
Cheap, Thermally Efficient Non-Structural Wall Detail
Onoff replied to Nick's topic in General Construction Issues
Would you not also want a service cavity detail internally? -
Is there a longest build competition?
-
Getting large bits of glass up onto a roof
Onoff replied to thomas's topic in Skylights & Roof Windows
Fully agree unless the OPs trying to save a few quid. If you're going to go "off the reservation" lifting anything you really need to be au fait with how to do things properly in the first place in order to adapt. I'll openly admit to having gone the "needs must" route in my younger years. Heaviest pane of glass I've been involved with changing is 540kg, 14 floors up. -
Getting large bits of glass up onto a roof
Onoff replied to thomas's topic in Skylights & Roof Windows
A couple of ladders laid at an angle and winch/haul it up on a sheet with a lip. Timber guidd on the board. Ratchet strap round the whole lot until the last moment. -
A new room above the garage, wood or brick?
Onoff replied to 8ball's topic in Garage & Cellar Conversions
Hope you and the neighbours get on well as you'll need access via the top of their garage of course. What's the score I wonder party wall wise if you do an extension now and they want to do similar later? Might be worth considering at the design stage. @Bitpipe had a 12'x38' caravan for sale I think, you could land straight on top....too wide? -
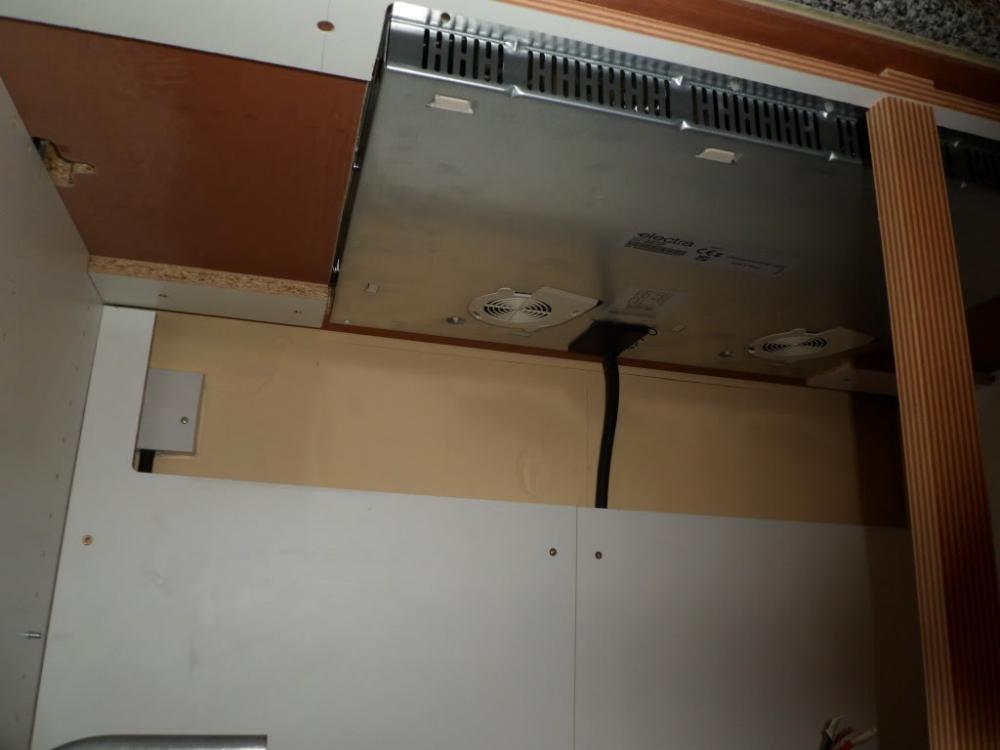
Dual Hobs in Worktop, design vs structural engineering
Onoff replied to TerryE's topic in Kitchen Units & Worktops
I ended up modding the hell out of one of our cabinets. Originally the induction hob was to go to the right, centred over where two cabinet sides meet which would have needed modding. SWMBO then decided she wanted it dead centre of the 1000mm unit. Meant I didn't have to mod the cabinet sides BUT it put the hob switch closer than 300mm. As I'd run everything in 20mm steel conduit I WASN'T changing it! The back panel was halved neatly with extra battens added and comes out via a couple of screws. I did route a 5mm gap in the horizontal member to allow better ventilation to the hob.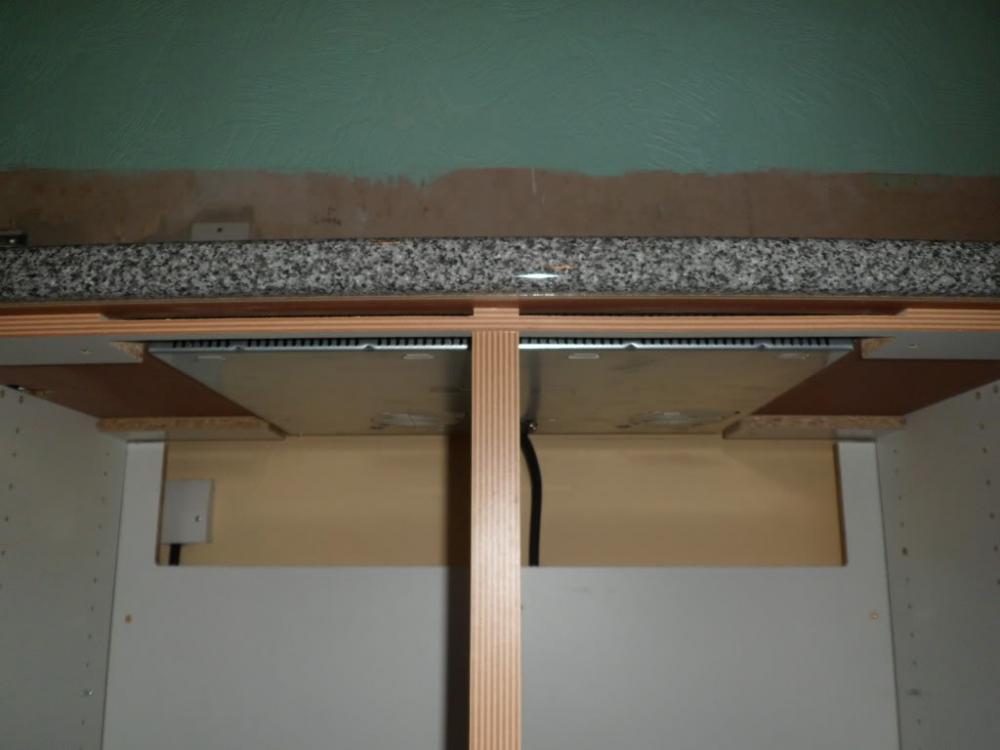
-
Optical or ionisation, and for which location?
Onoff replied to Nickfromwales's topic in Electrics - Other
You can't go wrong with Aico. With that many, possibly more I'd also fit a test/locate button to pinpoint which one in a hurry. Don't forget C02 up there if required. -
I'm not sure why I tend to over analyse things. It's not a fear of getting things wrong as I often only get whatever "new" thing I try right on the second attempt. If anything I've gotten worse as have had a tendency in the past to "read the instructions later", waste materials, buy the wrong stuff. I've done "it" all in the past but look back with embarrassment on a lot of stuff. I do feel quite guilty at times on here gleaning people's hard earned knowledge on new techniques / stuff I'm not familiar with. Believe it or not that often puts me off asking questions. I remember reading a thread thinking htf can a Passive Infra Red detector have anything to do with insulation. "PIR" Now I like the idea of NOT having to revisit something mainly when I'm older and more decrepit.
-
Just been out to the garage as I knew I had a NOS roll of this: http://uk.rs-online.com/web/p/single-sided-foam-tapes/2050899/?searchTerm=205-0899&relevancy-data=636F3D3126696E3D4931384E525353746F636B4E756D6265724D504E266C753D656E266D6D3D6D61746368616C6C26706D3D5E283F69292852537C5253207C52532D293F5C647B337D285C73293F5B5C732D2F255C2E2C5D285C73293F5C647B332C347D2426706F3D313426736E3D592673743D52535F53544F434B5F4E554D4245522677633D4E4F4E45267573743D3230352D30383939267374613D3230353038393926 Struggling to remember which site it was bought for as it's probably 20 years old. Still in the bag and you'd have been welcome to it to try but I can see the backing paper is separating from the foam which probably means the "sticky".....isn't! Tbh it would have cost more to post.
-
Hello to Everyone, Look Forward to Talking to You All
Onoff replied to Nick's topic in Introduce Yourself
My mate's missus is Polish and her dad runs a "double glazing" business over there. For one of his visits to the UK he brought all the windows and roof panels over in a big van for their conservatory and had a working holiday. The windows seem heavier duty than we're used to tbh. The big downfall was his using standard, big, heavy panels on the roof. Not only does it sag but it leaks. Water gets trapped behind the transoms. The base product looks good just badly installed imo. -
Try first drying the foam seal out and giving a good dose of silicon spray. Sounds daft but are you sure it's rain getting in and not condensation? I see this a lot and use these to stop it: https://uk.rs-online.com/mobile/p/pressure-compensation-components/0838805/ Tbh a cheap fix would be a bit of sill or even felt etc to hang over the front.
-
Stage 1 Is Very Nearly Complete :)
Onoff replied to Construction Channel's topic in General Self Build & DIY Discussion
My son who's aiming for a computer science degree explained the concept of "click bait" to me which I hadn't heard before. It clearly works in pulling the viewers in. -
Nothing like to the degree of air tightness being adhered to here but in doing one room (the bathroom) I've now put a taped vcl on 2 1/2 walls which were air leaky either through holes, mortar joints, cracked plaster etc. It's so noticable as I work my way round. The draught now comes from / is focused on the wet room corner & where the soil pipe comes in. I reckon I could close my eyes and navigate to it by touch. The downside is if I "drop one" and the missus walks in! It just lingers! Roll on the single room MVHR!
-
Stage 1 Is Very Nearly Complete :)
Onoff replied to Construction Channel's topic in General Self Build & DIY Discussion
Three things.... I think I picked up the tip of marking the PIR with the tape like that from one of your early videos before I was maybe even on eBuild. Was it you doing a loft conversion? Second, totally disagree about the proper Celotex saws. I've got a little pink one! Thirdly.....pretty sure there's a market for vids of girls in PPE wielding power tools. Some people find it very "exciting"... -
Pretty sure I read once that 15 cats in a radiator shaped cage would keep the average room warm.....
-
Bath Surround / Boxing In, and concealed pipework
Onoff replied to Onoff's topic in Bathrooms, Ensuites & Wetrooms
I do believe I'm ready for a test filling of the bath! Plan then is: 1) Remove the removable half of the bath. Brackets just inside the long side panel: There's also a screw to the floor batten at the foot of the bath which will also have a removable panel. Also via this panel, 3 st/st screws from below (need trimming): 2) Slide the bath in an TEMPORARILY fit the waste relying on the rubber washers around the waste. 3) Fill up the bath and check for leaks around the jets and solvent waste. 4) Test run the pump and light. Now the tiling questions, apologies if already asked: Do I half fill or fill the bath? Something to do with checking how it sits? I assume when I've filled it I can gauge the gap I'll have all round between the underside of the bath lip and the ply deck. Should I look to tile the alcove first where the LED strip is going? Thinking leaning across once the bath is in will be difficult. What tanking liquid do I prime the ply with? At the back, behind where your head will be this is only moisture resistant plasterboard. Should I prime it with something too or does it need some sort of tanking "membrane": So.....if it all doesn't leak remove the bath and refit, properly sticking the waste with Sika. Erm.....that's as far as I've figured! -
I really would have to look up what SAP means to be honest! I just look at something and think could I do that different/better. Even if I can't or it fails. I'll invariably have a go even if it ends up costing me a few quid. Keeps the old grey matter ticking over. Generally starts with looking at the shape of something and what's similar. With this I'm thinking about a wine making airlock. Ditch the top bit and fit a "cone" over the centre tube. Hot waste water goes in the top. Heat exchange coil goes around the outside to maximise surface area. "Cold", heat depleted water exits down the middle.

-
Don't tell me about hair! Between the wife and daughter it's like living with a pair of Cousin Its! It's No.2 clippers all over for me!
-
I've been looking at it for the bathroom tbh. That and the Ventaxia range that seems to double in price from the basic to the one with all the bolt on goodies like humidistats.
-
It's sourcing the sustainable energy floor tiles that's holding things up.
-
How about this for only £170? http://www.utilityfreeliving.co.uk/shower-water-heat-recovery/


