


Onoff
-
Posts
21173 -
Joined
-
Last visited
-
Days Won
206
Everything posted by Onoff
-

Discount Offers of the Week
Onoff replied to Ferdinand's topic in General Self Build & DIY Discussion
All those years of self abuse catching up with you? -
Thanks. This too refers to the plate being set vertical but at a lesser depth than your link suggests. https://www.electrical-installation.org/enwiki/Installation_and_measurements_of_earth_electrodes
-
I'm trying here to improve my TT earthing arrangement. Soil isn't the best, this topsoil, heavy clay chalk. Every layer scattered with copious large flints. There was an old 3/8" dia 4' rod in. Replaced with a new 5/8" 4' rod and remade all the connections. Made naff all difference. I've now got 3 5/8", 4' rods in, spaced <1 rod's depth between each. I've tried coupling extra rods on in all 3 positions but I'm consistently hitting something 4" down so guessing that much be the chalk layer. Even tried an SDS adapter to hammer them in. The reading is better with 3 rods but it's messy! I have now a 600x600mm ex DNO copper earth plate here that I'm going to bury. Came from someone's farm where they had an 11kVA trannie on two poles and the DNO moved it/the poles leaving the plate in the ground with the wire cut off. Main question is should I bury it horizontal or vertical? Hopefully this weekend I'll get a hole dug and see exactly what I have ground wise.
-
Been making these for a mate who has Parkside tools and batteries but wants to power the odd Fakita tool. A couple of types off of Thingiverse. One that allows swapping between Makita or Parkside batteries, then a second quite clever one that replaces the Makita battery connection plate in the tool so you can only ever use Parkside batteries: The "permanent" one. A real easy print. Pre removing the supports: It's designed to go into a real Makita. In effect it's the top of a Makita battery with Parkside battery fitment. No need either for complicated battery tabs, it just uses ordinary 1/4" male spade crimps. Here fitted to a Fakita 4" chainsaw, you can see it's a tad too wide to close the two halves of the case up: On my mate's 10/12" Fakita chainsaw, a different make to mine), it's even worse: Fixed it now, just reduced the width in CAD.
-
- 1
-

-
Enough screed to support weight of car
Onoff replied to Post and beam's topic in Garages & Workshops
Tbf everything gets lower. -
Enough screed to support weight of car
Onoff replied to Post and beam's topic in Garages & Workshops
Morlocks/Eloi 😬 -
If cat's can get in then so likely can foxes. That's the last thing you want!
-
-
Did you find their heat loss calcs?
-
Mice will get through a hole the size of a pencil.
-
Round where I live it was the done thing to put a layer of broken glass on the dirt before any concrete slab was laid. This to deter the rats from burrowing up through the concrete!
-
It was intentional the flint mortar being a different colour. I didn't want the traditional "lime" white prevalent locally here but wanted a nod to it. The flint mortar has the addition of some lime for plasticity along with being wetted with the Everbuild 202 mix. I've then sprayed about 3 coats of concrete sealer over the complete pillar, bricks and all. Looks really good imo and brings out the black in the flints.
-
That was 4:1 using bagged builders sand from Wickes. The trouble is the sand colour will like change according to regional variations, what quarry it comes from etc. Then the same cement as above. Mixed with Everbuild 202 to the ratio on the tub label. https://www.toolstation.com/everbuild-202-integral-liquid-waterproofer/p80460?
-
I didn't want white or yellow. My mix was 3 builders sand 1 sharp sand 1 lime 1 OPC.
-
They'll likely be getting in through those old air bricks! A mouse can get through a pencil sized hole.
-
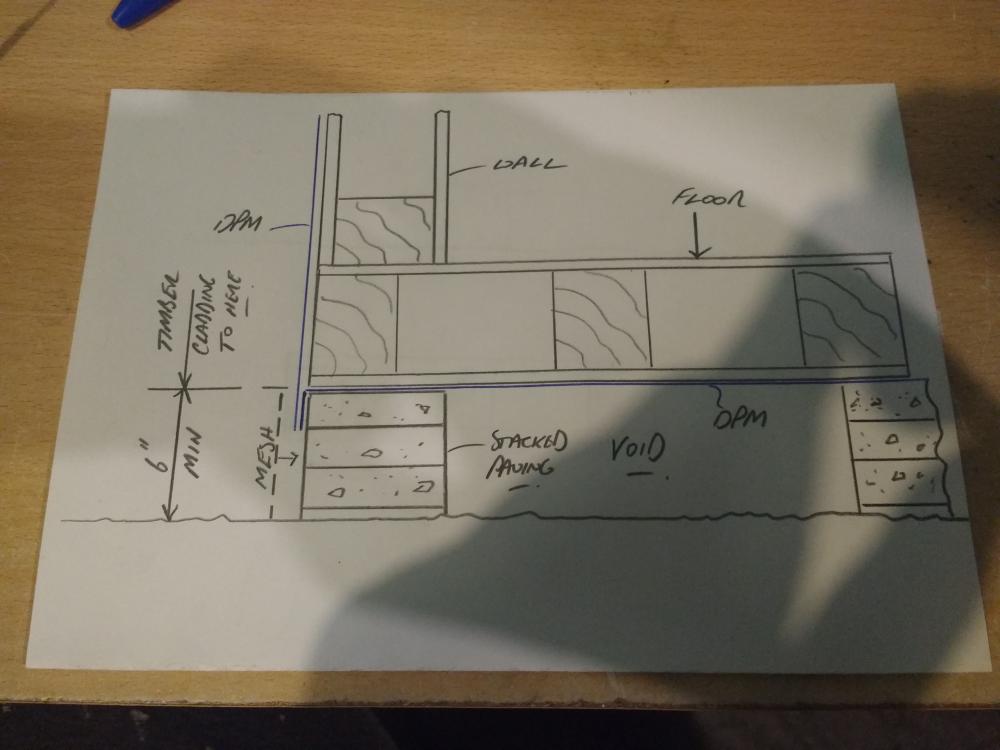
Erm, no I haven't used any paving, only ever built sheds on slabs. I just sketched it as you said that's the way you want to go. 3 2" council slabs would raise you 6" if you could get them for nothing/cheap. Or 140mm 7N dense concrete blocks. Cast your own plinths from knocked up timber boxes. Loads of options.
-
Quick, fag packet thoughts: Thinking leave the void but use a strip of rodent mesh around the perimeter. You could over clad with say uPVC or asbestolux type cement board...paint it black...
-
Like a knife through butter!
-
Presumably you could do similar with WC pans and soil pipe runs?
-
Planning through Celebration beers or more expense
Onoff replied to Canski's topic in Planning Permission
& a bodger den magically appeared! -
Rat City! 😂 I'd just do supports round the edges and where 4 pallets meet. If concrete piers have a bit of DPC on each one. Leave enough height to stick a ferret / Jack Russell underneath! Is the plan to insulate the floor somehow?
-
Is that the one with Patsy Kensit?
-
My mate in California built his shed on concrete piers: https://www.flickr.com/gp/122042403@N05/w34FF0rf63
-
Are you intending to use whole pallets as a floor or just for the walls?
-
Aside from any weed membrane you want a damp proof membrane on top of your blocks, then your pallet shed. We anchored a 4x2 wall plate around our slab perimeter then screwed the pallets to that when we did my nephew's pallet shed: His slab had a DPM under it. The wall plate then sat on a DPC abovevthr slab edge. The DPM got folded downward and clad over. You'll then of course need a "floor" atop the DPM or it'll be a bit slippery! Paving slabs are an option or even pallet wood. You could lay some insulation under it too. Ideally any timber wants to be 6" above ground level. He was going to grade/lower the dirt around the shed but hadn't gotten around to it last time I was there.



